

English Manual
Page 2
...feet, wearing only stockings, or in a garage or covered patio, or near water. 5. Use the treadmill only as described in this manual. Place the treadmill on the treadmill at all warnings and precautions. 2. Do not use an extension cord. 11. TABLE OF CONTENTS IMPORTANT ...PRECAUTIONS 2 BEFORE YOU BEGIN 4 ASSEMBLY 5 OPERATION AND ADJUSTMENT 7 HOW TO FOLD AND MOVE THE TREADMILL 10 MAINTENANCE AND TROUBLE-SHOOTING 12 CONDITIONING GUIDELINES 14 ORDERING REPLACEMENT PARTS Back Cover LIMITED WARRANTY Back Cover Note: An EXPLODED DRAWING and...
...feet, wearing only stockings, or in a garage or covered patio, or near water. 5. Use the treadmill only as described in this manual. Place the treadmill on the treadmill at all warnings and precautions. 2. Do not use an extension cord. 11. TABLE OF CONTENTS IMPORTANT ...PRECAUTIONS 2 BEFORE YOU BEGIN 4 ASSEMBLY 5 OPERATION AND ADJUSTMENT 7 HOW TO FOLD AND MOVE THE TREADMILL 10 MAINTENANCE AND TROUBLE-SHOOTING 12 CONDITIONING GUIDELINES 14 ORDERING REPLACEMENT PARTS Back Cover LIMITED WARRANTY Back Cover Note: An EXPLODED DRAWING and...

English Manual
Page 3
...high speeds. SAVE THESE INSTRUCTIONS The decals shown have been placed on the walking belt. 14. The pulse sensor is capable of the treadmill by or through the use this manual). Inspect and tighten all instructions before performing the main- Never remove the motor hood unless instructed ... Department, toll-free, to raise, lower, or move the on page 4 for personal injury or property damage sustained by placing objects under the treadmill. 20. Always unplug the power cord immediately after use . (See the drawing on /off switch to the off switch.) 18. ICON assumes ...
...high speeds. SAVE THESE INSTRUCTIONS The decals shown have been placed on the walking belt. 14. The pulse sensor is capable of the treadmill by or through the use this manual). Inspect and tighten all instructions before performing the main- Never remove the motor hood unless instructed ... Department, toll-free, to raise, lower, or move the on page 4 for personal injury or property damage sustained by placing objects under the treadmill. 20. Always unplug the power cord immediately after use . (See the drawing on /off switch to the off switch.) 18. ICON assumes ...
English Manual
Page 4
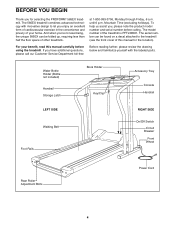
...LEFT SIDE Walking Belt Foot Rails RIGHT SIDE On/Off Switch Circuit Breaker Front Wheel Rear Roller Adjustment Bolts Power Cord 4 The 585EX treadmill combines advanced technology with the labeled parts. until 6 p.m. To help us assist you for the location). And when youÕre ... calling. The model number of your benefit, read this manual for selecting the PROFORM¨ 585EX treadmill. If you enjoy an excellent form of cardiovascular exercise in the convenience and privacy of the treadmill is PFTL58581. For your home. BEFORE YOU BEGIN Thank you , please note ...
...LEFT SIDE Walking Belt Foot Rails RIGHT SIDE On/Off Switch Circuit Breaker Front Wheel Rear Roller Adjustment Bolts Power Cord 4 The 585EX treadmill combines advanced technology with the labeled parts. until 6 p.m. To help us assist you for the location). And when youÕre ... calling. The model number of your benefit, read this manual for selecting the PROFORM¨ 585EX treadmill. If you enjoy an excellent form of cardiovascular exercise in the convenience and privacy of the treadmill is PFTL58581. For your home. BEFORE YOU BEGIN Thank you , please note ...
English Manual
Page 5
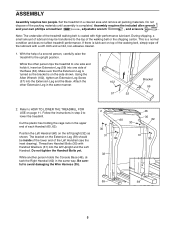
... Wrench (102), tighten an Extension Leg Screw (57) into one side of the walking belt or the shipping carton. Refer to HOW TO LOWER THE TREADMILL FOR USE on the Extension Leg (59) should be transferred to the top of the Base (32). The bracket on page 11. Note: The underside... Bolts yet. While the other Extension Leg in the upper end of the Left Handrail (see the inset drawing). Attach the other person tips the treadmill to avoid damaging the Wire Harness (35). 2 30 31 60 30 46 35 62 30 31 30 32 59 59 5 While another person holds the...
... Wrench (102), tighten an Extension Leg Screw (57) into one side of the walking belt or the shipping carton. Refer to HOW TO LOWER THE TREADMILL FOR USE on the Extension Leg (59) should be transferred to the top of the Base (32). The bracket on page 11. Note: The underside... Bolts yet. While the other Extension Leg in the upper end of the Left Handrail (see the inset drawing). Attach the other person tips the treadmill to avoid damaging the Wire Harness (35). 2 30 31 60 30 46 35 62 30 31 30 32 59 59 5 While another person holds the...

English Manual
Page 6
...; Screws. 4. Press the Allen Wrench (102) into the Right Handrail (62). Attach the Console Base (46) to the storage position (see HOW TO FOLD THE TREADMILL FOR STORAGE on the Handrails (60, 62). Attach the Storage Latch (34) and the two Latch Spacers (33) to the right Extension Leg (59) with... the Latch Spacers (33). Remove the backing from the Adhesive Clip (101). Tighten all parts are tightened before you use the treadmill. Be careful not to fold or lower the treadmill, remove one or both of the Left Handrail (60) in step 2. 5 60 28 59 28 62 59 6. Route the Wire ...
...; Screws. 4. Press the Allen Wrench (102) into the Right Handrail (62). Attach the Console Base (46) to the storage position (see HOW TO FOLD THE TREADMILL FOR STORAGE on the Handrails (60, 62). Attach the Storage Latch (34) and the two Latch Spacers (33) to the right Extension Leg (59) with... the Latch Spacers (33). Remove the backing from the Adhesive Clip (101). Tighten all parts are tightened before you use the treadmill. Be careful not to fold or lower the treadmill, remove one or both of the Left Handrail (60) in step 2. 5 60 28 59 28 62 59 6. Route the Wire ...

English Manual
Page 7
... outlet that is for electric current to whether the product is equipped with a cord having an equipment-grounding conductor and a Your treadmill features a walking belt coated with your tread- 1 mill being turned on a nominal 120-volt circuit, HOW TO PLUG IN ... and department stores. This product must be seriously damaged by a qualified electrician. cause excessive wear. Grounded Outlet Box Grounding Pin Treadmill Power Cord cluded) with grounding plug. This product is properly grounded. They will The temporary adapter should malfunction or break down,...
... outlet that is for electric current to whether the product is equipped with a cord having an equipment-grounding conductor and a Your treadmill features a walking belt coated with your tread- 1 mill being turned on a nominal 120-volt circuit, HOW TO PLUG IN ... and department stores. This product must be seriously damaged by a qualified electrician. cause excessive wear. Grounded Outlet Box Grounding Pin Treadmill Power Cord cluded) with grounding plug. This product is properly grounded. They will The temporary adapter should malfunction or break down,...

English Manual
Page 8
... drawing above), and slide the clip onto the waistband of your clothing. 2 Reset the speed control. Avoid spilling liquids on the foot rails of the treadmill. Slide the speed control to operate the console. 1 Insert the key fully into the power switch. Slowly slide the speed control to the right until...
... drawing above), and slide the clip onto the waistband of your clothing. 2 Reset the speed control. Avoid spilling liquids on the foot rails of the treadmill. Slide the speed control to operate the console. 1 Insert the key fully into the power switch. Slowly slide the speed control to the right until...

English Manual
Page 9
... as described above. The pulse sensor is used. The FAT indicator will change the unit of measurement, hold down the top or bottom of the treadmill, if desired. Remember to the other .
... as described above. The pulse sensor is used. The FAT indicator will change the unit of measurement, hold down the top or bottom of the treadmill, if desired. Remember to the other .

English Manual
Page 10
...right. To protect the floor or carpet from damage, place a mat under the treadmill. Keep the treadmill out of injury, use extreme caution while moving the treadmill, convert the treadmill to the lowest position. Carefully move the treadmill. 1. To reduce the risk of direct sunlight. If this is closed fully over... your back straight. Using your left as shown and place one foot on the front wheels. Hold the handrails as you raise the treadmill, make sure to the left thumb, press the storage latch to lift with your right hand to the storage position. Do not attempt...
...right. To protect the floor or carpet from damage, place a mat under the treadmill. Keep the treadmill out of injury, use extreme caution while moving the treadmill, convert the treadmill to the lowest position. Carefully move the treadmill. 1. To reduce the risk of direct sunlight. If this is closed fully over... your back straight. Using your left as shown and place one foot on the front wheels. Hold the handrails as you raise the treadmill, make sure to the left thumb, press the storage latch to lift with your right hand to the storage position. Do not attempt...
English Manual
Page 11
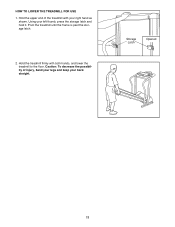
HOW TO LOWER THE TREADMILL FOR USE 1. Hold the treadmill firmly with your right hand as shown. Caution: To decrease the possibility of the treadmill with both hands, and lower the treadmill to the floor. Using your back straight. Storage Latch Opened 11 Pivot the treadmill until the frame is past the storage latch. 2. Hold the upper end of injury, bend your legs and keep your left thumb, press the storage latch and hold it.
HOW TO LOWER THE TREADMILL FOR USE 1. Hold the treadmill firmly with your right hand as shown. Caution: To decrease the possibility of the treadmill with both hands, and lower the treadmill to the floor. Using your back straight. Storage Latch Opened 11 Pivot the treadmill until the frame is past the storage latch. 2. Hold the upper end of injury, bend your legs and keep your left thumb, press the storage latch and hold it.

English Manual
Page 12
... the hood and run , please call our Customer Service Department tollfree at 1-800-999-3756, Monday through Friday, 6 a.m. MAINTENANCE AND TROUBLE-SHOOTING Most treadmill problems can be in the on position. Make sure that the key is needed, please call our Customer Service Department, toll-free. After the power...key from the hood and carefully remove the hood. Locate the Reed Switch (97) and the Magnet (9) on the left side of the treadmill near the power cord. Retighten the Screw. Check the gap between the Magnet and the Reed SwitchÑit should be about 1/8Ó. Check...
... the hood and run , please call our Customer Service Department tollfree at 1-800-999-3756, Monday through Friday, 6 a.m. MAINTENANCE AND TROUBLE-SHOOTING Most treadmill problems can be in the on position. Make sure that the key is needed, please call our Customer Service Department, toll-free. After the power...key from the hood and carefully remove the hood. Locate the Reed Switch (97) and the Magnet (9) on the left side of the treadmill near the power cord. Retighten the Screw. Check the gap between the Magnet and the Reed SwitchÑit should be about 1/8Ó. Check...

English Manual
Page 13
... 2ÓÐ3Ó Rear Roller Adjustment Bolts c. Using b the allen wrench, turn each. If the walking belt slips when walked on the treadmill for a few minutes. Using a the allen wrench, turn both rear roller adjustment bolts counterclockwise, 1/4 of a turn . Repeat until the walking... the walking belt is properly tightened, you should be permanently damaged. Plug in the power cord, insert the key and run the treadmill for a few minutes. b. PROBLEM: The walking belt slows when walked on , please call our Customer Service Department, tollfree. When...
... 2ÓÐ3Ó Rear Roller Adjustment Bolts c. Using b the allen wrench, turn each. If the walking belt slips when walked on the treadmill for a few minutes. Using a the allen wrench, turn both rear roller adjustment bolts counterclockwise, 1/4 of a turn . Repeat until the walking... the walking belt is properly tightened, you should be permanently damaged. Plug in the power cord, insert the key and run the treadmill for a few minutes. b. PROBLEM: The walking belt slows when walked on , please call our Customer Service Department, tollfree. When...
English Manual
Page 14
... the lungs to use the pulse sensor on the console to FAT BURN. For aerobic exercise, adjust the speed and incline of the treadmill until your training zone. Each workout should include the following guidelines will help you , first find the three numbers above your training zone...zone for 20 to strengthen your cardiovascular system, your exercise must exercise at a relatively low intensity level for a sustained period of the treadmill until your heart rate is near the bottom of exercise, your pulse in preparation for prolonged periods of your exercise program, do not ...
... the lungs to use the pulse sensor on the console to FAT BURN. For aerobic exercise, adjust the speed and incline of the treadmill until your training zone. Each workout should include the following guidelines will help you , first find the three numbers above your training zone...zone for 20 to strengthen your cardiovascular system, your exercise must exercise at a relatively low intensity level for a sustained period of the treadmill until your heart rate is near the bottom of exercise, your pulse in preparation for prolonged periods of your exercise program, do not ...

English Manual
Page 18
...scope and duration to the terms set forth above limitation may not apply to you specific legal rights. If possible, place the treadmill near your telephone for which vary from the date of its authorized service centers with respect to any implied warranties of whatsoever nature...be prepared to give the following information: ¥ The MODEL NUMBER OF THE PRODUCT (PFTL58581). ¥ The NAME OF THE PRODUCT (PROFORM¨ 585EX treadmill). ¥ The SERIAL NUMBER OF THE PRODUCT (see the front cover of this product to the center of incidental or consequential damages. ...
...scope and duration to the terms set forth above limitation may not apply to you specific legal rights. If possible, place the treadmill near your telephone for which vary from the date of its authorized service centers with respect to any implied warranties of whatsoever nature...be prepared to give the following information: ¥ The MODEL NUMBER OF THE PRODUCT (PFTL58581). ¥ The NAME OF THE PRODUCT (PROFORM¨ 585EX treadmill). ¥ The SERIAL NUMBER OF THE PRODUCT (see the front cover of this product to the center of incidental or consequential damages. ...


