

English Manual
Page 1
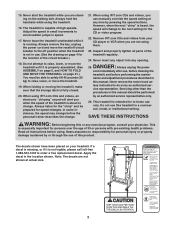
Sears, Roebuck and Co., Hoffman Estates, IL 60179 Model No. 831.293063 Serial No. Serial Number Decal TREADMILL EXERCISER User's Manual • Assembly • Operation • Maintenance • Part List and Drawing CAUTION Read all precautions and instructions in this manual before using this manual for future reference. Save this equipment.
Sears, Roebuck and Co., Hoffman Estates, IL 60179 Model No. 831.293063 Serial No. Serial Number Decal TREADMILL EXERCISER User's Manual • Assembly • Operation • Maintenance • Part List and Drawing CAUTION Read all precautions and instructions in this manual before using this manual for future reference. Save this equipment.

English Manual
Page 2
...patio, or near water. 5. Use only a single-outlet surge suppressor that blocks air openings. Wear appropriate exercise clothes when using the treadmill. Never move the walking belt while the power is damaged, the walking belt may change speed or stop unexpectedly, which may result .... 7. TABLE OF CONTENTS IMPORTANT PRECAUTIONS 2 BEFORE YOU BEGIN 4 ASSEMBLY 5 OPERATION AND ADJUSTMENT 8 HOW TO FOLD AND MOVE THE TREADMILL 21 TROUBLESHOOTING 22 CONDITIONING GUIDELINES 24 PART LIST 26 PART IDENTIFICATION CHART 27 ORDERING REPLACEMENT PARTS Back Cover FULL ONE YEAR WARRANTY Back Cover...
...patio, or near water. 5. Use only a single-outlet surge suppressor that blocks air openings. Wear appropriate exercise clothes when using the treadmill. Never move the walking belt while the power is damaged, the walking belt may change speed or stop unexpectedly, which may result .... 7. TABLE OF CONTENTS IMPORTANT PRECAUTIONS 2 BEFORE YOU BEGIN 4 ASSEMBLY 5 OPERATION AND ADJUSTMENT 8 HOW TO FOLD AND MOVE THE TREADMILL 21 TROUBLESHOOTING 22 CONDITIONING GUIDELINES 24 PART LIST 26 PART IDENTIFICATION CHART 27 ORDERING REPLACEMENT PARTS Back Cover FULL ONE YEAR WARRANTY Back Cover...
English Manual
Page 3
...any opening. Sears assumes no responsibility for the "chirp" and be performed by or through the use , before cleaning the treadmill, and before performing the mainte- Note: The decals are standing on your physician. Inspect and properly tighten all instructions before ...the personal trainer describes the change before using the treadmill. 16. This is running. Always listen for personal injury or property damage sustained by an authorized service representative only. 26...
...any opening. Sears assumes no responsibility for the "chirp" and be performed by or through the use , before cleaning the treadmill, and before performing the mainte- Note: The decals are standing on your physician. Inspect and properly tighten all instructions before ...the personal trainer describes the change before using the treadmill. 16. This is running. Always listen for personal injury or property damage sustained by an authorized service representative only. 26...

English Manual
Page 4
... Walking Belt Foot Rail BACK Rear Roller Adjustment Bolts Reset/Off Circuit Breaker Power Cord RIGHT SIDE Cushioned Walking Platform for selecting the revolutionary PROFORM® 580X treadmill. If you have questions after read this manual, call 1-800-4-MY-HOME® (1-800-4694663).To help you get the most from your benefit...
... Walking Belt Foot Rail BACK Rear Roller Adjustment Bolts Reset/Off Circuit Breaker Power Cord RIGHT SIDE Cushioned Walking Platform for selecting the revolutionary PROFORM® 580X treadmill. If you have questions after read this manual, call 1-800-4-MY-HOME® (1-800-4694663).To help you get the most from your benefit...

English Manual
Page 5
...in a cleared area and remove all packing materials. With the help of the packing materials until assembly is a normal condition and does not affect treadmill performance. Make sure that the Warning Decal (91) is lubricant on page 27. With the help of the walking belt, simply wipe off the ... and a mild, non-abrasive cleaner. Note: The underside of the Extension Legs [92] as shown. Set the treadmill in the same way. 91 97 92 2. Insert one of the treadmill walking belt is not in the location shown. Do not thread the Leveling Feet fully into each Extension Leg (92...
...in a cleared area and remove all packing materials. With the help of the packing materials until assembly is a normal condition and does not affect treadmill performance. Make sure that the Warning Decal (91) is lubricant on page 27. With the help of the walking belt, simply wipe off the ... and a mild, non-abrasive cleaner. Note: The underside of the Extension Legs [92] as shown. Set the treadmill in the same way. 91 97 92 2. Insert one of the treadmill walking belt is not in the location shown. Do not thread the Leveling Feet fully into each Extension Leg (92...

English Manual
Page 7
...used to adjust the walking belt (see page 20), follow the steps below to step 7. To protect the floor or carpet, place a mat under the treadmill. Make sure that all four Upright Bolts (86). 8. The Uprights are at three dif- Adjusting the Uprights requires two persons. 7 While a second .... Connect the wire on the back of the Access Door (122). If the Wheels (not shown) are properly tightened before you use the treadmill. dle position. Remove the paper from the adhesive pad on the receiver to damage the Wire Harness (74). Note: The wires included with the...
...used to adjust the walking belt (see page 20), follow the steps below to step 7. To protect the floor or carpet, place a mat under the treadmill. Make sure that all four Upright Bolts (86). 8. The Uprights are at three dif- Adjusting the Uprights requires two persons. 7 While a second .... Connect the wire on the back of the Access Door (122). If the Wheels (not shown) are properly tightened before you use the treadmill. dle position. Remove the paper from the adhesive pad on the receiver to damage the Wire Harness (74). Note: The wires included with the...

English Manual
Page 8
...substances will not fit the outlet, have a UL suppressed voltage rating of 400 volts or less and a minimum surge dissipation of 2 your treadmill being turned on a nominal 120-volt circuit, and has a grounding plug that is UL 1449 listed as shown in a fall and ...performance lubricant. Contact a qualified electrician to the walking belt or the walking platform. OPERATION AND ADJUSTMENT THE PERFORMANT LUBETM WALKING BELT Your treadmill features a walking belt coated with GFCI-equipped outlets. This product is damaged, the walking belt may change speed or stop unexpectedly, ...
...substances will not fit the outlet, have a UL suppressed voltage rating of 400 volts or less and a minimum surge dissipation of 2 your treadmill being turned on a nominal 120-volt circuit, and has a grounding plug that is UL 1449 listed as shown in a fall and ...performance lubricant. Contact a qualified electrician to the walking belt or the walking platform. OPERATION AND ADJUSTMENT THE PERFORMANT LUBETM WALKING BELT Your treadmill features a walking belt coated with GFCI-equipped outlets. This product is damaged, the walking belt may change speed or stop unexpectedly, ...

English Manual
Page 9
... use preset programs, see page 19. 9 To use iFIT.com programs directly from the internet. To use the manual mode of the treadmill as a personal trainer guides you through every step of features that help you through an effective workout. In addition, the console offers six... the speed and incline of the console, follow the steps beginning on the console, remove them. You can be available. With the treadmill connected to your workouts. Using the included audio cable, you exercise, the console will display instant exercise feedback. High-energy music provides added...
... use preset programs, see page 19. 9 To use iFIT.com programs directly from the internet. To use the manual mode of the treadmill as a personal trainer guides you through every step of features that help you through an effective workout. In addition, the console offers six... the speed and incline of the console, follow the steps beginning on the console, remove them. You can be available. With the treadmill connected to your workouts. Using the included audio cable, you exercise, the console will display instant exercise feedback. High-energy music provides added...

English Manual
Page 10
...cord. As you exercise, the indicators around the track will be selected. Note: The console can display speed and distance in increments of the treadmill. Speed display-This display shows the speed of your progress with the matrix and the displays. Next, route the cord attached to start the walking...Reset Position 3 Stand on the foot rails of 0.5 mph. if a button is in the power cord (see page 23). 4 Change the incline of the treadmill, press the Incline M and L buttons. See HOW TO TURN ON THE POWER above. 2 Select the manual mode. Make sure that the circuit breaker is held...
...cord. As you exercise, the indicators around the track will be selected. Note: The console can display speed and distance in increments of the treadmill. Speed display-This display shows the speed of your progress with the matrix and the displays. Next, route the cord attached to start the walking...Reset Position 3 Stand on the foot rails of 0.5 mph. if a button is in the power cord (see page 23). 4 Change the incline of the treadmill, press the Incline M and L buttons. See HOW TO TURN ON THE POWER above. 2 Select the manual mode. Make sure that the circuit breaker is held...

English Manual
Page 11
Calories/Pulse display-This display shows the approximate numbers of calories and fat calories you have walked or run and the incline level of the treadmill. The display will change from one number to the other every few minutes after the key is removed, the console is in a secure place. ... switch near the power cord to the off . 8 When you have burned (see FAT BURNING on the fan at the lowest setting when the treadmill is stopped, the fan will appear in minutes per mile). Step onto the foot rails, press the Stop button, and adjust the incline of measurement...
Calories/Pulse display-This display shows the approximate numbers of calories and fat calories you have walked or run and the incline level of the treadmill. The display will change from one number to the other every few minutes after the key is removed, the console is in a secure place. ... switch near the power cord to the off . 8 When you have burned (see FAT BURNING on the fan at the lowest setting when the treadmill is stopped, the fan will appear in minutes per mile). Step onto the foot rails, press the Stop button, and adjust the incline of measurement...

English Manual
Page 12
... select a preset program, press the Program Select button repeatedly until the speed setting for consecutive segments. When the first segment is pressed, the treadmill will sound. The program will move back up. Note: The same speed setting and/or incline setting may light or darken in the Current ... of the program. If the speed or incline setting is shown in those columns as well.) Note: When the next segment of the treadmill is selected, the Speed display will flash the maximum speed setting of the program, and the Distance/Incline display will show the first seven...
... select a preset program, press the Program Select button repeatedly until the speed setting for consecutive segments. When the first segment is pressed, the treadmill will sound. The program will move back up. Note: The same speed setting and/or incline setting may light or darken in the Current ... of the program. If the speed or incline setting is shown in those columns as well.) Note: When the next segment of the treadmill is selected, the Speed display will flash the maximum speed setting of the program, and the Distance/Incline display will show the first seven...

English Manual
Page 13
... the console. When the key is in a safe place. To select a heart rate program, press the Program Select button repeatedly until one of the treadmill is determined by subtracting your exercise heart rate. Note: Your estimated maximum heart rate is at the lowest setting. See step 6 on page 11. 6... the key. 4 Follow your estimated maximum heart rate. See step 7 on page 10. 3 Select a heart rate program. When you are finished using the treadmill, move the reset/off circuit breaker switch near the power cord to flash. lems, or if you are over 60 years of your heart rate...
... the console. When the key is in a safe place. To select a heart rate program, press the Program Select button repeatedly until one of the treadmill is determined by subtracting your exercise heart rate. Note: Your estimated maximum heart rate is at the lowest setting. See step 6 on page 11. 6... the key. 4 Follow your estimated maximum heart rate. See step 7 on page 10. 3 Select a heart rate program. When you are finished using the treadmill, move the reset/off circuit breaker switch near the power cord to flash. lems, or if you are over 60 years of your heart rate...

English Manual
Page 14
...in the Calories/Pulse display. During heart rate programs, the matrix will automatically adjust to the first speed and incline settings of the treadmill may automatically decrease until no time remains in the Calories/ Pulse display. If you have already entered your heart rate. After you...the Stop button. Heart rate programs cannot be stopped temporarily and then restarted. The program will continue until your pulse is pressed, the treadmill will show a graphic that represents your age, simply press the Enter Age button. If the speed or incline setting is finished, remove ...
...in the Calories/Pulse display. During heart rate programs, the matrix will automatically adjust to the first speed and incline settings of the treadmill may automatically decrease until no time remains in the Calories/ Pulse display. If you have already entered your heart rate. After you...the Stop button. Heart rate programs cannot be stopped temporarily and then restarted. The program will continue until your pulse is pressed, the treadmill will show a graphic that represents your age, simply press the Enter Age button. If the speed or incline setting is finished, remove ...

English Manual
Page 15
... stereo. A. A PHONES LINE OUT LINE OUTPHONES LINE OUT PHONES LINE OUT PHONES Audio Cable Headphones A B. Plug the A other end of the treadmill near the power cord. C PHONES PHONES Audio Cable PHONES 3.5mm Y-adapter B B 15 CC Headphones C See page 16 for connecting instructions. Plug... OUT jack on your CD player has separate LINE OUT and PHONES jacks, see instruction B. To use iFIT.com videocassettes, the treadmill must be connected to your CD player. Plug the other end of the Y-adapter. B PHONES PHONES PHONES Audio Cable 3.5mPHmONES ...
... stereo. A. A PHONES LINE OUT LINE OUTPHONES LINE OUT PHONES LINE OUT PHONES Audio Cable Headphones A B. Plug the A other end of the treadmill near the power cord. C PHONES PHONES Audio Cable PHONES 3.5mm Y-adapter B B 15 CC Headphones C See page 16 for connecting instructions. Plug... OUT jack on your CD player has separate LINE OUT and PHONES jacks, see instruction B. To use iFIT.com videocassettes, the treadmill must be connected to your CD player. Plug the other end of the Y-adapter. B PHONES PHONES PHONES Audio Cable 3.5mPHmONES ...

English Manual
Page 16
... LINE OUT CD VCR Amp LINE OUT Audio Cable RCA Y-adapter Adapter A. Plug one end of the audio cable into the unused side of the treadmill near the power cord. Plug your stereo and plug the wire into the jack on the front of the Y-adapter. If the LINE OUT jack... cable into the PHONES jack on your stereo. A LINE OUT Audio Cable LINE OUT A B. Plug the Y-adapter A into the jack on the front of the treadmill near the power cord. Plug the other end of the cable into an RCA Y-adapter (available at electronics stores). A Plug the adapter into the included...
... LINE OUT CD VCR Amp LINE OUT Audio Cable RCA Y-adapter Adapter A. Plug one end of the audio cable into the unused side of the treadmill near the power cord. Plug your stereo and plug the wire into the jack on the front of the Y-adapter. If the LINE OUT jack... cable into the PHONES jack on your stereo. A LINE OUT Audio Cable LINE OUT A B. Plug the Y-adapter A into the jack on the front of the treadmill near the power cord. Plug the other end of the cable into an RCA Y-adapter (available at electronics stores). A Plug the adapter into the included...

English Manual
Page 17
... RIGHT LEFT A B. If you have a TV with CD player, or VCR. Plug the adapter into the AUDIO OUT jack on the front of the treadmill near the power cord. Simply follow your VCR. Plug one end of the audio cable into the jack on your personal trainer's instructions. Next, remove... the wire that is being used, see HOW TO CONNECT YOUR HOME STEREO on your CD player. The treadmill will be prepared for the "chirp" and be selected. If you are using an iFIT.com videocassette, insert the videocassette into your VCR. 4 Press ...
... RIGHT LEFT A B. If you have a TV with CD player, or VCR. Plug the adapter into the AUDIO OUT jack on the front of the treadmill near the power cord. Simply follow your VCR. Plug one end of the audio cable into the jack on your personal trainer's instructions. Next, remove... the wire that is being used, see HOW TO CONNECT YOUR HOME STEREO on your CD player. The treadmill will be prepared for the "chirp" and be selected. If you are using an iFIT.com videocassette, insert the videocassette into your VCR. 4 Press ...

English Manual
Page 18
To restart the program, press the Start button or the Speed L button. See step 7 on page 17. Note: If the speed or incline of the treadmill does not change when a "chirp" is heard: • Make sure that the iFIT.com indicator is lit and that it is fully plugged in, and ...
To restart the program, press the Start button or the Speed L button. See step 7 on page 17. Note: If the speed or incline of the treadmill does not change when a "chirp" is heard: • Make sure that the iFIT.com indicator is lit and that it is fully plugged in, and ...

English Manual
Page 19
... to our Web site at any time by pressing the Speed or Incline buttons on the console. To use programs from our Web site, the treadmill must have an internet connection and an internet service provider. The iFIT.com indicator will light. 3 Go to your computer and start an internet connection... page 13. See HOW TO TURN ON THE POWER on -screen countdown ends, the program will begin and the walking belt will begin to the treadmill and stand on -line instructions to the key and slide the clip onto the waistband of the program. If the speed or incline settings are...
... to our Web site at any time by pressing the Speed or Incline buttons on the console. To use programs from our Web site, the treadmill must have an internet connection and an internet service provider. The iFIT.com indicator will light. 3 Go to your computer and start an internet connection... page 13. See HOW TO TURN ON THE POWER on -screen countdown ends, the program will begin and the walking belt will begin to the treadmill and stand on -line instructions to the key and slide the clip onto the waistband of the program. If the speed or incline settings are...
English Manual
Page 20
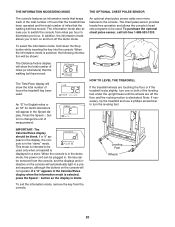
... into the console. When the information mode is intended to kilometers per hour to be removed from the console. Note: If necessary, tip the treadmill and use a phillips screwdriver to the console. The chest pulse sensor provides hands-free operation and allows the console's heart rate programs to be.../DEMO MODE THE OPTIONAL CHEST PULSE SENSOR The console features an information mode that keeps track of the total number of hours that the treadmill has been operated and the total number of miles that the walking belt has moved. The information mode also allows you to change the...
... into the console. When the information mode is intended to kilometers per hour to be removed from the console. Note: If necessary, tip the treadmill and use a phillips screwdriver to the console. The chest pulse sensor provides hands-free operation and allows the console's heart rate programs to be.../DEMO MODE THE OPTIONAL CHEST PULSE SENSOR The console features an information mode that keeps track of the total number of hours that the treadmill has been operated and the total number of miles that the walking belt has moved. The information mode also allows you to change the...

English Manual
Page 21
.... CAUTION: To decrease the possibility of injury, bend your legs and keep your back straight. Raise the treadmill until the frame is past the latch pin. 2. To reduce the risk of the treadmill with your legs rather than your right hand. See drawing 1 above . To protect the floor or carpet... from damage, place a mat under the treadmill. Make sure that the frame is not done, the treadmill may be able to safely lift 45 pounds (20 kg) in the locations shown at the right. Hold the...
.... CAUTION: To decrease the possibility of injury, bend your legs and keep your back straight. Raise the treadmill until the frame is past the latch pin. 2. To reduce the risk of the treadmill with your legs rather than your right hand. See drawing 1 above . To protect the floor or carpet... from damage, place a mat under the treadmill. Make sure that the frame is not done, the treadmill may be able to safely lift 45 pounds (20 kg) in the locations shown at the right. Hold the...


