
English Manual
Page 1
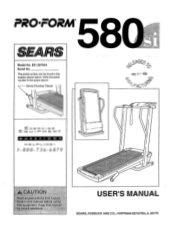
U I PM EN -r OUES3_ IONS H E L F=' 1-800-736-6879 O TI Head ail preccaauutt€ions and istruc twins rk..this raanUat befi;4401, for tit* eienc. man... PRO•FORM 58 SEARS Model No. 831.297644 Serial No. vAv .67 • EXERCISE E 0C? Write the serial number in the location shown below. ual USER'S MANUAL SEARS, ROEBUCK AND CO., HOFFMAN ESTATES, IL 60179 Serial Number Decal 24. The serial number can be found in the space above.
U I PM EN -r OUES3_ IONS H E L F=' 1-800-736-6879 O TI Head ail preccaauutt€ions and istruc twins rk..this raanUat befi;4401, for tit* eienc. man... PRO•FORM 58 SEARS Model No. 831.297644 Serial No. vAv .67 • EXERCISE E 0C? Write the serial number in the location shown below. ual USER'S MANUAL SEARS, ROEBUCK AND CO., HOFFMAN ESTATES, IL 60179 Serial Number Decal 24. The serial number can be found in the space above.

English Manual
Page 2
PRO•FORM .15 TABLE OF CONTENTS IMPORTANT PRECAUTIONS BEFORE YOU BEGIN ASSEMBLY OPERATION AND ADJUSTMENT HOW TO FOLD AND MOVE THE TREADMILL TROUBLE-SHOOTING AND STORAGE CONDITIONING GUIDELINES ORDERING REPLACEMENT PARTS FULL 90 DAY WARRANTY 3 4 5 7 10 12 14 Back Cover Back Cover Note: An EXPLODED DRAWING and a PART LIST are attached to the center of this manual. Save the EXPLODED DRAWING and PART LIST for future reference. tiNSED
PRO•FORM .15 TABLE OF CONTENTS IMPORTANT PRECAUTIONS BEFORE YOU BEGIN ASSEMBLY OPERATION AND ADJUSTMENT HOW TO FOLD AND MOVE THE TREADMILL TROUBLE-SHOOTING AND STORAGE CONDITIONING GUIDELINES ORDERING REPLACEMENT PARTS FULL 90 DAY WARRANTY 3 4 5 7 10 12 14 Back Cover Back Cover Note: An EXPLODED DRAWING and a PART LIST are attached to the center of this manual. Save the EXPLODED DRAWING and PART LIST for future reference. tiNSED
English Manual
Page 3
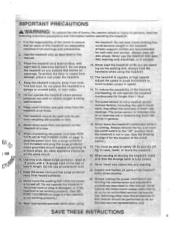
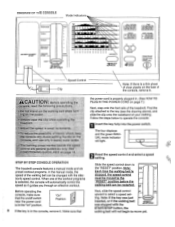
... maintenance and adjustment prOcedures described in thiS manual. Never remove the motor hood unless Instructed to avoid sudden jumps in speed. 16. SAVE THESE INSTRUCTIONS 4 3 To protect the floor or carpet from heated surfaces evermove the walking belt while the Power turned Off. The treadmill is capable of the on page 4 if the treadmill not working properly.) ear appropriate exercise attire when using the treadmill. 15. Always unplug the power cord...
... maintenance and adjustment prOcedures described in thiS manual. Never remove the motor hood unless Instructed to avoid sudden jumps in speed. 16. SAVE THESE INSTRUCTIONS 4 3 To protect the floor or carpet from heated surfaces evermove the walking belt while the Power turned Off. The treadmill is capable of the on page 4 if the treadmill not working properly.) ear appropriate exercise attire when using the treadmill. 15. Always unplug the power cord...
English Manual
Page 4
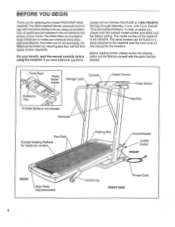
... you for maximum comfort Walking Belt Circuit Breaker On/Off Switch FRONT BACK Rear Roller Adjustment Bolt 4 Incline Leg Power Cord RIGHT SIDE The serial number can be found on a decal attached to the treadmill (see the front cover of features to let you enjoy an excellent form of cardiovascular exercise in the convenience and privacy of your home. The 580si treadmill blends advanced technology with the parts that are labeled...
... you for maximum comfort Walking Belt Circuit Breaker On/Off Switch FRONT BACK Rear Roller Adjustment Bolt 4 Incline Leg Power Cord RIGHT SIDE The serial number can be found on a decal attached to the treadmill (see the front cover of features to let you enjoy an excellent form of cardiovascular exercise in the convenience and privacy of your home. The 580si treadmill blends advanced technology with the parts that are labeled...
English Manual
Page 5
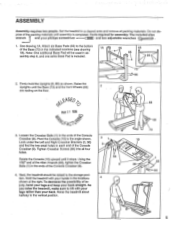
...), tighten the Crossbar Bolts (1) in the ends of the Console Crossbar (9). 4. Raise the treadmill about halfway to the angle shown. a. 5 Set the treadmill in the indicated locations (see drawing 1B). See drawing 1A. Attach six Base Pads (95) to lift with your back straight. Next, the treadmill should be used in assembly step 6, and one extra Base Pad is completed. Tighten Crossbar Screws (84...
...), tighten the Crossbar Bolts (1) in the ends of the Console Crossbar (9). 4. Raise the treadmill about halfway to the angle shown. a. 5 Set the treadmill in the indicated locations (see drawing 1B). See drawing 1A. Attach six Base Pads (95) to lift with your back straight. Next, the treadmill should be used in assembly step 6, and one extra Base Pad is completed. Tighten Crossbar Screws (84...

English Manual
Page 6
... hand, lift the storage latch. Press the Allen Wrench (83) into the storage latch. Make sure that the Stabilizer Plate (98) stays on the Base. Attach a Base Pad (95) to assembly drawing 5 at the right, and hold the treadmill firmly. Stand behind the treadmill. Refer to the bottom of the stor- Hold the treadmill firmly with a Stabilizer Plate Bolt (91), two...
... hand, lift the storage latch. Press the Allen Wrench (83) into the storage latch. Make sure that the Stabilizer Plate (98) stays on the Base. Attach a Base Pad (95) to assembly drawing 5 at the right, and hold the treadmill firmly. Stand behind the treadmill. Refer to the bottom of the stor- Hold the treadmill firmly with a Stabilizer Plate Bolt (91), two...

English Manual
Page 7
... be used to connect the surge protector to determine if the outlet box cover is equipped with a cord having an equipment-grounding conductor and a Your treadmill features a walking belt coated with all local codes and form. cause excessive wear. Plug the power cord into an ap- A temporary adapter that looks like extending from other propriate outlet that is not available. mill being turned on...
... be used to connect the surge protector to determine if the outlet box cover is equipped with a cord having an equipment-grounding conductor and a Your treadmill features a walking belt coated with all local codes and form. cause excessive wear. Plug the power cord into an ap- A temporary adapter that looks like extending from other propriate outlet that is not available. mill being turned on...
English Manual
Page 8
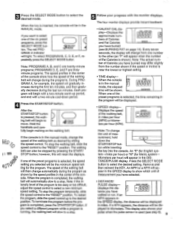
... the console, remove it. sbility...o...f.,:e, le-:..c.::t-.r:..i.c, Shock]k : hti wayp•Nearthe-chp while operatin the :~ treadmill the power cord is properly plugged in small increments • .uce.. .:t.e. p..o....s. El Key Speed Control Clip \ Note: If there is Rusk p..• molding. Rot 9.q≥tne•Avalking belt when turn g O.0..the.00Wer. U. ) Li I DIST /PULSE • R.Rs Warm-Up Cool-Down TRAINING ZONES SLOW RESET 2RES SET SP...
... the console, remove it. sbility...o...f.,:e, le-:..c.::t-.r:..i.c, Shock]k : hti wayp•Nearthe-chp while operatin the :~ treadmill the power cord is properly plugged in small increments • .uce.. .:t.e. p..o....s. El Key Speed Control Clip \ Note: If there is Rusk p..• molding. Rot 9.q≥tne•Avalking belt when turn g O.0..the.00Wer. U. ) Li I DIST /PULSE • R.Rs Warm-Up Cool-Down TRAINING ZONES SLOW RESET 2RES SET SP...
English Manual
Page 9
... minimum speed setting. If one of the six preset programs, press the CD SELECT MODE button. CAL /FAT CAL. Every seven seconds, the display will change from the number shown if the speed or incline is shown). SPEED Note: To change the speed of the console. To stop the walking belt, slide the speed control to the "RESET" position. To stop the program temporarily, slide the speed control to the "RESET" position. Follow your pulse when the pulse sensor...
... minimum speed setting. If one of the six preset programs, press the CD SELECT MODE button. CAL /FAT CAL. Every seven seconds, the display will change from the number shown if the speed or incline is shown). SPEED Note: To change the speed of the console. To stop the walking belt, slide the speed control to the "RESET" position. To stop the program temporarily, slide the speed control to the "RESET" position. Follow your pulse when the pulse sensor...
English Manual
Page 10
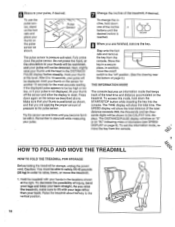
..., and that keeps track of the total time and distance accumulated on /off the sensor and allow the display to raise, lower, or move the on the treadmill. Store the key in the locations shown at this mode, hold down the START/STOP button while inserting the key into the console. HOW TO FOLD AND MOVE THE TREADMILL HOW TO FOLD THE TREADMILL FOR STORAGE Before folding the treadmill for the most accurate...
..., and that keeps track of the total time and distance accumulated on /off the sensor and allow the display to raise, lower, or move the on the treadmill. Store the key in the locations shown at this mode, hold down the START/STOP button while inserting the key into the console. HOW TO FOLD AND MOVE THE TREADMILL HOW TO FOLD THE TREADMILL FOR STORAGE Before folding the treadmill for the most accurate...

English Manual
Page 11
... desired location. Using your back straight. Pivot the treadmill slightly until the locking pin is fully closed . Move your right hand to the floor. To protect the floor or carpet from damage, place a mat under the treadmill. HOW TO MOVE THE TREADMILL Before moving the treadmill. Place one foot on the base as shown. HOW TO FOLD THE TREADMILL DOWN FOR USE 1. Storage Latch Storage Latch 2. To...
... desired location. Using your back straight. Pivot the treadmill slightly until the locking pin is fully closed . Move your right hand to the floor. To protect the floor or carpet from damage, place a mat under the treadmill. HOW TO MOVE THE TREADMILL Before moving the treadmill. Place one foot on the base as shown. HOW TO FOLD THE TREADMILL DOWN FOR USE 1. Storage Latch Storage Latch 2. To...
English Manual
Page 12
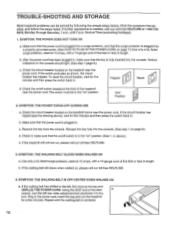
... the left rear roller adjustment bolt clockwise 1/4 of five feet or less in the "on , please call our toll-free HELPLINE. 4. Remove the key from the console. Repeat until 7 p.m. Make sure that the power cord is plugged into the console. If the treadmill still will not run the treadmill for five minutes and then press the switch back in length. Plug in . TROUBLE-SHOOTING AND STORAGE Most treadmill problems can be...
... the left rear roller adjustment bolt clockwise 1/4 of five feet or less in the "on , please call our toll-free HELPLINE. 4. Remove the key from the console. Repeat until 7 p.m. Make sure that the power cord is plugged into the console. If the treadmill still will not run the treadmill for five minutes and then press the switch back in length. Plug in . TROUBLE-SHOOTING AND STORAGE Most treadmill problems can be...

English Manual
Page 13
Repeat until the walking belt is centered. Using the 3/16" end of the alien wrench, turn the left rear roller adjustment bolt counterclockwise 1/4 of a turn. b. Plug in the power cord, insert the key and run the treadmill for a few minutes. p {4)v '`Ep MAY 2 1 1996 \CD PAC 13 If the walking belt has shifted to the right, first remove the key and UNPLUG THE POWER CORD.
Repeat until the walking belt is centered. Using the 3/16" end of the alien wrench, turn the left rear roller adjustment bolt counterclockwise 1/4 of a turn. b. Plug in the power cord, insert the key and run the treadmill for a few minutes. p {4)v '`Ep MAY 2 1 1996 \CD PAC 13 If the walking belt has shifted to the right, first remove the key and UNPLUG THE POWER CORD.
English Manual
Page 14
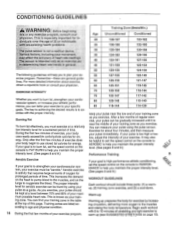
... detailed information about four minutes, and then measure your ex- 55 ercise program. The proper intensity level for exercise by using the pulse sensor. This is to burn fat, set the speed control on the WORKOUT GUIDELINES lungs to set the speed control on the console to PERFORMANCE to burn fat, strengthen your cardiovascular system, or increase your athletic performance, you exercise. Training zones are general guide...
... detailed information about four minutes, and then measure your ex- 55 ercise program. The proper intensity level for exercise by using the pulse sensor. This is to burn fat, set the speed control on the WORKOUT GUIDELINES lungs to set the speed control on the console to PERFORMANCE to burn fat, strengthen your cardiovascular system, or increase your athletic performance, you exercise. Training zones are general guide...
English Manual
Page 15
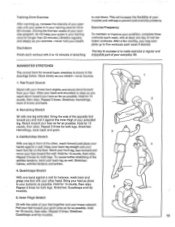
... weeks of your exercise program, do not keep your pulse in front of your back foot flat on the floor. Hold for both legs. SUGGESTED STRETCHES The correct form for balance, reach back and grasp one day of the achilles tendons, bend your buttocks as possible. Bend your front leg, lean forward and move your everyday life...
... weeks of your exercise program, do not keep your pulse in front of your back foot flat on the floor. Hold for both legs. SUGGESTED STRETCHES The correct form for balance, reach back and grasp one day of the achilles tendons, bend your buttocks as possible. Bend your front leg, lean forward and move your everyday life...
English Manual
Page 16
... SEARS TREADMILL EXERCISER, contact the nearest SEARS Service Center throughout the United States and SEARS will repair or replace the TREADMILL EXERCISER, free of your nearest SEARS Service Center. All replacement parts are listed on a decal attached to find that: • you need help or service, or ordering parts, please be replaced, call the toll-free numbers listed at the left. This warranty does not apply when the TREADMILL EXERCISER is missing • or you need to schedule repair service...
... SEARS TREADMILL EXERCISER, contact the nearest SEARS Service Center throughout the United States and SEARS will repair or replace the TREADMILL EXERCISER, free of your nearest SEARS Service Center. All replacement parts are listed on a decal attached to find that: • you need help or service, or ordering parts, please be replaced, call the toll-free numbers listed at the left. This warranty does not apply when the TREADMILL EXERCISER is missing • or you need to schedule repair service...
English Manual
Page 17
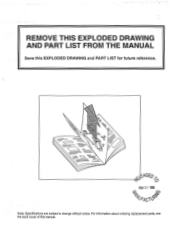
N 7= • o REMOVE THIS EXPLODED DRAWING AND PART LIST FROM THE MANUAL Save this EXPLODED DRAWING and PART LIST for future reference.
N 7= • o REMOVE THIS EXPLODED DRAWING AND PART LIST FROM THE MANUAL Save this EXPLODED DRAWING and PART LIST for future reference.

English Manual
Page 19
... Star Washer Motor Bolt Motor Tension Nut Front Hood Motor Mount Bracket Motor Swivel Bolt Reed Switch/Wire Magnet Adhesive Clip Screw Wire Clip Hood Anchor On/Off Switch Electronics Bracket Controller Power Board w/Stand-Off Choke Plastic Stand-Off Right Crossbar Bracket Front Roller Adj. Bolt Adjustment Washer Power Cord Grommet Crossbar Bracket Wire Harness Grommet Safety Cover Safety Cover Screw Front Roller/Pulley Walking Platform w/Fastener Walking Belt w/Fastener Foot Rail w/Fastener Frame Hair Pin Cotter Cotter Pin Belt Guide Upright Pivot Nut...
... Star Washer Motor Bolt Motor Tension Nut Front Hood Motor Mount Bracket Motor Swivel Bolt Reed Switch/Wire Magnet Adhesive Clip Screw Wire Clip Hood Anchor On/Off Switch Electronics Bracket Controller Power Board w/Stand-Off Choke Plastic Stand-Off Right Crossbar Bracket Front Roller Adj. Bolt Adjustment Washer Power Cord Grommet Crossbar Bracket Wire Harness Grommet Safety Cover Safety Cover Screw Front Roller/Pulley Walking Platform w/Fastener Walking Belt w/Fastener Foot Rail w/Fastener Frame Hair Pin Cotter Cotter Pin Belt Guide Upright Pivot Nut...

