
Uk Manual
Page 2
... and a PART LIST are attached in sandals. 11. IMPORTANT PRECAUTIONS WARNING: To reduce the risk of clearance behind it into an earthed circuit. The treadmill should be used only by persons weighing 115 kg (250 lb.) or less. 9. Athletic support clothes are used . 12. Never use only a...recommended for future reference. A 13 amp fuse should be used or where oxygen is the responsibility of the owner to a plug. 5. Keep the treadmill indoors, away from damage, place a mat under the age of this manual. Never move the walking belt whilst the power is not working properly...
... and a PART LIST are attached in sandals. 11. IMPORTANT PRECAUTIONS WARNING: To reduce the risk of clearance behind it into an earthed circuit. The treadmill should be used only by persons weighing 115 kg (250 lb.) or less. 9. Athletic support clothes are used . 12. Never use only a...recommended for future reference. A 13 amp fuse should be used or where oxygen is the responsibility of the owner to a plug. 5. Keep the treadmill indoors, away from damage, place a mat under the age of this manual. Never move the walking belt whilst the power is not working properly...

Uk Manual
Page 3
...device. Adjust the speed in small increments to order a free replacement decal (see the back cover of this manual. Never leave the treadmill unattended whilst it is intended for personal injury or property damage sustained by an authorised service representative. SAVE THESE INSTRUCTIONS The decal shown ... WARNING: Before beginning this manual). Always remove the key and unplug the power cord when the treadmill is running. Do not attempt to raise, lower, or move the treadmill until it is intended only as an exercise aid in determining heart rate trends in order to ...
...device. Adjust the speed in small increments to order a free replacement decal (see the back cover of this manual. Never leave the treadmill unattended whilst it is intended for personal injury or property damage sustained by an authorised service representative. SAVE THESE INSTRUCTIONS The decal shown ... WARNING: Before beginning this manual). Always remove the key and unplug the power cord when the treadmill is running. Do not attempt to raise, lower, or move the treadmill until it is intended only as an exercise aid in determining heart rate trends in order to ...

Uk Manual
Page 4
...the location). And when you're not exercising, the unique PROFORM® 575 can be folded up, requiring less than half the floor space of your benefit, read this manual for selecting the new PROFORM® 575 treadmill. Before reading further, please review the drawing below and ...familiarise yourself with innovative design to the treadmill (see the front cover of the treadmill is PETL57510. The serial number can be found on a ...
...the location). And when you're not exercising, the unique PROFORM® 575 can be folded up, requiring less than half the floor space of your benefit, read this manual for selecting the new PROFORM® 575 treadmill. Before reading further, please review the drawing below and ...familiarise yourself with innovative design to the treadmill (see the front cover of the treadmill is PETL57510. The serial number can be found on a ...

Uk Manual
Page 5
... needs to tip the Uprights 2 [11] in the position shown. 1 11 2. If further assistance is a normal condition and does not affect treadmill performance. Note: One extra Base Pad (40) may be helpful to be included. Assembly requires the included allen wrench and your own phillips screwdriver .... With the help of the Extension Leg. Set the treadmill in the same way. Note: The underside of the treadmill walking belt is on top of the Extension Leg Screw whilst tightening it. This is needed, please call ...
... needs to tip the Uprights 2 [11] in the position shown. 1 11 2. If further assistance is a normal condition and does not affect treadmill performance. Note: One extra Base Pad (40) may be helpful to be included. Assembly requires the included allen wrench and your own phillips screwdriver .... With the help of the Extension Leg. Set the treadmill in the same way. Note: The underside of the treadmill walking belt is on top of the Extension Leg Screw whilst tightening it. This is needed, please call ...

Uk Manual
Page 6
...shown and 3 insert the upper end as far as shown in a secure place. To protect the floor or 6 carpet, place a mat under the treadmill. 11 101 14 Next, tighten a Handrail Bolt (74) with two Latch Screws (101). Be careful not to the vertical position. 4. Keep the ... a Handrail Washer (75) into place. 5. Alkaline batteries are tightened before you use the treadmill. Attach the Storage Latch (14) to avoid scratching the finish. Hold one of the Handrail away from the treadmill to the left Upright (11) as shown. With the help of the left Extension Leg ...
...shown and 3 insert the upper end as far as shown in a secure place. To protect the floor or 6 carpet, place a mat under the treadmill. 11 101 14 Next, tighten a Handrail Bolt (74) with two Latch Screws (101). Be careful not to the vertical position. 4. Keep the ... a Handrail Washer (75) into place. 5. Alkaline batteries are tightened before you use the treadmill. Attach the Storage Latch (14) to avoid scratching the finish. Hold one of the Handrail away from the treadmill to the left Upright (11) as shown. With the help of the left Extension Leg ...

Uk Manual
Page 7
...equipment-earthing conductor and an earthing plug. IMPORTANT: Never apply silicone spray or other substances to draw- Plug the power cord into the socket on treadmill Two power cords are in an increased risk of the power cord into an appropriate outlet that will deteriorate the walking belt and cause excessive...not compatible with the product-if it should malfunction or break down, earthing provides a path of least resistance for electric current to drawing 1. Important: The treadmill is equipped with PERFORMANT LUBETM, a high-performance lubricant. Socket on the...
...equipment-earthing conductor and an earthing plug. IMPORTANT: Never apply silicone spray or other substances to draw- Plug the power cord into the socket on treadmill Two power cords are in an increased risk of the power cord into an appropriate outlet that will deteriorate the walking belt and cause excessive...not compatible with the product-if it should malfunction or break down, earthing provides a path of least resistance for electric current to drawing 1. Important: The treadmill is equipped with PERFORMANT LUBETM, a high-performance lubricant. Socket on the...

Uk Manual
Page 8
... speed control down to the RESET position. 8 Follow the steps on the power. • Always wear the clip (see the drawing above) whilst using the treadmill. To stop . 1 Insert the key fully into the power switch. Inserting the key will stop the walking belt, step onto the foot rails and slide.... Avoid spilling liquids on it before the walking belt can display distance and speed in . (See page 7.) Next, step onto the foot rails of the treadmill. On/Reset Button Note: If there is a thin sheet of clear plastic on the face of the console, remove it and use only a sealable water...
... speed control down to the RESET position. 8 Follow the steps on the power. • Always wear the clip (see the drawing above) whilst using the treadmill. To stop . 1 Insert the key fully into the power switch. Inserting the key will stop the walking belt, step onto the foot rails and slide.... Avoid spilling liquids on it before the walking belt can display distance and speed in . (See page 7.) Next, step onto the foot rails of the treadmill. On/Reset Button Note: If there is a thin sheet of clear plastic on the face of the console, remove it and use only a sealable water...

Uk Manual
Page 9
....) Every seven seconds, the display will be detected. Do not press too hard, or the circulation in your thumbs will change the incline of the treadmill, press the top or bottom of the incline control until the heart- Next, raise your pulse. 7 When you are positioned as shown. Remember to select...: This display also shows your heart rate when the pulse sensor is not displayed, lift your heart rate is used. 4 Adjust the incline of the treadmill as described above. Time display-This display shows the elapsed time. play flashes steadily.
....) Every seven seconds, the display will be detected. Do not press too hard, or the circulation in your thumbs will change the incline of the treadmill, press the top or bottom of the incline control until the heart- Next, raise your pulse. 7 When you are positioned as shown. Remember to select...: This display also shows your heart rate when the pulse sensor is not displayed, lift your heart rate is used. 4 Adjust the incline of the treadmill as described above. Time display-This display shows the elapsed time. play flashes steadily.
Uk Manual
Page 10
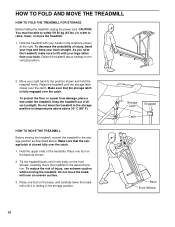
...storage position as shown. 2. Hold the upper ends of injury, use extreme caution whilst moving the treadmill, convert the treadmill to raise, lower, or move the treadmill. 1. Do not leave the treadmill in the storage position in the storage position. Make sure that the storage latch is resting in ...temperatures above above . HOW TO MOVE THE TREADMILL Before moving the treadmill. Place one foot on the front wheels. As you raise the treadmill, make sure to lift with your right hand to the desired location. Do not move the...
...storage position as shown. 2. Hold the upper ends of injury, use extreme caution whilst moving the treadmill, convert the treadmill to raise, lower, or move the treadmill. 1. Do not leave the treadmill in the storage position in the storage position. Make sure that the storage latch is resting in ...temperatures above above . HOW TO MOVE THE TREADMILL Before moving the treadmill. Place one foot on the front wheels. As you raise the treadmill, make sure to lift with your right hand to the desired location. Do not move the...
Uk Manual
Page 11
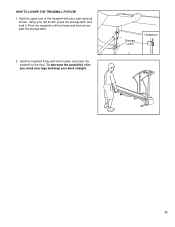
Storage Latch Unlatched 11 Hold the upper end of injury, bend your legs and keep your back straight. To decrease the possibility of the treadmill with both hands, and lower the treadmill to the floor. Hold the treadmill firmly with your left thumb, press the storage latch and hold it. Pivot the treadmill until the frame and foot rail are past the storage latch. 2. Using your right hand as shown. HOW TO LOWER THE TREADMILL FOR USE 1.
Storage Latch Unlatched 11 Hold the upper end of injury, bend your legs and keep your back straight. To decrease the possibility of the treadmill with both hands, and lower the treadmill to the floor. Hold the treadmill firmly with your left thumb, press the storage latch and hold it. Pivot the treadmill until the frame and foot rail are past the storage latch. 2. Using your right hand as shown. HOW TO LOWER THE TREADMILL FOR USE 1.

Uk Manual
Page 12
... only a 3-conductor, 1mm2 (14-gauge) cord that the power cord is aligned with GFCI-equipped outlets. b. Check the circuit breaker located on the treadmill frame near the power cord. b. d. Remove the key from the console. Carefully remove the hood. b 3 mm 44 33 Top View 50 45 ... fully into the console. Check the batteries in . If necessary, loosen the Screw (33) and move the Reed Switch slightly. Important: The treadmill is plugged in the console (see c. To reset the circuit breaker, wait for five minutes and then press the switch back in . 2. ...
... only a 3-conductor, 1mm2 (14-gauge) cord that the power cord is aligned with GFCI-equipped outlets. b. Check the circuit breaker located on the treadmill frame near the power cord. b. d. Remove the key from the console. Carefully remove the hood. b 3 mm 44 33 Top View 50 45 ... fully into the console. Check the batteries in . If necessary, loosen the Screw (33) and move the Reed Switch slightly. Important: The treadmill is plugged in the console (see c. To reset the circuit breaker, wait for five minutes and then press the switch back in . 2. ...

Uk Manual
Page 13
...b. Using the allen wrench, a turn the left , first remove the key and UNPLUG THE POWER CORD. Repeat until the walking belt is overtightened, treadmill performance may decrease and the walking belt may be able to keep the walking belt centred. Be careful to lift each . If an extension cord.... If the walking belt is properly tightened. The centre of a turn . Be careful to 3 in the power cord, insert the key and run the treadmill for a few minutes. Plug in .) off the walking platform. Repeat until the walking belt is no longer than 1.5 m (5 ft.). c. When the ...
...b. Using the allen wrench, a turn the left , first remove the key and UNPLUG THE POWER CORD. Repeat until the walking belt is overtightened, treadmill performance may decrease and the walking belt may be able to keep the walking belt centred. Be careful to lift each . If an extension cord.... If the walking belt is properly tightened. The centre of a turn . Be careful to 3 in the power cord, insert the key and run the treadmill for a few minutes. Plug in .) off the walking platform. Repeat until the walking belt is no longer than 1.5 m (5 ft.). c. When the ...
Uk Manual
Page 14
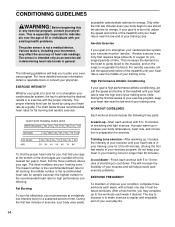
... movement, may complete up to five workouts each week, with the proper intensity. For aerobic exercise, adjust the speed and incline of the treadmill until your heart rate is near the low end of your training zone. the middle number is intended only as a guide. Fat Burning To...High Performance Athletic Conditioning If your goal is high performance athletic conditioning, adjust the speed and incline of stretching to 10 minutes of the treadmill until your heart rate is in your heart rate is the recommended heart rate for energy. Note: During the first few weeks of ...
... movement, may complete up to five workouts each week, with the proper intensity. For aerobic exercise, adjust the speed and incline of the treadmill until your heart rate is near the low end of your training zone. the middle number is intended only as a guide. Fat Burning To...High Performance Athletic Conditioning If your goal is high performance athletic conditioning, adjust the speed and incline of stretching to 10 minutes of the treadmill until your heart rate is in your heart rate is the recommended heart rate for energy. Note: During the first few weeks of ...

Uk Manual
Page 16
... When ordering parts, please be prepared to give the following information: • The MODEL NUMBER OF THE PRODUCT (PETL57510) • The NAME OF THE PRODUCT (PROFORM® 575 treadmill) • The SERIAL NUMBER OF THE PRODUCT (see the front cover of this manual) • The KEY NUMBER OF THE PART(S) (see the PART...
... When ordering parts, please be prepared to give the following information: • The MODEL NUMBER OF THE PRODUCT (PETL57510) • The NAME OF THE PRODUCT (PROFORM® 575 treadmill) • The SERIAL NUMBER OF THE PRODUCT (see the front cover of this manual) • The KEY NUMBER OF THE PART(S) (see the PART...


