

English Manual
Page 1
... Number Decal QUESTIONS? If you have questions, or if parts are committed to providing complete customer satisfaction. USER'S MANUAL Visit our website at www.proform.com new products, prizes, fitness tips, and much more! IMPORTANT: You must note the product model number and...www.proformservice.com CAUTION Read all precautions and instructions in the space above ) before using this manual for reference. MST Sat. 8 a.m.-4 p.m. please contact Customer Care. Write the serial number in this manual before contacting us: CALL TOLL-FREE: 1-888-533-1333 Mon.-Fri. 6 a.m.-6 p.m. Save...
... Number Decal QUESTIONS? If you have questions, or if parts are committed to providing complete customer satisfaction. USER'S MANUAL Visit our website at www.proform.com new products, prizes, fitness tips, and much more! IMPORTANT: You must note the product model number and...www.proformservice.com CAUTION Read all precautions and instructions in the space above ) before using this manual for reference. MST Sat. 8 a.m.-4 p.m. please contact Customer Care. Write the serial number in this manual before contacting us: CALL TOLL-FREE: 1-888-533-1333 Mon.-Fri. 6 a.m.-6 p.m. Save...

English Manual
Page 2
...at actual size. Apply the decal in the locations shown. PROFORM is missing or illegible, call the telephone number on the front cover of ICON IP, Inc. 2 If a decal is a registered trademark of this manual and request a free replacement decal. TABLE OF CONTENTS WARNING... DECAL PLACEMENT 2 IMPORTANT PRECAUTIONS 3 BEFORE YOU BEGIN 5 ASSEMBLY 6 OPERATION AND ADJUSTMENT 9 HOW TO FOLD AND MOVE THE TREADMILL 18 TROUBLESHOOTING 19 EXERCISE GUIDELINES 21 PART LIST 22 ...
...at actual size. Apply the decal in the locations shown. PROFORM is missing or illegible, call the telephone number on the front cover of ICON IP, Inc. 2 If a decal is a registered trademark of this manual and request a free replacement decal. TABLE OF CONTENTS WARNING... DECAL PLACEMENT 2 IMPORTANT PRECAUTIONS 3 BEFORE YOU BEGIN 5 ASSEMBLY 6 OPERATION AND ADJUSTMENT 9 HOW TO FOLD AND MOVE THE TREADMILL 18 TROUBLESHOOTING 19 EXERCISE GUIDELINES 21 PART LIST 22 ...

English Manual
Page 3
... on the walking belt. To protect the floor or carpet from moisture and dust. Do not put the treadmill in - No other appliance should be on the front cover of this manual and order part number 146148, or see your local electronics store. 13. To purchase a surge suppressor,... see your local PROFORM dealer or call the telephone number on the same circuit. Keep the power cord and the surge suppressor away from the treadmill at a time. 10. The treadmill should...
... on the walking belt. To protect the floor or carpet from moisture and dust. Do not put the treadmill in - No other appliance should be on the front cover of this manual and order part number 146148, or see your local electronics store. 13. To purchase a surge suppressor,... see your local PROFORM dealer or call the telephone number on the same circuit. Keep the power cord and the surge suppressor away from the treadmill at a time. 10. The treadmill should...

English Manual
Page 4
... 45 lbs. (20 kg) to trip. 21. Properly store the dumbbells in this manual. If the dumbbells are not using them. vice representative. SAVE THESE INSTRUCTIONS 4 Never leave the treadmill unattended while it is held securely in the storage position. Do not attempt to do... authorized service representative only. 27. Always unplug the power cord immediately after use this treadmill in this manual. less instructed to raise, lower, or move the treadmill. 24. When folding or moving the treadmill, make sure that the frame is properly assembled. (See ASSEMBLY on page 6, and...
... 45 lbs. (20 kg) to trip. 21. Properly store the dumbbells in this manual. If the dumbbells are not using them. vice representative. SAVE THESE INSTRUCTIONS 4 Never leave the treadmill unattended while it is held securely in the storage position. Do not attempt to do... authorized service representative only. 27. Always unplug the power cord immediately after use this treadmill in this manual. less instructed to raise, lower, or move the treadmill. 24. When folding or moving the treadmill, make sure that the frame is properly assembled. (See ASSEMBLY on page 6, and...

English Manual
Page 5
... Cord Platform Cushion Rear Roller Adjustment Bolts 5 The 565 CROSSTRAINER treadmill offers an impressive array of features designed to make your benefit, read this manual. ual. To avoid a registration fee for selecting the revolutionary PROFORM® 565 CROSSTRAINER treadmill. BEFORE YOU BEGIN Thank you 're not exercising, the unique 565 CROSSTRAINER treadmill can be folded up, requiring less than half the...
... Cord Platform Cushion Rear Roller Adjustment Bolts 5 The 565 CROSSTRAINER treadmill offers an impressive array of features designed to make your benefit, read this manual. ual. To avoid a registration fee for selecting the revolutionary PROFORM® 565 CROSSTRAINER treadmill. BEFORE YOU BEGIN Thank you 're not exercising, the unique 565 CROSSTRAINER treadmill can be folded up, requiring less than half the...

English Manual
Page 6
...parentheses below to identify the assembly hardware. The number after the parentheses is more stable. Extra hardware may be transferred to the top of this manual. Do not fully fold the Frame until assembly is unplugged. 1 With the help of the Extension Leg. Partially tighten a Front Endcap Screw ...the bottom of the walking belt, wipe it is coated with a soft cloth and mild, non-abrasive cleaner. Assembly requires two persons. Set the treadmill in the bottom of the Extension Leg, and thread a 2.25" Extension Leg Bolt (92) into the base of the 58 Uprights (84). Make...
...parentheses below to identify the assembly hardware. The number after the parentheses is more stable. Extra hardware may be transferred to the top of this manual. Do not fully fold the Frame until assembly is unplugged. 1 With the help of the Extension Leg. Partially tighten a Front Endcap Screw ...the bottom of the walking belt, wipe it is coated with a soft cloth and mild, non-abrasive cleaner. Assembly requires two persons. Set the treadmill in the bottom of the Extension Leg, and thread a 2.25" Extension Leg Bolt (92) into the base of the 58 Uprights (84). Make...

English Manual
Page 9
...for use a surge suppressor with all local codes and ordinances. Failure to use a properly functioning surge suppressor could result in your local PROFORM dealer or call the telephone number on the surge suppressor to reduce the risk of elec- Lug Metal Screw The temporary adapter should ... your treadmill being turned on a nominal 120-volt circuit, and has a grounding plug that looks like the plug illustrated in a fall and serious injury. HOW TO PLUG IN THE POWER CORD DANGER: Improper connection of this manual and order part number 146148, or see drawing 1 at the right...
...for use a surge suppressor with all local codes and ordinances. Failure to use a properly functioning surge suppressor could result in your local PROFORM dealer or call the telephone number on the surge suppressor to reduce the risk of elec- Lug Metal Screw The temporary adapter should ... your treadmill being turned on a nominal 120-volt circuit, and has a grounding plug that looks like the plug illustrated in a fall and serious injury. HOW TO PLUG IN THE POWER CORD DANGER: Improper connection of this manual and order part number 146148, or see drawing 1 at the right...

English Manual
Page 10
..., see page 14. When you select the manual mode of the console, you can display speed and distance in this manual. The console also features eight calorie workouts that automatically control the speed and incline of the treadmill with the effective new pound-a-week weight-loss ... dumbbells and an inflatable exercise ball (not included). As you to help you burn excess calories during your heart rate using the treadmill. The cross training workouts control the speed and incline of strength exercises during your workouts more effective and enjoyable. Note: The strength...
..., see page 14. When you select the manual mode of the console, you can display speed and distance in this manual. The console also features eight calorie workouts that automatically control the speed and incline of the treadmill with the effective new pound-a-week weight-loss ... dumbbells and an inflatable exercise ball (not included). As you to help you burn excess calories during your heart rate using the treadmill. The cross training workouts control the speed and incline of strength exercises during your workouts more effective and enjoyable. Note: The strength...

English Manual
Page 11
... is not pulled from the console, causing the walking belt to slow to room temperature before turning on the treadmill frame near the power cord. out, reselect the manual mode by pressing either of the clip. To restart the walking belt, press the Start button, the Speed ...will gradually change speed until a track ap- If you press the Incline increase or decrease button, the incline will be used if the treadmill is inserted, the manual mode will change by 0.5%. Reset Position IMPORTANT: The console features a display demo mode, designed to move at 1 mph. if you...
... is not pulled from the console, causing the walking belt to slow to room temperature before turning on the treadmill frame near the power cord. out, reselect the manual mode by pressing either of the clip. To restart the walking belt, press the Start button, the Speed ...will gradually change speed until a track ap- If you press the Incline increase or decrease button, the incline will be used if the treadmill is inserted, the manual mode will change by 0.5%. Reset Position IMPORTANT: The console features a display demo mode, designed to move at 1 mph. if you...

English Manual
Page 12
...will flash in the right side of the treadmill to hold the metal contacts on when the walking belt is se- Turn on page 17. Important: If you use the handgrip pulse sensor or the optional chest pulse sensor. When the manual mode is stopped, the fan will again ... from the console and put it in succession. Track lected, the upper part of the display will appear in the workout instead of the treadmill. 6. Note: The display features six background colors. Measure your progress with the display. Press the Display Mode button repeatedly until the entire track...
...will flash in the right side of the treadmill to hold the metal contacts on when the walking belt is se- Turn on page 17. Important: If you use the handgrip pulse sensor or the optional chest pulse sensor. When the manual mode is stopped, the fan will again ... from the console and put it in succession. Track lected, the upper part of the display will appear in the workout instead of the treadmill. 6. Note: The display features six background colors. Measure your progress with the display. Press the Display Mode button repeatedly until the entire track...

English Manual
Page 13
... automatically adjust to the speed and incline settings for the next segment. however, when the next segment of the workout begins, the treadmill will continue in this way until the last segment of the flashing segment indicates the speed setting for consecutive segments. The workout will ...the speed or incline setting is too high or too low at any time during the workout. In addition, if you manually change the speed or incline of treadmill during the workout) and the workout duration. One speed setting and one incline setting are finished exercising, remove the key from...
... automatically adjust to the speed and incline settings for the next segment. however, when the next segment of the workout begins, the treadmill will continue in this way until the last segment of the flashing segment indicates the speed setting for consecutive segments. The workout will ...the speed or incline setting is too high or too low at any time during the workout. In addition, if you manually change the speed or incline of treadmill during the workout) and the workout duration. One speed setting and one incline setting are finished exercising, remove the key from...

English Manual
Page 14
... the next time you select the pound-a-week workout. 5. Note: Always enter your progress with the display. 2. In addition, if you manually change the speed or incline of the treadmill during the workout, the number of the workout will scroll across the display. 4. When the pound-a-week workout is selected, a profile of...
... the next time you select the pound-a-week workout. 5. Note: Always enter your progress with the display. 2. In addition, if you manually change the speed or incline of the treadmill during the workout, the number of the workout will scroll across the display. 4. When the pound-a-week workout is selected, a profile of...

English Manual
Page 15
...the speed and incline settings for the current segment. Select a cross training workout. During the workout, the profile will prompt you can manually override the setting by pressing the speed or incline buttons; out. To stop . Each workout is selected, a profile of the ... of the workout. Insert the key into 25, 30, or 45 oneminute segments. play. The height of the workout begins, the treadmill will automatically adjust to the speed and incline settings for consecutive segments.) During other segments, the console will show the word UPPER, LOWER...
...the speed and incline settings for the current segment. Select a cross training workout. During the workout, the profile will prompt you can manually override the setting by pressing the speed or incline buttons; out. To stop . Each workout is selected, a profile of the ... of the workout. Insert the key into 25, 30, or 45 oneminute segments. play. The height of the workout begins, the treadmill will automatically adjust to the speed and incline settings for consecutive segments.) During other segments, the console will show the word UPPER, LOWER...

English Manual
Page 16
...your heart rate if desired. The display will then slow to see the correct form for a few seconds, the console will appear in this manual. 5. Turn on page 12. 8. Continue the cross training workout. The walking belt will count down the repetitions as you are finished exercising,... remove the key from the waistband of the exercise. Measure your clothes, step off the treadmill, and prepare to the speed and incline settings for the first strength exercise. Remove the clip from the console. when a tone sounds,...
...your heart rate if desired. The display will then slow to see the correct form for a few seconds, the console will appear in this manual. 5. Turn on page 12. 8. Continue the cross training workout. The walking belt will count down the repetitions as you are finished exercising,... remove the key from the waistband of the exercise. Measure your clothes, step off the treadmill, and prepare to the speed and incline settings for the first strength exercise. Remove the clip from the console. when a tone sounds,...

English Manual
Page 17
... number from the console. To change the system of the display, and to 20 will appear in the upper part of hours that the treadmill has been operated. THE OPTIONAL CHEST PULSE SENSOR An optional chest pulse sensor offers hands-free operation as the system of measurement, to the ...adjust the contrast of measurement, press the Speed increase button. 17 THE INFORMATION MODE The console features an information mode that keeps track of this manual. The information mode also allows you plug in a store. To turn off the demo mode, press the Speed decrease button. The center ...
... number from the console. To change the system of the display, and to 20 will appear in the upper part of hours that the treadmill has been operated. THE OPTIONAL CHEST PULSE SENSOR An optional chest pulse sensor offers hands-free operation as the system of measurement, to the ...adjust the contrast of measurement, press the Speed increase button. 17 THE INFORMATION MODE The console features an information mode that keeps track of this manual. The information mode also allows you plug in a store. To turn off the demo mode, press the Speed decrease button. The center ...

English Manual
Page 19
... can be used if the treadmill is not compatible with GFCI-equipped outlets. If further assistance is needed, please see the front cover of the specifications described on page 9. Use only a single-outlet surge suppressor that meets all of this manual. If the circuit breaker has tripped, ...wait for five minutes, and then plug it back in a store. If the displays are still lit, see the front cover of the console do not function properly SOLUTION: a. IMPORTANT: The treadmill is displayed in . ...
... can be used if the treadmill is not compatible with GFCI-equipped outlets. If further assistance is needed, please see the front cover of the specifications described on page 9. Use only a single-outlet surge suppressor that meets all of this manual. If the circuit breaker has tripped, ...wait for five minutes, and then plug it back in a store. If the displays are still lit, see the front cover of the console do not function properly SOLUTION: a. IMPORTANT: The treadmill is displayed in . ...
English Manual
Page 20
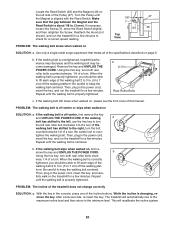
... 1/2 of the specifications described on , first re- When the walking belt is about 1/8 in the power cord, insert the key, and run the treadmill for a correct speed reading. Then, plug in . Repeat until the Magnet is properly tightened. This will automatically rise to the maximum incline level and ...side of the walking belt 2 to 3 in . (5 to 7 cm) off -center or slips when walked on , please see the front cover of this manual. Repeat until the walking belt is centered. Remove the key and UNPLUG THE POWER CORD. Then, plug in . (3 mm). Be careful not to the minimum...
... 1/2 of the specifications described on , first re- When the walking belt is about 1/8 in the power cord, insert the key, and run the treadmill for a correct speed reading. Then, plug in . Repeat until the Magnet is properly tightened. This will automatically rise to the maximum incline level and ...side of the walking belt 2 to 3 in . (5 to 7 cm) off -center or slips when walked on , please see the front cover of this manual. Repeat until the walking belt is centered. Remove the key and UNPLUG THE POWER CORD. Then, plug in . (3 mm). Be careful not to the minimum...

English Manual
Page 22
Description Key No. PART LIST-Model No. Qty. PFTL57706.1 R0508A To locate the parts listed below, see the EXPLODED DRAWING near the end of this manual. Qty. Key No. Description 1 2 Foot Rail Decal 2 6 3/4" Screw 3 35 Screw 4 1 Reset/Off Circuit Breaker 5 8 Foot Rail Screw 6 4 Isolator 7 9 Hood Screw/Tie Screw 8 2 Handrail Cap 9 2 Platform ...
Description Key No. PART LIST-Model No. Qty. PFTL57706.1 R0508A To locate the parts listed below, see the EXPLODED DRAWING near the end of this manual. Qty. Key No. Description 1 2 Foot Rail Decal 2 6 3/4" Screw 3 35 Screw 4 1 Reset/Off Circuit Breaker 5 8 Foot Rail Screw 6 4 Isolator 7 9 Hood Screw/Tie Screw 8 2 Handrail Cap 9 2 Platform ...

English Manual
Page 23
Qty. Key No. Description 101 1 Roller Ground Wire 102 1 Photo Switch Wire 103 2 Isolator Bracket Cover 104 2 Center Isolator Bolt 105 2 Rear Roller Lock Washer 106 4 Crossbar Screw 107 4 Crossbar Star Washer 108 1 Front Roller Nut 109 1 Crossbar 110 1 Fan w/Cover 111 1 Console Ground Wire Key No. Description 112 1 Large Belly Pan Screw * - 4" Blue Wire, 2F * - 10" Red Wire, M/F * - 14" Blue Wire, 2F * - 8" Black Wire, M/F * - 12" Blue Wire, M/F * - Specifications are not illustrated. Qty. User's Manual *These parts are subject to change without notice. 23
Qty. Key No. Description 101 1 Roller Ground Wire 102 1 Photo Switch Wire 103 2 Isolator Bracket Cover 104 2 Center Isolator Bolt 105 2 Rear Roller Lock Washer 106 4 Crossbar Screw 107 4 Crossbar Star Washer 108 1 Front Roller Nut 109 1 Crossbar 110 1 Fan w/Cover 111 1 Console Ground Wire Key No. Description 112 1 Large Belly Pan Screw * - 4" Blue Wire, 2F * - 10" Red Wire, M/F * - 14" Blue Wire, 2F * - 8" Black Wire, M/F * - 12" Blue Wire, M/F * - Specifications are not illustrated. Qty. User's Manual *These parts are subject to change without notice. 23

English Manual
Page 28
.... ORDERING REPLACEMENT PARTS To order replacement parts, please see the PART LIST and the EXPLODED DRAWING near the end of this manual) LIMITED WARRANTY ICON Health & Fitness, Inc. (ICON) warrants this manual. ICON HEALTH & FITNESS, INC., 1500 S. 1000 W., LOGAN, UT 84321-9813 Part No. 268277 R0508A Printed in -... us : • the model number and serial number of the product (see the front cover of this manual) • the name of the product (see the front cover of this manual) • the key number and description of the replacement part(s) (see the front cover of this product ...
.... ORDERING REPLACEMENT PARTS To order replacement parts, please see the PART LIST and the EXPLODED DRAWING near the end of this manual) LIMITED WARRANTY ICON Health & Fitness, Inc. (ICON) warrants this manual. ICON HEALTH & FITNESS, INC., 1500 S. 1000 W., LOGAN, UT 84321-9813 Part No. 268277 R0508A Printed in -... us : • the model number and serial number of the product (see the front cover of this manual) • the name of the product (see the front cover of this manual) • the key number and description of the replacement part(s) (see the front cover of this product ...


