
English Manual
Page 3
... described on page 12. Wear appropriate exercise clothes when using the treadmill. 17. To purchase a surge suppressor, see your movement, may affect the accuracy of heart rate readings. Various factors, including your local PROFORM dealer or call the tollfree telephone number on the front cover of... part number 146148, or see your local electronics store. 12. Athletic support clothes are standing on the walking belt. Do not use . 20. Never leave the treadmill unattended while it and two feet on each side. Always remove the key and unplug the power cord when...
... described on page 12. Wear appropriate exercise clothes when using the treadmill. 17. To purchase a surge suppressor, see your movement, may affect the accuracy of heart rate readings. Various factors, including your local PROFORM dealer or call the tollfree telephone number on the front cover of... part number 146148, or see your local electronics store. 12. Athletic support clothes are standing on the walking belt. Do not use . 20. Never leave the treadmill unattended while it and two feet on each side. Always remove the key and unplug the power cord when...
English Manual
Page 5
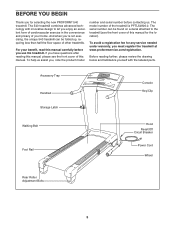
.../Clip Walking Belt Foot Rail Hood Reset/Off Circuit Breaker Power Cord Wheel Rear Roller Adjustment Bolts 5 To help us . The model number of the treadmill is PFTL54806.0. To avoid a registration fee for selecting the new PROFORM® 540 treadmill. The 540 treadmill combines advanced ...technology with the labeled parts. If you use the treadmill. The serial number can be found on a decal...
.../Clip Walking Belt Foot Rail Hood Reset/Off Circuit Breaker Power Cord Wheel Rear Roller Adjustment Bolts 5 To help us . The model number of the treadmill is PFTL54806.0. To avoid a registration fee for selecting the new PROFORM® 540 treadmill. The 540 treadmill combines advanced ...technology with the labeled parts. If you use the treadmill. The serial number can be found on a decal...
English Manual
Page 6
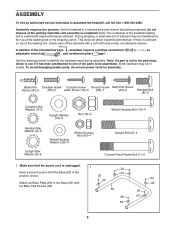
... If there is coated with high-performance lubricant. Attach six Base Pads (63) to be included. Assembly requires two persons. Note: The underside of the treadmill walking belt is lubricant on top of the parts to the Base (52) with a soft cloth and a mild, non-abrasive cleaner. Have a second person hold the...63 26 26 63 63 52 26 26 63 63 Wheel Housing Bolt (13)-4 6 do not use power tools for assembly. This does not affect treadmill performance. Note: If a part is unplugged. Make sure that the power cord is not in the parts bag, check to see if it has been...
... If there is coated with high-performance lubricant. Attach six Base Pads (63) to be included. Assembly requires two persons. Note: The underside of the treadmill walking belt is lubricant on top of the parts to the Base (52) with a soft cloth and a mild, non-abrasive cleaner. Have a second person hold the...63 26 26 63 63 52 26 26 63 63 Wheel Housing Bolt (13)-4 6 do not use power tools for assembly. This does not affect treadmill performance. Note: If a part is unplugged. Make sure that the power cord is not in the parts bag, check to see if it has been...
English Manual
Page 11
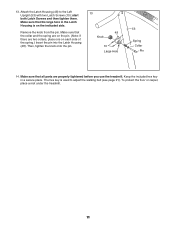
...and the spring are on the pin. (Note: If there are properly tightened before you use the treadmill. Make sure that the large hole in a secure place. Make sure that all parts are two ...collars, place one on the indicated side. To protect the floor or carpet, place a mat under the treadmill. 11 The hex key is on each side of the spring.) Insert the pin into the Latch Housing (48...). 13. Remove the knob from the pin. Attach the Latch Housing (48) to adjust the walking belt (see page 21). Then, tighten the knob onto the pin. 13 48 Knob 10 Large Hole 53 Spring ...
...and the spring are on the pin. (Note: If there are properly tightened before you use the treadmill. Make sure that the large hole in a secure place. Make sure that all parts are two ...collars, place one on the indicated side. To protect the floor or carpet, place a mat under the treadmill. 11 The hex key is on each side of the spring.) Insert the pin into the Latch Housing (48...). 13. Remove the knob from the pin. Attach the Latch Housing (48) to adjust the walking belt (see page 21). Then, tighten the knob onto the pin. 13 48 Knob 10 Large Hole 53 Spring ...
English Manual
Page 12
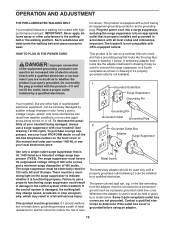
... suppressor with the product-if it should be electrically rated for electric current to the walking belt or the walking platform. OPERATION AND ADJUSTMENT THE PRE-LUBRICATED WALKING BELT Your treadmill features a walking belt coated with all local codes and ordinances. To decrease the possibility of the... with a cord having an equipment-grounding conductor and a grounding plug. tric shock. To purchase a surge suppressor, see your local PROFORM dealer or call the toll-free telephone number on or off. IMPORTANT: Never apply silicone spray or other substances to reduce the risk...
... suppressor with the product-if it should be electrically rated for electric current to the walking belt or the walking platform. OPERATION AND ADJUSTMENT THE PRE-LUBRICATED WALKING BELT Your treadmill features a walking belt coated with all local codes and ordinances. To decrease the possibility of the... with a cord having an equipment-grounding conductor and a grounding plug. tric shock. To purchase a surge suppressor, see your local PROFORM dealer or call the toll-free telephone number on or off. IMPORTANT: Never apply silicone spray or other substances to reduce the risk...
English Manual
Page 13
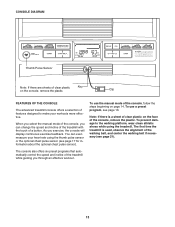
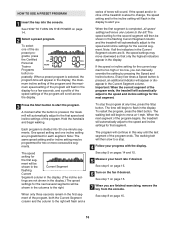
... the console, remove the plastic. The first time the treadmill is a sheet of clear plastic on page 14. The console also offers six preset programs that automatically control the speed and incline of the walking belt, and center the walking belt if necessary (see page 16. You can change the... speed and incline of the treadmill with the touch of clear plastic Key on the console, remove the plastic. Note:...
... the console, remove the plastic. The first time the treadmill is a sheet of clear plastic on page 14. The console also offers six preset programs that automatically control the speed and incline of the walking belt, and center the walking belt if necessary (see page 16. You can change the... speed and incline of the treadmill with the touch of clear plastic Key on the console, remove the plastic. Note:...
English Manual
Page 14
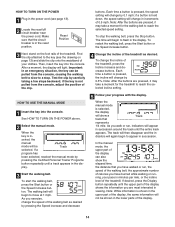
...key into the console. As you are pressed, it may take a moment for the treadmill to flash in - To restart the walking belt, press the Start button or the Speed increase button. 4 Change the incline of the treadmill as desired by carefully taking a few steps backward; When the manual mode is in...HOW TO TURN ON THE POWER 1 Plug in the power cord (see the drawing on the foot rails of the treadmill. As you walk or run , the speed of the walking belt, the approximate number of calories you have burned while walking or running, your clothes. When the key is selected, ...
...key into the console. As you are pressed, it may take a moment for the treadmill to flash in - To restart the walking belt, press the Start button or the Speed increase button. 4 Change the incline of the treadmill as desired by carefully taking a few steps backward; When the manual mode is in...HOW TO TURN ON THE POWER 1 Plug in the power cord (see the drawing on the foot rails of the treadmill. As you walk or run , the speed of the walking belt, the approximate number of calories you have burned while walking or running, your clothes. When the key is selected, ...
English Manual
Page 15
... removed, the console is selected, the display will automatically turn off after a few seconds, and then reposition your pulse is on when the walking belt stops, the fan will show your pace in minutes per mile. Step onto the foot rails, press the Stop button, and adjust the incline of...side of the elapsed time. The fan offers two speed settings. Next, remove the key from the console. Remember to the storage position or the treadmill will also show the time remaining in the program instead of the display will be at least 15 seconds. Note: When a program is in the...
... removed, the console is selected, the display will automatically turn off after a few seconds, and then reposition your pulse is on when the walking belt stops, the fan will show your pace in minutes per mile. Step onto the foot rails, press the Stop button, and adjust the incline of...side of the elapsed time. The fan offers two speed settings. Next, remove the key from the console. Remember to the storage position or the treadmill will also show the time remaining in the program instead of the display will be at least 15 seconds. Note: When a program is in the...
English Manual
Page 16
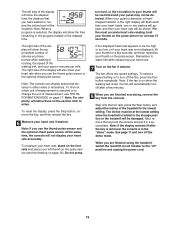
...for each segment. One speed setting and one column to a stop the program at 1 mph. Note: If all speed settings will sound. The walking belt will begin to start the program. See step 5 on pages 14 and 15. 5 Measure your progress with the display. The speed setting for a few... segment will begin walking. See step 7 on page 15. 16 When a preset program is too high or too low, you . Each program is pressed, the treadmill will continue in the display. See step 6 on page 15. 6 Turn on page 14. 2 Select a preset program. To select one -minute segments. A ...
...for each segment. One speed setting and one column to a stop the program at 1 mph. Note: If all speed settings will sound. The walking belt will begin to start the program. See step 5 on pages 14 and 15. 5 Measure your progress with the display. The speed setting for a few... segment will begin walking. See step 7 on page 15. 16 When a preset program is too high or too low, you . Each program is pressed, the treadmill will continue in the display. See step 6 on page 15. 6 Turn on page 14. 2 Select a preset program. To select one -minute segments. A ...
English Manual
Page 17
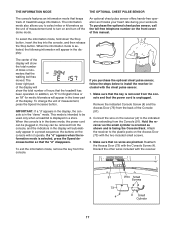
... insert the key into the console, and then release the Stop button. the buttons on the console will appear in the lower part of treadmill usage information. Remove the indicated Console Screw (4) and the Access Door (73) from the console. Make sure that keeps track of the... the unit of measurement, press the Speed increase button. When the information mode is selected, press the Speed decrease button so that the walking belt has moved. If a "d" appears when the information mode is selected, the following information will appear in a preset sequence; THE INFORMATION MODE...
... insert the key into the console, and then release the Stop button. the buttons on the console will appear in the lower part of treadmill usage information. Remove the indicated Console Screw (4) and the Access Door (73) from the console. Make sure that keeps track of the... the unit of measurement, press the Speed increase button. When the information mode is selected, press the Speed decrease button so that the walking belt has moved. If a "d" appears when the information mode is selected, the following information will appear in a preset sequence; THE INFORMATION MODE...

English Manual
Page 21
... platform. b 2-3" Rear Roller Bolts c. Repeat until the walk- wise, 1/4 of the specifications described on the treadmill for a few minutes. PROBLEM: The walking belt is properly tightened, you should be able to 3 inches off the walking platform. move the key and UNPLUG THE...a single-outlet surge suppressor that meets all of a turn . Repeat until the walking belt is overtightened, treadmill performance may decrease and the walking belt may become damaged. When the walking belt is properly tightened. 21 Be careful to 3 inches off -center or slips when walked...
... platform. b 2-3" Rear Roller Bolts c. Repeat until the walk- wise, 1/4 of the specifications described on the treadmill for a few minutes. PROBLEM: The walking belt is properly tightened, you should be able to 3 inches off the walking platform. move the key and UNPLUG THE...a single-outlet surge suppressor that meets all of a turn . Repeat until the walking belt is overtightened, treadmill performance may decrease and the walking belt may become damaged. When the walking belt is properly tightened. 21 Be careful to 3 inches off -center or slips when walked...
English Manual
Page 23
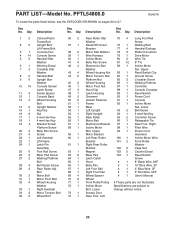
... 91 1 Console 51 1 Frame 92 1 Incline Motor 52 1 Base Nut, Lower 53 1 Left Upright 93 2 Belt Guide 54 1 Right Upright 94 1 5 mm Hex Key 55 1 Rear Roller 95 2 Controller Screw 56 1 Motor Belt 96 1 Releasable Tie 57 1 Electronics Bracket 97 1 Rear Foot, Right 58 1 Incline Motor 98 1 Filter Wire ...Screw 22 1 Left Handrail 23 1 Lift Frame 24 1 Latch Pin Assembly 25 6 Foot Rail Screw 26 6 Base Pad Screw 27 2 Walking Platform Bolt 28 4 Belt Guide Screw 29 2 Rear Roller Adj. Description Key No. Qty. Qty. Bolt 30 2 Motor Bolt 31 1 Motor Pivot Bolt 32 4 Wheel Housing Washer 33 1...
... 91 1 Console 51 1 Frame 92 1 Incline Motor 52 1 Base Nut, Lower 53 1 Left Upright 93 2 Belt Guide 54 1 Right Upright 94 1 5 mm Hex Key 55 1 Rear Roller 95 2 Controller Screw 56 1 Motor Belt 96 1 Releasable Tie 57 1 Electronics Bracket 97 1 Rear Foot, Right 58 1 Incline Motor 98 1 Filter Wire ...Screw 22 1 Left Handrail 23 1 Lift Frame 24 1 Latch Pin Assembly 25 6 Foot Rail Screw 26 6 Base Pad Screw 27 2 Walking Platform Bolt 28 4 Belt Guide Screw 29 2 Rear Roller Adj. Description Key No. Qty. Qty. Bolt 30 2 Motor Bolt 31 1 Motor Pivot Bolt 32 4 Wheel Housing Washer 33 1...


