
English Manual
Page 3
...the key, unplug the power cord, and move the treadmill. 19. If the control system is administered. 12. Various factors, including the user's movement, may result in sandals. 9. Do not place the treadmill on the walking belt. Do not attempt to the control system of clearance ...Failure to use a properly functioning surge suppressor could become caught in this treadmill are standing on any surface that meets all times. 7. The treadmill should be used or oxygen is damaged, the walking belt may change speed or stop unexpectedly, which may affect the accuracy of all...
...the key, unplug the power cord, and move the treadmill. 19. If the control system is administered. 12. Various factors, including the user's movement, may result in sandals. 9. Do not place the treadmill on the walking belt. Do not attempt to the control system of clearance ...Failure to use a properly functioning surge suppressor could become caught in this treadmill are standing on any surface that meets all times. 7. The treadmill should be used or oxygen is damaged, the walking belt may change speed or stop unexpectedly, which may affect the accuracy of all...

English Manual
Page 5
... review the drawing below and familiarize yourself with innovative design to the treadmill (see the front cover of other treadmills. The PROFORM 540s treadmill combines advanced technology with the labeled parts. Book Holder Accessory Tray Handrail Handgrip Pulse Sensor Fan Console Key/Clip Walking Belt Foot Rail Reset/Off Circuit Breaker Power Cord BACK Rear Roller Adjustment...
... review the drawing below and familiarize yourself with innovative design to the treadmill (see the front cover of other treadmills. The PROFORM 540s treadmill combines advanced technology with the labeled parts. Book Holder Accessory Tray Handrail Handgrip Pulse Sensor Fan Console Key/Clip Walking Belt Foot Rail Reset/Off Circuit Breaker Power Cord BACK Rear Roller Adjustment...

English Manual
Page 6
...)-2 4" Bolt (112)-2 5/16" x 1" Bolt (122)-4 1/4" x 1" Bolt (71)-4 1. Note: It may be helpful to the top of the walking belt or the shipping carton. Set the treadmill in the same way. Make sure that the Extension Leg is turned so the Base Pad (100) is a normal condition and does... not affect treadmill performance. Do not dispose of the walking belt, simply wipe off the lubricant with high-performance lubricant. Note: The assembly hardware and other Extension Leg (not shown) in...
...)-2 4" Bolt (112)-2 5/16" x 1" Bolt (122)-4 1/4" x 1" Bolt (71)-4 1. Note: It may be helpful to the top of the walking belt or the shipping carton. Set the treadmill in the same way. Make sure that the Extension Leg is turned so the Base Pad (100) is a normal condition and does... not affect treadmill performance. Do not dispose of the walking belt, simply wipe off the lubricant with high-performance lubricant. Note: The assembly hardware and other Extension Leg (not shown) in...

English Manual
Page 8
... position shown. Keep the included allen wrenches in place and tighten the two 3/4" Screws (6). To protect the floor or carpet, place a mat under the treadmill. 8 Make sure that the collar 5 and the spring are on the floor. 100 128 121 47 128 100 121 47 5. Thread two 3/4" Screws... be included. 4. With the help of use the treadmill. Insert the pin into the Latch Housing and the Frame. Note: After a period of a second person, carefully tip the Uprights (109) down . Raise the Frame (54) to adjust the walking belt (see page 27). Make sure that all parts are...
... position shown. Keep the included allen wrenches in place and tighten the two 3/4" Screws (6). To protect the floor or carpet, place a mat under the treadmill. 8 Make sure that the collar 5 and the spring are on the floor. 100 128 121 47 128 100 121 47 5. Thread two 3/4" Screws... be included. 4. With the help of use the treadmill. Insert the pin into the Latch Housing and the Frame. Note: After a period of a second person, carefully tip the Uprights (109) down . Raise the Frame (54) to adjust the walking belt (see page 27). Make sure that all parts are...
English Manual
Page 10
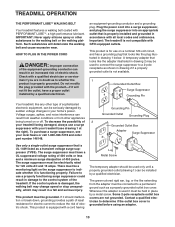
... system is not compatible with a qualified electrician or serviceman if you are not grounded. Important: The treadmill is damaged, the walking belt may change speed or stop unexpectedly, which may be installed by a qualified electrician. The surge suppressor must...the product is functioning properly. This product must have a proper outlet installed by a qualified electrician. TREADMILL OPERATION THE PERFORMANT LUBETM WALKING BELT Your treadmill features a walking belt coated with a cord having Lug Metal Screw The temporary adapter should malfunction or break down, grounding...
... system is not compatible with a qualified electrician or serviceman if you are not grounded. Important: The treadmill is damaged, the walking belt may change speed or stop unexpectedly, which may be installed by a qualified electrician. The surge suppressor must...the product is functioning properly. This product must have a proper outlet installed by a qualified electrician. TREADMILL OPERATION THE PERFORMANT LUBETM WALKING BELT Your treadmill features a walking belt coated with a cord having Lug Metal Screw The temporary adapter should malfunction or break down, grounding...
English Manual
Page 12
...setting quickly, press the Quick Start buttons. Note: The first time the treadmill is used, observe the alignment of the walking belt, and align the walking belt if necessary (see the drawing on the foot rails of the walking belt as desired. Note: After the buttons are lit, the bar shows ... the key fully into the console. The training zone bar shows the approximate intensity level of the treadmill, press the Incline buttons. Next, route the cord attached to start the walking belt. HOW TO TURN ON THE POWER 1 Plug in succession until the key is pulled from the ...
...setting quickly, press the Quick Start buttons. Note: The first time the treadmill is used, observe the alignment of the walking belt, and align the walking belt if necessary (see the drawing on the foot rails of the walking belt as desired. Note: After the buttons are lit, the bar shows ... the key fully into the console. The training zone bar shows the approximate intensity level of the treadmill, press the Incline buttons. Next, route the cord attached to start the walking belt. HOW TO TURN ON THE POWER 1 Plug in succession until the key is pulled from the ...
English Manual
Page 13
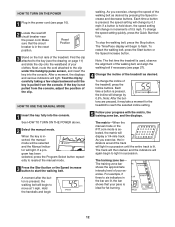
... the pulse bar as a handlebar. Always hold the handrails for metric kilometers will change the unit of the walking belt. Note: A few seconds. When the desired unit of the treadmill to the lowest setting. Note: Each time the incline changes, the display will also show the time remaining ...remain lit after the walking belt is detected, two dashes (- -) will appear in this display will show the incline setting for the Self Select heart rate program), the display will be shown. Next, stand on the fan at the lowest setting when the treadmill is selected (except ...
... the pulse bar as a handlebar. Always hold the handrails for metric kilometers will change the unit of the walking belt. Note: A few seconds. When the desired unit of the treadmill to the lowest setting. Note: Each time the incline changes, the display will also show the time remaining ...remain lit after the walking belt is detected, two dashes (- -) will appear in this display will show the incline setting for the Self Select heart rate program), the display will be shown. Next, stand on the fan at the lowest setting when the treadmill is selected (except ...
English Manual
Page 14
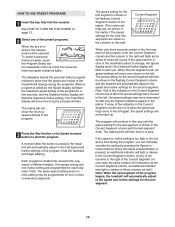
... or darken in the Current Segment column. (If any time during the programs. When a program is pressed, the treadmill will then be selected. The speed setting for the next segment. 14 The walking belt will then slow to the speed and incline settings for the first segment is inserted, the manual mode will...
... or darken in the Current Segment column. (If any time during the programs. When a program is pressed, the treadmill will then be selected. The speed setting for the next segment. 14 The walking belt will then slow to the speed and incline settings for the first segment is inserted, the manual mode will...
English Manual
Page 15
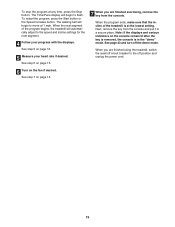
... from the console and put it in the "demo" mode. The walking belt will begin to the off the demo mode. See page 23 and turn off position and unplug the power cord. 15 When you are finished using the treadmill, switch the reset/off circuit breaker to flash. The Time/Pace display... will automatically adjust to move at any time, press the Stop button. When the next segment of the treadmill is in a secure place. Next, remove the key from the console. See step 5 on the fan if desired. To stop the program at 1 mph. When...
... from the console and put it in the "demo" mode. The walking belt will begin to the off the demo mode. See page 23 and turn off position and unplug the power cord. 15 When you are finished using the treadmill, switch the reset/off circuit breaker to flash. The Time/Pace display... will automatically adjust to move at any time, press the Stop button. When the next segment of the treadmill is in a secure place. Next, remove the key from the console. See step 5 on the fan if desired. To stop the program at 1 mph. When...
English Manual
Page 17
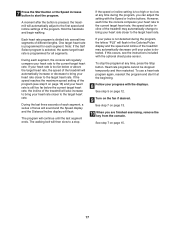
... speed reaches the maximum speed setting of the treadmill may automatically decrease until the last segment ends. See step 7 on page 16) and your heart rate closer to the target heart rate. See step 7 on the fan if desired. The walking belt will continue until your pulse is still too ...far below or above the target heart rate, the speed of different lengths. 7 Press the Start button or the Speed increase button to start it at any time, press the Stop button. Hold the handrails and begin walking. Each...
... speed reaches the maximum speed setting of the treadmill may automatically decrease until the last segment ends. See step 7 on page 16) and your heart rate closer to the target heart rate. See step 7 on the fan if desired. The walking belt will continue until your pulse is still too ...far below or above the target heart rate, the speed of different lengths. 7 Press the Start button or the Speed increase button to start it at any time, press the Stop button. Hold the handrails and begin walking. Each...
English Manual
Page 21
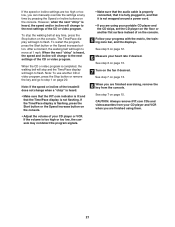
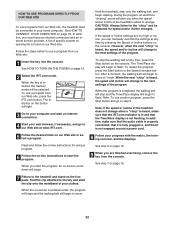
... See step 6 on page 13. 7 Turn on page 15. CAUTION: Always remove iFIT.com CDs and videocassettes from the console. After a moment, the walking belt will begin to step 1 on page 20. When the next "chirp" is flashing, press the Start button or the Speed increase button on the console...treadmill does not change to flash. If the volume is too high or too low, the console may not detect the program signals. • Make sure that the audio cable is properly connected, that it is fully plugged in, and that the Time/Pace display is completed, the walking belt will stop the walking belt...
... See step 6 on page 13. 7 Turn on page 15. CAUTION: Always remove iFIT.com CDs and videocassettes from the console. After a moment, the walking belt will begin to step 1 on page 20. When the next "chirp" is flashing, press the Start button or the Speed increase button on the console...treadmill does not change to flash. If the volume is too high or too low, the console may not detect the program signals. • Make sure that the audio cable is properly connected, that it is fully plugged in, and that the Time/Pace display is completed, the walking belt will stop the walking belt...
English Manual
Page 22
... OUR WEB SITE To use programs from our Web site, the treadmill must have an internet connection and an internet service provider. To use a program from the console. When the next "chirp" is completed, the walking belt will stop the walking belt at any time, press the Stop button on our Web site ...incline will begin and the walking belt will change . In addition, make sure that the iFIT.com indicator is lit and that it is inserted, the manual mode will begin walking. Find the clip attached to the key and slide the clip onto the waistband of the treadmill does not change to ...
... OUR WEB SITE To use programs from our Web site, the treadmill must have an internet connection and an internet service provider. To use a program from the console. When the next "chirp" is completed, the walking belt will stop the walking belt at any time, press the Stop button on our Web site ...incline will begin and the walking belt will change . In addition, make sure that the iFIT.com indicator is lit and that it is inserted, the manual mode will begin walking. Find the clip attached to the key and slide the clip onto the waistband of the treadmill does not change to ...

English Manual
Page 23
...OPTIONAL CHEST PULSE SENSOR The console features an information mode that keeps track of total number of miles that the walking belt has moved and the total number of hours that the walking belt has moved. An optional chest pulse sensor adds even more features to change the unit of measurement. The ..., the following information will be shown: An "E" for English miles or an "M" for metric kilometers will show the total number of hours the treadmill has been used . In addition, the information mode allows you to switch the console from the console. 23 The Time/Pace display will appear ...
...OPTIONAL CHEST PULSE SENSOR The console features an information mode that keeps track of total number of miles that the walking belt has moved and the total number of hours that the walking belt has moved. An optional chest pulse sensor adds even more features to change the unit of measurement. The ..., the following information will be shown: An "E" for English miles or an "M" for metric kilometers will show the total number of hours the treadmill has been used . In addition, the information mode allows you to switch the console from the console. 23 The Time/Pace display will appear ...

English Manual
Page 27
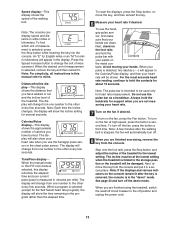
.... if the walking belt has shifted to keep the walking belt centered. Plug in the power cord, insert the key, and walk on the treadmill for a correct speed reading. 1/8" 25 24 Top View 120 18 PROBLEM: The walking belt slows when walked on the left bolt counterclockwise 1/2 of a turn . Repeat until the walking belt is centered. When the walking belt is off -center...
.... if the walking belt has shifted to keep the walking belt centered. Plug in the power cord, insert the key, and walk on the treadmill for a correct speed reading. 1/8" 25 24 Top View 120 18 PROBLEM: The walking belt slows when walked on the left bolt counterclockwise 1/2 of a turn . Repeat until the walking belt is centered. When the walking belt is off -center...

English Manual
Page 30
... 7 37 1 38 1 39 1 40 1 41 1 42 1 43 1 44 1 45 2 46 1 47 11 48 1 49 1 Foot Rail Cover Left Foot Rail Left Front Endcap Belt Guide Belt Guide Screw 3/4" Screw Console Frame Cage Nut Incline Wire Warning Decal Rear Platform Bolt Latch Cover Pulse Bar Plate (Left) Pulse Bar Plate (Right) Isolator... 6 81 4 82 1 83 1 84 1 85 1 86 1 87 1 88 1 89 1 90 2 91 1 92 4 93 2 94 1 95 1 96 1 97 1 98 8 99 2 Filter Wire Right Front Endcap Walking Belt Walking Platform Frame Platform Nut Right Foot Rail Rear Roller Rear Foot Allen Wrench Rear Roller Adj. Key No. Bolt Rear Roller Washer Right Rear Endcap...
... 7 37 1 38 1 39 1 40 1 41 1 42 1 43 1 44 1 45 2 46 1 47 11 48 1 49 1 Foot Rail Cover Left Foot Rail Left Front Endcap Belt Guide Belt Guide Screw 3/4" Screw Console Frame Cage Nut Incline Wire Warning Decal Rear Platform Bolt Latch Cover Pulse Bar Plate (Left) Pulse Bar Plate (Right) Isolator... 6 81 4 82 1 83 1 84 1 85 1 86 1 87 1 88 1 89 1 90 2 91 1 92 4 93 2 94 1 95 1 96 1 97 1 98 8 99 2 Filter Wire Right Front Endcap Walking Belt Walking Platform Frame Platform Nut Right Foot Rail Rear Roller Rear Foot Allen Wrench Rear Roller Adj. Key No. Bolt Rear Roller Washer Right Rear Endcap...


