
Uk Manual
Page 1
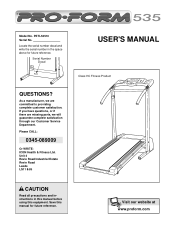
... Leeds LS11 8JG USER'S MANUAL Class HC Fitness Product CAUTION Read all precautions and instructions in the space above for future reference. Visit our website at www.proform.com Serial Number Decal QUESTIONS? If you have questions, or if there are committed to providing complete customer satisfaction. Please CALL: 0345-089009 Or WRITE: ICON Health & Fitness Ltd. Model No. PETL53510 Serial No. As...
... Leeds LS11 8JG USER'S MANUAL Class HC Fitness Product CAUTION Read all precautions and instructions in the space above for future reference. Visit our website at www.proform.com Serial Number Decal QUESTIONS? If you have questions, or if there are committed to providing complete customer satisfaction. Please CALL: 0345-089009 Or WRITE: ICON Health & Fitness Ltd. Model No. PETL53510 Serial No. As...
Uk Manual
Page 2
... TO ORDER REPLACEMENT PARTS Back Cover Note: An EXPLODED DRAWING and a PART LIST are attached in a garage or covered patio, or near water. 11. Wear appropriate exercise clothing when using the treadmill. Do not wear loose clothing that is turned off. Never use only a 3conductor, 1mm2 (14 gauge) cord that could become caught in sandals. 10. When connecting the power cord (see page 7), plug the power cord into an...
... TO ORDER REPLACEMENT PARTS Back Cover Note: An EXPLODED DRAWING and a PART LIST are attached in a garage or covered patio, or near water. 11. Wear appropriate exercise clothing when using the treadmill. Do not wear loose clothing that is turned off. Never use only a 3conductor, 1mm2 (14 gauge) cord that could become caught in sandals. 10. When connecting the power cord (see page 7), plug the power cord into an...
Uk Manual
Page 3
... heart rate trends in -home use . 19. Inspect and tighten all instructions before performing the maintenance and adjustment procedures de- Never remove the motor hood unless instructed to avoid sudden jumps in any opening. vice representative only. 18. This treadmill is shown at 38% of this treadmill in speed. 16. The treadmill is not in this product. The pulse sensor is fully closed. 20. Always remove the key and unplug the power cord...
... heart rate trends in -home use . 19. Inspect and tighten all instructions before performing the maintenance and adjustment procedures de- Never remove the motor hood unless instructed to avoid sudden jumps in any opening. vice representative only. 18. This treadmill is shown at 38% of this treadmill in speed. 16. The treadmill is not in this product. The pulse sensor is fully closed. 20. Always remove the key and unplug the power cord...
Uk Manual
Page 4
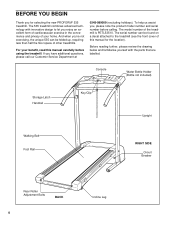
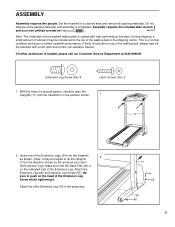
... to the treadmill (see the front cover of your benefit, read this manual for selecting the new PROFORM® 535 treadmill. The model number of other treadmills. BEFORE YOU BEGIN Thank you for the location). Console Water Bottle Holder (Bottle not included) Storage Latch Handrail Key/Clip Upright Walking Belt Foot Rail RIGHT SIDE Circuit Breaker Rear Roller Adjustment Bolts BACK 4 Incline Leg And when you're not exercising, the unique 535 can be folded up...
... to the treadmill (see the front cover of your benefit, read this manual for selecting the new PROFORM® 535 treadmill. The model number of other treadmills. BEFORE YOU BEGIN Thank you for the location). Console Water Bottle Holder (Bottle not included) Storage Latch Handrail Key/Clip Upright Walking Belt Foot Rail RIGHT SIDE Circuit Breaker Rear Roller Adjustment Bolts BACK 4 Incline Leg And when you're not exercising, the unique 535 can be folded up...
Uk Manual
Page 5
.... Extension Leg Screw (53)-4 Latch Screw (35)-2 1. Do not dispose of the walking belt, simply wipe off the lubricant with a soft cloth and a mild, non-abrasive cleaner. With the help of the Extension Leg Screw whilst tightening it. ASSEMBLY Assembly requires two people. If there is on the head of a second person, carefully raise the Uprights (11) until assembly is in the direction shown by...
.... Extension Leg Screw (53)-4 Latch Screw (35)-2 1. Do not dispose of the walking belt, simply wipe off the lubricant with a soft cloth and a mild, non-abrasive cleaner. With the help of the Extension Leg Screw whilst tightening it. ASSEMBLY Assembly requires two people. If there is on the head of a second person, carefully raise the Uprights (11) until assembly is in the direction shown by...
Uk Manual
Page 6
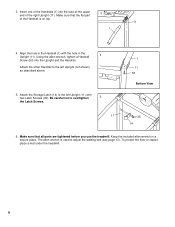
... Storage Latch (14) to adjust the walking belt (see page 13). Be careful not to the left Upright (11) with the hole in a secure place. To protect the floor or carpet, place a mat under the treadmill. 6 Attach the other Handrail to overtighten 5 the Latch Screws. 1 11 53 Bottom View 11 35 14 6. Make sure that all parts are tightened before you use the treadmill. Using...
... Storage Latch (14) to adjust the walking belt (see page 13). Be careful not to the left Upright (11) with the hole in a secure place. To protect the floor or carpet, place a mat under the treadmill. 6 Attach the other Handrail to overtighten 5 the Latch Screws. 1 11 53 Bottom View 11 35 14 6. Make sure that all parts are tightened before you use the treadmill. Using...
Uk Manual
Page 7
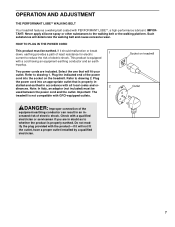
...-performance lubricant. Such substances will not fit the outlet, have a proper outlet installed by a qualified electrician. 7 Select the one that is properly earthed. If it will deteriorate the walking belt and cause excessive wear. Note: In Italy, an adaptor (not included) must be used between the power cord and the outlet. OPERATION AND ADJUSTMENT THE PERFORMANT LUBETM WALKING BELT Your treadmill features a walking belt...
...-performance lubricant. Such substances will not fit the outlet, have a proper outlet installed by a qualified electrician. 7 Select the one that is properly earthed. If it will deteriorate the walking belt and cause excessive wear. Note: In Italy, an adaptor (not included) must be used between the power cord and the outlet. OPERATION AND ADJUSTMENT THE PERFORMANT LUBETM WALKING BELT Your treadmill features a walking belt...
Uk Manual
Page 8
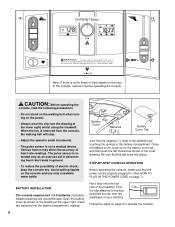
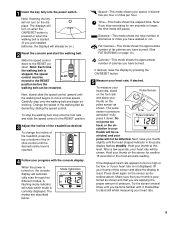
... the console. When the key is removed from the console, the walking belt will stop. • Adjust the speed in small increments. • The pulse sensor is intended only as shown in the drawing at the lower right) whilst using the treadmill. Alkaline batteries are touching the springs in general. • To reduce the possibility of the batteries are recommended. Open the battery cover as an exercise aid in determining heart rate...
... the console. When the key is removed from the console, the walking belt will stop. • Adjust the speed in small increments. • The pulse sensor is intended only as shown in the drawing at the lower right) whilst using the treadmill. Alkaline batteries are touching the springs in general. • To reduce the possibility of the batteries are recommended. Open the battery cover as an exercise aid in determining heart rate...
Uk Manual
Page 9
... treadmill, press the top or bottom of fat calories you stop the walking belt, step onto the foot rails and slide the speed control to move at this level. Try the sensor several times until the desired incline level is positioned as desired. 1 Insert the key fully into the power switch. Slide the speed control down again on , the console display will show which mode is pressure activated-fully Pulse...
... treadmill, press the top or bottom of fat calories you stop the walking belt, step onto the foot rails and slide the speed control to move at this level. Try the sensor several times until the desired incline level is positioned as desired. 1 Insert the key fully into the power switch. Slide the speed control down again on , the console display will show which mode is pressure activated-fully Pulse...
Uk Manual
Page 10
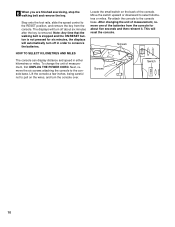
... miles. Step onto the foot rails, slide the speed control to conserve the batteries. Locate the small switch on the wires, and turn the console over. This will automatically turn off about six minutes after the key is not pressed for about five seconds and then reinsert it. 6 When you are finished exercising, stop the walking belt and remove the key. The displays will turn off in either kilometres or miles. After changing...
... miles. Step onto the foot rails, slide the speed control to conserve the batteries. Locate the small switch on the wires, and turn the console over. This will automatically turn off about six minutes after the key is not pressed for about five seconds and then reinsert it. 6 When you are finished exercising, stop the walking belt and remove the key. The displays will turn off in either kilometres or miles. After changing...
Uk Manual
Page 11
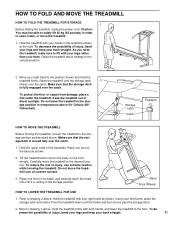
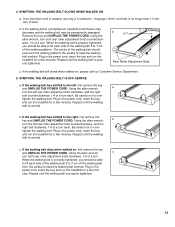
... until the frame and foot rail are past the storage latch. 2. Base Front Wheels HOW TO LOWER THE TREADMILL FOR USE 1. Using your back. Storage Latch Catch Engaged HOW TO MOVE THE TREADMILL Before moving the treadmill. HOW TO FOLD AND MOVE THE TREADMILL HOW TO FOLD THE TREADMILL FOR STORAGE 1 Before folding the treadmill, unplug the power cord. Caution: You must be able to safely lift 20 kg (45 pounds) in...
... until the frame and foot rail are past the storage latch. 2. Base Front Wheels HOW TO LOWER THE TREADMILL FOR USE 1. Using your back. Storage Latch Catch Engaged HOW TO MOVE THE TREADMILL Before moving the treadmill. HOW TO FOLD AND MOVE THE TREADMILL HOW TO FOLD THE TREADMILL FOR STORAGE 1 Before folding the treadmill, unplug the power cord. Caution: You must be able to safely lift 20 kg (45 pounds) in...
Uk Manual
Page 12
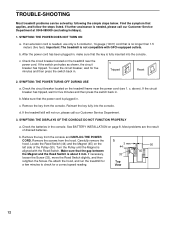
...-gauge (1mm2) cord that is needed, please call our Customer Service Department. 3. Important: The treadmill is not compatible with the Reed Switch. Check the circuit breaker located on the left side of drained batteries. above). Check the batteries in . See BATTERY INSTALLATION on the treadmill near the power cord (see 1. Remove the screws from the console and UNPLUG THE POWER CORD. If necessary, loosen the Screw (33), move the Reed Switch slightly, and...
...-gauge (1mm2) cord that is needed, please call our Customer Service Department. 3. Important: The treadmill is not compatible with the Reed Switch. Check the circuit breaker located on the left side of drained batteries. above). Check the batteries in . See BATTERY INSTALLATION on the treadmill near the power cord (see 1. Remove the screws from the console and UNPLUG THE POWER CORD. If necessary, loosen the Screw (33), move the Reed Switch slightly, and...
Uk Manual
Page 13
... wrench, turn both rear roller adjustment bolts clockwise, 1/4 of a turn each side of the walking belt should be permanently damaged. If the walking belt has shifted to over - Repeat until the walking belt is correctly tightened, you should just touch the walking platform. When the walking belt is properly tightened. If the walking belt slips when walked on , please call our Customer Service Department. 5. Plug in the power cord, insert the key and run the treadmill for...
... wrench, turn both rear roller adjustment bolts clockwise, 1/4 of a turn each side of the walking belt should be permanently damaged. If the walking belt has shifted to over - Repeat until the walking belt is correctly tightened, you should just touch the walking platform. When the walking belt is properly tightened. If the walking belt slips when walked on , please call our Customer Service Department. 5. Plug in the power cord, insert the key and run the treadmill for...
Uk Manual
Page 14
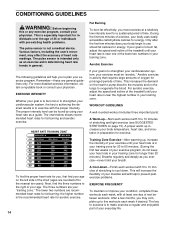
... to make exercise a regular and enjoyable part of exercise, your body begin to exercise with pre-existing health problems. The pulse sensor is to burn fat or to strengthen your heart rate as a guide. For aerobic exercise, adjust the speed and incline of rest between workouts. The three numbers are your everyday life. 14 the higher number is near the highest number in general. After a few minutes does your body uses easily...
... to make exercise a regular and enjoyable part of exercise, your body begin to exercise with pre-existing health problems. The pulse sensor is to burn fat or to strengthen your heart rate as a guide. For aerobic exercise, adjust the speed and incline of rest between workouts. The three numbers are your everyday life. 14 the higher number is near the highest number in general. After a few minutes does your body uses easily...
Uk Manual
Page 15
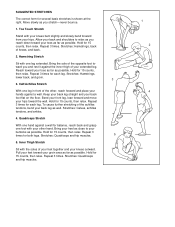
...Toe Touch Stretch Stand with one hand against a wall for both legs. Repeat 3 times. Hold for 15 counts, then relax. Stretches: Hamstrings, lower back, and groin. 3 3. Hold for 15 counts, then relax. Quadriceps Stretch With one leg extended. Stretches: Quadriceps and hip muscles. 1 2 4 Hold ...form for each leg. Keep your back leg straight and your hips toward the wall. Repeat 3 times for balance, reach back and grasp one leg in front of the opposite foot toward your back leg as you and rest it against a wall. Bend your front leg, lean forward and move...
...Toe Touch Stretch Stand with one hand against a wall for both legs. Repeat 3 times. Hold for 15 counts, then relax. Stretches: Hamstrings, lower back, and groin. 3 3. Hold for 15 counts, then relax. Quadriceps Stretch With one leg extended. Stretches: Quadriceps and hip muscles. 1 2 4 Hold ...form for each leg. Keep your back leg straight and your hips toward the wall. Repeat 3 times for balance, reach back and grasp one leg in front of the opposite foot toward your back leg as you and rest it against a wall. Bend your front leg, lean forward and move...
Uk Manual
Page 16
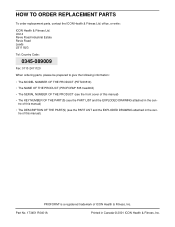
... MODEL NUMBER OF THE PRODUCT (PETL53510) • The NAME OF THE PRODUCT (PROFORM® 535 treadmill) • The SERIAL NUMBER OF THE PRODUCT (see the front cover of this manual) • The KEY NUMBER OF THE PART(S) (see the PART LIST and the EXPLODED DRAWING attached in the centre of ICON Health & Fitness, Inc. PROFORM® is a registered trademark of this manual) • The DESCRIPTION OF THE PART(S) (see the PART LIST and...
... MODEL NUMBER OF THE PRODUCT (PETL53510) • The NAME OF THE PRODUCT (PROFORM® 535 treadmill) • The SERIAL NUMBER OF THE PRODUCT (see the front cover of this manual) • The KEY NUMBER OF THE PART(S) (see the PART LIST and the EXPLODED DRAWING attached in the centre of ICON Health & Fitness, Inc. PROFORM® is a registered trademark of this manual) • The DESCRIPTION OF THE PART(S) (see the PART LIST and...
Uk Manual
Page 17
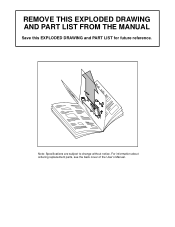
For information about ordering replacement parts, see the back cover of the User's Manual. 34 REMOVE THIS EXPLODED DRAWING AND PART LIST FROM THE MANUAL Save this EXPLODED DRAWING and PART LIST for future reference. Note: Specifications are subject to change without notice.
For information about ordering replacement parts, see the back cover of the User's Manual. 34 REMOVE THIS EXPLODED DRAWING AND PART LIST FROM THE MANUAL Save this EXPLODED DRAWING and PART LIST for future reference. Note: Specifications are subject to change without notice.

Uk Manual
Page 18
... Screw Battery Cover Foot Rail Lift Motor Nylon Washer Speed Potentiometer Speed Control Knob Console Assembly Upright Motor Belt Small Screw Storage Latch Power Cord Kit 8" Cable Tie Motor Swivel Nut Pulley/Flywheel/Fan Motor Motor/Pulley/Flywheel/Fan Wire Harness Short Hood Screw Motor Hood Hood Shield Belly Pan Screw Controller Motor Swivel Bolt Motor Tension Nut Motor Tension Star Washer Motor Tension Washer Motor Tension Bolt Incline Stop Bracket Clip Screw Extension Leg Latch Screw Wheel Bolt Wheel 5/6 Nylon Locknut Washer Base Pad Handrail Endcap Latch Catch Reed Switch Clip Reed Switch...
... Screw Battery Cover Foot Rail Lift Motor Nylon Washer Speed Potentiometer Speed Control Knob Console Assembly Upright Motor Belt Small Screw Storage Latch Power Cord Kit 8" Cable Tie Motor Swivel Nut Pulley/Flywheel/Fan Motor Motor/Pulley/Flywheel/Fan Wire Harness Short Hood Screw Motor Hood Hood Shield Belly Pan Screw Controller Motor Swivel Bolt Motor Tension Nut Motor Tension Star Washer Motor Tension Washer Motor Tension Bolt Incline Stop Bracket Clip Screw Extension Leg Latch Screw Wheel Bolt Wheel 5/6 Nylon Locknut Washer Base Pad Handrail Endcap Latch Catch Reed Switch Clip Reed Switch...

