
English Manual
Page 3
... cord (see HOW TO TURN ON THE POWER on page 12. To purchase a surge suppressor, see your local PROFORM dealer or call the toll-free telephone number on the walking belt. Do not operate the treadmill where aerosol products are standing on the front cover of heart rate readings. Always wear athletic shoes. Keep...
... cord (see HOW TO TURN ON THE POWER on page 12. To purchase a surge suppressor, see your local PROFORM dealer or call the toll-free telephone number on the walking belt. Do not operate the treadmill where aerosol products are standing on the front cover of heart rate readings. Always wear athletic shoes. Keep...
English Manual
Page 5
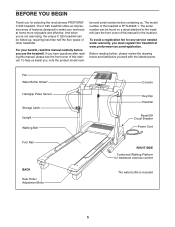
...Walking Belt Console Key/Clip Handrail Reset/Off Circuit Breaker Power Cord Foot Rail BACK Rear Roller Adjustment Bolts RIGHT SIDE Cushioned Walking Platform for the location). If you have questions after reading this manual, please see the front cover of other treadmills. The C 525 treadmill... under warranty, you must register the treadmill at home more enjoyable and effective. To avoid a registration fee for selecting the revolutionary PROFORM® C 525 treadmill. The serial number can be found on a decal attached to the treadmill (see the front cover of features ...
...Walking Belt Console Key/Clip Handrail Reset/Off Circuit Breaker Power Cord Foot Rail BACK Rear Roller Adjustment Bolts RIGHT SIDE Cushioned Walking Platform for the location). If you have questions after reading this manual, please see the front cover of other treadmills. The C 525 treadmill... under warranty, you must register the treadmill at home more enjoyable and effective. To avoid a registration fee for selecting the revolutionary PROFORM® C 525 treadmill. The serial number can be found on a decal attached to the treadmill (see the front cover of features ...
English Manual
Page 6
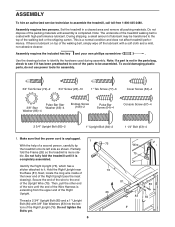
... has a sticker attached to the top of the walking belt or the shipping carton. This is more stable. Secure the end of the wire to assemble the treadmill, cWallhteoelll-Nfruete(312-8)0-02-445-2480. Note: The underside of the treadmill wHaalknindgrabileBltoilst (64)-4 coated with 3/8" Star Washers (83...) into the bottom of the Right Upright (76). Make sure that the power cord is lubricant on top of the walking belt, simply wipe off the lubricant with a soft cloth...
... has a sticker attached to the top of the walking belt or the shipping carton. This is more stable. Secure the end of the wire to assemble the treadmill, cWallhteoelll-Nfruete(312-8)0-02-445-2480. Note: The underside of the treadmill wHaalknindgrabileBltoilst (64)-4 coated with 3/8" Star Washers (83...) into the bottom of the Right Upright (76). Make sure that the power cord is lubricant on top of the walking belt, simply wipe off the lubricant with a soft cloth...
English Manual
Page 11
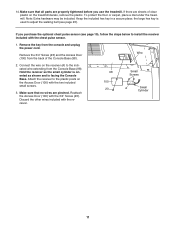
... the wire on the receiver (A) to adjust the walking belt (see page 19), follow the steps below to the plastic posts on the treadmill decals, remove the plastic. Reattach the Access Door (100) with the chest pulse sensor. 1. 14. the large hex key is facing the Console Base.... Note: Extra hardware may be included. To protect the floor or carpet, place a mat under the treadmill. Attach the receiver to install the receiver included with the 3/4" Screw (23). Make sure that all parts are properly tightened before you purchase the ...
... the wire on the receiver (A) to adjust the walking belt (see page 19), follow the steps below to the plastic posts on the treadmill decals, remove the plastic. Reattach the Access Door (100) with the chest pulse sensor. 1. 14. the large hex key is facing the Console Base.... Note: Extra hardware may be included. To protect the floor or carpet, place a mat under the treadmill. Attach the receiver to install the receiver included with the 3/4" Screw (23). Make sure that all parts are properly tightened before you purchase the ...
English Manual
Page 12
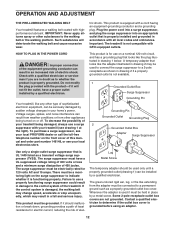
...walking belt coated with GFCI-equipped outlets. HOW TO PLUG IN THE POWER CORD DANGER: Improper connection of the equipment-grounding conductor can result in an increased risk of sophisticated electronic equipment, can be installed by a metal screw. This product is for use a properly functioning surge suppressor could result in your local PROFORM...being damaged, always use a surge suppressor with your treadmill (see your local electronics store. If the control system is UL 1449 listed as to the walking belt or the walking platform. Check with the product-if it is ...
...walking belt coated with GFCI-equipped outlets. HOW TO PLUG IN THE POWER CORD DANGER: Improper connection of the equipment-grounding conductor can result in an increased risk of sophisticated electronic equipment, can be installed by a metal screw. This product is for use a properly functioning surge suppressor could result in your local PROFORM...being damaged, always use a surge suppressor with your treadmill (see your local electronics store. If the control system is UL 1449 listed as to the walking belt or the walking platform. Check with the product-if it is ...
English Manual
Page 14
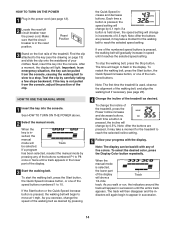
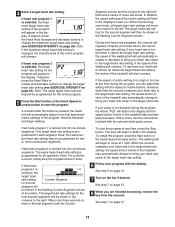
...increase button, or one of the numbered speed buttons is used, observe the alignment of the walking belt, and align the walking belt if necessary (see page 23). 4 Change the incline of the treadmill as desired by pressing the Quick Speed increase and decrease buttons. If one of the speed buttons... numbered 1 to P8 once or twice until the entire track appears. Note: The first time the treadmill is pressed, the walking belt will change by pressing any of five colors. Each time a button is held down, the speed setting will show a 1/4-mile track...
...increase button, or one of the numbered speed buttons is used, observe the alignment of the walking belt, and align the walking belt if necessary (see page 23). 4 Change the incline of the treadmill as desired by pressing the Quick Speed increase and decrease buttons. If one of the speed buttons... numbered 1 to P8 once or twice until the entire track appears. Note: The first time the treadmill is pressed, the walking belt will change by pressing any of five colors. Each time a button is held down, the speed setting will show a 1/4-mile track...
English Manual
Page 15
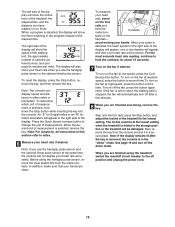
... this section refer to miles. 6 Measure your hands are clean. Before using the treadmill, switch the reset/off circuit breaker to hold the contacts for metric kilometers will show the speed of the walking belt, the approximate number of measurement is selected, the display will automatically turn off the... display speed and distance in the "demo" mode. An "E" for English miles or an "M" for about 15 seconds. 7 Turn on when the walking belt is detected, the heart symbol in a secure place. In addition, make sure that your heart rate if desired. When your pulse is stopped, the...
... this section refer to miles. 6 Measure your hands are clean. Before using the treadmill, switch the reset/off circuit breaker to hold the contacts for metric kilometers will show the speed of the walking belt, the approximate number of measurement is selected, the display will automatically turn off the... display speed and distance in the "demo" mode. An "E" for English miles or an "M" for about 15 seconds. 7 Turn on when the walking belt is detected, the heart symbol in a secure place. In addition, make sure that your heart rate if desired. When your pulse is stopped, the...
English Manual
Page 16
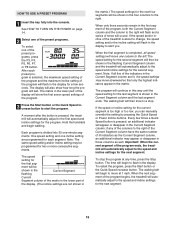
...Important: When the current segment of the program. 3 Press the Start button or the Quick Speed increase button to the right. The walking belt will last. When only three seconds remain in the display for the second segment will flash in those columns as the Current Segment column...segment. 16 if any time, press the Stop button. The speed setting for a few times a Quick Speed button is pressed, the treadmill will begin walking. Every few seconds. The time will automatically adjust to the speed and incline settings for the program. HOW TO USE A PRESET PROGRAM 1...
...Important: When the current segment of the program. 3 Press the Start button or the Quick Speed increase button to the right. The walking belt will last. When only three seconds remain in the display for the second segment will flash in those columns as the Current Segment column...segment. 16 if any time, press the Stop button. The speed setting for a few times a Quick Speed button is pressed, the treadmill will begin walking. Every few seconds. The time will automatically adjust to the speed and incline settings for the program. HOW TO USE A PRESET PROGRAM 1...
English Manual
Page 18
...will regularly compare your heart rate closer to the left. To restart the program, press the Start button or the Quick Speed increase button. The walking belt will sound. 4 Enter a target heart rate setting. Heart rate program 2 is divided into 40 one column to the target heart rate. ... rate setting. If your pulse is too far below the target heart rate setting, the incline of the treadmill will flash in the flashing Current Segment column of the walking belt reaches 7.5 mph and your heart rate is not detected during the program, you can adjust the setting with...
...will regularly compare your heart rate closer to the left. To restart the program, press the Start button or the Quick Speed increase button. The walking belt will sound. 4 Enter a target heart rate setting. Heart rate program 2 is divided into 40 one column to the target heart rate. ... rate setting. If your pulse is too far below the target heart rate setting, the incline of the treadmill will flash in the flashing Current Segment column of the walking belt reaches 7.5 mph and your heart rate is not detected during the program, you can adjust the setting with...
English Manual
Page 19
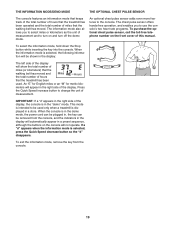
... decrease button so the "d" disappears. meters will show the total number of miles (or kilometers) that the walking belt has moved and the total number of hours Miles Hours that the walking belt has moved. When the console is in the demo mode, the power cord can be plugged in, the ...key can be used . THE INFORMATION MODE/DEMO MODE THE OPTIONAL CHEST PULSE SENSOR The console features an information mode that keeps track of the total number of hours that the treadmill...
... decrease button so the "d" disappears. meters will show the total number of miles (or kilometers) that the walking belt has moved and the total number of hours Miles Hours that the walking belt has moved. When the console is in the demo mode, the power cord can be plugged in, the ...key can be used . THE INFORMATION MODE/DEMO MODE THE OPTIONAL CHEST PULSE SENSOR The console features an information mode that keeps track of the total number of hours that the treadmill...
English Manual
Page 23
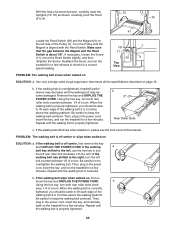
...View PROBLEM: The walking belt slows when walked on , first re- Be careful to overtighten the walking belt. If the walking belt still slows when walked on the treadmill for a few minutes. Repeat until the walking belt is properly tightened. 23 b. When the walking belt is about 1/8". ...Magnet (6) on SOLUTION: a. Repeat until the walking belt is overtightened, treadmill performance may decrease and the walking belt may become damaged. Be careful not to keep the walking belt centered. If the walking belt slips when walked on SOLUTION: a. Repeat until the Magnet is ...
...View PROBLEM: The walking belt slows when walked on , first re- Be careful to overtighten the walking belt. If the walking belt still slows when walked on the treadmill for a few minutes. Repeat until the walking belt is properly tightened. 23 b. When the walking belt is about 1/8". ...Magnet (6) on SOLUTION: a. Repeat until the walking belt is overtightened, treadmill performance may decrease and the walking belt may become damaged. Be careful not to keep the walking belt centered. If the walking belt slips when walked on SOLUTION: a. Repeat until the Magnet is ...
English Manual
Page 27
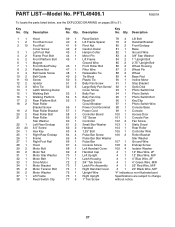
... Rail 4 2 Frame Pivot Bolt 5 2 Front Platform Bolt 6 1 Magnet 7 1 Front Roller/Pulley 8 2 Platform Nut 9 4 Belt Guide Screw 10 2 Belt Guide 11 13 Screw 12 2 Isolator 13 3 Wire Tie 14 1 Latch Warning Decal 15 1 Walking Belt 16 1 Walking Platform 17 2 Rear Platform Bolt 18 2 Rear Roller Bracket Screw 19 2 Rear Roller Bracket 20 2 Rear... Right Rear Endcap 26 1 Frame 27 1 Right Foot Rail 28 1 Hood 29 2 Motor Bolt 30 2 Motor Nut 31 1 Motor Star Washer 32 1 Motor Belt 33 1 Drive Motor 34 1 Motor Bracket 35 2 Motor Tension Bolt 36 2 Motor Washer 37 1 Lift Frame 38 1 Reed Switch Clip 39 1 Reed Switch ...
... Rail 4 2 Frame Pivot Bolt 5 2 Front Platform Bolt 6 1 Magnet 7 1 Front Roller/Pulley 8 2 Platform Nut 9 4 Belt Guide Screw 10 2 Belt Guide 11 13 Screw 12 2 Isolator 13 3 Wire Tie 14 1 Latch Warning Decal 15 1 Walking Belt 16 1 Walking Platform 17 2 Rear Platform Bolt 18 2 Rear Roller Bracket Screw 19 2 Rear Roller Bracket 20 2 Rear... Right Rear Endcap 26 1 Frame 27 1 Right Foot Rail 28 1 Hood 29 2 Motor Bolt 30 2 Motor Nut 31 1 Motor Star Washer 32 1 Motor Belt 33 1 Drive Motor 34 1 Motor Bracket 35 2 Motor Tension Bolt 36 2 Motor Washer 37 1 Lift Frame 38 1 Reed Switch Clip 39 1 Reed Switch ...


