
Uk Manual
Page 2
... of 12 and pets away from moisture and dust. Never start the treadmill whilst you are used . 5. TABLE OF CONTENTS IMPORTANT PRECAUTIONS 2 BEFORE YOU BEGIN 4 ASSEMBLY 5 OPERATION AND ADJUSTMENT 7 HOW TO FOLD AND MOVE THE TREADMILL 10 MAINTENANCE AND TROUBLE-SHOOTING 12 CONDITIONING GUIDELINES 14 ORDERING REPLACEMENT PARTS Back Cover Note...
... of 12 and pets away from moisture and dust. Never start the treadmill whilst you are used . 5. TABLE OF CONTENTS IMPORTANT PRECAUTIONS 2 BEFORE YOU BEGIN 4 ASSEMBLY 5 OPERATION AND ADJUSTMENT 7 HOW TO FOLD AND MOVE THE TREADMILL 10 MAINTENANCE AND TROUBLE-SHOOTING 12 CONDITIONING GUIDELINES 14 ORDERING REPLACEMENT PARTS Back Cover Note...
Uk Manual
Page 3
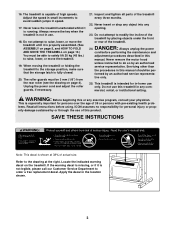
... speeds. Locate the indicated warning decal on page 10.) You must be per- If the warning decal is missing, or if it is properly assembled. (See ASSEMBLY on page 5, and HOW TO FOLD AND MOVE THE TREADMILL on the treadmill. formed by placing objects under the front or rear of this manual...
... speeds. Locate the indicated warning decal on page 10.) You must be per- If the warning decal is missing, or if it is properly assembled. (See ASSEMBLY on page 5, and HOW TO FOLD AND MOVE THE TREADMILL on the treadmill. formed by placing objects under the front or rear of this manual...
Uk Manual
Page 5
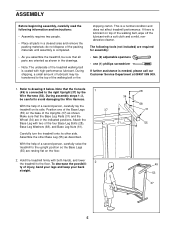
.... Carefully turn the treadmill onto its side. If there is needed, please call our Customer Service Department at 08457 089 009. 1. During assembly steps 1-3, be careful to drawing 2 below. Hold the treadmill firmly with a soft cloth and a mild, nonabrasive cleaner. To decrease the... assistance is lubricant on top of the walking belt or the shipping carton. Attach the Base Leg with high-performance lubricant. ASSEMBLY Before beginning assembly, carefully read the following tools (not included) are in a cleared area and remove the packing materials; do not dispose...
.... Carefully turn the treadmill onto its side. If there is needed, please call our Customer Service Department at 08457 089 009. 1. During assembly steps 1-3, be careful to drawing 2 below. Hold the treadmill firmly with a soft cloth and a mild, nonabrasive cleaner. To decrease the... assistance is lubricant on top of the walking belt or the shipping carton. Attach the Base Leg with high-performance lubricant. ASSEMBLY Before beginning assembly, carefully read the following tools (not included) are in a cleared area and remove the packing materials; do not dispose...
Uk Manual
Page 12
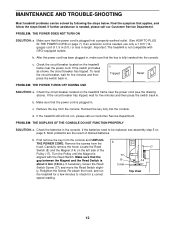
.... If the switch protrudes as shown, the circuit breaker has tripped. Check the circuit breaker located on the treadmill frame near the power cord (see assembly step 5 on page 6. Make sure that the key is needed , please call our Customer Service Department. Reinsert the key fully into the console. If the...
.... If the switch protrudes as shown, the circuit breaker has tripped. Check the circuit breaker located on the treadmill frame near the power cord (see assembly step 5 on page 6. Make sure that the key is needed , please call our Customer Service Department. Reinsert the key fully into the console. If the...
Uk Manual
Page 18
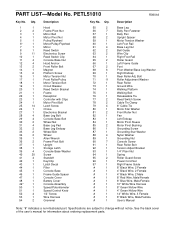
... Pivot Bolt Upright Storage Latch Console Base Washer Screw Standoff Key/Clip Latch Decal Filter Console Base Frame Guide Spacer Console Cover Battery Cover Console Assembly Speed Potentiometer Speed Control Knob 1/2" Screw Wire Harness Grommet Key No. Bolt Roller Adjustment Washer Rear Roller Ground Wire Walking Platform Walking Belt Releaseable Tie...
... Pivot Bolt Upright Storage Latch Console Base Washer Screw Standoff Key/Clip Latch Decal Filter Console Base Frame Guide Spacer Console Cover Battery Cover Console Assembly Speed Potentiometer Speed Control Knob 1/2" Screw Wire Harness Grommet Key No. Bolt Roller Adjustment Washer Rear Roller Ground Wire Walking Platform Walking Belt Releaseable Tie...


