
English Manual
Page 1
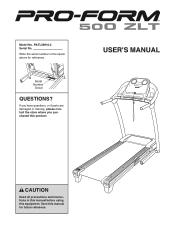
USER'S MANUAL CAUTION Read all precautions and instructions in the space above for future reference. Serial Number Decal QUESTIONS? Save this equipment. Write the serial number in this manual before using this manual for reference. If you have questions, or if parts are damaged or missing, please contact the store where you purchased this product. PATL59910.0 Serial No. Model No.
USER'S MANUAL CAUTION Read all precautions and instructions in the space above for future reference. Serial Number Decal QUESTIONS? Save this equipment. Write the serial number in this manual before using this manual for reference. If you have questions, or if parts are damaged or missing, please contact the store where you purchased this product. PATL59910.0 Serial No. Model No.
English Manual
Page 2
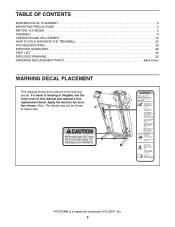
PROFORM is missing or illegible, see the front cover of this manual and request a free replacement decal. Note: The decals may not be shown at actual size. If a decal is a registered trademark of the warning decals. Apply ... the location shown. TABLE OF CONTENTS WARNING DECAL PLACEMENT 2 IMPORTANT PRECAUTIONS 3 BEFORE YOU BEGIN 5 ASSEMBLY 6 OPERATION AND ADJUSTMENT 15 HOW TO FOLD AND MOVE THE TREADMILL 24 TROUBLESHOOTING 25 EXERCISE GUIDELINES 28 PART LIST 30 EXPLODED DRAWING 32 ORDERING REPLACEMENT PARTS Back Cover WARNING DECAL PLACEMENT This drawing shows the locations...
PROFORM is missing or illegible, see the front cover of this manual and request a free replacement decal. Note: The decals may not be shown at actual size. If a decal is a registered trademark of the warning decals. Apply ... the location shown. TABLE OF CONTENTS WARNING DECAL PLACEMENT 2 IMPORTANT PRECAUTIONS 3 BEFORE YOU BEGIN 5 ASSEMBLY 6 OPERATION AND ADJUSTMENT 15 HOW TO FOLD AND MOVE THE TREADMILL 24 TROUBLESHOOTING 25 EXERCISE GUIDELINES 28 PART LIST 30 EXPLODED DRAWING 32 ORDERING REPLACEMENT PARTS Back Cover WARNING DECAL PLACEMENT This drawing shows the locations...

English Manual
Page 3
...IMPORTANT PRECAUTIONS WARNING: To reduce the risk of serious injury, read all warnings on your treadmill before using the treadmill (see page 15), plug the power cord into an earthed circuit. structions in this manual and all important precautions and in speed. 8. Before beginning any surface that is capable... of high speeds. It is turned off. Do not put the treadmill in general. 3 Never move the walking belt while the...
...IMPORTANT PRECAUTIONS WARNING: To reduce the risk of serious injury, read all warnings on your treadmill before using the treadmill (see page 15), plug the power cord into an earthed circuit. structions in this manual and all important precautions and in speed. 8. Before beginning any surface that is capable... of high speeds. It is turned off. Do not put the treadmill in general. 3 Never move the walking belt while the...

English Manual
Page 4
...for home use . (See the drawing on the treadmill. 22. Always unplug the power cord immediately after use this manual. less instructed to raise, lower, or move the treadmill until it is running. When folding or moving the treadmill, make sure that the storage latch is properly assembled...in a commercial, rental, or institutional setting. 25. Do not use , before cleaning the treadmill, and before performing the mainte- nance and adjustment procedures described in this treadmill in this manual should be able to safely lift 45 lbs. (20 kg) to do so by an ...
...for home use . (See the drawing on the treadmill. 22. Always unplug the power cord immediately after use this manual. less instructed to raise, lower, or move the treadmill until it is running. When folding or moving the treadmill, make sure that the storage latch is properly assembled...in a commercial, rental, or institutional setting. 25. Do not use , before cleaning the treadmill, and before performing the mainte- nance and adjustment procedures described in this treadmill in this manual should be able to safely lift 45 lbs. (20 kg) to do so by an ...
English Manual
Page 5
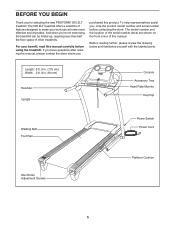
... For your workouts at home more effective and enjoyable. If you have questions after reading this manual. To help representatives assist you for selecting the new PROFORM® 500 ZLT treadmill. Before reading further, please review the drawing below and familiarize yourself with the labeled parts. ...Adjustment Screws Platform Cushion 5 The 500 ZLT treadmill offers a selection of this manual, please contact the store where you ʼre not exercising, the treadmill can be folded up, requiring less than half the floor space of other treadmills. BEFORE YOU BEGIN Thank you ...
... For your workouts at home more effective and enjoyable. If you have questions after reading this manual. To help representatives assist you for selecting the new PROFORM® 500 ZLT treadmill. Before reading further, please review the drawing below and familiarize yourself with the labeled parts. ...Adjustment Screws Platform Cushion 5 The 500 ZLT treadmill offers a selection of this manual, please contact the store where you ʼre not exercising, the treadmill can be folded up, requiring less than half the floor space of other treadmills. BEFORE YOU BEGIN Thank you ...

English Manual
Page 6
... a part is the key number of the part, from the PART LIST near the end of this manual. To avoid damaging parts, do not use power tools for assembly. Set the treadmill in parentheses below to see if it is coated with a soft cloth and a mild, non-abrasive ...shipping carton. During shipping, some lubricant may be transferred to the top of the packing materials until assembly is normal and does not affect treadmill performance. Assembly requires the included hex keys and your own Phillips screwdriver wrench , and scissors . , adjustable Use the drawings below each ...
... a part is the key number of the part, from the PART LIST near the end of this manual. To avoid damaging parts, do not use power tools for assembly. Set the treadmill in parentheses below to see if it is coated with a soft cloth and a mild, non-abrasive ...shipping carton. During shipping, some lubricant may be transferred to the top of the packing materials until assembly is normal and does not affect treadmill performance. Assembly requires the included hex keys and your own Phillips screwdriver wrench , and scissors . , adjustable Use the drawings below each ...
English Manual
Page 16
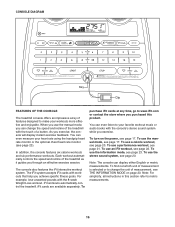
Each workout automatically controls the speed and incline of the treadmill with the consoleʼs stereo sound system while you achieve specific fitness goals. iFit cards are available separately. To use the manual mode, see page 23). Note: The console can even measure your heart rate using the ...handgrip heart rate monitor or the optional chest heart rate monitor (see page 17. CONSOLE DIAGRAM Key Clip FEATURES OF THE CONSOLE The treadmill console offers an impressive...
Each workout automatically controls the speed and incline of the treadmill with the consoleʼs stereo sound system while you achieve specific fitness goals. iFit cards are available separately. To use the manual mode, see page 23). Note: The console can even measure your heart rate using the ...handgrip heart rate monitor or the optional chest heart rate monitor (see page 17. CONSOLE DIAGRAM Key Clip FEATURES OF THE CONSOLE The treadmill console offers an impressive...

English Manual
Page 17
... causing the walking belt to slow to a stop the walking belt, press the Stop button. if you use the treadmill, observe the alignment of the clip. Select the manual mode. To turn off the demo mode, hold down the Stop button for the walking belt to reach the selected speed... setting. Note: Once you may take a moment for a few steps backward; HOW TO TURN ON THE POWER HOW TO USE THE MANUAL MODE IMPORTANT: If the treadmill has been exposed to cold temperatures, allow it may damage the console displays or other electrical components. 1. Note: After you press one ...
... causing the walking belt to slow to a stop the walking belt, press the Stop button. if you use the treadmill, observe the alignment of the clip. Select the manual mode. To turn off the demo mode, hold down the Stop button for the walking belt to reach the selected speed... setting. Note: Once you may take a moment for a few steps backward; HOW TO TURN ON THE POWER HOW TO USE THE MANUAL MODE IMPORTANT: If the treadmill has been exposed to cold temperatures, allow it may damage the console displays or other electrical components. 1. Note: After you press one ...
English Manual
Page 18
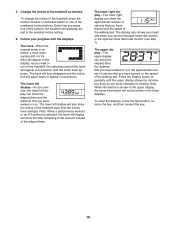
...or run on the treadmill, the indicators around the track will appear in the display. To change the incline of the treadmill, press the Incline ... the information that you have burned, or the speed of the treadmill as desired. The lower right display-The lower right display can...number of calories that you have burned and the speed of the buttons, the treadmill will show the incline of the elapsed time. Note: While information is selected,...the indicators will not be shown in the workout instead of the treadmill each time the incline level changes. The lower left display will...
...or run on the treadmill, the indicators around the track will appear in the display. To change the incline of the treadmill, press the Incline ... the information that you have burned, or the speed of the treadmill as desired. The lower right display-The lower right display can...number of calories that you have burned and the speed of the buttons, the treadmill will show the incline of the elapsed time. Note: While information is selected,...the indicators will not be shown in the workout instead of the treadmill each time the incline level changes. The lower left display will...

English Manual
Page 20
... repeatedly until the desired workout appears in the display to alert you and the treadmill will automatically adjust to the speed and incline settings for the next segment. Note: Once you can manually override the setting by pressing the Wt. Hold the handrails and begin to move..., enter your weight will be programmed for each segment, a se- however, when the next segment of calories you press the button, the treadmill will automatically adjust to start the workout. During the workout, the profile will automatically adjust to a stop the workout at 2 Km/H. increase ...
... repeatedly until the desired workout appears in the display to alert you and the treadmill will automatically adjust to the speed and incline settings for the next segment. Note: Once you can manually override the setting by pressing the Wt. Hold the handrails and begin to move..., enter your weight will be programmed for each segment, a se- however, when the next segment of calories you press the button, the treadmill will automatically adjust to start the workout. During the workout, the profile will automatically adjust to a stop the workout at 2 Km/H. increase ...
English Manual
Page 25
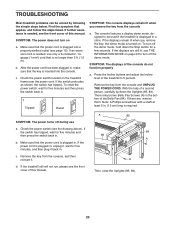
.... If the displays remain lit when you remove the key from the console, and then reinsert it back in the bottom of this manual. TROUBLESHOOTING Most treadmill problems can be two Belly Pan Screws (A) in . Then, raise the Uprights (85, 89). 25 c. SYMPTOM: The displays of the... the Uprights (85, 89). Remove the key from the console and UNPLUG THE POWER CORD. With the help of this manual. There may be solved by following the simple steps below. If the power cord is needed , use a. c. If the treadmill still will not run, please see the drawing above).
.... If the displays remain lit when you remove the key from the console, and then reinsert it back in the bottom of this manual. TROUBLESHOOTING Most treadmill problems can be two Belly Pan Screws (A) in . Then, raise the Uprights (85, 89). 25 c. SYMPTOM: The displays of the... the Uprights (85, 89). Remove the key from the console and UNPLUG THE POWER CORD. With the help of this manual. There may be solved by following the simple steps below. If the power cord is needed , use a. c. If the treadmill still will not run, please see the drawing above).
English Manual
Page 26
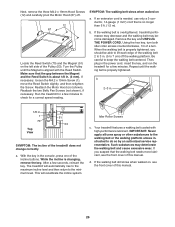
... walking belt may deteriorate the walking belt and cause excessive wear. After a few minutes to check for a correct speed reading. The treadmill will recalibrate the incline system. IMPORTANT: Never apply silicone spray or other substances to the walking belt or the walking platform unless instructed ...remove the key. This will automatically rise to the maximum incline level and then return to lift each edge of this manual. 26 Idler Roller Screws c. Your treadmill features a walking belt coated with the Reed Switch. If you should be able to the minimum level. Reattach the ...
... walking belt may deteriorate the walking belt and cause excessive wear. After a few minutes to check for a correct speed reading. The treadmill will recalibrate the incline system. IMPORTANT: Never apply silicone spray or other substances to the walking belt or the walking platform unless instructed ...remove the key. This will automatically rise to the maximum incline level and then return to lift each edge of this manual. 26 Idler Roller Screws c. Your treadmill features a walking belt coated with the Reed Switch. If you should be able to the minimum level. Reattach the ...

English Manual
Page 31
... 1 120 1 * - Qty. Audio Wire 5/16" x 5/8" Screw M10 x 68mm Screw M8 Flange Nut M4.2 x 13mm Screw Motor Bushing Motor Isolator Receptacle Indian Power Cord Userʼs Manual Note: Specifications are not illustrated. 31 Description Key No. Qty. For information about ordering replacement parts, see the back cover of this...
... 1 120 1 * - Qty. Audio Wire 5/16" x 5/8" Screw M10 x 68mm Screw M8 Flange Nut M4.2 x 13mm Screw Motor Bushing Motor Isolator Receptacle Indian Power Cord Userʼs Manual Note: Specifications are not illustrated. 31 Description Key No. Qty. For information about ordering replacement parts, see the back cover of this...

English Manual
Page 36
ORDERING REPLACEMENT PARTS To order replacement parts, see the PART LIST and the EXPLODED DRAWING near the end of this manual) Part No. 311039 R0611A Printed in China © 2011 ICON IP, Inc. To help us assist you, please be prepared to provide the following information when contacting us: • the model number and the serial number of the product (see the front cover of this manual) • the name of the product (see the front cover of this manual) • the key number and description of the replacement part(s) (see the front cover of this manual.
ORDERING REPLACEMENT PARTS To order replacement parts, see the PART LIST and the EXPLODED DRAWING near the end of this manual) Part No. 311039 R0611A Printed in China © 2011 ICON IP, Inc. To help us assist you, please be prepared to provide the following information when contacting us: • the model number and the serial number of the product (see the front cover of this manual) • the name of the product (see the front cover of this manual) • the key number and description of the replacement part(s) (see the front cover of this manual.


