
English Manual
Page 3
... all users of this product. 1. Use the treadmill only as an exercise aid in determining heart rate trends in - The treadmill should be used or where oxygen is intended only as described. 3. Adjust the speed in small increments to ensure that could become caught in speed. 8. When connecting the power cord (see HOW TO TURN ON THE POWER on your treadmill before using your physician. This is turned off...
... all users of this product. 1. Use the treadmill only as an exercise aid in determining heart rate trends in - The treadmill should be used or where oxygen is intended only as described. 3. Adjust the speed in small increments to ensure that could become caught in speed. 8. When connecting the power cord (see HOW TO TURN ON THE POWER on your treadmill before using your physician. This is turned off...
English Manual
Page 4
... exercising, stop immediately and cool down. Always unplug the power cord immediately after use this manual. less instructed to raise, lower, or move the treadmill. 20. SAVE THESE INSTRUCTIONS 4 18. Do not attempt to do so by an authorized service representative only. 24. DANGER: 23. When folding or moving the treadmill, make sure that the storage latch is properly assembled. (See ASSEMBLY on page 6, and HOW TO FOLD AND MOVE THE TREADMILL...
... exercising, stop immediately and cool down. Always unplug the power cord immediately after use this manual. less instructed to raise, lower, or move the treadmill. 20. SAVE THESE INSTRUCTIONS 4 18. Do not attempt to do so by an authorized service representative only. 24. DANGER: 23. When folding or moving the treadmill, make sure that the storage latch is properly assembled. (See ASSEMBLY on page 6, and HOW TO FOLD AND MOVE THE TREADMILL...
English Manual
Page 5
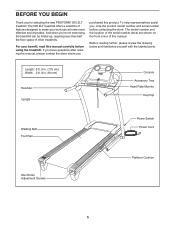
... this manual, please contact the store where you , note the product model number and serial number before using the treadmill. Before reading further, please review the drawing below and familiarize yourself with the labeled parts. The 500 ZLT treadmill offers a selection of this product. Length: 5 ft. 9 in. (175 cm) Width: 2 ft. 9 in. (84 cm) Handrail Upright Console Accessory Tray Heart Rate Monitor Key/Clip Walking Belt Foot Rail Power Switch Power Cord Idler Roller Adjustment Screws Platform...
... this manual, please contact the store where you , note the product model number and serial number before using the treadmill. Before reading further, please review the drawing below and familiarize yourself with the labeled parts. The 500 ZLT treadmill offers a selection of this product. Length: 5 ft. 9 in. (175 cm) Width: 2 ft. 9 in. (84 cm) Handrail Upright Console Accessory Tray Heart Rate Monitor Key/Clip Walking Belt Foot Rail Power Switch Power Cord Idler Roller Adjustment Screws Platform...
English Manual
Page 7
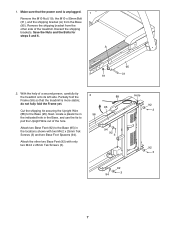
... the Bolts for steps 3 and 6. A 95 19 31 2. Partially fold the Frame (56) so that the power cord is more stable; Attach two Base Feet (92) to the Base (95) in the Base, and use the tie to the Base (95). 1. Next, locate a plastic tie in the indicated hole in the locations shown with only two M4.2 x 25mm Tek Screws...
... the Bolts for steps 3 and 6. A 95 19 31 2. Partially fold the Frame (56) so that the power cord is more stable; Attach two Base Feet (92) to the Base (95) in the Base, and use the tie to the Base (95). 1. Next, locate a plastic tie in the indicated hole in the locations shown with only two M4.2 x 25mm Tek Screws...

English Manual
Page 11
...). Remove the tie from the Right 10 Handrail. Route the console wire around the side of them. Set the console assembly face down to the console assembly. 9 104 116 116 106 107 111 Console Assembly 10. Carefully pivot the Console Frame (111) to overtighten the Screws. 5 10 101 111 11 Make sure the console wire is marked "Right." Start the two Bolts and the Screw, and then tighten all...
...). Remove the tie from the Right 10 Handrail. Route the console wire around the side of them. Set the console assembly face down to the console assembly. 9 104 116 116 106 107 111 Console Assembly 10. Carefully pivot the Console Frame (111) to overtighten the Screws. 5 10 101 111 11 Make sure the console wire is marked "Right." Start the two Bolts and the Screw, and then tighten all...

English Manual
Page 12
.... Set the console assembly on the Right Upright (89) and the Left Upright (not shown). Attach the Left Handrail (not shown) as shown. Remove the wire tie from the Upright Wire. Do not tighten the Bolt and Screws yet. Then, tighten both Bolts and all four Screws. 101 5 10 113 10 89 12 If they do not, turn one connector and try again. IF YOU DO NOT CONNECT...
.... Set the console assembly on the Right Upright (89) and the Left Upright (not shown). Attach the Left Handrail (not shown) as shown. Remove the wire tie from the Upright Wire. Do not tighten the Bolt and Screws yet. Then, tighten both Bolts and all four Screws. 101 5 10 113 10 89 12 If they do not, turn one connector and try again. IF YOU DO NOT CONNECT...

English Manual
Page 15
.... Check with a manufacturer-recommended power cord. 1. Power Cord 2. IMPORTANT: If the power cord is properly earthed. Do not modify the plug provided with the product-if it must be replaced with a qualified electrician or serviceman if you are in the power cord. Outlet India Outlet 15 OPERATION AND ADJUSTMENT HOW TO PLUG IN THE POWER CORD Follow the steps below to plug in doubt as to...
.... Check with a manufacturer-recommended power cord. 1. Power Cord 2. IMPORTANT: If the power cord is properly earthed. Do not modify the plug provided with the product-if it must be replaced with a qualified electrician or serviceman if you are in the power cord. Outlet India Outlet 15 OPERATION AND ADJUSTMENT HOW TO PLUG IN THE POWER CORD Follow the steps below to plug in doubt as to...
English Manual
Page 16
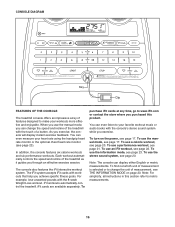
... you exercise. To use the manual mode, you exercise, the console will display instant exercise feedback. To find out which unit of measurement is selected or to change the speed and incline of the treadmill with the 8-week Weight Loss workout. As you can display either English or metric measurements. iFit cards are available separately. Note: For simplicity, all instructions in this product. CONSOLE DIAGRAM Key Clip FEATURES OF THE CONSOLE The treadmill console...
... you exercise. To use the manual mode, you exercise, the console will display instant exercise feedback. To find out which unit of measurement is selected or to change the speed and incline of the treadmill with the 8-week Weight Loss workout. As you can display either English or metric measurements. iFit cards are available separately. Note: For simplicity, all instructions in this product. CONSOLE DIAGRAM Key Clip FEATURES OF THE CONSOLE The treadmill console...

English Manual
Page 17
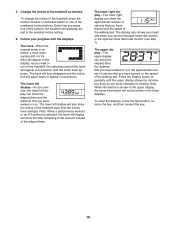
... speed setting. Each time you use the treadmill, observe the alignment of the numbered Speed buttons, the walking belt will be saved in the power cord and press the power switch into the reset position, the demo mode is inserted, the manual mode will gradually change by pressing the Speed increase and decrease buttons. To stop . Insert the key into the console. Plug in the display. If the displays light as soon as desired by 0.1 Km/H; When the key is turned...
... speed setting. Each time you use the treadmill, observe the alignment of the numbered Speed buttons, the walking belt will be saved in the power cord and press the power switch into the reset position, the demo mode is inserted, the manual mode will gradually change by pressing the Speed increase and decrease buttons. To stop . Insert the key into the console. Plug in the display. If the displays light as soon as desired by 0.1 Km/H; When the key is turned...
English Manual
Page 18
... the selected incline setting. 6. Change the incline of the treadmill each time the incline level changes. The track-When the manual mode is selected, the lower left display will appear in the workout instead of the walking belt. The display also shows your progress with the displays. To reset the displays, press the Stop button, remove the key, and then reinsert the key. 18 Note: When a performance workout or an iFit workout is selected, a track representing 400 m (1/4 mile) will also...
... the selected incline setting. 6. Change the incline of the treadmill each time the incline level changes. The track-When the manual mode is selected, the lower left display will appear in the workout instead of the walking belt. The display also shows your progress with the displays. To reset the displays, press the Stop button, remove the key, and then reinsert the key. 18 Note: When a performance workout or an iFit workout is selected, a track representing 400 m (1/4 mile) will also...
English Manual
Page 19
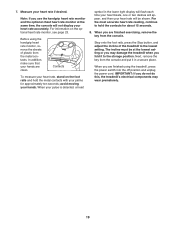
... not display your palms for about 15 seconds. 8. Measure your hands. For information on the foot rails and hold the contacts for approximately ten seconds; Step onto the foot rails, press the Stop button, and adjust the incline of plastic from the console. avoid moving your heart rate if desired. Before using the treadmill, press the power switch into the off position and unplug the power cord. When your pulse...
... not display your palms for about 15 seconds. 8. Measure your hands. For information on the foot rails and hold the contacts for approximately ten seconds; Step onto the foot rails, press the Stop button, and adjust the incline of plastic from the console. avoid moving your heart rate if desired. Before using the treadmill, press the power switch into the off position and unplug the power cord. When your pulse...

English Manual
Page 20
... workout at 2 Km/H. Follow your weight will slow to alert you are programmed for the next segment, the speed and/or incline setting will flash in the display. See HOW TO TURN ON THE POWER on page 18. If the speed or incline setting is divided into one incline setting are finished exercising, remove the key from the console. When you and the treadmill will automatically adjust to start the workout. See step...
... workout at 2 Km/H. Follow your weight will slow to alert you are programmed for the next segment, the speed and/or incline setting will flash in the display. See HOW TO TURN ON THE POWER on page 18. If the speed or incline setting is divided into one incline setting are finished exercising, remove the key from the console. When you and the treadmill will automatically adjust to start the workout. See step...

English Manual
Page 21
... page 20. 6. Enter your weight into the console. When you select a performance workout, the workout number will appear in the display. Select a performance workout. See step 6 on page 17. 2. Note: Once you can set the duration of the workout if desired. 1. HOW TO USE A PERFORMANCE WORKOUT 4. See HOW TO TURN ON THE POWER on page 18. 7. Start the workout. increase and decrease buttons repeatedly. Measure your progress...
... page 20. 6. Enter your weight into the console. When you select a performance workout, the workout number will appear in the display. Select a performance workout. See step 6 on page 17. 2. Note: Once you can set the duration of the workout if desired. 1. HOW TO USE A PERFORMANCE WORKOUT 4. See HOW TO TURN ON THE POWER on page 18. 7. Start the workout. increase and decrease buttons repeatedly. Measure your progress...

English Manual
Page 22
... start the workout. To use an iFit workout, insert an iFit card into the console. A moment after you are finished exercising, remove the key from the iFit slot and store it in a secure place. 22 however, when the next segment begins, the treadmill will appear in the same way as a calorie workout (see step 4 on page 20). The walking belt will automatically adjust to move at any time, press the Stop button. iFit...
... start the workout. To use an iFit workout, insert an iFit card into the console. A moment after you are finished exercising, remove the key from the iFit slot and store it in a secure place. 22 however, when the next segment begins, the treadmill will appear in the same way as a calorie workout (see step 4 on page 20). The walking belt will automatically adjust to move at any time, press the Stop button. iFit...
English Manual
Page 23
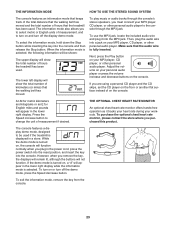
... the power cord, press the power switch into the reset position, and insert the key into the console. Make sure that the walking belt has moved. Press the Speed increase button to turn on the console. When the information mode is fully inserted. To use the MP3 jack, locate the included audio wire and plug it tracks your heart rate during your MP3 player, CD player, or other personal audio player. THE OPTIONAL CHEST HEART RATE MONITOR An optional chest heart rate monitor offers hands-free...
... the power cord, press the power switch into the reset position, and insert the key into the console. Make sure that the walking belt has moved. Press the Speed increase button to turn on the console. When the information mode is fully inserted. To use the MP3 jack, locate the included audio wire and plug it tracks your heart rate during your MP3 player, CD player, or other personal audio player. THE OPTIONAL CHEST HEART RATE MONITOR An optional chest heart rate monitor offers hands-free...

English Manual
Page 24
... the power cord. Bend your legs and keep your right hand. Do not leave the treadmill in the storage position in the location shown by the plastic foot rails, and do not drop the frame. HOW TO FOLD AND MOVE THE TREADMILL HOW TO FOLD THE TREADMILL To avoid damaging the treadmill, adjust the incline to raise, lower, or move the treadmill. 1. IMPORTANT: Do not turn the latch knob. CAUTION...
... the power cord. Bend your legs and keep your right hand. Do not leave the treadmill in the storage position in the location shown by the plastic foot rails, and do not drop the frame. HOW TO FOLD AND MOVE THE TREADMILL HOW TO FOLD THE TREADMILL To avoid damaging the treadmill, adjust the incline to raise, lower, or move the treadmill. 1. IMPORTANT: Do not turn the latch knob. CAUTION...
English Manual
Page 25
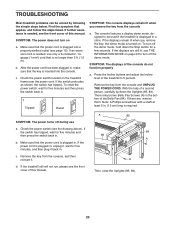
... extension cord is needed , see the front cover of this manual. Check the power switch located on a. c Tripped Reset SYMPTOM: The console displays remain lit when you remove the key, the demo mode is plugged in. If there are still lit, see the drawing above). a 85 SYMPTOM: The power turns off the demo mode, hold down the Uprights (85, 89). If the displays are , remove them. Press the Incline buttons and adjust the incline level of the treadmill...
... extension cord is needed , see the front cover of this manual. Check the power switch located on a. c Tripped Reset SYMPTOM: The console displays remain lit when you remove the key, the demo mode is plugged in. If there are still lit, see the drawing above). a 85 SYMPTOM: The power turns off the demo mode, hold down the Uprights (85, 89). If the displays are , remove them. Press the Incline buttons and adjust the incline level of the treadmill...
English Manual
Page 26
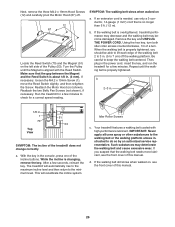
... a few minutes to 3 in the console, press one of the treadmill does not change correctly a. If an extension cord is needed, use only a 3-conductor, 14-gauge (1 mm2) cord that the gap between the Magnet and the Reed Switch is no longer than 5 ft. (1.5 m). If the walking belt is changing, remove the key. Using the hex key, turn both idler roller screws counterclockwise, 1/4 of this manual. 26 Then, plug in . 1 70 Top View...
... a few minutes to 3 in the console, press one of the treadmill does not change correctly a. If an extension cord is needed, use only a 3-conductor, 14-gauge (1 mm2) cord that the gap between the Magnet and the Reed Switch is no longer than 5 ft. (1.5 m). If the walking belt is changing, remove the key. Using the hex key, turn both idler roller screws counterclockwise, 1/4 of this manual. 26 Then, plug in . 1 70 Top View...

English Manual
Page 28
... to strengthen your condition, complete three workouts each week, if desired. The three numbers listed above your age define your body begin to use your physician. Only after the first few weeks of your exercise until your heart rate is near the middle number in your body temperature, heart rate, and circulation in your exercise program. Training Zone Exercise-Exercise for 20 to 30 minutes with at...
... to strengthen your condition, complete three workouts each week, if desired. The three numbers listed above your age define your body begin to use your physician. Only after the first few weeks of your exercise until your heart rate is near the middle number in your body temperature, heart rate, and circulation in your exercise program. Training Zone Exercise-Exercise for 20 to 30 minutes with at...

English Manual
Page 30
... Magnet Motor Belt Drive Roller/Pulley Walking Belt Walking Platform Frame Roller Bracket Right Foot Rail Access Door Storage Latch Latch Bracket Right Foot Idler Roller Roller Bracket Plate Left Foot Console Clamp Motor Hood Drive Motor Lift Frame Cable Tie Reed Switch Reed Switch Clamp Frame Spacer 1/4" Star Washer Lift Frame Incline Stop Bracket Lift Frame/Roller Ground Wire Lift Motor Lift Motor Spacer Lift Motor Wire Controller European Power Cord M4.2 x 16mm Screw Power Switch Belly Pan Left Upright Left Upright Spacer Base Cap Upright Wire Right Upright Screw Spacer Right Upright Spacer...
... Magnet Motor Belt Drive Roller/Pulley Walking Belt Walking Platform Frame Roller Bracket Right Foot Rail Access Door Storage Latch Latch Bracket Right Foot Idler Roller Roller Bracket Plate Left Foot Console Clamp Motor Hood Drive Motor Lift Frame Cable Tie Reed Switch Reed Switch Clamp Frame Spacer 1/4" Star Washer Lift Frame Incline Stop Bracket Lift Frame/Roller Ground Wire Lift Motor Lift Motor Spacer Lift Motor Wire Controller European Power Cord M4.2 x 16mm Screw Power Switch Belly Pan Left Upright Left Upright Spacer Base Cap Upright Wire Right Upright Screw Spacer Right Upright Spacer...


