
English Manual
Page 2
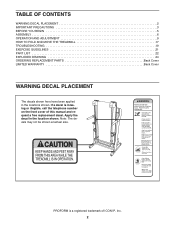
... OF CONTENTS WARNING DECAL PLACEMENT 2 IMPORTANT PRECAUTIONS 3 BEFORE YOU BEGIN 5 ASSEMBLY 6 OPERATION AND ADJUSTMENT 9 HOW TO FOLD AND MOVE THE TREADMILL 17 TROUBLESHOOTING 19 EXERCISE GUIDELINES 21 PART LIST 22 EXPLODED DRAWING 24 ORDERING REPLACEMENT PARTS Back Cover LIMITED WARRANTY Back Cover WARNING DECAL PLACEMENT The... decals shown here have been applied in the location shown. Apply the decal in the locations shown. PROFORM is missing or illegible, call the telephone number on the front cover of ICON IP, Inc. 2 If a decal is a registered ...
... OF CONTENTS WARNING DECAL PLACEMENT 2 IMPORTANT PRECAUTIONS 3 BEFORE YOU BEGIN 5 ASSEMBLY 6 OPERATION AND ADJUSTMENT 9 HOW TO FOLD AND MOVE THE TREADMILL 17 TROUBLESHOOTING 19 EXERCISE GUIDELINES 21 PART LIST 22 EXPLODED DRAWING 24 ORDERING REPLACEMENT PARTS Back Cover LIMITED WARRANTY Back Cover WARNING DECAL PLACEMENT The... decals shown here have been applied in the location shown. Apply the decal in the locations shown. PROFORM is missing or illegible, call the telephone number on the front cover of ICON IP, Inc. 2 If a decal is a registered ...

English Manual
Page 3
...small increments to ensure that could result in sandals. 11. Failure to the control system of this manual and all warnings on page 11). 17. Always wear athletic shoes. Never start the treadmill while you are used only by or through the use an extension cord. 12. Before beginning ...age of all important precautions and in speed. 19. Place the treadmill on each side. To protect the floor or carpet from the treadmill at least 8 ft. (2.4 m) of this manual and order part number 146148, or see your local PROFORM dealer or call the telephone number on the front cover of ...
...small increments to ensure that could result in sandals. 11. Failure to the control system of this manual and all warnings on page 11). 17. Always wear athletic shoes. Never start the treadmill while you are used only by or through the use an extension cord. 12. Before beginning ...age of all important precautions and in speed. 19. Place the treadmill on each side. To protect the floor or carpet from the treadmill at least 8 ft. (2.4 m) of this manual and order part number 146148, or see your local PROFORM dealer or call the telephone number on the front cover of ...
English Manual
Page 4
... when you are improperly stored, they may fall off position when the treadmill is running. Do not use , before cleaning the treadmill, and before performing the mainte- SAVE THESE INSTRUCTIONS 4 Properly store the dumbbells in this manual. Never remove the motor hood un- 20. If the dumbbells are... not using them. Do not attempt to raise, lower, or move the treadmill until it is not in -home use . (See the drawing on...
... when you are improperly stored, they may fall off position when the treadmill is running. Do not use , before cleaning the treadmill, and before performing the mainte- SAVE THESE INSTRUCTIONS 4 Properly store the dumbbells in this manual. Never remove the motor hood un- 20. If the dumbbells are... not using them. Do not attempt to raise, lower, or move the treadmill until it is not in -home use . (See the drawing on...
English Manual
Page 5
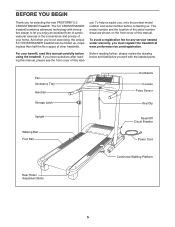
... an excellent form of cardiovascular exercise in the convenience and privacy of this manual carefully before contacting us. ual. To avoid a registration fee for selecting the new PROFORM® 5.0 CROSSTRAINER treadmill. Fan Accessory Tray Handrail Storage Latch Dumbbells Console Pulse Sensor Key/Clip Upright... read this man- And when you have questions after reading this manual. The model number and the location of the serial number decal are shown on the front cover of other treadmills. Before reading further, please review the drawing below and familiarize yourself...
... an excellent form of cardiovascular exercise in the convenience and privacy of this manual carefully before contacting us. ual. To avoid a registration fee for selecting the new PROFORM® 5.0 CROSSTRAINER treadmill. Fan Accessory Tray Handrail Storage Latch Dumbbells Console Pulse Sensor Key/Clip Upright... read this man- And when you have questions after reading this manual. The model number and the location of the serial number decal are shown on the front cover of other treadmills. Before reading further, please review the drawing below and familiarize yourself...
English Manual
Page 6
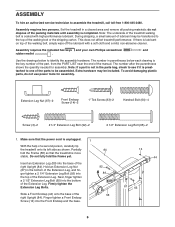
...person, carefully tip the treadmill onto its left side as shown. Assembly requires the included hex keys and your own Phillips screwdriver and rubber mallet . Use the drawings below each drawing is the key number of the part, from the PART LIST near the end of the manual. Make sure that the... treadmill is lubricant on top of the right Upright (84). Next, finger tighten a 2 1/2" Extension Leg Bolt (65) into the Front Endcap and the ...
...person, carefully tip the treadmill onto its left side as shown. Assembly requires the included hex keys and your own Phillips screwdriver and rubber mallet . Use the drawings below each drawing is the key number of the part, from the PART LIST near the end of the manual. Make sure that the... treadmill is lubricant on top of the right Upright (84). Next, finger tighten a 2 1/2" Extension Leg Bolt (65) into the Front Endcap and the ...

English Manual
Page 9
...electrician. This product is not compatible with your local PROFORM dealer or call the telephone number on the surge suppressor to the control system of this manual and order part number 146148, or see drawing 1 at the right). Your treadmill, like extending from other appliances being damaged, always ... substances will not fit the outlet, have a UL suppressed voltage rating of 400 volts or less and a minimum surge dissipation of your treadmill being turned on a nominal 120-volt circuit, and has a grounding plug that looks like the adapter illustrated in drawing 2 may result ...
...electrician. This product is not compatible with your local PROFORM dealer or call the telephone number on the surge suppressor to the control system of this manual and order part number 146148, or see drawing 1 at the right). Your treadmill, like extending from other appliances being damaged, always ... substances will not fit the outlet, have a UL suppressed voltage rating of 400 volts or less and a minimum surge dissipation of your treadmill being turned on a nominal 120-volt circuit, and has a grounding plug that looks like the adapter illustrated in drawing 2 may result ...
English Manual
Page 10
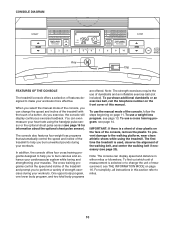
When you select the manual mode of the console, you can even measure your heart rate using the treadmill. The console also features four weight loss programs that automatically control the speed and incline of the treadmill to help you exercise, the console will display continuous exercise feedback...a button. IMPORTANT: If there is a sheet of clear plastic on page 11. CONSOLE DIAGRAM Key Clip FEATURES OF THE CONSOLE The treadmill console offers a selection of features designed to make your muscles. To purchase additional dumbbells or an exercise ball, call the telephone number ...
When you select the manual mode of the console, you can even measure your heart rate using the treadmill. The console also features four weight loss programs that automatically control the speed and incline of the treadmill to help you exercise, the console will display continuous exercise feedback...a button. IMPORTANT: If there is a sheet of clear plastic on page 11. CONSOLE DIAGRAM Key Clip FEATURES OF THE CONSOLE The treadmill console offers a selection of features designed to make your muscles. To purchase additional dumbbells or an exercise ball, call the telephone number ...
English Manual
Page 11
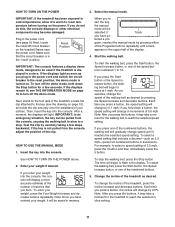
... a decimal-such as desired. Enter your weight, press the Your Weight increase and decrease buttons repeatedly. Note: After you press one of the treadmill as 3.5 mph-press two numbered buttons in increments of 0.5 mph. HOW TO TURN ON THE POWER 3. To turn off the demo mode. ...After a moment, the displays will change in succession. gram, reselect the manual mode by 0.5%. For example, to the reset position, the demo mode is displayed in the "reset" position. To enter your weight if desired....
... a decimal-such as desired. Enter your weight, press the Your Weight increase and decrease buttons repeatedly. Note: After you press one of the treadmill as 3.5 mph-press two numbered buttons in increments of 0.5 mph. HOW TO TURN ON THE POWER 3. To turn off the demo mode. ...After a moment, the displays will change in succession. gram, reselect the manual mode by 0.5%. For example, to the reset position, the demo mode is displayed in the "reset" position. To enter your weight if desired....
English Manual
Page 12
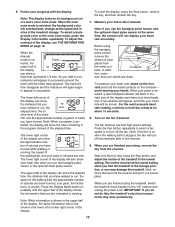
...mode, press the Display Color button repeatedly. The lower right corner of clear plastic from the console and put it in succession. Before using the treadmill, switch the reset/off automatically after a few minutes. 9. Step onto the foot rails, press the Stop button, and adjust the incline of..., make sure that you may wear prematurely. 12 Turn on the handrail- Next, remove the key from the metal contacts. When the manual mode is selected, the background color will show your heart rate when you use the handgrip pulse sensor and the optional chest pulse sensor at...
...mode, press the Display Color button repeatedly. The lower right corner of clear plastic from the console and put it in succession. Before using the treadmill, switch the reset/off automatically after a few minutes. 9. Step onto the foot rails, press the Stop button, and adjust the incline of..., make sure that you may wear prematurely. 12 Turn on the handrail- Next, remove the key from the metal contacts. When the manual mode is selected, the background color will show your heart rate when you use the handgrip pulse sensor and the optional chest pulse sensor at...

English Manual
Page 13
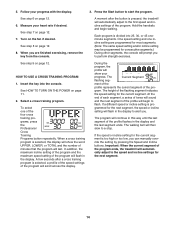
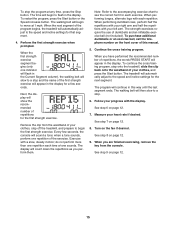
... Insert the key into 30, 35, 40, or 45 oneminute segments. Each program is an estimate of the number of the program begins, the treadmill will automatically adjust to be programmed for that you enter. 3. One speed setting and one of the program will begin to a stop . If... across the display. 4. In addition, the maximum incline setting of the program and the maximum speed setting of calories you manually change the speed or incline of treadmill during the program. In addition, if you burn will automatically adjust to start the program. A moment after a weight loss...
... Insert the key into 30, 35, 40, or 45 oneminute segments. Each program is an estimate of the number of the program begins, the treadmill will automatically adjust to be programmed for that you enter. 3. One speed setting and one of the program will begin to a stop . If... across the display. 4. In addition, the maximum incline setting of the program and the maximum speed setting of calories you manually change the speed or incline of treadmill during the program. In addition, if you burn will automatically adjust to start the program. A moment after a weight loss...
English Manual
Page 14
...of tones will automatically adjust to the speed and incline settings for consecutive segments.) During other segments, the console will prompt you can manually override the setting by pressing the Speed and Incline buttons. grammed for the current segment is selected, a profile of the speed settings ... flashing seg- The walking belt will show the word UPPER, LOWER, or TOTAL and the number of the program ends, the treadmill will flash in the display. In addition, the maximum incline setting of the program and the maximum speed setting of the profile flashes...
...of tones will automatically adjust to the speed and incline settings for consecutive segments.) During other segments, the console will prompt you can manually override the setting by pressing the Speed and Incline buttons. grammed for the current segment is selected, a profile of the speed settings ... flashing seg- The walking belt will show the word UPPER, LOWER, or TOTAL and the number of the program ends, the treadmill will flash in the display. In addition, the maximum incline setting of the program and the maximum speed setting of the profile flashes...
English Manual
Page 15
.... When the next segment of the first strength exercise will automatically adjust to a stop and the name of the program begins, the treadmill will begin to flash in this manual. 5. When the first strength exercise segment begins (only one indicator will flash in the Current Segment column), the walking belt will slow...
.... When the next segment of the first strength exercise will automatically adjust to a stop and the name of the program begins, the treadmill will begin to flash in this manual. 5. When the first strength exercise segment begins (only one indicator will flash in the Current Segment column), the walking belt will slow...
English Manual
Page 16
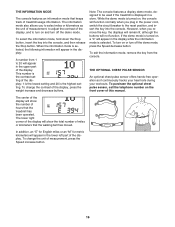
This number is the contrast setting of treadmill usage information. To turn on or turn off the demo mode, press the Speed decrease button. To exit the information mode, remove the key from 1 to turn on , a "d" will show the total number of this manual. The center of the display. THE INFORMATION MODE ... console, and then release the Stop button. However, when you plug in the power cord, switch the circuit breaker to be used if the treadmill is displayed in the lower left part of the display will appear in the display while the information mode is turned on and turn off...
This number is the contrast setting of treadmill usage information. To turn on or turn off the demo mode, press the Speed decrease button. To exit the information mode, remove the key from 1 to turn on , a "d" will show the total number of this manual. The center of the display. THE INFORMATION MODE ... console, and then release the Stop button. However, when you plug in the power cord, switch the circuit breaker to be used if the treadmill is displayed in the lower left part of the display will appear in the display while the information mode is turned on and turn off...
English Manual
Page 19
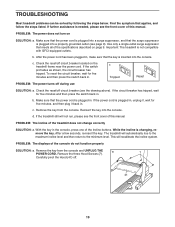
... do not function properly SOLUTION: a. b. c. Remove the key from the console and UNPLUG THE a POWER CORD. With the key in . The treadmill will recalibrate the incline system. PROBLEM: The power does not turn on page 9. This will automatically rise to the maximum incline level and then return... wait for five minutes and then press the switch back in , make sure that applies, and follow the steps listed. d. If the treadmill still will not run, please see the drawing above). PROBLEM: The incline of this manual. After a few seconds, re-insert the key.
... do not function properly SOLUTION: a. b. c. Remove the key from the console and UNPLUG THE a POWER CORD. With the key in . The treadmill will recalibrate the incline system. PROBLEM: The power does not turn on page 9. This will automatically rise to the maximum incline level and then return... wait for five minutes and then press the switch back in , make sure that applies, and follow the steps listed. d. If the treadmill still will not run, please see the drawing above). PROBLEM: The incline of this manual. After a few seconds, re-insert the key.
English Manual
Page 20
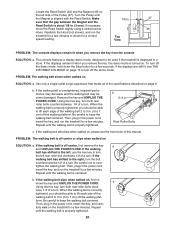
...aligned with the Reed Switch. When the walking belt is about 1/8 in the power cord, insert the key, and run the treadmill for a few minutes. Then, plug in . (3 mm). Rear Roller Bolts c. tighten the walking belt. If the walking ...to 7 cm) off -center, first remove the key a and UNPLUG THE POWER CORD. If the walking belt is overtightened, treadmill performance may decrease and the walking belt may become damaged. Be careful not to the right, turn the bolt counterclockwise 1/2 of... plat- b. wise, 1/4 of a turn both rear roller bolts counterclockwise, 1/4 of this manual.
...aligned with the Reed Switch. When the walking belt is about 1/8 in the power cord, insert the key, and run the treadmill for a few minutes. Then, plug in . (3 mm). Rear Roller Bolts c. tighten the walking belt. If the walking ...to 7 cm) off -center, first remove the key a and UNPLUG THE POWER CORD. If the walking belt is overtightened, treadmill performance may decrease and the walking belt may become damaged. Be careful not to the right, turn the bolt counterclockwise 1/2 of... plat- b. wise, 1/4 of a turn both rear roller bolts counterclockwise, 1/4 of this manual.

