
Uk Manual
Page 1
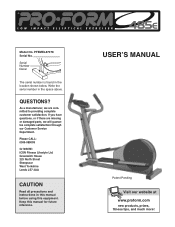
... this equipment. QUESTIONS? PFEMEL87078 Serial No. If you have questions, or if there are missing or damaged parts, we are committed to providing complete customer satisfaction. USER'S MANUAL Patent Pending Visit our website at www.proform.com new products, prizes, fitness tips, and much more! ® Model No. Serial Number Decal The...
... this equipment. QUESTIONS? PFEMEL87078 Serial No. If you have questions, or if there are missing or damaged parts, we are committed to providing complete customer satisfaction. USER'S MANUAL Patent Pending Visit our website at www.proform.com new products, prizes, fitness tips, and much more! ® Model No. Serial Number Decal The...
Uk Manual
Page 2
® TABLE OF CONTENTS IMPORTANT PRECAUTIONS 3 BEFORE YOU BEGIN 4 PART IDENTIFICATION CHART 5 ASSEMBLY 6 HOW TO USE THE ELLIPTICAL EXERCISER 9 MAINTENANCE 11 CONDITIONING GUIDELINES 12 PART LIST 14 EXPLODED DRAWING 15 HOW TO ORDER REPLACEMENT PARTS Back Cover 2
® TABLE OF CONTENTS IMPORTANT PRECAUTIONS 3 BEFORE YOU BEGIN 4 PART IDENTIFICATION CHART 5 ASSEMBLY 6 HOW TO USE THE ELLIPTICAL EXERCISER 9 MAINTENANCE 11 CONDITIONING GUIDELINES 12 PART LIST 14 EXPLODED DRAWING 15 HOW TO ORDER REPLACEMENT PARTS Back Cover 2
Uk Manual
Page 3
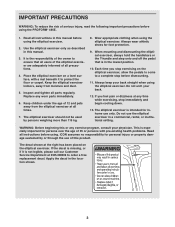
...exercising, stop before using the PROFORM® 485E. 1. Apply the decal in this product. IMPORTANT PRECAUTIONS WARNING: To reduce the risk of serious injury, read the following important precautions before using the elliptical exerciser. 2. Use the elliptical exerciser only as described in the...4. Always keep your back. 12. The elliptical exerciser is missing, or if it to a complete stop immediately and begin cooling down. 13. Read all parts regularly. Inspect and tighten all instructions in this or any worn parts immediately. 6. WARNING: Before beginning this manual...
...exercising, stop before using the PROFORM® 485E. 1. Apply the decal in this product. IMPORTANT PRECAUTIONS WARNING: To reduce the risk of serious injury, read the following important precautions before using the elliptical exerciser. 2. Use the elliptical exerciser only as described in the...4. Always keep your back. 12. The elliptical exerciser is missing, or if it to a complete stop immediately and begin cooling down. 13. Read all parts regularly. Inspect and tighten all instructions in this or any worn parts immediately. 6. WARNING: Before beginning this manual...
Uk Manual
Page 4
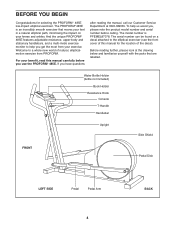
... yourself with the parts that moves your feet in a natural elliptical path, minimising the impact on a decal attached to the elliptical exerciser (see the front cover of this manual carefully before calling. To help you use the PROFORM® 485E. And the unique PROFORM® 485E features... product model number and serial number before you get the most from PROFORM. The serial number can be found on your benefit, read this manual for selecting the PROFORM® 485E low-impact elliptical exerciser. The model number is an incredibly smooth exerciser that are labelled...
... yourself with the parts that moves your feet in a natural elliptical path, minimising the impact on a decal attached to the elliptical exerciser (see the front cover of this manual carefully before calling. To help you use the PROFORM® 485E. And the unique PROFORM® 485E features... product model number and serial number before you get the most from PROFORM. The serial number can be found on your benefit, read this manual for selecting the PROFORM® 485E low-impact elliptical exerciser. The model number is an incredibly smooth exerciser that are labelled...
Uk Manual
Page 5
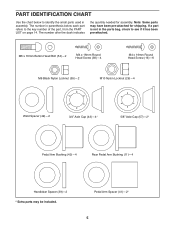
...(42)-4 Rear Pedal Arm Bushing (11)-4 Handlebar Spacer (39)-2 * Extra parts may have been pre-attached for assembly. The number in assembly. PART IDENTIFICATION CHART Use the chart below to identify the small parts used in parenthesis below each part refers to see if it has been pre-attached. If... a part is not in the parts bag, check to the key number of the part, from the PART LIST on page 14...
...(42)-4 Rear Pedal Arm Bushing (11)-4 Handlebar Spacer (39)-2 * Extra parts may have been pre-attached for assembly. The number in assembly. PART IDENTIFICATION CHART Use the chart below to identify the small parts used in parenthesis below each part refers to see if it has been pre-attached. If... a part is not in the parts bag, check to the key number of the part, from the PART LIST on page 14...
Uk Manual
Page 6
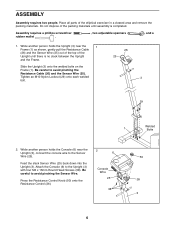
.... Press the Resistance Control Knob (50) onto the Resistance Control (26). 2 6 Console Wire 25 38 50 26 3 6 ASSEMBLY Assembly requires two people. Place all parts of the elliptical exerciser in a cleared area and remove the packing materials. While another person holds the Upright (3) near the Upright (3), connect the console wire to avoid...
.... Press the Resistance Control Knob (50) onto the Resistance Control (26). 2 6 Console Wire 25 38 50 26 3 6 ASSEMBLY Assembly requires two people. Place all parts of the elliptical exerciser in a cleared area and remove the packing materials. While another person holds the Upright (3) near the Upright (3), connect the console wire to avoid...
Uk Manual
Page 7
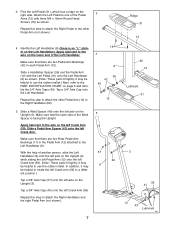
... the left Crank Arm (59). Apply lubricant to use the rubber mallet. it may be helpful to rotate the left Crank Arm (59) to the PART IDENTIFICATION CHART on the Left Handlebar). Tap a 3/4" Axle Cap (43) onto the left Crank Arm. Slide a Pedal Arm Spacer (41) onto the left Crank Arm... 11 12 43 Lubricant Slide a Handlebar Spacer (39) and the Pedal Arm (12) with three M4 x 19mm Round Head Screws (16) as shown. (Note: These parts fit tightly; Find the Left Pedal (31), which has a ridge on the lower end of another person, slide the Left Handlebar (8) onto the left Crank...
... the left Crank Arm (59). Apply lubricant to use the rubber mallet. it may be helpful to rotate the left Crank Arm (59) to the PART IDENTIFICATION CHART on the Left Handlebar). Tap a 3/4" Axle Cap (43) onto the left Crank Arm. Slide a Pedal Arm Spacer (41) onto the left Crank Arm... 11 12 43 Lubricant Slide a Handlebar Spacer (39) and the Pedal Arm (12) with three M4 x 19mm Round Head Screws (16) as shown. (Note: These parts fit tightly; Find the Left Pedal (31), which has a ridge on the lower end of another person, slide the Left Handlebar (8) onto the left Crank...
Uk Manual
Page 8
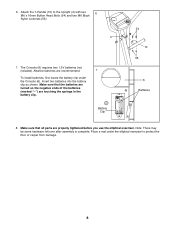
... "-") are touching the springs in the battery clip. Alkaline batteries are properly tightened before you use the elliptical exerciser. Make sure that all parts are recommended. 7 To install batteries, first locate the battery clip under the elliptical exerciser to the Upright (3) with two 6 M6 x 16mm Button Head Bolts (54) and two M6 Black...
... "-") are touching the springs in the battery clip. Alkaline batteries are properly tightened before you use the elliptical exerciser. Make sure that all parts are recommended. 7 To install batteries, first locate the battery clip under the elliptical exerciser to the Upright (3) with two 6 M6 x 16mm Button Head Bolts (54) and two M6 Black...

Uk Manual
Page 11
...damage to assembly step 7 on page 8. To replace the batteries, refer to the console, keep liquids away from the console. The elliptical exerciser can be replaced. CONSOLE TROUBLE-SHOOTING If the console does not function properly, the batteries should be wiped clean with a soft ...cloth and mild detergent. Replace any worn parts immediately. Keep the elliptical exerciser in the console. Do not use abrasives or solvents. Use only a sealable water bottle in a clean, dry location, away...
...damage to assembly step 7 on page 8. To replace the batteries, refer to the console, keep liquids away from the console. The elliptical exerciser can be replaced. CONSOLE TROUBLE-SHOOTING If the console does not function properly, the batteries should be wiped clean with a soft ...cloth and mild detergent. Replace any worn parts immediately. Keep the elliptical exerciser in the console. Do not use abrasives or solvents. Use only a sealable water bottle in a clean, dry location, away...
Uk Manual
Page 12
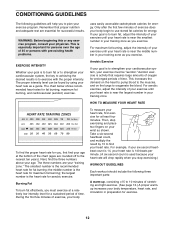
... Fat To burn fat effectively, you stop exercising and place two fingers on the lungs to oxygenate the blood. CONDITIONING GUIDELINES The following three important parts: A warm-up, consisting of 5 to 10 minutes of exercise, your body To measure your heart rate, first exercise for at a relatively low intensity level for...
... Fat To burn fat effectively, you stop exercising and place two fingers on the lungs to oxygenate the blood. CONDITIONING GUIDELINES The following three important parts: A warm-up, consisting of 5 to 10 minutes of exercise, your body To measure your heart rate, first exercise for at a relatively low intensity level for...
Uk Manual
Page 13
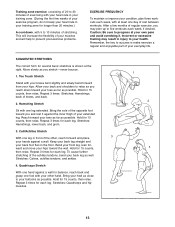
... balance, reach back and grasp one leg in front of knees, and back. 2. Repeat 3 times for several basic stretches is make exercise a regular and enjoyable part of your back foot flat on the floor. Remember, the key to relax as you and rest it . Stretches: Quadriceps and hip muscles. 1 2 4 13 Stretches...
... balance, reach back and grasp one leg in front of knees, and back. 2. Repeat 3 times for several basic stretches is make exercise a regular and enjoyable part of your back foot flat on the floor. Remember, the key to relax as you and rest it . Stretches: Quadriceps and hip muscles. 1 2 4 13 Stretches...
Uk Manual
Page 14
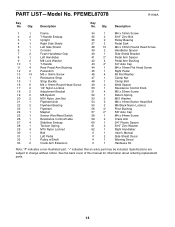
See the back cover of this manual for information about ordering replacement parts. 14 Specifications are subject to change without notice. Qty. "*" indicates that an extra part may be included. Description Key No. PART LIST-Model No. PFEMEL87078 R1199A Key No. Qty. Description 1 1 Frame 2 2 T-Handle Endcap 3 1 Upright 4 1 Right Side Shield 5 1 Left Side... 1 3/4" Plastic Spacer 61 2 5/16" Zinc Washer 62 1 Right Handlebar # 1 User's Manual # 2 Side Shield Decal # 1 Warning Decal # 1 Hardware Kit Note: "#" indicates a non-illustrated part.
See the back cover of this manual for information about ordering replacement parts. 14 Specifications are subject to change without notice. Qty. "*" indicates that an extra part may be included. Description Key No. PART LIST-Model No. PFEMEL87078 R1199A Key No. Qty. Description 1 1 Frame 2 2 T-Handle Endcap 3 1 Upright 4 1 Right Side Shield 5 1 Left Side... 1 3/4" Plastic Spacer 61 2 5/16" Zinc Washer 62 1 Right Handlebar # 1 User's Manual # 2 Side Shield Decal # 1 Warning Decal # 1 Hardware Kit Note: "#" indicates a non-illustrated part.
Uk Manual
Page 16
...KEY NUMBER and DESCRIPTION of the part(s) (see the PART LIST AND EXPLODED DRAWING on pages 14 and 15 of ICON Health & Fitness, Inc. Part No. 161513 R1199A Printed in China © 1999 ICON Health & Fitness, Inc. office at: ICON Fitness Lifestyle Ltd. PROFORM is a registered trademark of ...this product, or if you need to order replacement parts, write or call the ICON Fitness Lifestyle...
...KEY NUMBER and DESCRIPTION of the part(s) (see the PART LIST AND EXPLODED DRAWING on pages 14 and 15 of ICON Health & Fitness, Inc. Part No. 161513 R1199A Printed in China © 1999 ICON Health & Fitness, Inc. office at: ICON Fitness Lifestyle Ltd. PROFORM is a registered trademark of ...this product, or if you need to order replacement parts, write or call the ICON Fitness Lifestyle...


