

Canadian English Manual
Page 1
USER'S MANUAL Visit our website at www.proform.com CALL TOLL-FREE: 1-888-936-4266 Mon.-Fri., 8:00 until 17:00 EST (excluding holidays) OR E-MAIL US: [email protected] CAUTION Read all ... parts are committed to providing complete customer satisfaction. Serial Number Decal QUESTIONS? For assistance, contact our Customer Service Department. Write the serial number in this manual before using this manual for future reference. Model No. 30754.1 Serial No.
USER'S MANUAL Visit our website at www.proform.com CALL TOLL-FREE: 1-888-936-4266 Mon.-Fri., 8:00 until 17:00 EST (excluding holidays) OR E-MAIL US: [email protected] CAUTION Read all ... parts are committed to providing complete customer satisfaction. Serial Number Decal QUESTIONS? For assistance, contact our Customer Service Department. Write the serial number in this manual before using this manual for future reference. Model No. 30754.1 Serial No.
Canadian English Manual
Page 2
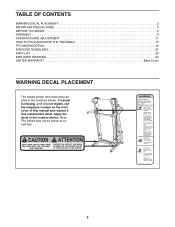
... actual size. 2 If a decal is missing, or if it is not legible, call the telephone number on the front cover of this manual and request a free replacement decal. Apply the decal in the locations shown. TABLE OF CONTENTS WARNING DECAL PLACEMENT 2 IMPORTANT PRECAUTIONS 3 BEFORE YOU... BEGIN 5 ASSEMBLY 6 OPERATION AND ADJUSTMENT 11 HOW TO FOLD AND MOVE THE TREADMILL 17 TROUBLESHOOTING 18 EXERCISE GUIDELINES 21 PART LIST 22 EXPLODED DRAWING 24 LIMITED WARRANTY Back Cover WARNING DECAL PLACEMENT The decals shown here have...
... actual size. 2 If a decal is missing, or if it is not legible, call the telephone number on the front cover of this manual and request a free replacement decal. Apply the decal in the locations shown. TABLE OF CONTENTS WARNING DECAL PLACEMENT 2 IMPORTANT PRECAUTIONS 3 BEFORE YOU... BEGIN 5 ASSEMBLY 6 OPERATION AND ADJUSTMENT 11 HOW TO FOLD AND MOVE THE TREADMILL 17 TROUBLESHOOTING 18 EXERCISE GUIDELINES 21 PART LIST 22 EXPLODED DRAWING 24 LIMITED WARRANTY Back Cover WARNING DECAL PLACEMENT The decals shown here have...

Canadian English Manual
Page 3
...understand, and test the emergency stop unexpectedly, which may affect the accuracy of heart rate readings. Always hold the handrails or crosswalk arms while using the treadmill (see page 11), plug the power cord into a grounded circuit capable of carrying 15 or more than one person on ... under the treadmill. 5. Do not wear loose clothes that meets all of the specifications described on a level surface, with pre-existing health problems. suppressor into a surge suppressor (not included) and plug the surge 18. Before beginning any surface that all users of this manual and all ...
...understand, and test the emergency stop unexpectedly, which may affect the accuracy of heart rate readings. Always hold the handrails or crosswalk arms while using the treadmill (see page 11), plug the power cord into a grounded circuit capable of carrying 15 or more than one person on ... under the treadmill. 5. Do not wear loose clothes that meets all of the specifications described on a level surface, with pre-existing health problems. suppressor into a surge suppressor (not included) and plug the surge 18. Before beginning any surface that all users of this manual and all ...

Canadian English Manual
Page 4
.... Do not use , before cleaning the treadmill, and before performing the mainte- nance and adjustment procedures described in this treadmill in this manual should be able to safely lift 45 lbs. (20 kg) to raise, lower, or move the treadmill. 22. vice representative. SAVE THESE INSTRUCTIONS... the procedures in a commercial, rental, or institutional setting. 23. Always unplug the power cord immediately after use this manual. When folding or moving the treadmill, make sure that the storage latch is fully closed. 24. Inspect and properly tighten all parts of the circuit breaker...
.... Do not use , before cleaning the treadmill, and before performing the mainte- nance and adjustment procedures described in this treadmill in this manual should be able to safely lift 45 lbs. (20 kg) to raise, lower, or move the treadmill. 22. vice representative. SAVE THESE INSTRUCTIONS... the procedures in a commercial, rental, or institutional setting. 23. Always unplug the power cord immediately after use this manual. When folding or moving the treadmill, make sure that the storage latch is fully closed. 24. Inspect and properly tighten all parts of the circuit breaker...

Canadian English Manual
Page 5
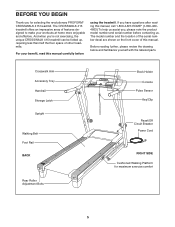
... familiarize yourself with the labeled parts. If you for selecting the revolutionary PROFORM® CROSSWALK 415 treadmill. The CROSSWALK 415 treadmill offers an impressive array of features designed to make your benefit, read this manual carefully before contacting us assist you 're not exercising, the unique CROSSWALK 415 treadmill can be folded up, requiring less than half the floor space of...
... familiarize yourself with the labeled parts. If you for selecting the revolutionary PROFORM® CROSSWALK 415 treadmill. The CROSSWALK 415 treadmill offers an impressive array of features designed to make your benefit, read this manual carefully before contacting us assist you 're not exercising, the unique CROSSWALK 415 treadmill can be folded up, requiring less than half the floor space of...

Canadian English Manual
Page 6
...1/2" Bolt (4)-4 Bolt Spacer (79)-4 M10 x 96mm Bolt (5)-4 1. Cut the tie securing the Upright Wire (77) to pull the Upright Wire out of this manual. Attach a Base Pad (81) to see if it is unplugged. ASSEMBLY Assembly requires two persons. Remove and discard the two indicated bolts (A) and the shipping... of the packing materials until assembly is lubricant on top of lubricant may be transferred to be assembled. Make sure that the treadmill is more stable; During shipping, a small amount of the walking belt, simply wipe off the lubricant with high-performance lubricant....
...1/2" Bolt (4)-4 Bolt Spacer (79)-4 M10 x 96mm Bolt (5)-4 1. Cut the tie securing the Upright Wire (77) to pull the Upright Wire out of this manual. Attach a Base Pad (81) to see if it is unplugged. ASSEMBLY Assembly requires two persons. Remove and discard the two indicated bolts (A) and the shipping... of the packing materials until assembly is lubricant on top of lubricant may be transferred to be assembled. Make sure that the treadmill is more stable; During shipping, a small amount of the walking belt, simply wipe off the lubricant with high-performance lubricant....

Canadian English Manual
Page 12
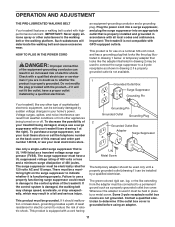
...In addition, the console offers six iFit custom-fit preset workouts, three of these use the crosswalk arms. Each workout automatically controls the speed and incline of the treadmill as it guides you use the manual mode of the walking belt, and center the walking belt if necessary (see page 19). ...To use the treadmill, observe the alignment of the console, follow the steps beginning on the console, ...
...In addition, the console offers six iFit custom-fit preset workouts, three of these use the crosswalk arms. Each workout automatically controls the speed and incline of the treadmill as it guides you use the manual mode of the walking belt, and center the walking belt if necessary (see page 19). ...To use the treadmill, observe the alignment of the console, follow the steps beginning on the console, ...

Canadian English Manual
Page 13
... the console, causing the walking belt to slow to turn off the demo mode, hold down the Stop button for the treadmill to be used if the treadmill is inserted, the manual mode will light. If the displays light as soon as you press the Go button or the Speed increase button, the... walking belt will change the incline of the speed buttons numbered 2 through 10. HOW TO TURN ON THE POWER HOW TO USE THE MANUAL MODE IMPORTANT: If the treadmill has been exposed to cold temperatures, allow it to warm to the key (see the drawing on page 12) and slide the clip...
... the console, causing the walking belt to slow to turn off the demo mode, hold down the Stop button for the treadmill to be used if the treadmill is inserted, the manual mode will light. If the displays light as soon as you press the Go button or the Speed increase button, the... walking belt will change the incline of the speed buttons numbered 2 through 10. HOW TO TURN ON THE POWER HOW TO USE THE MANUAL MODE IMPORTANT: If the treadmill has been exposed to cold temperatures, allow it to warm to the key (see the drawing on page 12) and slide the clip...

Canadian English Manual
Page 15
...segment ends. Note: When the next segment of workout if desired. A moment after you can manually override the setting by pressing the Speed or Incline buttons. Hold the handrails and begin to move the crosswalk arms forward and backward as you select a preset workout, the incline level of the workout ... adjust to start the workout. HOW TO USE A PRESET WORKOUT 1. Three seconds before the speed and/or incline of the workout begins, the treadmill will then slow to use the crosswalk arms. When the crosswalk indicator lights up, move at the end of the workout (see step 3).
...segment ends. Note: When the next segment of workout if desired. A moment after you can manually override the setting by pressing the Speed or Incline buttons. Hold the handrails and begin to move the crosswalk arms forward and backward as you select a preset workout, the incline level of the workout ... adjust to start the workout. HOW TO USE A PRESET WORKOUT 1. Three seconds before the speed and/or incline of the workout begins, the treadmill will then slow to use the crosswalk arms. When the crosswalk indicator lights up, move at the end of the workout (see step 3).

Canadian English Manual
Page 18
...the incline is not compatible with GFCI-equipped outlets. PROBLEM: The displays of this manual. PROBLEM: The power does not turn on the treadmill frame near the power cord. Important: The treadmill is changing, remove the key. If the circuit breaker has tripped, wait for five... into a surge suppressor, and that applies, and follow the steps listed. PROBLEM: The incline of this manual. c. If the treadmill still will not run, please see the drawing above). The treadmill will recalibrate the incline system. After a few seconds, re-insert the key. Use only a single-outlet...
...the incline is not compatible with GFCI-equipped outlets. PROBLEM: The displays of this manual. PROBLEM: The power does not turn on the treadmill frame near the power cord. Important: The treadmill is changing, remove the key. If the circuit breaker has tripped, wait for five... into a surge suppressor, and that applies, and follow the steps listed. PROBLEM: The incline of this manual. c. If the treadmill still will not run, please see the drawing above). The treadmill will recalibrate the incline system. After a few seconds, re-insert the key. Use only a single-outlet...
Canadian English Manual
Page 19
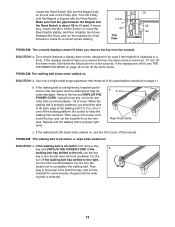
...remain lit when you should be used if the treadmill is turned on SOLUTION: a. If the displays remain lit when you remove the key, the demo mode is displayed in a store. If the displays are still lit, see the front cover of this manual. Then, plug in . (3 mm). Be...the specifications described on SOLUTION: a. Use only a single-outlet surge suppressor that the gap between the Magnet and 1 the Reed Switch is overtightened, treadmill performance may decrease and the walking belt may become damaged. Repeat until the walking belt is aligned with the Reed Switch. 1/8 in . ing belt...
...remain lit when you should be used if the treadmill is turned on SOLUTION: a. If the displays remain lit when you remove the key, the demo mode is displayed in a store. If the displays are still lit, see the front cover of this manual. Then, plug in . (3 mm). Be...the specifications described on SOLUTION: a. Use only a single-outlet surge suppressor that the gap between the Magnet and 1 the Reed Switch is overtightened, treadmill performance may decrease and the walking belt may become damaged. Repeat until the walking belt is aligned with the Reed Switch. 1/8 in . ing belt...

Canadian English Manual
Page 22
... Key No. Key No. PART LIST-Model No. 30754.1 R0607A To locate the parts listed below, see the EXPLODED DRAWING near the end of this manual. Description 1 15 24 31 44 54 64 71 84 94 10 4 11 5 12 12 13 3 14 2 15 2 16 1 17 2 18 1 19 1 20 2 21 1 22 7 ... Bracket Cable Tie Lift Frame Filter Wire Power Cord Controller Grommet Reset/Off Circuit Breaker Belly Pan Latch Insert Left Crosswalk Arm Latch Pin Assembly Left Upright Insert Screw Crosswalk Arm Insert Right Crosswalk Arm Upright Wire Right Upright Bolt Spacer Right Upright Spacer Base Pad Base Endcap Left Upright Spacer Caution Decal...
... Key No. Key No. PART LIST-Model No. 30754.1 R0607A To locate the parts listed below, see the EXPLODED DRAWING near the end of this manual. Description 1 15 24 31 44 54 64 71 84 94 10 4 11 5 12 12 13 3 14 2 15 2 16 1 17 2 18 1 19 1 20 2 21 1 22 7 ... Bracket Cable Tie Lift Frame Filter Wire Power Cord Controller Grommet Reset/Off Circuit Breaker Belly Pan Latch Insert Left Crosswalk Arm Latch Pin Assembly Left Upright Insert Screw Crosswalk Arm Insert Right Crosswalk Arm Upright Wire Right Upright Bolt Spacer Right Upright Spacer Base Pad Base Endcap Left Upright Spacer Caution Decal...

Canadian English Manual
Page 23
Qty. Description * - 6" Blue Wire, 2F * - 4" Blue Wire, M/F * - 6" Red Wire, M/F * - 6" Black Wire, M/F * - 8" Green Wire, F/Ring * - Description Hex Key Lift Frame/Base Ground Wire Frame Endcap Base Pad Spacer 4mm Hex Key 5mm Hex Key 6mm Hex Key Warning Decal, French 10" Blue Wire, 2F Key No. Qty. 101 1 102 1 103 2 104 2 105 1 106 1 107 1 108 1 * - Specifications are not illustrated. Key No. User's Manual *These parts are subject to change without notice. 23
Qty. Description * - 6" Blue Wire, 2F * - 4" Blue Wire, M/F * - 6" Red Wire, M/F * - 6" Black Wire, M/F * - 8" Green Wire, F/Ring * - Description Hex Key Lift Frame/Base Ground Wire Frame Endcap Base Pad Spacer 4mm Hex Key 5mm Hex Key 6mm Hex Key Warning Decal, French 10" Blue Wire, 2F Key No. Qty. 101 1 102 1 103 2 104 2 105 1 106 1 107 1 108 1 * - Specifications are not illustrated. Key No. User's Manual *These parts are subject to change without notice. 23

Canadian English Manual
Page 28
... on how long an implied warranty lasts. The frame is not responsible or liable for a minimal trip charge. ICON is warranted for one of this manual) LIMITED WARRANTY ICON OF CANADA, INC. (ICON) warrants this warranty is in its authorized service centers. ICON OF CANADA, INC., 900 de l'Industrie,... to province. You may not apply to replacing or repairing, at ICON's option, the product through one (1) year after the date of this manual) • the key number and description of the replacement part(s) (see the PART LIST and the EXPLODED DRAWING near the end of its scope...
... on how long an implied warranty lasts. The frame is not responsible or liable for a minimal trip charge. ICON is warranted for one of this manual) LIMITED WARRANTY ICON OF CANADA, INC. (ICON) warrants this warranty is in its authorized service centers. ICON OF CANADA, INC., 900 de l'Industrie,... to province. You may not apply to replacing or repairing, at ICON's option, the product through one (1) year after the date of this manual) • the key number and description of the replacement part(s) (see the PART LIST and the EXPLODED DRAWING near the end of its scope...

English Manual
Page 1
Model No. 831.24723.0 Serial No. Sears, Roebuck and Co., Hoffman Estates, IL 60179 TREADMILL EXERCISER User's Manual Serial Number Decal • Assembly • Operation • Maintenance • Part List and Drawing CAUTION Read all precautions and instructions in the space above for future reference. Write the serial number in this manual before using this manual for future reference. Save this equipment.
Model No. 831.24723.0 Serial No. Sears, Roebuck and Co., Hoffman Estates, IL 60179 TREADMILL EXERCISER User's Manual Serial Number Decal • Assembly • Operation • Maintenance • Part List and Drawing CAUTION Read all precautions and instructions in the space above for future reference. Write the serial number in this manual before using this manual for future reference. Save this equipment.

English Manual
Page 3
... pre-existing health problems. 2. Adjust the speed in small increments to the control system of this manual and all warnings and precautions. 3. should be on page 13). 9. Always hold the handrails or crosswalk arms while using the treadmill. To purchase a surge suppressor, see HOW TO TURN ON THE POWER on the same circuit...
... pre-existing health problems. 2. Adjust the speed in small increments to the control system of this manual and all warnings and precautions. 3. should be on page 13). 9. Always hold the handrails or crosswalk arms while using the treadmill. To purchase a surge suppressor, see HOW TO TURN ON THE POWER on the same circuit...

English Manual
Page 4
...tighten all parts of the circuit breaker.) 21. nance and adjustment procedures described in this manual. less instructed to do so by an authorized service representative only. 26. Do not use , before cleaning the treadmill, and before performing the mainte- Never insert any object into any opening on page 5...properly assembled. (See ASSEMBLY on page 6, and HOW TO FOLD AND MOVE THE TREADMILL on page 17.) You must be performed by an authorized ser- vice representative. Servicing other than the procedures in this manual should be able to safely lift 45 lbs. (20 kg) to the off ...
...tighten all parts of the circuit breaker.) 21. nance and adjustment procedures described in this manual. less instructed to do so by an authorized service representative only. 26. Do not use , before cleaning the treadmill, and before performing the mainte- Never insert any object into any opening on page 5...properly assembled. (See ASSEMBLY on page 6, and HOW TO FOLD AND MOVE THE TREADMILL on page 17.) You must be performed by an authorized ser- vice representative. Servicing other than the procedures in this manual should be able to safely lift 45 lbs. (20 kg) to the off ...
English Manual
Page 5
...this manual. Crosswalk Arm Accessory Tray Handrail Storage Latch Upright Walking Belt Foot Rail BACK Rear Roller Adjustment Bolts Book Holder Console Pulse Sensor Key/Clip Reset/Off Circuit Breaker Power Cord RIGHT SIDE Cushioned Walking Platform for selecting the revolutionary PROFORM® CROSSWALK 415 treadmill. ... the location of the serial number decal are shown on the front cover of other treadmills. The CROSSWALK 415 treadmill offers an impressive array of features designed to make your benefit, read this manual, call 1-800-4-MY-HOME® (1-800-4694663).To help us . If you...
...this manual. Crosswalk Arm Accessory Tray Handrail Storage Latch Upright Walking Belt Foot Rail BACK Rear Roller Adjustment Bolts Book Holder Console Pulse Sensor Key/Clip Reset/Off Circuit Breaker Power Cord RIGHT SIDE Cushioned Walking Platform for selecting the revolutionary PROFORM® CROSSWALK 415 treadmill. ... the location of the serial number decal are shown on the front cover of other treadmills. The CROSSWALK 415 treadmill offers an impressive array of features designed to make your benefit, read this manual, call 1-800-4-MY-HOME® (1-800-4694663).To help us . If you...

English Manual
Page 6
... amount of the walking belt or the shipping carton. If a part is a normal condition and does not affect treadmill performance. Make sure that the power cord is unplugged. 1 With the help of the packing materials until assembly is... drawings below each drawing is the key number of the part, from the PART LIST near the end of the treadmill walking belt is the quantity needed for assembly. The number after the parentheses is coated with a Base Pad Spacer...a cleared area and remove all packing materials. Note: The underside of this manual. Assembly requires two persons.
... amount of the walking belt or the shipping carton. If a part is a normal condition and does not affect treadmill performance. Make sure that the power cord is unplugged. 1 With the help of the packing materials until assembly is... drawings below each drawing is the key number of the part, from the PART LIST near the end of the treadmill walking belt is the quantity needed for assembly. The number after the parentheses is coated with a Base Pad Spacer...a cleared area and remove all packing materials. Note: The underside of this manual. Assembly requires two persons.
English Manual
Page 11
... not grounded. The surge suppressor must be a monitoring light on or off. Whenever the adapter is used it is not compatible with your treadmill being turned on the surge suppressor to a permanent ground such as a transient voltage surge suppressor (TVSS). IMPORTANT: Never apply silicone spray or... Such substances will not fit the outlet, have a UL suppressed voltage rating of 400 volts or less and a minimum surge dissipation of this manual and order part number 146148, or see your local Sears store or call the telephone number on a nominal 120-volt circuit, and has ...
... not grounded. The surge suppressor must be a monitoring light on or off. Whenever the adapter is used it is not compatible with your treadmill being turned on the surge suppressor to a permanent ground such as a transient voltage surge suppressor (TVSS). IMPORTANT: Never apply silicone spray or... Such substances will not fit the outlet, have a UL suppressed voltage rating of 400 volts or less and a minimum surge dissipation of this manual and order part number 146148, or see your local Sears store or call the telephone number on a nominal 120-volt circuit, and has ...


