
Canadian English Manual
Page 1
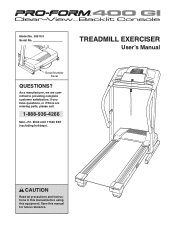
As a manufacturer, we are missing parts, please call: 1-888-936-4266 Mon.-Fri. 8h00 until 17h00 EST (excluding holidays). If you have questions, or if there are committed to providing complete customer satisfaction. Model No. 30514.0 Serial No. CAUTION Read all precautions and instructions in this manual before using this manual for future reference. Save this equipment. TREADMILL EXERCISER User's Manual Serial Number Decal QUESTIONS?
As a manufacturer, we are missing parts, please call: 1-888-936-4266 Mon.-Fri. 8h00 until 17h00 EST (excluding holidays). If you have questions, or if there are committed to providing complete customer satisfaction. Model No. 30514.0 Serial No. CAUTION Read all precautions and instructions in this manual before using this manual for future reference. Save this equipment. TREADMILL EXERCISER User's Manual Serial Number Decal QUESTIONS?

Canadian English Manual
Page 2
TABLE OF CONTENTS IMPORTANT PRECAUTIONS 3 BEFORE YOU BEGIN 5 ASSEMBLY 6 OPERATION AND ADJUSTMENT 10 HOW TO FOLD AND MOVE THE TREADMILL 22 TROUBLESHOOTING 24 CONDITIONING GUIDELINES 26 ORDERING REPLACEMENT PARTS 27 LIMITED WARRANTY Back Cover Note: An EXPLODED DRAWING and a PART LIST are attached in the center of this manual. 2
TABLE OF CONTENTS IMPORTANT PRECAUTIONS 3 BEFORE YOU BEGIN 5 ASSEMBLY 6 OPERATION AND ADJUSTMENT 10 HOW TO FOLD AND MOVE THE TREADMILL 22 TROUBLESHOOTING 24 CONDITIONING GUIDELINES 26 ORDERING REPLACEMENT PARTS 27 LIMITED WARRANTY Back Cover Note: An EXPLODED DRAWING and a PART LIST are attached in the center of this manual. 2
Canadian English Manual
Page 4
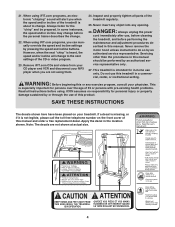
... do so by or through the use , before cleaning the treadmill, and before the personal trainer describes the change before performing the maintenance and adjustment procedures de- WARNING: Before beginning this manual. SAVE THESE INSTRUCTIONS The decals shown here have been placed on... the front cover of the treadmill regularly. 25. Apply the decal in a commercial, rental, or institutional setting. Note...
... do so by or through the use , before cleaning the treadmill, and before the personal trainer describes the change before performing the maintenance and adjustment procedures de- WARNING: Before beginning this manual. SAVE THESE INSTRUCTIONS The decals shown here have been placed on... the front cover of the treadmill regularly. 25. Apply the decal in a commercial, rental, or institutional setting. Note...
Canadian English Manual
Page 5
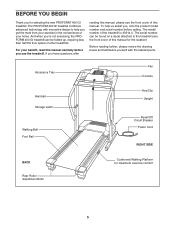
... Cord RIGHT SIDE BACK Rear Roller Adjustment Bolts Cushioned Walking Platform for selecting the new PROFORM® 400 GI treadmill. And when you're not exercising, the PROFORM 400 GI treadmill can be folded up, requiring less than half the floor space of this manual carefully before calling. To help you get the most from your home. BEFORE YOU...
... Cord RIGHT SIDE BACK Rear Roller Adjustment Bolts Cushioned Walking Platform for selecting the new PROFORM® 400 GI treadmill. And when you're not exercising, the PROFORM 400 GI treadmill can be folded up, requiring less than half the floor space of this manual carefully before calling. To help you get the most from your home. BEFORE YOU...
Canadian English Manual
Page 11
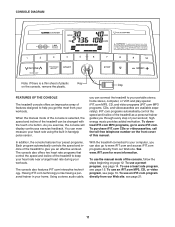
...the console, remove the plastic. Having iFIT.com technology is selected, the speed and incline of the treadmill can also go to www.iFIT.com. To use the manual mode of this manual. When the manual mode of your workouts. iFIT.com programs automatically control the speed and incline of the... treadmill as a personal trainer guides you through every step of the console is like having a personal trainer in ...
...the console, remove the plastic. Having iFIT.com technology is selected, the speed and incline of the treadmill can also go to www.iFIT.com. To use the manual mode of this manual. When the manual mode of your workouts. iFIT.com programs automatically control the speed and incline of the... treadmill as a personal trainer guides you through every step of the console is like having a personal trainer in ...
Canadian English Manual
Page 12
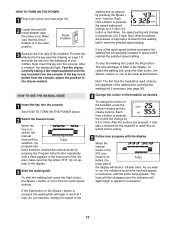
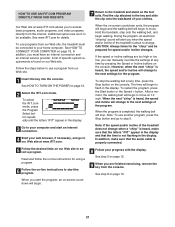
...by 0.5%. Each time a button is pressed, the speed setting will begin to flash in the display. As you exercise, change in increments of the treadmill as desired. play; buttons. To restart the walking belt, press the Start button, the Speed + button, or one of the display will appear ...sure that the letters "iFIT" do not ap- Note: The first time the treadmill is pressed, the walking belt will be Track selected. The track will then disappear and the indicators will light. serted, the manual mode will gradually increase in speed until the entire track appears. HOW TO TURN...
...by 0.5%. Each time a button is pressed, the speed setting will begin to flash in the display. As you exercise, change in increments of the treadmill as desired. play; buttons. To restart the walking belt, press the Start button, the Speed + button, or one of the display will appear ...sure that the letters "iFIT" do not ap- Note: The first time the treadmill is pressed, the walking belt will be Track selected. The track will then disappear and the indicators will light. serted, the manual mode will gradually increase in speed until the entire track appears. HOW TO TURN...
Canadian English Manual
Page 14
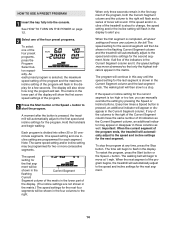
...USE A PRESET PROGRAM 1 Insert the key fully into either 20 or 30 oneminute segments. The matrix in the display to alert you can manually override the setting by pressing the Speed or Incline buttons. The speed setting for the current segment is about to change, the speed setting and... speed setting of the program and the maximum incline setting of tones will flash in the Current Segment column; Each program is pressed, the treadmill will automatically adjust to the speed and incline settings for the next four segments will be shown in the display. A moment after the button...
...USE A PRESET PROGRAM 1 Insert the key fully into either 20 or 30 oneminute segments. The matrix in the display to alert you can manually override the setting by pressing the Speed or Incline buttons. The speed setting for the current segment is about to change, the speed setting and... speed setting of the program and the maximum incline setting of tones will flash in the Current Segment column; Each program is pressed, the treadmill will automatically adjust to the speed and incline settings for the next four segments will be shown in the display. A moment after the button...
Canadian English Manual
Page 19
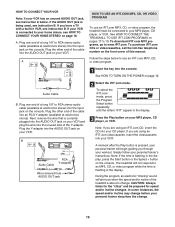
...Play button is pressed, your personal trainer will not respond to an MP3, CD, or video program while the time is about to change. The treadmill will begin guiding you through your workout. Plug the other end of a long 1/8" to RCA stereo audio cable (available at electronics stores) into the... AUDIO OUT jack on the console. A Plug the Y-adapter into the unused side of this manual. IN VIDEO AUDIO IN CH 34 OUT RF OUT B Audio Cable RCA Y-adapter Wire removed from AUDIO OUT jack B 2 Select the iFIT.com mode....
...Play button is pressed, your personal trainer will not respond to an MP3, CD, or video program while the time is about to change. The treadmill will begin guiding you through your workout. Plug the other end of a long 1/8" to RCA stereo audio cable (available at electronics stores) into the... AUDIO OUT jack on the console. A Plug the Y-adapter into the unused side of this manual. IN VIDEO AUDIO IN CH 34 OUT RF OUT B Audio Cable RCA Y-adapter Wire removed from AUDIO OUT jack B 2 Select the iFIT.com mode....
Canadian English Manual
Page 20
The time will begin to the next settings of the treadmill does not change when a "chirp" is heard: • Make sure that the letters "iFIT" appear in the display and that the audio cable is not ... time by pressing the Speed or Incline buttons on the console. If the speed or incline settings are too high or too low, you can manually override the settings at any time, press the Stop button on the console.
The time will begin to the next settings of the treadmill does not change when a "chirp" is heard: • Make sure that the letters "iFIT" appear in the display and that the audio cable is not ... time by pressing the Speed or Incline buttons on the console. If the speed or incline settings are too high or too low, you can manually override the settings at any time, press the Stop button on the console.
Canadian English Manual
Page 21
....com mode, press the Program Select button repeatedly until the letters "iFIT" appear in the display. Note: If the speed and/or incline of the treadmill is heard, the speed and incline will change to step 5. In addition, make sure that the audio cable is found on -screen countdown ends, the..., if necessary, and go to the next settings of specific system requirements is properly connected. 5 Follow the desired links on page 12. 9 When you can manually override the settings at www.iFIT.com. When the on our Web site. If the speed or incline settings are too high or too low...
....com mode, press the Program Select button repeatedly until the letters "iFIT" appear in the display. Note: If the speed and/or incline of the treadmill is heard, the speed and incline will change to step 5. In addition, make sure that the audio cable is found on -screen countdown ends, the..., if necessary, and go to the next settings of specific system requirements is properly connected. 5 Follow the desired links on page 12. 9 When you can manually override the settings at www.iFIT.com. When the on our Web site. If the speed or incline settings are too high or too low...
Canadian English Manual
Page 24
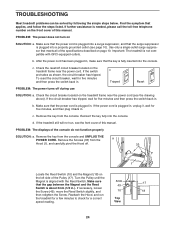
... into a properly grounded outlet (see page 10). c Tripped Reset PROBLEM: The power turns off circuit breaker located on the treadmill frame near the power cord (see the front cover of this manual. Check the circuit breaker located on the left side of the console do not function properly SOLUTION: a. Reinsert the key...
... into a properly grounded outlet (see page 10). c Tripped Reset PROBLEM: The power turns off circuit breaker located on the treadmill frame near the power cord (see the front cover of this manual. Check the circuit breaker located on the left side of the console do not function properly SOLUTION: a. Reinsert the key...
Canadian English Manual
Page 25
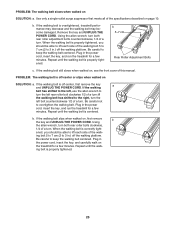
... if the walking belt has shifted to the right, turn both rear roller bolts clockwise, 1/4 of this manual. b. Plug in the power cord, insert the key, and run the treadmill for a few minutes. Remove the key and UNPLUG THE POWER CORD. When the walking belt is overtightened...left , use the allen wrench to lift each side of a turn both rear roller adjustment bolts counterclockwise, 1/4 of the specifications described on the treadmill for a few minutes. Be careful to lift each side of a turn . If the walking belt is properly tightened, you should be able...
... if the walking belt has shifted to the right, turn both rear roller bolts clockwise, 1/4 of this manual. b. Plug in the power cord, insert the key, and run the treadmill for a few minutes. Remove the key and UNPLUG THE POWER CORD. When the walking belt is overtightened...left , use the allen wrench to lift each side of a turn both rear roller adjustment bolts counterclockwise, 1/4 of the specifications described on the treadmill for a few minutes. Be careful to lift each side of a turn . If the walking belt is properly tightened, you should be able...

Canadian English Manual
Page 27
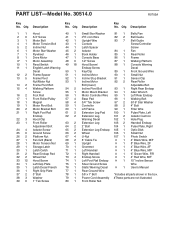
HOW TO ORDER REPLACEMENT PARTS To order replacement parts, see the EXPLODED DRAWING and PART LIST in the center of this manual) 27 To help us assist you, please be prepared to give the following information: • The MODEL NUMBER of the product (30514.0) • The NAME of the product (PROFORM 400 GI treadmill) • The SERIAL NUMBER of the product (see the front cover of this manual) • The KEY NUMBER AND DESCRIPTION OF THE PART(S) (see the front cover of this manual.
HOW TO ORDER REPLACEMENT PARTS To order replacement parts, see the EXPLODED DRAWING and PART LIST in the center of this manual) 27 To help us assist you, please be prepared to give the following information: • The MODEL NUMBER of the product (30514.0) • The NAME of the product (PROFORM 400 GI treadmill) • The SERIAL NUMBER of the product (see the front cover of this manual) • The KEY NUMBER AND DESCRIPTION OF THE PART(S) (see the front cover of this manual.

Canadian English Manual
Page 28
For information about ordering replacement parts, see the back cover of the User's Manual. 34 Note: Specifications are subject to change without notice. REMOVE THIS PART LIST/EXPLODED RDEMROAVWE ITNHLGIISSTEFXFRRPOLOOMMDTETHDHEDEMRAAMNWUAINANGLUAANDL!PART Save this EXPLODED DRAWING and PART LIST for future reference.
For information about ordering replacement parts, see the back cover of the User's Manual. 34 Note: Specifications are subject to change without notice. REMOVE THIS PART LIST/EXPLODED RDEMROAVWE ITNHLGIISSTEFXFRRPOLOOMMDTETHDHEDEMRAAMNWUAINANGLUAANDL!PART Save this EXPLODED DRAWING and PART LIST for future reference.
Canadian English Manual
Page 29
... 1 Left Foot Rail Endcap # 1 15" Incline Sensor 34 1 Left Grip Plate 75 1 Silver Ground Screw Wire 35 1 Latch Decal French 76 1 Static Warning Decal # 1 User's Manual 36 1 Right Grip Plate 77 1 Rear Ground Wire 37 2 3" Bolt 78 1 3/8 x 1" Bolt *Includes all parts shown in the box. 38 3 Washer 79 1 Power Cord Assembly...
... 1 Left Foot Rail Endcap # 1 15" Incline Sensor 34 1 Left Grip Plate 75 1 Silver Ground Screw Wire 35 1 Latch Decal French 76 1 Static Warning Decal # 1 User's Manual 36 1 Right Grip Plate 77 1 Rear Ground Wire 37 2 3" Bolt 78 1 3/8 x 1" Bolt *Includes all parts shown in the box. 38 3 Washer 79 1 Power Cord Assembly...

Canadian English Manual
Page 30
... Product. Labor is covered for one is authorized to change, modify or extend the terms of this limited warranty. on your User's Manual ("Manual"). Some states do not allow the exclusion or limitation of incidental or consequential damages. They will ship to you . The warranty extended ... days after the date of purchase. USER'S MANUAL-It is VERY IMPORTANT THAT YOU READ THE MANUAL before operating the Product. No one (1) year after discovery of the defect; LIMITED WARRANTY WHAT IS COVERED-The entire PROFORM® XP 590s treadmill ("Product") is warranted to be free of ...
... Product. Labor is covered for one is authorized to change, modify or extend the terms of this limited warranty. on your User's Manual ("Manual"). Some states do not allow the exclusion or limitation of incidental or consequential damages. They will ship to you . The warranty extended ... days after the date of purchase. USER'S MANUAL-It is VERY IMPORTANT THAT YOU READ THE MANUAL before operating the Product. No one (1) year after discovery of the defect; LIMITED WARRANTY WHAT IS COVERED-The entire PROFORM® XP 590s treadmill ("Product") is warranted to be free of ...


