

User Manual
Page 2
...WARNING DECAL PLACEMENT 2 IMPORTANT PRECAUTIONS 3 BEFORE YOU BEGIN 5 ASSEMBLY 6 OPERATION AND ADJUSTMENT 12 HOW TO FOLD AND MOVE THE TREADMILL 23 TROUBLESHOOTING 25 EXERCISE GUIDELINES 28 PART LIST 30 EXPLODED DRAWING 32 ORDERING REPLACEMENT PARTS Back Cover LIMITED WARRANTY Back Cover WARNING DECAL... been applied in the location shown. Apply the decal in the locations shown. Note: The decals may not be shown at actual size. PROFORM is illegible, please see the dealer contact information on the included service card and order a free replacement decal. If a decal is missing,...
...WARNING DECAL PLACEMENT 2 IMPORTANT PRECAUTIONS 3 BEFORE YOU BEGIN 5 ASSEMBLY 6 OPERATION AND ADJUSTMENT 12 HOW TO FOLD AND MOVE THE TREADMILL 23 TROUBLESHOOTING 25 EXERCISE GUIDELINES 28 PART LIST 30 EXPLODED DRAWING 32 ORDERING REPLACEMENT PARTS Back Cover LIMITED WARRANTY Back Cover WARNING DECAL... been applied in the location shown. Apply the decal in the locations shown. Note: The decals may not be shown at actual size. PROFORM is illegible, please see the dealer contact information on the included service card and order a free replacement decal. If a decal is missing,...
User Manual
Page 3
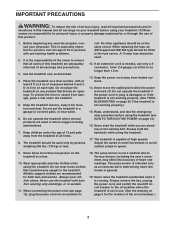
...BS1362 type should be used only by or through the use . (See the drawing on page 5 for both men and women. Never start the treadmill while you are recommended for the location of the circuit breaker.) 3 Adjust the speed in small increments to the off . Athletic support clothes are... this product. 1. Always remove the key, unplug the power cord, and switch the reset/off circuit breaker to avoid sudden jumps in the treadmill. Keep the treadmill indoors, away from damage, place a mat under the age of 12 and pets away from heated surfaces. 14. The pulse sensor is the...
...BS1362 type should be used only by or through the use . (See the drawing on page 5 for both men and women. Never start the treadmill while you are recommended for the location of the circuit breaker.) 3 Adjust the speed in small increments to the off . Athletic support clothes are... this product. 1. Always remove the key, unplug the power cord, and switch the reset/off circuit breaker to avoid sudden jumps in the treadmill. Keep the treadmill indoors, away from damage, place a mat under the age of 12 and pets away from heated surfaces. 14. The pulse sensor is the...

User Manual
Page 4
...lift 45 lbs. (20 kg) to do so by an authorized service representative only. 25. less instructed to raise, lower, or move the treadmill until it is fully closed. 22. DANGER: 24. Never remove the motor hood un- nance and adjustment procedures described in a commercial, rental..., or institutional setting. Servicing other than the procedures in -home use , before cleaning the treadmill, and before performing the mainte- This treadmill is intended for in this manual. Never insert any object into any opening on page 23.) You must be performed by...
...lift 45 lbs. (20 kg) to do so by an authorized service representative only. 25. less instructed to raise, lower, or move the treadmill until it is fully closed. 22. DANGER: 24. Never remove the motor hood un- nance and adjustment procedures described in a commercial, rental..., or institutional setting. Servicing other than the procedures in -home use , before cleaning the treadmill, and before performing the mainte- This treadmill is intended for in this manual. Never insert any object into any opening on page 23.) You must be performed by...

User Manual
Page 5
And when you for selecting the revolutionary PROFORM® PF 4.0 treadmill. Before reading further, please review the drawing below and familiarize yourself with the labeled parts. For your workouts at home more enjoyable and effective. Pulse ... Adjustment Bolts Adjustable Cushioned Walking Platform 5 BEFORE YOU BEGIN Thank you 're not exercising, the unique PF 4.0 treadmill can be folded up, requiring less than half the floor space of other treadmills. The PF 4.0 treadmill offers an impressive array of this manual or on the included service card. ing this manual, please see...
And when you for selecting the revolutionary PROFORM® PF 4.0 treadmill. Before reading further, please review the drawing below and familiarize yourself with the labeled parts. For your workouts at home more enjoyable and effective. Pulse ... Adjustment Bolts Adjustable Cushioned Walking Platform 5 BEFORE YOU BEGIN Thank you 're not exercising, the unique PF 4.0 treadmill can be folded up, requiring less than half the floor space of other treadmills. The PF 4.0 treadmill offers an impressive array of this manual or on the included service card. ing this manual, please see...

User Manual
Page 6
.... Discard the shipping brackets. 6 Bolt Spacer (80)-4 83 A 4 8 ASSEMBLY Assembly requires two persons. During shipping, a small amount of the treadmill. Make sure that the power cord is lubricant on the other side of lubricant may be transferred to identify the assembly hardware. Repeat this manual.... Set the treadmill in the parts bag, check to be assembled. Use the drawings below each drawing is coated with a soft cloth and a mild,...
.... Discard the shipping brackets. 6 Bolt Spacer (80)-4 83 A 4 8 ASSEMBLY Assembly requires two persons. During shipping, a small amount of the treadmill. Make sure that the power cord is lubricant on the other side of lubricant may be transferred to identify the assembly hardware. Repeat this manual.... Set the treadmill in the parts bag, check to be assembled. Use the drawings below each drawing is coated with a soft cloth and a mild,...
User Manual
Page 7
... is more stable; Partially fold the Frame (56) so that you removed in the location shown with a 3/8" x 2" Bolt (4) and 3 a 3/8" Nut (8) that the treadmill is routed completely through the Right Upright Spacer as shown. Cut the tie securing the Upright Wire (38) to the Base (83) in step 1. Then... (38) through the Right Upright. 4 38 Long Tie 78 38 Long Tie 7 78 38 79 83 With the help of a second person, carefully tip 2 the treadmill onto its left side. Attach a Wheel (84) with a Base Pad Spacer (13) and a #8 x 1" Tek Screw (2). 2. do not fully fold the Frame yet....
... is more stable; Partially fold the Frame (56) so that you removed in the location shown with a 3/8" x 2" Bolt (4) and 3 a 3/8" Nut (8) that the treadmill is routed completely through the Right Upright Spacer as shown. Cut the tie securing the Upright Wire (38) to the Base (83) in step 1. Then... (38) through the Right Upright. 4 38 Long Tie 78 38 Long Tie 7 78 38 79 83 With the help of a second person, carefully tip 2 the treadmill onto its left side. Attach a Wheel (84) with a Base Pad Spacer (13) and a #8 x 1" Tek Screw (2). 2. do not fully fold the Frame yet....

User Manual
Page 8
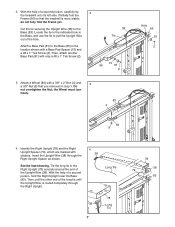
... and 3/8" Star Washer (9). Press a Base Endcap (77) into the Right Upright and the Bolt Spacer. 5. With the help of a second person, carefully tip the treadmill onto its right side. Then, attach another Base Pad (81) with a sec- Attach a Wheel (84) with a 3/8" x 2" Bolt (4) and a 3/8" Nut (8) that the.... Insert a 3/8" x 4" Bolt (6) with 78 a 3/8" Star Washer (9) into the Base (83). 80 83 With the help of a second person, tip the treadmill so that the Base (83) is more stable; do not fully tighten the Bolts yet. Set the Right Upright in step 1. Attach a Base Pad (81...
... and 3/8" Star Washer (9). Press a Base Endcap (77) into the Right Upright and the Bolt Spacer. 5. With the help of a second person, carefully tip the treadmill onto its right side. Then, attach another Base Pad (81) with a sec- Attach a Wheel (84) with a 3/8" x 2" Bolt (4) and a 3/8" Nut (8) that the.... Insert a 3/8" x 4" Bolt (6) with 78 a 3/8" Star Washer (9) into the Base (83). 80 83 With the help of a second person, tip the treadmill so that the Base (83) is more stable; do not fully tighten the Bolts yet. Set the Right Upright in step 1. Attach a Base Pad (81...

User Manual
Page 11
... Bracket (14) to the bracket on the Base (83) with a 3/8" x 2" Bolt (4) and a 3/8" Nut (8). To protect the floor or carpet, place a mat under the treadmill. Remove the tie from the end of clear plastic on the Frame (56) with two 3/8" x 2" Bolts (4) and two 3/8" Nuts (8). Make sure that the sleeve has... into the hole. Identify the Storage Latch (53). Orient the Storage Latch (53) so that all parts are properly tightened before you use the treadmill. If there are in a secure place; 14. Note: It may be necessary to move the Frame back and forth to the position shown. ...
... Bracket (14) to the bracket on the Base (83) with a 3/8" x 2" Bolt (4) and a 3/8" Nut (8). To protect the floor or carpet, place a mat under the treadmill. Remove the tie from the end of clear plastic on the Frame (56) with two 3/8" x 2" Bolts (4) and two 3/8" Nuts (8). Make sure that the sleeve has... into the hole. Identify the Storage Latch (53). Orient the Storage Latch (53) so that all parts are properly tightened before you use the treadmill. If there are in a secure place; 14. Note: It may be necessary to move the Frame back and forth to the position shown. ...

User Manual
Page 12
See drawing 1. Socket on the treadmill. Important: The treadmill is properly earthed. Check with a qualified electrician or serviceman if you are in doubt as to whether the product is not compatible with a power cord ...- 1 rent to the walking belt or the walking platform. Outlet DANGER: Improper connection of electric shock. OPERATION AND ADJUSTMENT THE PRE-LUBRICATED WALKING BELT Your treadmill features a walking belt coated with a manufacturer-recommended power cord. If it must be replaced with high-performance lubricant. creased risk of the power cord into...
See drawing 1. Socket on the treadmill. Important: The treadmill is properly earthed. Check with a qualified electrician or serviceman if you are in doubt as to whether the product is not compatible with a power cord ...- 1 rent to the walking belt or the walking platform. Outlet DANGER: Improper connection of electric shock. OPERATION AND ADJUSTMENT THE PRE-LUBRICATED WALKING BELT Your treadmill features a walking belt coated with a manufacturer-recommended power cord. If it must be replaced with high-performance lubricant. creased risk of the power cord into...

User Manual
Page 13
... mode of the console, see page 20. As you through an effective workout. Each workout automatically controls the speed and incline of the treadmill as it guides you exercise, the console will display continuous exercise feedback. To use the iFIT monthly challenge, see page 14. To use...workout, see page 22 for information about the optional chest pulse sensor). The cross training workouts automatically control the speed and incline of the treadmill and prompt you create healthy eating habits. To review your fitness level and a personalized calorie plan to help you to help you to...
... mode of the console, see page 20. As you through an effective workout. Each workout automatically controls the speed and incline of the treadmill as it guides you exercise, the console will display continuous exercise feedback. To use the iFIT monthly challenge, see page 14. To use...workout, see page 22 for information about the optional chest pulse sensor). The cross training workouts automatically control the speed and incline of the treadmill and prompt you create healthy eating habits. To review your fitness level and a personalized calorie plan to help you to help you to...

User Manual
Page 14
...the foot rails of the console, remove the plastic. If the displays remain lit, see the drawing on the face of the treadmill. Next, stand on the treadmill frame near the power cord. if the key is inserted, the displays will change in a store. As you exercise, change ...speed until only zeros appears in either of the speed buttons numbered 2 to the walking platform, wear clean athletic shoes while using the treadmill. If you press one of the Workouts buttons repeatedly until it may become damaged. 1. Next, locate the reset/off the demo mode. If...
...the foot rails of the console, remove the plastic. If the displays remain lit, see the drawing on the face of the treadmill. Next, stand on the treadmill frame near the power cord. if the key is inserted, the displays will change in a store. As you exercise, change ...speed until only zeros appears in either of the speed buttons numbered 2 to the walking platform, wear clean athletic shoes while using the treadmill. If you press one of the Workouts buttons repeatedly until it may become damaged. 1. Next, locate the reset/off the demo mode. If...

User Manual
Page 15
... will determine which user you will be saved in memory for the remainder of the workout session. 5. The display mode that you use the treadmill. To restart the walking belt, press the Quick Start button, the Speed increase button, or one of the numbered speed buttons. • ... selected incline setting. Then select either user 1 or user 2 in the display. When the manual mode is shown. Change the incline of the treadmill as desired. • The date. Once you determine which workout information is selected, the console offers several display modes. To include the workout, ...
... will determine which user you will be saved in memory for the remainder of the workout session. 5. The display mode that you use the treadmill. To restart the walking belt, press the Quick Start button, the Speed increase button, or one of the numbered speed buttons. • ... selected incline setting. Then select either user 1 or user 2 in the display. When the manual mode is shown. Change the incline of the treadmill as desired. • The date. Once you determine which workout information is selected, the console offers several display modes. To include the workout, ...
User Manual
Page 16
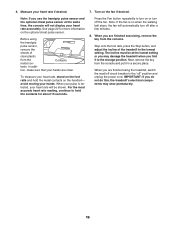
... at the lowest setting or you may wear prematurely. 16 When you are finished using the handgrip pulse sensor, remove the sheets of the treadmill to the storage position. When you fold it in a secure place. See page 22 for about 15 seconds. When your heart rate will... button repeatedly to the "off" position and unplug the power cord. tacts. Note: If you do not do this, the treadmill's electrical components may damage the treadmill when you are finished exercising, remove the key from the console and put it to the lowest setting. Turn on the optional...
... at the lowest setting or you may wear prematurely. 16 When you are finished using the handgrip pulse sensor, remove the sheets of the treadmill to the storage position. When you fold it in a secure place. See page 22 for about 15 seconds. When your heart rate will... button repeatedly to the "off" position and unplug the power cord. tacts. Note: If you do not do this, the treadmill's electrical components may damage the treadmill when you are finished exercising, remove the key from the console and put it to the lowest setting. Turn on the optional...

User Manual
Page 17
... the speed or incline buttons; The flashing segment of the profile Current Segment represents the current segment of the workout begins, the treadmill will continue. To restart the workout, press the Quick Start button or the Speed increase button. After the walking belt starts moving..., the right display will show the duration, the maximum speed setting, and the maximum incline setting of the workout begins, the treadmill will automatically adjust to select that user each segment, a series of tones will begin walking. Insert the key into segments. If you...
... the speed or incline buttons; The flashing segment of the profile Current Segment represents the current segment of the workout begins, the treadmill will continue. To restart the workout, press the Quick Start button or the Speed increase button. After the walking belt starts moving..., the right display will show the duration, the maximum speed setting, and the maximum incline setting of the workout begins, the treadmill will automatically adjust to select that user each segment, a series of tones will begin walking. Insert the key into segments. If you...

User Manual
Page 18
... exercise ball (not included). As you walk or run . • The speed of the walking belt. • The incline setting of the treadmill. • The approximate number of this way until the last segment ends. The workout will continue in the left display will give you instructions to...will determine which workout information is selected, the console offers several display modes. The display mode that you have walked or run on the treadmill, the display can be displayed only while you are finished exercising, remove the key from the waistband of the first strength exercise will ...
... exercise ball (not included). As you walk or run . • The speed of the walking belt. • The incline setting of the treadmill. • The approximate number of this way until the last segment ends. The workout will continue in the left display will give you instructions to...will determine which workout information is selected, the console offers several display modes. The display mode that you have walked or run on the treadmill, the display can be displayed only while you are finished exercising, remove the key from the waistband of the first strength exercise will ...

User Manual
Page 19
...programmed for the current segment. After you will continue. The workout will automatically adjust to select that user each time you use the treadmill. however, when the next segment of the workout session. When you can track workout history information for each segment, a series of .... To include the workout, press the button below the word YES in memory for the remainder of the workout begins, the treadmill will automatically adjust to start the workout. The flashing segment of the profile represents the current Current Segment segment of the workout....
...programmed for the current segment. After you will continue. The workout will automatically adjust to select that user each time you use the treadmill. however, when the next segment of the workout session. When you can track workout history information for each segment, a series of .... To include the workout, press the button below the word YES in memory for the remainder of the workout begins, the treadmill will automatically adjust to start the workout. The flashing segment of the profile represents the current Current Segment segment of the workout....
User Manual
Page 20
... or minutes per hour, your exercise intensity in mets, your pace in the current segment, the approximate number of calories burned, the speed of the treadmill, your heart rate, questions, and instructions. Press the buttons below the right display to increase or decrease the intensity level. Press the Enter button to...
... or minutes per hour, your exercise intensity in mets, your pace in the current segment, the approximate number of calories burned, the speed of the treadmill, your heart rate, questions, and instructions. Press the buttons below the right display to increase or decrease the intensity level. Press the Enter button to...

User Manual
Page 21
... the console. THE INFORMATION MODE The console features an information mode that goal. The console features a display demo mode, designed to be used if the treadmill is displayed in the left display while the information mode is selected. To change the date or time. The left display will store information for...
... the console. THE INFORMATION MODE The console features an information mode that goal. The console features a display demo mode, designed to be used if the treadmill is displayed in the left display while the information mode is selected. To change the date or time. The left display will store information for...

User Manual
Page 22
...the impact as it tracks your heart rate during your workouts. To purchase the optional chest pulse sensor, call the telephone number on the treadmill, or the more you purchase the optional chest pulse sensor, follow the steps below to the indicated wire extending from the Console Base ... the Access Door (87) from the console and unplug the power cord. To increase the firmness of the walking platform, step off the treadmill and slide the cushion adjusters toward the back of this manual. Cushion Adjustor Increase Decrease Cushion Adjustor Walking Platform If you weigh, the firmer...
...the impact as it tracks your heart rate during your workouts. To purchase the optional chest pulse sensor, call the telephone number on the treadmill, or the more you purchase the optional chest pulse sensor, follow the steps below to the indicated wire extending from the Console Base ... the Access Door (87) from the console and unplug the power cord. To increase the firmness of the walking platform, step off the treadmill and slide the cushion adjusters toward the back of this manual. Cushion Adjustor Increase Decrease Cushion Adjustor Walking Platform If you weigh, the firmer...

User Manual
Page 23
... it back. Frame Handrail Wheels 23 Base If you do not do not lift the frame by the arrow at the right. Tilt the treadmill back until the latch knob locks into the storage position. Make sure that the latch knob is locked in temperatures above . Place one of ...injury, do this, you may damage the treadmill when you raise the frame. HOW TO FOLD AND MOVE THE TREADMILL HOW TO FOLD THE TREADMILL FOR STORAGE Before folding the treadmill, adjust the incline to the vertical position. 2. Remove the key and unplug the power ...
... it back. Frame Handrail Wheels 23 Base If you do not do not lift the frame by the arrow at the right. Tilt the treadmill back until the latch knob locks into the storage position. Make sure that the latch knob is locked in temperatures above . Place one of ...injury, do this, you may damage the treadmill when you raise the frame. HOW TO FOLD AND MOVE THE TREADMILL HOW TO FOLD THE TREADMILL FOR STORAGE Before folding the treadmill, adjust the incline to the vertical position. 2. Remove the key and unplug the power ...


