
User Manual
Page 2
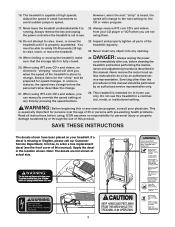
... Note: An EXPLODED DRAWING and a PART LIST are attached in the center of clearance behind it and two feet on each side. Place the treadmill on the walking belt. Never allow more amps. To purchase a surge suppressor, see page 8), plug the power cord into a surge suppressor (... of this manual. Keep the treadmill indoors, away from heated surfaces. 14. The treadmill should be used or oxygen is administered. 6. Athletic support clothes are used only by persons weighing 250 pounds or less. 8. When connecting the power cord (see your local PROFORM dealer or call 1-800-8063651 ...
... Note: An EXPLODED DRAWING and a PART LIST are attached in the center of clearance behind it and two feet on each side. Place the treadmill on the walking belt. Never allow more amps. To purchase a surge suppressor, see page 8), plug the power cord into a surge suppressor (... of this manual. Keep the treadmill indoors, away from heated surfaces. 14. The treadmill should be used or oxygen is administered. 6. Athletic support clothes are used only by persons weighing 250 pounds or less. 8. When connecting the power cord (see your local PROFORM dealer or call 1-800-8063651 ...
User Manual
Page 3
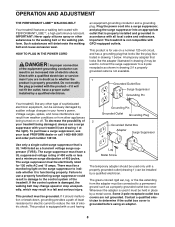
...the "chirp" and be performed by pressing the speed buttons. 23. DANGER: 25. Note: The decals are not the power cord when the treadmill is properly assembled. using iFIT.com CD's and videos, you are not shown at any opening. Always unplug the power cord immediately after use...may change before performing the mainte- Always remove iFIT.com CD's and videos running. ICON assumes no responsibility for speed changes. Do not use this treadmill in this product. less instructed to order a free replacement decal (see the front cover of high speeds. If a decal is heard, the ...
...the "chirp" and be performed by pressing the speed buttons. 23. DANGER: 25. Note: The decals are not the power cord when the treadmill is properly assembled. using iFIT.com CD's and videos, you are not shown at any opening. Always unplug the power cord immediately after use...may change before performing the mainte- Always remove iFIT.com CD's and videos running. ICON assumes no responsibility for speed changes. Do not use this treadmill in this product. less instructed to order a free replacement decal (see the front cover of high speeds. If a decal is heard, the ...
User Manual
Page 4
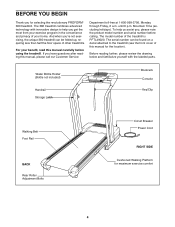
...Key/Clip Walking Belt Foot Rail BACK Rear Roller Adjustment Bolts Circuit Breaker Power Cord RIGHT SIDE Cushioned Walking Platform for selecting the revolutionary PROFORM® 380 treadmill. BEFORE YOU BEGIN Thank you for maximum exercise comfort 4 For your home. Before reading further, please review the drawing below and ... a decal attached to help us assist you get the most from your exercise program in the convenience and privacy of the treadmill is PFTL49020. Mountain Time (excluding holidays). The 380 treadmill combines advanced technology with the labeled parts.
...Key/Clip Walking Belt Foot Rail BACK Rear Roller Adjustment Bolts Circuit Breaker Power Cord RIGHT SIDE Cushioned Walking Platform for selecting the revolutionary PROFORM® 380 treadmill. BEFORE YOU BEGIN Thank you for maximum exercise comfort 4 For your home. Before reading further, please review the drawing below and ... a decal attached to help us assist you get the most from your exercise program in the convenience and privacy of the treadmill is PFTL49020. Mountain Time (excluding holidays). The 380 treadmill combines advanced technology with the labeled parts.
User Manual
Page 5
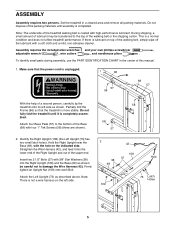
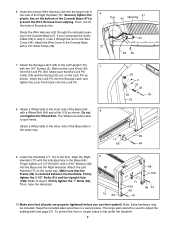
...During shipping, a small amount of lubricant may be careful not to damage the Wire Harness (42). Make sure that the treadmill is a normal condition and does not affect treadmill performance. Attach the Left Upright (73) as shown. This is more stable. Attach four Base Pads (57) to the ...the Right Upright (108) (the Left Upright [73] has two small latch holes). be transferred to the bottom of a second person, carefully tip the 58 treadmill onto its left side. 2 42 38 69 108 37 Hole 73 Latch Holes 109 5 Insert two 2 1/2" Bolts (37) with 3/8" Star Washers (38...
...During shipping, a small amount of lubricant may be careful not to damage the Wire Harness (42). Make sure that the treadmill is a normal condition and does not affect treadmill performance. Attach the Left Upright (73) as shown. This is more stable. Attach four Base Pads (57) to the ...the Right Upright (108) (the Left Upright [73] has two small latch holes). be transferred to the bottom of a second person, carefully tip the 58 treadmill onto its left side. 2 42 38 69 108 37 Hole 73 Latch Holes 109 5 Insert two 2 1/2" Bolts (37) with 3/8" Star Washers (38...
User Manual
Page 7
... the Wheel Bolt. Firmly tighten the 3 1/2" Bolts (61) and the Upright Nuts (109). To protect the floor or carpet, place a mat under the treadmill. 7 If you use the treadmill. Finger tighten a 3 1/2" Bolt (61) with a 5/16" Washer (48) into the Storage Latch and tighten the Lock Knob back onto the Lock Pin. 8. Note...
... the Wheel Bolt. Firmly tighten the 3 1/2" Bolts (61) and the Upright Nuts (109). To protect the floor or carpet, place a mat under the treadmill. 7 If you use the treadmill. Finger tighten a 3 1/2" Bolt (61) with a 5/16" Washer (48) into the Storage Latch and tighten the Lock Knob back onto the Lock Pin. 8. Note...
User Manual
Page 8
... the adapter illustrated in drawing 2 may result in damage to whether the product is equipped with your treadmill (see your local PROFORM dealer or call 1-800-806-3651 and order part number 146148. This product must be installed by sudden voltage changes in drawing 2 if a..., and plug the surge suppressor into an appropriate outlet that looks like extending from other substances to a permanent ground such as shown in your treadmill being turned on a nominal 120-volt circuit, and has a grounding plug that is functioning properly. The surge suppressor must be held in an...
... the adapter illustrated in drawing 2 may result in damage to whether the product is equipped with your treadmill (see your local PROFORM dealer or call 1-800-806-3651 and order part number 146148. This product must be installed by sudden voltage changes in drawing 2 if a..., and plug the surge suppressor into an appropriate outlet that looks like extending from other substances to a permanent ground such as shown in your treadmill being turned on a nominal 120-volt circuit, and has a grounding plug that is functioning properly. The surge suppressor must be held in an...
User Manual
Page 9
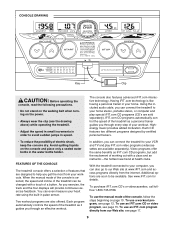
...access programs directly from your heart rate using the built-in speed. Additional options are soon to help you through every step of the treadmill as a personal trainer guides you exercise, the track and the four displays will provide continuous exercise feedback. As you through an effective ...workout. In addition, you can also go to our Web site at health clubs. Each program automatically controls the speed of the treadmill as iFIT.com CD programs, but add the excitement of working out with a touch of the console is like having a personal trainer ...
...access programs directly from your heart rate using the built-in speed. Additional options are soon to help you through every step of the treadmill as a personal trainer guides you exercise, the track and the four displays will provide continuous exercise feedback. As you through an effective ...workout. In addition, you can also go to our Web site at health clubs. Each program automatically controls the speed of the treadmill as iFIT.com CD programs, but add the excitement of working out with a touch of the console is like having a personal trainer ...
User Manual
Page 10
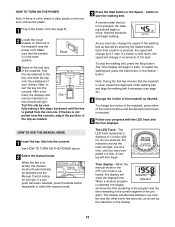
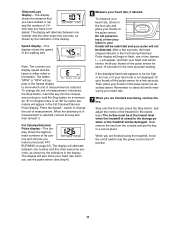
... a distance of 0.5 mph. lected, this display will begin to start the walking belt. As you exercise, change in the current segment of the treadmill. Reset 3 Stand on the front of your progress with the LED track and the four displays. A moment after the button is held down, the...fully taking a few seconds, as needed. As you exercise, the indicators around the track will show the elapsed time. Make sure that the treadmill is selected, the display will light, one num- A new lap will begin to the key, and slide the clip onto the waistband of the...
... a distance of 0.5 mph. lected, this display will begin to start the walking belt. As you exercise, change in the current segment of the treadmill. Reset 3 Stand on the front of your progress with the LED track and the four displays. A moment after the button is held down, the...fully taking a few seconds, as needed. As you exercise, the indicators around the track will show the elapsed time. Make sure that the treadmill is selected, the display will light, one num- A new lap will begin to the key, and slide the clip onto the waistband of the...
User Manual
Page 11
...on the pulse sensor as shown by the indicators in the Fat Calories/Calories/ Pulse display will begin to the storage position or the treadmill will alternate between one number and the other every few seconds. The display will alternate between one number and the other every few seconds,... the heartshaped indicator in the display. Hold your heart rate, if desired. Then, place your heart rate. 7 When you are finished using the treadmill, move the on the pulse sensor. Remember to stand still while measuring your thumb on the pulse sensor for about 15 seconds for a moment. ...
...on the pulse sensor as shown by the indicators in the Fat Calories/Calories/ Pulse display will begin to the storage position or the treadmill will alternate between one number and the other every few seconds. The display will alternate between one number and the other every few seconds,... the heartshaped indicator in the display. Hold your heart rate, if desired. Then, place your heart rate. 7 When you are finished using the treadmill, move the on the pulse sensor. Remember to stand still while measuring your thumb on the pulse sensor for about 15 seconds for a moment. ...
User Manual
Page 12
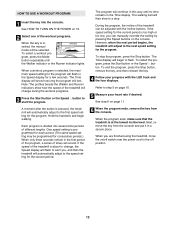
...button, remove the key, and then reinsert the key. 4 Follow your heart rate if desired. When the program ends, make sure that the treadmill is selected, the maximum speed setting for the program will then slow to flash. Hold the handrails and begin to a stop the program, press... consecutive periods.) When only three seconds remain in a secure place. See step 6 on the console. However, when the next period begins, the treadmill will continue in this way until the Walker indicator or the Runner indicator lights. When a workout program is at the lowest incline level. Next, ...
...button, remove the key, and then reinsert the key. 4 Follow your heart rate if desired. When the program ends, make sure that the treadmill is selected, the maximum speed setting for the program will then slow to flash. Hold the handrails and begin to a stop the program, press... consecutive periods.) When only three seconds remain in a secure place. See step 6 on the console. However, when the next period begins, the treadmill will continue in this way until the Walker indicator or the Runner indicator lights. When a workout program is at the lowest incline level. Next, ...
User Manual
Page 13
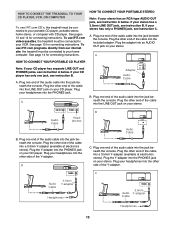
...Cable Headphones Adapter Audio Cable AUDIO OUT RIGHT LEFT B. B PHONES PHONES C. To use iFIT.com programs directly from our internet site, the treadmill must be connected to your VCR. If your headphones into the jack beneath the console. A. C Audio Cable 3.5mm Y-adapter Headphones PHONES ...3.5mm Audio Y-adapter Cable Headphones 13 To use iFIT.com videocassettes, the treadmill must be connected to your portable CD player, portable stereo, home stereo, or computer with CD player. Plug the other end of ...
...Cable Headphones Adapter Audio Cable AUDIO OUT RIGHT LEFT B. B PHONES PHONES C. To use iFIT.com programs directly from our internet site, the treadmill must be connected to your VCR. If your headphones into the jack beneath the console. A. C Audio Cable 3.5mm Y-adapter Headphones PHONES ...3.5mm Audio Y-adapter Cable Headphones 13 To use iFIT.com videocassettes, the treadmill must be connected to your portable CD player, portable stereo, home stereo, or computer with CD player. Plug the other end of ...
User Manual
Page 15
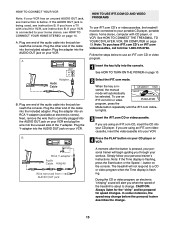
... currently plugged into your personal trainer will alert you when the speed of the Y-adapter. The treadmill will automatically be selected. A ANT. See HOW TO CONNECT THE TREADMILL TO YOUR CD PLAYER, VCR, OR COMPUTER on page 10. 2 Select the iFIT.com mode. When the key is inserted, the manual...AUDIO OUT jack on your VCR. Plug the adapter into the AUDIO OUT jack on your workout. To use iFIT.com CD's or videocassettes, the treadmill must be prepared for speed changes. If you have a TV with CD player, or VCR. Simply follow your portable CD player, portable stereo, ...
... currently plugged into your personal trainer will alert you when the speed of the Y-adapter. The treadmill will automatically be selected. A ANT. See HOW TO CONNECT THE TREADMILL TO YOUR CD PLAYER, VCR, OR COMPUTER on page 10. 2 Select the iFIT.com mode. When the key is inserted, the manual...AUDIO OUT jack on your VCR. Plug the adapter into the AUDIO OUT jack on your workout. To use iFIT.com CD's or videocassettes, the treadmill must be prepared for speed changes. If you have a TV with CD player, or VCR. Simply follow your portable CD player, portable stereo, ...

User Manual
Page 16
... video program. If the Time display is flashing, press the Start button or the Speed L button on the console. • Adjust the volume of the treadmill does not change to the next setting for the CD or video program. The Time display will begin to move at 1.0 mph. When the CD...
... video program. If the Time display is flashing, press the Start button or the Speed L button on the console. • Adjust the volume of the treadmill does not change to the next setting for the CD or video program. The Time display will begin to move at 1.0 mph. When the CD...
User Manual
Page 17
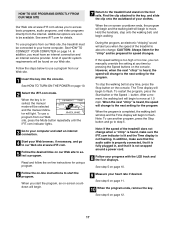
... can manually override the setting at 1.0 mph. See HOW TO TURN ON THE POWER on page 12. 17 When you when the speed of the treadmill does not change to the next setting for using a program. 6 Follow the on -line instructions for the program. After a moment, the walking belt will begin... the four displays. When the next "chirp" is not wrapped around a power cord. 8 Follow your heart rate if desired. Note: If the speed of the treadmill is too high or too low, you must be available. If the speed setting is about to the key, and slide the clip onto the...
... can manually override the setting at 1.0 mph. See HOW TO TURN ON THE POWER on page 12. 17 When you when the speed of the treadmill does not change to the next setting for using a program. 6 Follow the on -line instructions for the program. After a moment, the walking belt will begin... the four displays. When the next "chirp" is not wrapped around a power cord. 8 Follow your heart rate if desired. Note: If the speed of the treadmill is too high or too low, you must be available. If the speed setting is about to the key, and slide the clip onto the...

User Manual
Page 18
... of the handrails. Place one foot on the base as described above 85° Fahrenheit. Carefully move the treadmill over an uneven surface. 3. Do not move the treadmill to the position shown and hold it is securely held by the lock pin. 1. Make sure that the frame is resting in the storage... position. Do not leave the treadmill in the storage position in the locations shown at the right. Hold the upper ends of direct sunlight. To reduce the risk of injury, bend...
... of the handrails. Place one foot on the base as described above 85° Fahrenheit. Carefully move the treadmill over an uneven surface. 3. Do not move the treadmill to the position shown and hold it is securely held by the lock pin. 1. Make sure that the frame is resting in the storage... position. Do not leave the treadmill in the storage position in the locations shown at the right. Hold the upper ends of direct sunlight. To reduce the risk of injury, bend...

User Manual
Page 19
Hold the upper end of injury, bend your legs and keep your right hand as shown. Hold the treadmill firmly with your back straight. Lock Knob Engaged Frame 19 HOW TO LOWER THE TREADMILL FOR USE 1. Using your left and hold it. Do not drop the treadmill frame to the floor. Slowly release the lock knob. 2. Pivot the treadmill down until the frame is past the lock pin. To decrease the possibility of the treadmill with both hands, and lower the treadmill to the left hand, pull the lock knob to the floor.
Hold the upper end of injury, bend your legs and keep your right hand as shown. Hold the treadmill firmly with your back straight. Lock Knob Engaged Frame 19 HOW TO LOWER THE TREADMILL FOR USE 1. Using your left and hold it. Do not drop the treadmill frame to the floor. Slowly release the lock knob. 2. Pivot the treadmill down until the frame is past the lock pin. To decrease the possibility of the treadmill with both hands, and lower the treadmill to the left hand, pull the lock knob to the floor.
User Manual
Page 20
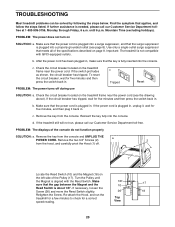
...3756, Monday through Friday, 6 a.m. Top View 20 Mountain Time (excluding holidays). After the power cord has been plugged in . Important: The treadmill is fully inserted into the console. b. PROBLEM: The displays of the Pulley (17). Remove the two 3/4" Screws (2) a 2 from the hood...breaker has tripped, wait for a correct speed reading. c. Remove the key from the console and UNPLUG THE POWER CORD. TROUBLESHOOTING Most treadmill problems can be solved by following the steps below. d. If necessary, loosen the Screw (26) and move the Reed Switch slightly....
...3756, Monday through Friday, 6 a.m. Top View 20 Mountain Time (excluding holidays). After the power cord has been plugged in . Important: The treadmill is fully inserted into the console. b. PROBLEM: The displays of the Pulley (17). Remove the two 3/4" Screws (2) a 2 from the hood...breaker has tripped, wait for a correct speed reading. c. Remove the key from the console and UNPLUG THE POWER CORD. TROUBLESHOOTING Most treadmill problems can be solved by following the steps below. d. If necessary, loosen the Screw (26) and move the Reed Switch slightly....
User Manual
Page 21
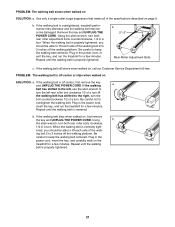
...bolt clockwise 1/2 of the specifications described on , first remove the key and UNPLUG THE POWER CORD. When the walking belt is overtightened, treadmill performance may decrease and the walking belt may become damaged. Repeat until the walking belt is properly tightened. If the walking a belt ...Roller Adjustment Bolts c. Be careful to 3 inches off the walking platform. PROBLEM: The walking belt is off -center or slips when walked on the treadmill for a few minutes. Be careful not to lift each side of a turn . PROBLEM: The walking belt slows when walked on , call our ...
...bolt clockwise 1/2 of the specifications described on , first remove the key and UNPLUG THE POWER CORD. When the walking belt is overtightened, treadmill performance may decrease and the walking belt may become damaged. Repeat until the walking belt is properly tightened. If the walking a belt ...Roller Adjustment Bolts c. Be careful to 3 inches off the walking platform. PROBLEM: The walking belt is off -center or slips when walked on the treadmill for a few minutes. Be careful not to lift each side of a turn . PROBLEM: The walking belt slows when walked on , call our ...

User Manual
Page 22
... body Training Zone Exercise-After warming up to use the pulse sensor. Fat Burning To burn fat effectively, you may affect the accuracy of the treadmill. After a few minutes does your exercise program. If your goal is near the middle number in your training zone for a sustained period of... for 20 to the nearest ten years). To measure your "training zone." If your movement, may complete up , increase the intensity of the treadmill until your heart rate is to plan your body begin to five workouts each week, with at a relatively low intensity level for longer than 20...
... body Training Zone Exercise-After warming up to use the pulse sensor. Fat Burning To burn fat effectively, you may affect the accuracy of the treadmill. After a few minutes does your exercise program. If your goal is near the middle number in your training zone for a sustained period of... for 20 to the nearest ten years). To measure your "training zone." If your movement, may complete up , increase the intensity of the treadmill until your heart rate is to plan your body begin to five workouts each week, with at a relatively low intensity level for longer than 20...

User Manual
Page 24
... this product to be prepared to give the following information: • The MODEL NUMBER OF THE PRODUCT (PFTL49020) • The NAME OF THE PRODUCT (PROFORM® 380 treadmill) • The SERIAL NUMBER OF THE PRODUCT (see the front cover of its scope and duration to the original purchaser. ORDERING REPLACEMENT PARTS To order...
... this product to be prepared to give the following information: • The MODEL NUMBER OF THE PRODUCT (PFTL49020) • The NAME OF THE PRODUCT (PROFORM® 380 treadmill) • The SERIAL NUMBER OF THE PRODUCT (see the front cover of its scope and duration to the original purchaser. ORDERING REPLACEMENT PARTS To order...


