
User Manual
Page 1
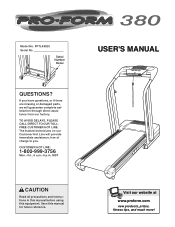
...CAUTION Read all precautions and instructions in this manual before using this manual for future reference. Serial Number Decal QUESTIONS? TO AVOID DELAYS, PLEASE CALL DIRECT TO OUR TOLLFREE CUSTOMER HOT LINE. USER'S MANUAL Visit our website at www.proform.com new products, prizes, fitness tips, and much more!... this equipment. The trained technicians on our Customer Hot Line will provide immediate assistance, free of charge to you have questions, or if there are missing or damaged parts, we will guarantee complete satisfaction through direct assistance from our factory. Model No.
...CAUTION Read all precautions and instructions in this manual before using this manual for future reference. Serial Number Decal QUESTIONS? TO AVOID DELAYS, PLEASE CALL DIRECT TO OUR TOLLFREE CUSTOMER HOT LINE. USER'S MANUAL Visit our website at www.proform.com new products, prizes, fitness tips, and much more!... this equipment. The trained technicians on our Customer Hot Line will provide immediate assistance, free of charge to you have questions, or if there are missing or damaged parts, we will guarantee complete satisfaction through direct assistance from our factory. Model No.
User Manual
Page 2
... manual. Do not operate the treadmill if the power cord or plug is damaged, or if the treadmill is the responsibility of the owner to ensure that meets all times. 7. TABLE OF CONTENTS IMPORTANT PRECAUTIONS 2 BEFORE YOU BEGIN 4 ASSEMBLY 5 OPERATION AND ADJUSTMENT 8 HOW TO FOLD AND MOVE THE TREADMILL 18 TROUBLESHOOTING 20 CONDITIONING GUIDELINES 22 ORDERING REPLACEMENT PARTS Back Cover LIMITED WARRANTY Back Cover Note: An EXPLODED DRAWING and a PART LIST...
... manual. Do not operate the treadmill if the power cord or plug is damaged, or if the treadmill is the responsibility of the owner to ensure that meets all times. 7. TABLE OF CONTENTS IMPORTANT PRECAUTIONS 2 BEFORE YOU BEGIN 4 ASSEMBLY 5 OPERATION AND ADJUSTMENT 8 HOW TO FOLD AND MOVE THE TREADMILL 18 TROUBLESHOOTING 20 CONDITIONING GUIDELINES 22 ORDERING REPLACEMENT PARTS Back Cover LIMITED WARRANTY Back Cover Note: An EXPLODED DRAWING and a PART LIST...
User Manual
Page 3
... through the use of the treadmill is properly assembled. When folding or moving the treadmill, make sure that the storage latch is 22. When using iFIT.com CD's and videos, an electronic "chirping" sound will change . 21. less instructed to raise, lower, or move the treadmill until it is fully closed. 20. This treadmill is heard, the speed will alert you can manually override the speed setting at actual size. 3 ICON assumes no...
... through the use of the treadmill is properly assembled. When folding or moving the treadmill, make sure that the storage latch is 22. When using iFIT.com CD's and videos, an electronic "chirping" sound will change . 21. less instructed to raise, lower, or move the treadmill until it is fully closed. 20. This treadmill is heard, the speed will alert you can manually override the speed setting at actual size. 3 ICON assumes no...
User Manual
Page 4
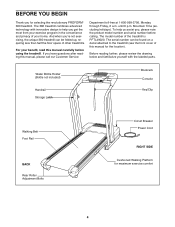
... treadmill (see the front cover of other treadmills. If you get the most from your exercise program in the convenience and privacy of the treadmill is PFTL49020. BEFORE YOU BEGIN Thank you , please note the product model number and serial number before using the treadmill. Water Bottle Holder (Bottle not included) Handrail Storage Latch Bookrack Console Key/Clip Walking Belt Foot Rail BACK Rear Roller Adjustment Bolts Circuit Breaker Power Cord RIGHT SIDE Cushioned Walking...
... treadmill (see the front cover of other treadmills. If you get the most from your exercise program in the convenience and privacy of the treadmill is PFTL49020. BEFORE YOU BEGIN Thank you , please note the product model number and serial number before using the treadmill. Water Bottle Holder (Bottle not included) Handrail Storage Latch Bookrack Console Key/Clip Walking Belt Foot Rail BACK Rear Roller Adjustment Bolts Circuit Breaker Power Cord RIGHT SIDE Cushioned Walking...
User Manual
Page 5
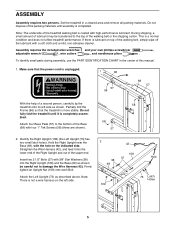
... out of the walking belt or the shipping carton. If there is not a wire harness on the left side as described above. Attach the Left Upright (73) as shown. Note: There is lubricant on the indicated side. Attach four Base Pads (57) to the top of the upper end. To identify small parts during assembly, use the PART IDENTIFICATION CHART in a cleared...
... out of the walking belt or the shipping carton. If there is not a wire harness on the left side as described above. Attach the Left Upright (73) as shown. Note: There is lubricant on the indicated side. Attach four Base Pads (57) to the top of the upper end. To identify small parts during assembly, use the PART IDENTIFICATION CHART in a cleared...
User Manual
Page 6
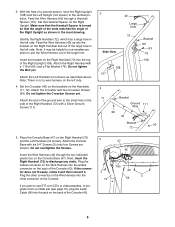
... Wire Harness into the widest connector on the Console Base (47). tor does not fit easily, rotate it and then connect it. 2 Ties 43 Plug the other connector on the left side. Attach the Right Handrail with two Crossbar Screws (39). Note: There is turned ...Upright (108) and the Left Upright (not shown) to use iFIT.com CD's or videocassettes, or programs from our Web site (see page 13), plug the Audio Cable (56) into the bracket on the Right Handrail (72) 5 and the Left Handrail (not shown). If the connec- Do not tighten the Bolt yet. With the help of the Console...
... Wire Harness into the widest connector on the Console Base (47). tor does not fit easily, rotate it and then connect it. 2 Ties 43 Plug the other connector on the left side. Attach the Right Handrail with two Crossbar Screws (39). Note: There is turned ...Upright (108) and the Left Upright (not shown) to use iFIT.com CD's or videocassettes, or programs from our Web site (see page 13), plug the Audio Cable (56) into the bracket on the Right Handrail (72) 5 and the Left Handrail (not shown). If the connec- Do not tighten the Bolt yet. With the help of the Console...
User Manual
Page 7
... Lock Pin Collar (33) and the Spring (32) are properly tightened before you connected the Audio Cable (56) in step 5, route it through the indicated opening in the side of the Console Base (47) to adjust the walking belt (see page 21). Do not 8 overtighten the Wheel Bolt. The Wheel should be included. Lower the Handrails (71, 72) to step 3. Make sure that all parts are...
... Lock Pin Collar (33) and the Spring (32) are properly tightened before you connected the Audio Cable (56) in step 5, route it through the indicated opening in the side of the Console Base (47) to adjust the walking belt (see page 21). Do not 8 overtighten the Wheel Bolt. The Wheel should be included. Lower the Handrails (71, 72) to step 3. Make sure that all parts are...
User Manual
Page 8
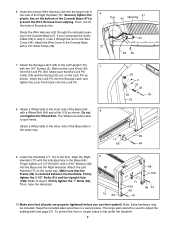
... Screw The temporary adapter should malfunction or break down, grounding provides a path of 2 your local PROFORM dealer or call 1-800-806-3651 and order part number 146148. Important: The treadmill is functioning properly. To decrease the possibility of least resistance for electric current to whether the product is damaged, the walking belt may change speed or stop unexpectedly, which may be used to connect...
... Screw The temporary adapter should malfunction or break down, grounding provides a path of 2 your local PROFORM dealer or call 1-800-806-3651 and order part number 146148. Important: The treadmill is functioning properly. To decrease the possibility of least resistance for electric current to whether the product is damaged, the walking belt may change speed or stop unexpectedly, which may be used to connect...
User Manual
Page 9
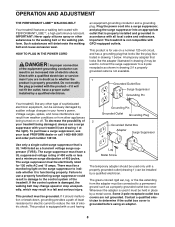
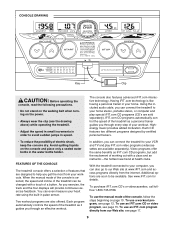
... controls the speed of the console is like having a personal trainer in order to our Web site at health clubs. To use a workout program, see the drawing above) while operating the treadmill. • Adjust the speed in small increments in your computer, you through an effective workout. CONSOLE DRAWING Key Clip CAUTION: Before operating the console, read the following precautions. • Do not stand on the walking belt...
... controls the speed of the console is like having a personal trainer in order to our Web site at health clubs. To use a workout program, see the drawing above) while operating the treadmill. • Adjust the speed in small increments in your computer, you through an effective workout. CONSOLE DRAWING Key Clip CAUTION: Before operating the console, read the following precautions. • Do not stand on the walking belt...
User Manual
Page 10
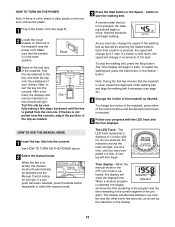
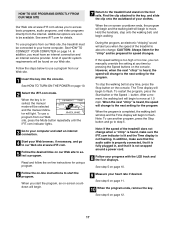
... the treadmill near the power cord. lected, this display will light. HOW TO TURN ON THE POWER Note: If there is not pulled from the console. Reset 3 Stand on the front of the pro- Test the clip by pressing the Speed buttons. See HOW TO TURN ON THE POWER above. 2 Select the manual mode. A moment after the button is used, inspect the alignment of the walking belt and align the walking belt...
... the treadmill near the power cord. lected, this display will light. HOW TO TURN ON THE POWER Note: If there is not pulled from the console. Reset 3 Stand on the front of the pro- Test the clip by pressing the Speed buttons. See HOW TO TURN ON THE POWER above. 2 Select the manual mode. A moment after the button is used, inspect the alignment of the walking belt and align the walking belt...
User Manual
Page 11
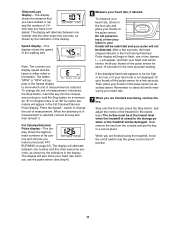
... not displayed, lift your heart rate when you are finished using the treadmill, move the on the pulse sensor as described above. Remember to show your thumb off switch near the power cord to change the unit of measurement. Next, remove the key from the console and put the key in either miles or kilometers. The display will appear in the Fat Calories/Calories/ Pulse display. Note: The console can display speed and distance...
... not displayed, lift your heart rate when you are finished using the treadmill, move the on the pulse sensor as described above. Remember to show your thumb off switch near the power cord to change the unit of measurement. Next, remove the key from the console and put the key in either miles or kilometers. The display will appear in the Fat Calories/Calories/ Pulse display. Note: The console can display speed and distance...
User Manual
Page 12
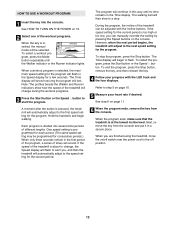
... inserted, the manual mode will be selected. The Time display will automatically adjust to flash. To restart the program, press the Start button or the Speed L button. Refer to the off switch near the power cord to step 5 on 10. 2 Select one of the workout programs. When the key is about to change during the workout programs. 3 Press the Start button or the Speed L button to a stop the program, press the Stop button. When you are finished using the treadmill, move the on...
... inserted, the manual mode will be selected. The Time display will automatically adjust to flash. To restart the program, press the Start button or the Speed L button. Refer to the off switch near the power cord to step 5 on 10. 2 Select one of the workout programs. When the key is about to change during the workout programs. 3 Press the Start button or the Speed L button to a stop the program, press the Stop button. When you are finished using the treadmill, move the on...
User Manual
Page 15
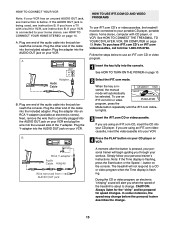
... steps below . In some instances, the speed may change before the personal trainer describes the change . Plug one end of the cable into the jack beneath the console. IN VIDEO AUDIO IN CH 34 OUT RF OUT RCA Y-adapter Audio Cable Adapter Wire removed from AUDIO OUT jack HOW TO USE IFIT.COM CD AND VIDEO PROGRAMS To use iFIT.com CD's or videocassettes, the treadmill must be connected to use an iFIT.com CD or video program, press the Mode button...
... steps below . In some instances, the speed may change before the personal trainer describes the change . Plug one end of the cable into the jack beneath the console. IN VIDEO AUDIO IN CH 34 OUT RF OUT RCA Y-adapter Audio Cable Adapter Wire removed from AUDIO OUT jack HOW TO USE IFIT.COM CD AND VIDEO PROGRAMS To use iFIT.com CD's or videocassettes, the treadmill must be connected to use an iFIT.com CD or video program, press the Mode button...
User Manual
Page 16
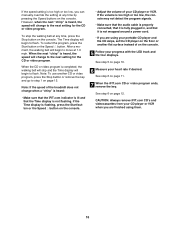
... the program, press the Start button or the Speed L button. See step 6 on page 11. 7 When the iFIT.com CD or video program ends, remove the key. If the volume is too high or too low, the console may not detect the program signals. • Make sure that the audio cable is properly connected, that it is fully plugged in, and that the Time display is completed, the walking belt will...
... the program, press the Start button or the Speed L button. See step 6 on page 11. 7 When the iFIT.com CD or video program ends, remove the key. If the volume is too high or too low, the console may not detect the program signals. • Make sure that the audio cable is properly connected, that it is fully plugged in, and that the Time display is completed, the walking belt will...
User Manual
Page 17
... program, press the Start button or the Speed L button. A list of your heart rate if desired. If the speed setting is too high or too low, you when the speed of the treadmill does not change when a "chirp" is heard, make sure that the audio cable is properly connected, that it is fully plugged in, and that it is heard, the speed will begin walking. When the program is inserted, the manual mode...
... program, press the Start button or the Speed L button. A list of your heart rate if desired. If the speed setting is too high or too low, you when the speed of the treadmill does not change when a "chirp" is heard, make sure that the audio cable is properly connected, that it is fully plugged in, and that it is heard, the speed will begin walking. When the program is inserted, the manual mode...
User Manual
Page 20
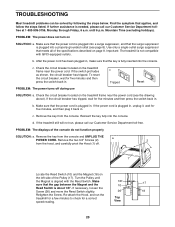
... press the switch back in . Turn the Pulley until 6 p.m. Top View 20 TROUBLESHOOTING Most treadmill problems can be solved by following the steps below. If the switch protrudes as shown, the circuit breaker has tripped. If the power cord is plugged into the console. Remove the key from the console and UNPLUG THE POWER CORD. Remove the two 3/4" Screws (2) a 2 from the hood, and carefully pivot the Hood (1) off during use c Tripped Reset SOLUTION: a. Re-attach...
... press the switch back in . Turn the Pulley until 6 p.m. Top View 20 TROUBLESHOOTING Most treadmill problems can be solved by following the steps below. If the switch protrudes as shown, the circuit breaker has tripped. If the power cord is plugged into the console. Remove the key from the console and UNPLUG THE POWER CORD. Remove the two 3/4" Screws (2) a 2 from the hood, and carefully pivot the Hood (1) off during use c Tripped Reset SOLUTION: a. Re-attach...
User Manual
Page 21
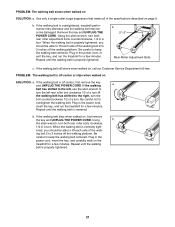
... POWER CORD. b. ing belt 2 to turn . Repeat until the walking belt is off the walking platform. If the walking belt is properly tightened. 21 When the walking belt is overtightened, treadmill performance may decrease and the walking belt may become damaged. Plug in the power cord, insert the key, and run the treadmill for a few minutes. PROBLEM: The walking belt slows when walked on , call our Customer Service Department toll-free. b 2"-3" Rear Roller Adjustment Bolts c. Be careful to overtighten the walking belt...
... POWER CORD. b. ing belt 2 to turn . Repeat until the walking belt is off the walking platform. If the walking belt is properly tightened. 21 When the walking belt is overtightened, treadmill performance may decrease and the walking belt may become damaged. Plug in the power cord, insert the key, and run the treadmill for a few minutes. PROBLEM: The walking belt slows when walked on , call our Customer Service Department toll-free. b 2"-3" Rear Roller Adjustment Bolts c. Be careful to overtighten the walking belt...

User Manual
Page 22
... of the treadmill until your training zone. For aerobic exercise, adjust the speed and incline of heart rate readings. A proper warm-up to success is near the middle number in general. A Cool-down . After a few weeks of stretching and light exercise. The key to five workouts each workout with preexisting health problems. The pulse sensor is intended only as an exercise aid in determining heart rate trends in your heart rate is...
... of the treadmill until your training zone. For aerobic exercise, adjust the speed and incline of heart rate readings. A proper warm-up to success is near the middle number in general. A Cool-down . After a few weeks of stretching and light exercise. The key to five workouts each workout with preexisting health problems. The pulse sensor is intended only as an exercise aid in determining heart rate trends in your heart rate is...

User Manual
Page 24
... use , costs of removal or installation or other rights which warranty claims are made must be prepared to give the following information: • The MODEL NUMBER OF THE PRODUCT (PFTL49020) • The NAME OF THE PRODUCT (PROFORM® 380 treadmill) • The SERIAL NUMBER OF THE PRODUCT (see the front cover of this manual) LIMITED WARRANTY ICON Health & Fitness, Inc. (ICON), warrants this warranty is authorized by an ICON authorized service center; This warranty...
... use , costs of removal or installation or other rights which warranty claims are made must be prepared to give the following information: • The MODEL NUMBER OF THE PRODUCT (PFTL49020) • The NAME OF THE PRODUCT (PROFORM® 380 treadmill) • The SERIAL NUMBER OF THE PRODUCT (see the front cover of this manual) LIMITED WARRANTY ICON Health & Fitness, Inc. (ICON), warrants this warranty is authorized by an ICON authorized service center; This warranty...
User Manual
Page 26
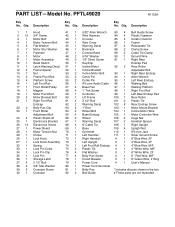
... Wire 9* 1 Motor Assembly 49 3 1/2" Silver Screw 91 1 Right Rear 10 1 Reed Switch 50 1 Key/Clip Endcap Pad 11 1 Latch Warning Decal 51 1 Incline Motor 92 2 Rear Roller 12 2 Frame Spacer 52 1 Incline Bracket Adjustable Bolt 13 7 Nut 53 2 Incline Motor Bolt 93 1 Right Rear Endcap 14 2 Frame Pivot Bolt 54 2 Clevis Pin 94 1 Allen Wrench 15 4 Platform Screw 55 2 Cotter Pin 95 1 Left Rear Endcap 16 1 Left Foot Rail 56 1 IFit.com Audio Cable 96 1 Walking Belt 17 1 Front Roller/Pulley 57...
... Wire 9* 1 Motor Assembly 49 3 1/2" Silver Screw 91 1 Right Rear 10 1 Reed Switch 50 1 Key/Clip Endcap Pad 11 1 Latch Warning Decal 51 1 Incline Motor 92 2 Rear Roller 12 2 Frame Spacer 52 1 Incline Bracket Adjustable Bolt 13 7 Nut 53 2 Incline Motor Bolt 93 1 Right Rear Endcap 14 2 Frame Pivot Bolt 54 2 Clevis Pin 94 1 Allen Wrench 15 4 Platform Screw 55 2 Cotter Pin 95 1 Left Rear Endcap 16 1 Left Foot Rail 56 1 IFit.com Audio Cable 96 1 Walking Belt 17 1 Front Roller/Pulley 57...


