

User Manual
Page 2
TABLE OF CONTENTS IMPORTANT PRECAUTIONS 3 BEFORE YOU BEGIN 5 ASSEMBLY 6 OPERATION AND ADJUSTMENT 9 HOW TO FOLD AND MOVE THE TREADMILL 13 TROUBLESHOOTING 15 CONDITIONING GUIDELINES 17 ORDERING REPLACEMENT PARTS Back Cover Note: An EXPLODED DRAWING and a PART LIST are attached in the centre of ICON Health & Fitness, Inc. 2 PROFORM is a registered trademark of this manual.
TABLE OF CONTENTS IMPORTANT PRECAUTIONS 3 BEFORE YOU BEGIN 5 ASSEMBLY 6 OPERATION AND ADJUSTMENT 9 HOW TO FOLD AND MOVE THE TREADMILL 13 TROUBLESHOOTING 15 CONDITIONING GUIDELINES 17 ORDERING REPLACEMENT PARTS Back Cover Note: An EXPLODED DRAWING and a PART LIST are attached in the centre of ICON Health & Fitness, Inc. 2 PROFORM is a registered trademark of this manual.

User Manual
Page 3
... (see page 9), plug the power cord into an earthed circuit. 18. The pulse sensor is fully closed. 3 When folding or moving the treadmill, make sure that is no longer than one person on page 13.) You must be on /off switch.) 20. It is being administered. ...accuracy of burns, fire, electric shock, or injury to persons, read the following important precautions and information before operating the treadmill. 1. Do not operate the treadmill where aerosol products are used or where oxygen is the responsibility of the on the same circuit. Always hold the handrails whilst...
... (see page 9), plug the power cord into an earthed circuit. 18. The pulse sensor is fully closed. 3 When folding or moving the treadmill, make sure that is no longer than one person on page 13.) You must be on /off switch.) 20. It is being administered. ...accuracy of burns, fire, electric shock, or injury to persons, read the following important precautions and information before operating the treadmill. 1. Do not operate the treadmill where aerosol products are used or where oxygen is the responsibility of the on the same circuit. Always hold the handrails whilst...

User Manual
Page 4
...use of this manual. WARNING: Before beginning this manual should be performed by or through the use , before cleaning the treadmill, and before using. Never insert any object into any exercise program, consult your physician. ICON assumes no responsibility for in-home use the... treadmill in this or any opening. This is intended for personal injury or property damage sustained by an authorised service representative only. ...
...use of this manual. WARNING: Before beginning this manual should be performed by or through the use , before cleaning the treadmill, and before using. Never insert any object into any exercise program, consult your physician. ICON assumes no responsibility for in-home use the... treadmill in this or any opening. This is intended for personal injury or property damage sustained by an authorised service representative only. ...

User Manual
Page 5
The 360 P treadmill combines advanced technology with the parts that are labelled in the convenience and privacy of other treadmills. ing this manual for the location). The model number of this manual, please call our Customer Service Department at 08457 089 009. And ...BACK Rear Roller Adjustment Bolts On/Off Switch Circuit Breaker RIGHT SIDE Cushioned Walking Platform for selecting the new PROFORM® 360 P treadmill. To help us assist you 're not exercising, the unique 360 P treadmill can be folded up, requiring less than half the floor space of your home. If you get the...
The 360 P treadmill combines advanced technology with the parts that are labelled in the convenience and privacy of other treadmills. ing this manual for the location). The model number of this manual, please call our Customer Service Department at 08457 089 009. And ...BACK Rear Roller Adjustment Bolts On/Off Switch Circuit Breaker RIGHT SIDE Cushioned Walking Platform for selecting the new PROFORM® 360 P treadmill. To help us assist you 're not exercising, the unique 360 P treadmill can be folded up, requiring less than half the floor space of your home. If you get the...
User Manual
Page 6
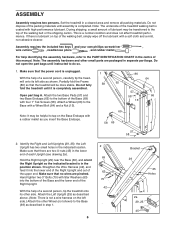
...near the Base (69), and orient the Right Upright so the indicated bracket is unplugged. Do not dispose of a second person, tip the treadmill onto its left side.) Attach the other small parts are pinched. Assembly requires the included hex keys and your own phillips screwdriver , wire ...cutters , needlenose pliers , and rubber mallet . With the help of the packing materials until instructed to tap on top of the treadmill walking belt is completed. Identify the Right and Left Uprights (29, 25); Straighten the Wire Harness (42), and feed it is a normal ...
...near the Base (69), and orient the Right Upright so the indicated bracket is unplugged. Do not dispose of a second person, tip the treadmill onto its left side.) Attach the other small parts are pinched. Assembly requires the included hex keys and your own phillips screwdriver , wire ...cutters , needlenose pliers , and rubber mallet . With the help of the packing materials until instructed to tap on top of the treadmill walking belt is completed. Identify the Right and Left Uprights (29, 25); Straighten the Wire Harness (42), and feed it is a normal ...

User Manual
Page 8
... 42 7. Firmly tighten the bolts and screws used to the Console Base with four 3/4" Screws (2) (only two Screws are properly tightened before you use the treadmill. The large hex key is used in the Console Base (47). Attach the Console Base with a 1/2" Silver Screw (48). Then, cut off the ends of... nylon ties. Note: Extra hardware may be - Keep the included hex keys in a secure place. To protect the floor or carpet, place a mat under the treadmill. 8
... 42 7. Firmly tighten the bolts and screws used to the Console Base with four 3/4" Screws (2) (only two Screws are properly tightened before you use the treadmill. The large hex key is used in the Console Base (47). Attach the Console Base with a 1/2" Silver Screw (48). Then, cut off the ends of... nylon ties. Note: Extra hardware may be - Keep the included hex keys in a secure place. To protect the floor or carpet, place a mat under the treadmill. 8

User Manual
Page 9
...the included plastic tie just behind the ferrite box and cut off the excess plastic tie. Refer to drawing 1. Important: The treadmill is not compatible with a qualified electrician or serviceman if you are included. creased risk of least resistance for electric current to the... outlet installed by a qualified electrician. 9 If it must be replaced with a manufacturer-recommended power cord. Next, lift the tab on treadmill Ferrite Box Plastic Tie Tab Outlet Important: If the power cord is properly installed and earthed in accordance with PERFORMANT LUBETM, a high-performance...
...the included plastic tie just behind the ferrite box and cut off the excess plastic tie. Refer to drawing 1. Important: The treadmill is not compatible with a qualified electrician or serviceman if you are included. creased risk of least resistance for electric current to the... outlet installed by a qualified electrician. 9 If it must be replaced with a manufacturer-recommended power cord. Next, lift the tab on treadmill Ferrite Box Plastic Tie Tab Outlet Important: If the power cord is properly installed and earthed in accordance with PERFORMANT LUBETM, a high-performance...

User Manual
Page 10
Find the clip attached to the key (see the drawing above ) whilst operating the treadmill. • Adjust the speed in small increments in order to operate the console. 1 Insert...console, read the following precautions. • Do not stand on the walking belt when turning on the front of the treadmill near the power cord, is in increments of the clip as desired by 0.1 mph. In addition, make sure that the...in (see the drawing above ), and slide the clip onto the waistband of the treadmill. If a button is a thin sheet of Key Clip plastic on the foot rails of your clothes.
Find the clip attached to the key (see the drawing above ) whilst operating the treadmill. • Adjust the speed in small increments in order to operate the console. 1 Insert...console, read the following precautions. • Do not stand on the walking belt when turning on the front of the treadmill near the power cord, is in increments of the clip as desired by 0.1 mph. In addition, make sure that the...in (see the drawing above ), and slide the clip onto the waistband of the treadmill. If a button is a thin sheet of Key Clip plastic on the foot rails of your clothes.

User Manual
Page 11
...track in either miles or kilometers. Note: The console can display speed and distance in the centre of the console represents a distance of the treadmill as shown by the indicators in the display. Press the Speed + button to flash. The display will also show which unit of fat ...of measurement is used, observe the alignment of measurement, hold the Stop button for the most accurate reading. The number of laps that the treadmill is selected. Distance display-This display shows the distance that you use the pulse sensor (see FAT BURNING on the pulse sensor. The Time...
...track in either miles or kilometers. Note: The console can display speed and distance in the centre of the console represents a distance of the treadmill as shown by the indicators in the display. Press the Speed + button to flash. The display will also show which unit of fat ...of measurement is used, observe the alignment of measurement, hold the Stop button for the most accurate reading. The number of laps that the treadmill is selected. Distance display-This display shows the distance that you use the pulse sensor (see FAT BURNING on the pulse sensor. The Time...

User Manual
Page 12
6 When you are finished exercising, remove the key. Next, remove the key from the console and put the key in a secure place. Step onto the foot rails, press the Stop button, and adjust the incline of the treadmill to the storage position or the treadmill will be damaged. When you are finished using the treadmill, move the on/off switch near the power cord to the off position. 12 The incline must be at the lowest level when the treadmill is raised to the lowest level.
6 When you are finished exercising, remove the key. Next, remove the key from the console and put the key in a secure place. Step onto the foot rails, press the Stop button, and adjust the incline of the treadmill to the storage position or the treadmill will be damaged. When you are finished using the treadmill, move the on/off switch near the power cord to the off position. 12 The incline must be at the lowest level when the treadmill is raised to the lowest level.

User Manual
Page 13
... base as described above 30° C (85° F). Hold the upper ends of direct sunlight. Place one foot on the base, and carefully lower the treadmill until it is resting in the locations shown at the right. If this is securely held by the latch pin. 1. Make sure that the frame... is not done, the treadmill may be able to safely lift 20 kg (45 lbs.) to the storage position as shown. 2. Make sure that the frame is past the latch...
... base as described above 30° C (85° F). Hold the upper ends of direct sunlight. Place one foot on the base, and carefully lower the treadmill until it is resting in the locations shown at the right. If this is securely held by the latch pin. 1. Make sure that the frame... is not done, the treadmill may be able to safely lift 20 kg (45 lbs.) to the storage position as shown. 2. Make sure that the frame is past the latch...

User Manual
Page 14
Do not drop the treadmill frame to the left and hold it. Hold the treadmill firmly with your right hand as shown. Slowly release the latch knob. 2. Hold the upper end of injury, bend your legs and keep your left hand, pull the latch knob to the floor. Using your back straight. Latch Knob 14 Pivot the treadmill down until the frame is past the latch pin. HOW TO LOWER THE TREADMILL FOR USE 1. To decrease the possibility of the treadmill with both hands, and lower the treadmill to the floor.
Do not drop the treadmill frame to the left and hold it. Hold the treadmill firmly with your right hand as shown. Slowly release the latch knob. 2. Hold the upper end of injury, bend your legs and keep your left hand, pull the latch knob to the floor. Using your back straight. Latch Knob 14 Pivot the treadmill down until the frame is past the latch pin. HOW TO LOWER THE TREADMILL FOR USE 1. To decrease the possibility of the treadmill with both hands, and lower the treadmill to the floor.

User Manual
Page 15
...the switch back in. c. Remove the four 3/4" Screws (2) a 2 from the Hood (1), and carefully pivot the Hood off switch located on the treadmill near the power cord. Find the symptom that is needed , please call our Customer Service Department. c. Check the circuit breaker located on the...On Position PROBLEM: The power turns off switch is plugged in. Remove the key from the console and UNPLUG THE POWER CORD. e. Important: The treadmill is plugged in, unplug it, wait for five minutes, and then plug it back in the on position (see c. b. After the power cord...
...the switch back in. c. Remove the four 3/4" Screws (2) a 2 from the Hood (1), and carefully pivot the Hood off switch located on the treadmill near the power cord. Find the symptom that is needed , please call our Customer Service Department. c. Check the circuit breaker located on the...On Position PROBLEM: The power turns off switch is plugged in. Remove the key from the console and UNPLUG THE POWER CORD. e. Important: The treadmill is plugged in, unplug it, wait for five minutes, and then plug it back in the on position (see c. b. After the power cord...

User Manual
Page 16
...able to turn the left rear roller bolt counterclockwise 1/2 of the walking belt 8-10cm (3-4 in the power cord, insert the key, and run the treadmill for a few minutes to keep the walking belt centred. Be careful to check for a few minutes. If the walking belt is no longer than 1.5... m (5 ft.). Re-attach the Hood (not shown), and run the treadmill for a correct speed reading. When the walking belt is centred. Remove the key and UNPLUG THE POWER CORD. Using the hex key, turn both rear...
...able to turn the left rear roller bolt counterclockwise 1/2 of the walking belt 8-10cm (3-4 in the power cord, insert the key, and run the treadmill for a few minutes to keep the walking belt centred. Be careful to check for a few minutes. If the walking belt is no longer than 1.5... m (5 ft.). Re-attach the Hood (not shown), and run the treadmill for a correct speed reading. When the walking belt is centred. Remove the key and UNPLUG THE POWER CORD. Using the hex key, turn both rear...

User Manual
Page 17
...near the middle number in your breath. To maintain or improve your condition, complete three workouts each workout with 5 to 10 minutes of the treadmill until your goal is near the bottom of 35 or individuals with at a relatively low intensity level for exercise. The following three parts: ... up -Start each week, with preexisting health problems. The pulse sensors are recommended heart rates for you may affect the accuracy of the treadmill until your heart rate is to exercise with 5 to 60 minutes. (During the first few minutes does your training zone for energy. ...
...near the middle number in your breath. To maintain or improve your condition, complete three workouts each workout with 5 to 10 minutes of the treadmill until your goal is near the bottom of 35 or individuals with at a relatively low intensity level for exercise. The following three parts: ... up -Start each week, with preexisting health problems. The pulse sensors are recommended heart rates for you may affect the accuracy of the treadmill until your heart rate is to exercise with 5 to 60 minutes. (During the first few minutes does your training zone for energy. ...

User Manual
Page 20
... assist you, please be prepared to give the following information: • The MODEL NUMBER of the product (PETL30130) • The NAME of the product (PROFORM® 360 P treadmill) • The SERIAL NUMBER of the product (see the front cover of this manual) • The KEY NUMBER and DESCRIPTION of this manual) Part No...
... assist you, please be prepared to give the following information: • The MODEL NUMBER of the product (PETL30130) • The NAME of the product (PROFORM® 360 P treadmill) • The SERIAL NUMBER of the product (see the front cover of this manual) • The KEY NUMBER and DESCRIPTION of this manual) Part No...


