

Uk Manual
Page 1
... our Customer Service Department. Please CALL: 0345-089009 Or WRITE: ICON Fitness Lifestyle Ltd. Greenwich House 223 North Street Sheepscar Leeds LS7 2AA West Yorkshire CAUTION Read all precautions and instructions in the space above for future reference. Write the serial number in this manual before using this manual for reference. Serial Number Decal QUESTIONS? Class HC Fitness Product USERÕS MANUAL PETL32571 Serial No. If...
... our Customer Service Department. Please CALL: 0345-089009 Or WRITE: ICON Fitness Lifestyle Ltd. Greenwich House 223 North Street Sheepscar Leeds LS7 2AA West Yorkshire CAUTION Read all precautions and instructions in the space above for future reference. Write the serial number in this manual before using this manual for reference. Serial Number Decal QUESTIONS? Class HC Fitness Product USERÕS MANUAL PETL32571 Serial No. If...
Uk Manual
Page 2
... the power cord or plug is damaged, or if the treadmill is not working properly.) 14. Never start the treadmill whilst you are used or where oxygen is capable of clearance behind it. Do not wear loose clothing that could become caught in a garage or covered patio, or near water. 5. Adjust the speed in small increments to the fuse carrier; Remove the PART LIST...
... the power cord or plug is damaged, or if the treadmill is not working properly.) 14. Never start the treadmill whilst you are used or where oxygen is capable of clearance behind it. Do not wear loose clothing that could become caught in a garage or covered patio, or near water. 5. Adjust the speed in small increments to the fuse carrier; Remove the PART LIST...
Uk Manual
Page 3
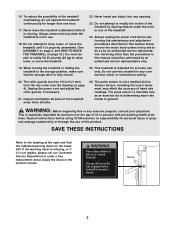
... institutional setting. 20. Always remove the key when the treadmill is properly assembled. (See ASSEMBLY on page 5, and HOW TO MOVE THE TREADMILL on page 4). Always unplug the power cord before using. Inspect and tighten all parts of 35 or persons with pre-existing health problems. Read all instructions before performing the maintenance and adjustment procedures described in this treadmill in use this manual. Do not use . 18. Unplug the power cord and adjust the roller...
... institutional setting. 20. Always remove the key when the treadmill is properly assembled. (See ASSEMBLY on page 5, and HOW TO MOVE THE TREADMILL on page 4). Always unplug the power cord before using. Inspect and tighten all parts of 35 or persons with pre-existing health problems. Read all instructions before performing the maintenance and adjustment procedures described in this treadmill in use this manual. Do not use . 18. Unplug the power cord and adjust the roller...
Uk Manual
Page 4
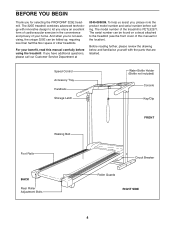
.... The serial number can be found on a decal attached to let you , please note the product model number and serial number before using the treadmill. Speed Control Accessory Tray Handrails Storage Latch Water Bottle Holder (Bottle not included) Console Key/Clip Walking Belt FRONT Foot Rails BACK Rear Roller Adjustment Bolts Circuit Breaker Roller Guards RIGHT SIDE 4 If you for the location). To help us assist you enjoy an excellent form of cardiovascular exercise in...
.... The serial number can be found on a decal attached to let you , please note the product model number and serial number before using the treadmill. Speed Control Accessory Tray Handrails Storage Latch Water Bottle Holder (Bottle not included) Console Key/Clip Walking Belt FRONT Foot Rails BACK Rear Roller Adjustment Bolts Circuit Breaker Roller Guards RIGHT SIDE 4 If you for the location). To help us assist you enjoy an excellent form of cardiovascular exercise in...
Uk Manual
Page 5
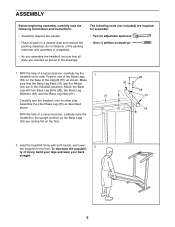
... in a cleared area and remove the packing materials; The following information and instructions: ¥ Assembly requires two people. ¥ Place all parts are in the indicated positions. Attach the Base Leg with both hands, and lower 2 the treadmill to the upright position so the Base Legs (55) are required for assembly: ¥ Two (2) adjustable spanners ¥ One (1) phillips screwdriver 1. Assemble the other side. With...
... in a cleared area and remove the packing materials; The following information and instructions: ¥ Assembly requires two people. ¥ Place all parts are in the indicated positions. Attach the Base Leg with both hands, and lower 2 the treadmill to the upright position so the Base Legs (55) are required for assembly: ¥ Two (2) adjustable spanners ¥ One (1) phillips screwdriver 1. Assemble the other side. With...
Uk Manual
Page 6
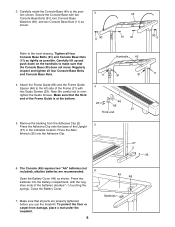
... and tighten all parts are recommended. 6 Open the Battery Cover (48) as possible. Remove the backing from damage, place a mat under the treadmill. 6 Batteries Handrails 45 11 91 91 11 4. The Console (49) requires two "AA" batteries (not included); Make sure that all four Console Base Bolts and Console Base Nuts. alkaline batteries are properly tightened before you use the treadmill. Close the Battery Cover. 49 48 7. tighten the Guide Screws. Carefully...
... and tighten all parts are recommended. 6 Open the Battery Cover (48) as possible. Remove the backing from damage, place a mat under the treadmill. 6 Batteries Handrails 45 11 91 91 11 4. The Console (49) requires two "AA" batteries (not included); Make sure that all four Console Base Bolts and Console Base Nuts. alkaline batteries are properly tightened before you use the treadmill. Close the Battery Cover. 49 48 7. tighten the Guide Screws. Carefully...
Uk Manual
Page 7
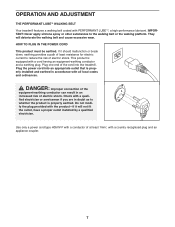
... and a earthing plug. This product is properly earthed. Check with PERFORMANT LUBETM, a high-performance lubricant. Plug the power cord into the treadmill. OPERATION AND ADJUSTMENT THE PERFORMANT LUBETM WALKING BELT Your treadmill features a walking belt coated with a quali- Use only a power cord type H05VV-F with a conductor of the cord into an appropriate outlet that is properly installed and earthed in doubt as to the walking belt or the walking platform.
... and a earthing plug. This product is properly earthed. Check with PERFORMANT LUBETM, a high-performance lubricant. Plug the power cord into the treadmill. OPERATION AND ADJUSTMENT THE PERFORMANT LUBETM WALKING BELT Your treadmill features a walking belt coated with a quali- Use only a power cord type H05VV-F with a conductor of the cord into an appropriate outlet that is properly installed and earthed in doubt as to the walking belt or the walking platform.
Uk Manual
Page 8
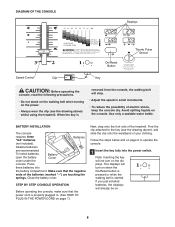
DIAGRAM OF THE CONSOLE Displays On/Reset Button Thumb Pulse Sensor Speed Control Clip Key CAUTION: Before operating the console, read the following precautions. ¥ Do not stand on the walking belt when turning on the power. ¥ Always wear the clip (see the drawing above ) whilst using the treadmill. To install batteries, open the battery Battery Cover cover under the console. STEP BY STEP CONSOLE OPERATION Before operating the console, make sure that the negative ends of electric shock...
DIAGRAM OF THE CONSOLE Displays On/Reset Button Thumb Pulse Sensor Speed Control Clip Key CAUTION: Before operating the console, read the following precautions. ¥ Do not stand on the walking belt when turning on the power. ¥ Always wear the clip (see the drawing above ) whilst using the treadmill. To install batteries, open the battery Battery Cover cover under the console. STEP BY STEP CONSOLE OPERATION Before operating the console, make sure that the negative ends of electric shock...
Uk Manual
Page 9
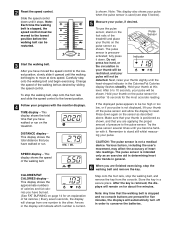
... automatically turn off the pulse sensor and allow the display to the pulse sensor. 2 Reset the speed control. Note: This display also shows your pulse when the pulse sensor is stopped and no console buttons are finished exercising, stop the walking belt and remove the key. Hold your pulse, if desired. Make sure that the walking belt is used (see step 5 below). 5 Measure your thumb at slow speed. CAUTION: The pulse sensor is pressure- To stop the walking belt, and remove the key from one number...
... automatically turn off the pulse sensor and allow the display to the pulse sensor. 2 Reset the speed control. Note: This display also shows your pulse when the pulse sensor is stopped and no console buttons are finished exercising, stop the walking belt and remove the key. Hold your pulse, if desired. Make sure that the walking belt is used (see step 5 below). 5 Measure your thumb at slow speed. CAUTION: The pulse sensor is pressure- To stop the walking belt, and remove the key from one number...
Uk Manual
Page 10
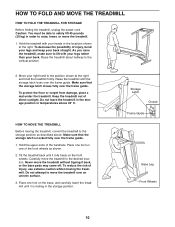
HOW TO FOLD AND MOVE THE TREADMILL HOW TO FOLD THE TREADMILL FOR STORAGE Before folding the treadmill, unplug the power cord. To decrease the possibility of the handrails. Do not leave the treadmill in the storage position in the locations shown at the right, and hold the treadmill firmly. Hold the upper ends of injury, bend your legs and keep your hands in temperatures above...
HOW TO FOLD AND MOVE THE TREADMILL HOW TO FOLD THE TREADMILL FOR STORAGE Before folding the treadmill, unplug the power cord. To decrease the possibility of the handrails. Do not leave the treadmill in the storage position in the locations shown at the right, and hold the treadmill firmly. Hold the upper ends of injury, bend your legs and keep your hands in temperatures above...

Uk Manual
Page 11
Hold the upper end of injury, bend your legs and keep your right hand as shown. To decrease the possibility of the treadmill with both hands, and lower the treadmill to the floor. Pivot the treadmill until the frame guide and the foot rail are past the storage latch. 2. Storage Opened Latch Frame Guide 11 Hold the treadmill firmly with your back straight. HOW TO LOWER THE TREADMILL FOR USE 1. Using your left hand, slide open the storage latch.
Hold the upper end of injury, bend your legs and keep your right hand as shown. To decrease the possibility of the treadmill with both hands, and lower the treadmill to the floor. Pivot the treadmill until the frame guide and the foot rail are past the storage latch. 2. Storage Opened Latch Frame Guide 11 Hold the treadmill firmly with your back straight. HOW TO LOWER THE TREADMILL FOR USE 1. Using your left hand, slide open the storage latch.
Uk Manual
Page 12
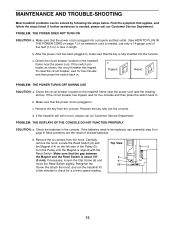
... Screw (9) and move the Reed Switch slightly. Retighten the Screw. Top View 9 8 1/8Ó 5 14 12 c Tripped Reset Tripped Reset PROBLEM: THE POWER TURNS OFF DURING USE SOLUTION: a. Reinsert the key fully into the console. Turn the Pulley until the Magnet is fully inserted into the console. Re-attach the hood, and run , please call our Customer Service Department. MAINTENANCE AND TROUBLE-SHOOTING Most treadmill problems can be replaced, see assembly step 6 on the treadmill frame near the power cord. d. PROBLEM...
... Screw (9) and move the Reed Switch slightly. Retighten the Screw. Top View 9 8 1/8Ó 5 14 12 c Tripped Reset Tripped Reset PROBLEM: THE POWER TURNS OFF DURING USE SOLUTION: a. Reinsert the key fully into the console. Turn the Pulley until the Magnet is fully inserted into the console. Re-attach the hood, and run , please call our Customer Service Department. MAINTENANCE AND TROUBLE-SHOOTING Most treadmill problems can be replaced, see assembly step 6 on the treadmill frame near the power cord. d. PROBLEM...
Uk Manual
Page 13
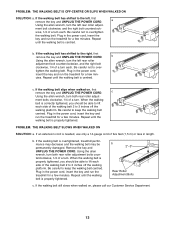
... off the walking platform. tighten the walking belt. c. If the walking belt slips when walked on , please call our Customer Service Department. 13 PROBLEM: THE WALKING BELT SLOWS WHEN WALKED ON SOLUTION: a. b 2ÓÐ3Ó Rear Roller Adjustment Bolts c. Be careful not to the right, first remove the key and UNPLUG THE POWER CORD. ment bolts clockwise, 1/4 of the walking belt 2 to keep the walking belt centred. Plug in the power cord, insert the key and run the treadmill for a few...
... off the walking platform. tighten the walking belt. c. If the walking belt slips when walked on , please call our Customer Service Department. 13 PROBLEM: THE WALKING BELT SLOWS WHEN WALKED ON SOLUTION: a. b 2ÓÐ3Ó Rear Roller Adjustment Bolts c. Be careful not to the right, first remove the key and UNPLUG THE POWER CORD. ment bolts clockwise, 1/4 of the walking belt 2 to keep the walking belt centred. Plug in the power cord, insert the key and run the treadmill for a few...
Uk Manual
Page 14
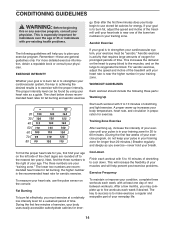
... a guide. For aerobic exercise, adjust the speed and incline of the treadmill until your heart rate is near the higher number in your training zone. Training Zone Exercise After warming up, increase the intensity of your exercise until your pulse is near one day of your breath. To find the proper heart rate for fat burning; The three numbers are your Òtraining zone.Ó The lower two numbers are...
... a guide. For aerobic exercise, adjust the speed and incline of the treadmill until your heart rate is near the higher number in your training zone. Training Zone Exercise After warming up, increase the intensity of your exercise until your pulse is near one day of your breath. To find the proper heart rate for fat burning; The three numbers are your Òtraining zone.Ó The lower two numbers are...
Uk Manual
Page 15
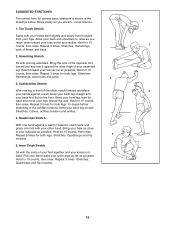
...The correct form for several basic stretches is shown in front of knees and back. 2. Hold for 15 counts, then relax. Stretches: Hamstrings, lower back and groin. 3 3. Hold for 15 counts, then relax. Stretches: Calves, achilles tendons and ankles. 4. Repeat 3 times for both legs. Inner Thigh... Repeat 3 times for balance, reach back and grasp one leg in the drawings below. Repeat 3 times. Move slowly as you reach down toward the wall. Allow your knees outward. Bend your front leg, lean forward and move your groin area as far as you stretchÑnever bounce...
...The correct form for several basic stretches is shown in front of knees and back. 2. Hold for 15 counts, then relax. Stretches: Hamstrings, lower back and groin. 3 3. Hold for 15 counts, then relax. Stretches: Calves, achilles tendons and ankles. 4. Repeat 3 times for both legs. Inner Thigh... Repeat 3 times for balance, reach back and grasp one leg in the drawings below. Repeat 3 times. Move slowly as you reach down toward the wall. Allow your knees outward. Bend your front leg, lean forward and move your groin area as far as you stretchÑnever bounce...
Uk Manual
Page 16
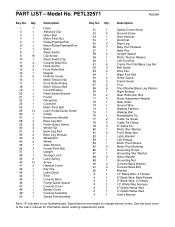
... Front Roller Bolt Magnet Platform Screw Motor Tension Nut Front Roller/Pulley Motor Tension Bolt Circuit Breaker Reed Switch Bracket Frame Receptical Controller Motor Pivot Bolt Latch Screw/Guide Screw Choke Electronics Bracket Base Leg Bolt Roller Guard Screw Wheel Nut Base Leg Pad Base Leg Endcap Wheel Bolt Wheel Allen Wrench Frame Pivot Bolt Upright Storage Latch Latch Spring Screw Handrail Cover Key Clip Latch Decal Filter Console Base Frame Guide Spacer Console Cover Battery Cover Console Assembly Speed Potentiometer Key No. See the back cover of the userÕs manual for information...
... Front Roller Bolt Magnet Platform Screw Motor Tension Nut Front Roller/Pulley Motor Tension Bolt Circuit Breaker Reed Switch Bracket Frame Receptical Controller Motor Pivot Bolt Latch Screw/Guide Screw Choke Electronics Bracket Base Leg Bolt Roller Guard Screw Wheel Nut Base Leg Pad Base Leg Endcap Wheel Bolt Wheel Allen Wrench Frame Pivot Bolt Upright Storage Latch Latch Spring Screw Handrail Cover Key Clip Latch Decal Filter Console Base Frame Guide Spacer Console Cover Battery Cover Console Assembly Speed Potentiometer Key No. See the back cover of the userÕs manual for information...
Uk Manual
Page 18
... product (PROFORM¨ 325E treadmill) ¥ The MODEL NUMBER of the product (PETL32571) ¥ The PART NUMBER of the part (see the EXPLODED DRAWING and PART LIST attached in the centre of this manual) ¥ The DESCRIPTION of the part (see the EXPLODED DRAWING and PART LIST attached in Canada © 1999 ICON Health & Fitness, Inc. office, or write: ICON Fitness Lifestyle Ltd. ORDERING REPLACEMENT PARTS To order replacement parts, contact the ICON Fitness Lifestyle Ltd...
... product (PROFORM¨ 325E treadmill) ¥ The MODEL NUMBER of the product (PETL32571) ¥ The PART NUMBER of the part (see the EXPLODED DRAWING and PART LIST attached in the centre of this manual) ¥ The DESCRIPTION of the part (see the EXPLODED DRAWING and PART LIST attached in Canada © 1999 ICON Health & Fitness, Inc. office, or write: ICON Fitness Lifestyle Ltd. ORDERING REPLACEMENT PARTS To order replacement parts, contact the ICON Fitness Lifestyle Ltd...

