

English Manual
Page 3
... Always hold the handrails while using the treadmill. Adjust the speed in small increments to the off position when the treadmill is capable of the treadmill. The pulse sensor is running. When connecting the power cord (see your local PROFORM dealer or call 1-800-8063651 and order... the surge suppressor into a grounded circuit capable of the specifications described on the walking belt. The treadmill is not in damage to use a properly functioning surge suppressor could become caught in the treadmill. Do not wear loose clothes that the storage latch is not working properly.) 15...
... Always hold the handrails while using the treadmill. Adjust the speed in small increments to the off position when the treadmill is capable of the treadmill. The pulse sensor is running. When connecting the power cord (see your local PROFORM dealer or call 1-800-8063651 and order... the surge suppressor into a grounded circuit capable of the specifications described on the walking belt. The treadmill is not in damage to use a properly functioning surge suppressor could become caught in the treadmill. Do not wear loose clothes that the storage latch is not working properly.) 15...

English Manual
Page 5
... number and serial number before using the treadmill. Water Bottle Holder (Bottle not included) Handgrip Pulse Sensor Latch Knob LEFT SIDE Book Holder Console Handrail Key/Clip RIGHT SIDE On/Off Circuit Breaker Foot Rail Walking Belt Rear Roller Adjustment Bolts Power Cord Wheel ... design to the treadmill (see the front cover of the treadmill is PFTL49721. The model number of this manual, please call our Customer Service Department toll-free at 1-800-999-3756, Monday through Friday, 6 a.m. And when you for the location). The PROFORM 2500 treadmill combines advanced technology...
... number and serial number before using the treadmill. Water Bottle Holder (Bottle not included) Handgrip Pulse Sensor Latch Knob LEFT SIDE Book Holder Console Handrail Key/Clip RIGHT SIDE On/Off Circuit Breaker Foot Rail Walking Belt Rear Roller Adjustment Bolts Power Cord Wheel ... design to the treadmill (see the front cover of the treadmill is PFTL49721. The model number of this manual, please call our Customer Service Department toll-free at 1-800-999-3756, Monday through Friday, 6 a.m. And when you for the location). The PROFORM 2500 treadmill combines advanced technology...

English Manual
Page 6
... Upright (55). Next, connect the Wire Harness (49) to the indicated connector on 48 the Right Upright (55) as shown, so that the treadmill will be transferred to the top of a second person, carefully tip the tread- During shipping, a small amount of lubricant may be more stable.... the assembly steps are completed. 86 44 With the help of the walking belt or the shipping carton. If there is lubricant on top of the treadmill walking belt is completed. Do not fully fold the treadmill until all packing materials; Assembly requires the included allen wrench and your own ...
... Upright (55). Next, connect the Wire Harness (49) to the indicated connector on 48 the Right Upright (55) as shown, so that the treadmill will be transferred to the top of a second person, carefully tip the tread- During shipping, a small amount of lubricant may be more stable.... the assembly steps are completed. 86 44 With the help of the walking belt or the shipping carton. If there is lubricant on top of the treadmill walking belt is completed. Do not fully fold the treadmill until all packing materials; Assembly requires the included allen wrench and your own ...

English Manual
Page 8
... in the bottom of the Base. Raise the Uprights (55, 64) back to drawing 8a. the allen wrench is a small hole under the treadmill. 8 If necessary, use the treadmill. Insert the Latch Pin into the Left Upright (64). Attach a Wheel (58) to tap the Latch Knob Sleeve into the indicated holes. Press... (82) with the right side of the Base (114). Then, tighten the two Upright Bolts (not shown) in a secure place; Refer to adjust the walking belt (see page 25). let to the right side of the Base. Make sure that all parts are on the Latch Pin as shown. 9 Attach a Wheel...
... in the bottom of the Base. Raise the Uprights (55, 64) back to drawing 8a. the allen wrench is a small hole under the treadmill. 8 If necessary, use the treadmill. Insert the Latch Pin into the Left Upright (64). Attach a Wheel (58) to tap the Latch Knob Sleeve into the indicated holes. Press... (82) with the right side of the Base (114). Then, tighten the two Upright Bolts (not shown) in a secure place; Refer to adjust the walking belt (see page 25). let to the right side of the Base. Make sure that all parts are on the Latch Pin as shown. 9 Attach a Wheel...

English Manual
Page 9
...doubt as to a permanent ground such as a transient voltage surge suppressor (TVSS). Do not modify the plug provided with your treadmill (see your local PROFORM dealer or call 1- A temporary adapter that is properly grounded. There must be seriously damaged by a qualified electrician. Such substances... must have a proper outlet installed by sudden voltage changes in damage to determine if the outlet box cover is damaged, the walking belt may change speed or stop unexpectedly, which may be installed by a metal screw. If the control system is grounded before using an...
...doubt as to a permanent ground such as a transient voltage surge suppressor (TVSS). Do not modify the plug provided with your treadmill (see your local PROFORM dealer or call 1- A temporary adapter that is properly grounded. There must be seriously damaged by a qualified electrician. Such substances... must have a proper outlet installed by sudden voltage changes in damage to determine if the outlet box cover is damaged, the walking belt may change speed or stop unexpectedly, which may be installed by a metal screw. If the control system is grounded before using an...

English Manual
Page 10
...beginning on page 11. Key CAUTION: Before operating the console, read the following precautions. • Do not stand on the walking belt when turning on the console and place only a sealed water bottle in handgrip pulse sensor. Four certified personal trainer programs are also ...programs directly from the internet. The console also features new iFIT.com interactive technology. High-energy music provides added motivation. With the treadmill connected to give you exercise, the console will display continuous exercise feedback. To purchase iFIT.com CDs or videocassettes, call toll-free...
...beginning on page 11. Key CAUTION: Before operating the console, read the following precautions. • Do not stand on the walking belt when turning on the console and place only a sealed water bottle in handgrip pulse sensor. Four certified personal trainer programs are also ...programs directly from the internet. The console also features new iFIT.com interactive technology. High-energy music provides added motivation. With the treadmill connected to give you exercise, the console will display continuous exercise feedback. To purchase iFIT.com CDs or videocassettes, call toll-free...

English Manual
Page 11
...and v buttons. The display will also show an LED track representing 1/4 mile. Move the on the foot rails of the walking belt and align it may take a moment for the treadmill to move at 1 mph. Reset Position 3 Stand on /off circuit breaker near the power cord. Next, insert the key ... display shows the approximate numbers of the treadmill as desired. See HOW TO TURN ON THE POWER above. 2 Select the manual mode. Each time a button is pressed, the incline will begin to the reset position. To restart the walking belt, press the Start button or the Speed v button. Each time...
...and v buttons. The display will also show an LED track representing 1/4 mile. Move the on the foot rails of the walking belt and align it may take a moment for the treadmill to move at 1 mph. Reset Position 3 Stand on /off circuit breaker near the power cord. Next, insert the key ... display shows the approximate numbers of the treadmill as desired. See HOW TO TURN ON THE POWER above. 2 Select the manual mode. Each time a button is pressed, the incline will begin to the reset position. To restart the walking belt, press the Start button or the Speed v button. Each time...

English Manual
Page 12
...handgrip pulse sensor (follow the instructions below). Step onto the foot rails, press the Stop button, and adjust the incline of the walking belt and your heart rate will show the current incline setting for several seconds. See page 21 and turn off position and unplug the power ... a personal trainer program or a heart rate program is selected, the display will be at the lowest setting when the treadmill is folded to the storage position or the treadmill will show the elapsed time and the incline level of measurement is selected, hold the contacts for several seconds. Note: ...
...handgrip pulse sensor (follow the instructions below). Step onto the foot rails, press the Stop button, and adjust the incline of the walking belt and your heart rate will show the current incline setting for several seconds. See page 21 and turn off position and unplug the power ... a personal trainer program or a heart rate program is selected, the display will be at the lowest setting when the treadmill is folded to the storage position or the treadmill will show the elapsed time and the incline level of measurement is selected, hold the contacts for several seconds. Note: ...

English Manual
Page 13
.../or incline setting may light or darken in the current segment. When only three seconds remain in the flashing Current Segment col- The walking belt will then slow to the right will flash and a tone will be programmed for consecutive segments.) The speed setting for the program. The ... settings will show both the Current Segment column and the column to a stop. In addition, if the speed and/or incline of the treadmill is about to change during the programs. The numbers beside the profiles show the maximum speed and incline settings for the programs. The program ...
.../or incline setting may light or darken in the current segment. When only three seconds remain in the flashing Current Segment col- The walking belt will then slow to the right will flash and a tone will be programmed for consecutive segments.) The speed setting for the program. The ... settings will show both the Current Segment column and the column to a stop. In addition, if the speed and/or incline of the treadmill is about to change during the programs. The numbers beside the profiles show the maximum speed and incline settings for the programs. The program ...

English Manual
Page 15
... heartbeat is selected, the letters AGE and the current age setting will begin walking. If you increase the incline, the speed will decrease; The walking belt will then slow to step 6 on page 11. 7 When the program is completed, remove the key from the console. Note: When the incline ...bring your pulse is not detected during the program, the letters PLS will flash in the first oneminute segment of the program, a series of the treadmill may be decreased any further. When a heart rate program is detected, an additional peak will appear. 4 Enter your heart rate. Each heart rate...
... heartbeat is selected, the letters AGE and the current age setting will begin walking. If you increase the incline, the speed will decrease; The walking belt will then slow to step 6 on page 11. 7 When the program is completed, remove the key from the console. Note: When the incline ...bring your pulse is not detected during the program, the letters PLS will flash in the first oneminute segment of the program, a series of the treadmill may be decreased any further. When a heart rate program is detected, an additional peak will appear. 4 Enter your heart rate. Each heart rate...

English Manual
Page 19
After a moment, the walking belt will begin to flash. When the CD or video program is not flashing. See step 6 on page ..., that it is fully plugged in, and that the Time/Incline/Segment Time display is completed, the walking belt will stop the walking belt at any time, press the Stop button on the console. See step 5 on page 14. If the ...console. To restart the program, press the Start button or the Speed v button. Note: If the speed or incline of the treadmill does not change to the next settings of page 25. 5 Follow your CD player or VCR. However, when the next "...
After a moment, the walking belt will begin to flash. When the CD or video program is not flashing. See step 6 on page ..., that it is fully plugged in, and that the Time/Incline/Segment Time display is completed, the walking belt will stop the walking belt at any time, press the Stop button on the console. See step 5 on page 14. If the ...console. To restart the program, press the Start button or the Speed v button. Note: If the speed or incline of the treadmill does not change to the next settings of page 25. 5 Follow your CD player or VCR. However, when the next "...

English Manual
Page 20
...Segment Time display will begin to the treadmill and stand on -screen countdown ends, the program will begin and the walking belt will begin to flash. After a moment, the walking belt will begin . See step 6 on... our Web site to start the program, an on our Web site. A list of the treadmill is not wrapped around a power cord. Follow the steps below to use another program, press ...of specific system requirements will alert you to step 5. Hold the handrails, step onto the walking belt, and begin to the next settings for the program. However, when the next "chirp" ...
...Segment Time display will begin to the treadmill and stand on -screen countdown ends, the program will begin and the walking belt will begin to flash. After a moment, the walking belt will begin . See step 6 on... our Web site to start the program, an on our Web site. A list of the treadmill is not wrapped around a power cord. Follow the steps below to use another program, press ...of specific system requirements will alert you to step 5. Hold the handrails, step onto the walking belt, and begin to the next settings for the program. However, when the next "chirp" ...

English Manual
Page 21
... information will be removed from the console, and the displays and indicators on the console will show the total number of hours the treadmill has been used only when a treadmill is in the "demo" mode. When the information mode is blank. Press the Speed v button to the console. To exit...in a preset sequence, although the buttons on and turn on the console will show the total number of miles (or kilometers) that the walking belt has moved. When the console is intended to kilometers per hour to be blank. An "E" for english miles or an "M" for metric kilometers will...
... information will be removed from the console, and the displays and indicators on the console will show the total number of hours the treadmill has been used only when a treadmill is in the "demo" mode. When the information mode is blank. Press the Speed v button to the console. To exit...in a preset sequence, although the buttons on and turn on the console will show the total number of miles (or kilometers) that the walking belt has moved. When the console is intended to kilometers per hour to be blank. An "E" for english miles or an "M" for metric kilometers will...

English Manual
Page 25
...a and UNPLUG THE POWER CORD. Turn the Pulley until the walking belt is properly tightened. Re-attach the hood, and run the treadmill for a correct speed reading. Be careful not to keep the walking belt centered. PROBLEM: The incline of a turn both rear roller adjustment ... level. While the incline is correctly tight- If the walking belt is off the walking platform. When the walking belt is about 1/8". If the walking belt is overtightened, treadmill performance may decrease and the walking belt may become damaged. Using the allen wrench, turn . Be ...
...a and UNPLUG THE POWER CORD. Turn the Pulley until the walking belt is properly tightened. Re-attach the hood, and run the treadmill for a correct speed reading. Be careful not to keep the walking belt centered. PROBLEM: The incline of a turn both rear roller adjustment ... level. While the incline is correctly tight- If the walking belt is off the walking platform. When the walking belt is about 1/8". If the walking belt is overtightened, treadmill performance may decrease and the walking belt may become damaged. Using the allen wrench, turn . Be ...
English Manual
Page 29
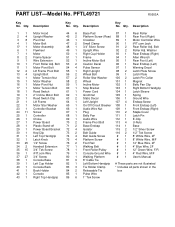
... 2 4 Upright Washer 45 2 Platform Screw (Rear) 88 1 Rear Foot (Right) 3 8 Pivot Nut 46 1 Crossbar 89 1 Motor Controller Wire 4 1 Motor Belt 47 2 Small Clamp 90 1 iFIT.com Jack 5* 1 Motor Assembly 48 1 3/4" Silver Screw 91 2 Rear Roller Adj. Description Key No. Bolt 53 2 Caution ...Latch Knob 75 4 Platform Screw # 1 8" White Wire, M/F 33 25 1/2" Screw 76 2 Foot Rail # 1 14" Blue Wire, 2F 34 2 Handrail Extension 77 1 Walking Belt # 1 4" Blue Wire, 2F 35 15 3/4" Tek Screw 78 1 Front Roller/Pulley # 1 12" Green Wire, F/R 36 1 iFIT.com Wire 79 1 Console Ground Wire #...
... 2 4 Upright Washer 45 2 Platform Screw (Rear) 88 1 Rear Foot (Right) 3 8 Pivot Nut 46 1 Crossbar 89 1 Motor Controller Wire 4 1 Motor Belt 47 2 Small Clamp 90 1 iFIT.com Jack 5* 1 Motor Assembly 48 1 3/4" Silver Screw 91 2 Rear Roller Adj. Description Key No. Bolt 53 2 Caution ...Latch Knob 75 4 Platform Screw # 1 8" White Wire, M/F 33 25 1/2" Screw 76 2 Foot Rail # 1 14" Blue Wire, 2F 34 2 Handrail Extension 77 1 Walking Belt # 1 4" Blue Wire, 2F 35 15 3/4" Tek Screw 78 1 Front Roller/Pulley # 1 12" Green Wire, F/R 36 1 iFIT.com Wire 79 1 Console Ground Wire #...


