
English Manual
Page 9
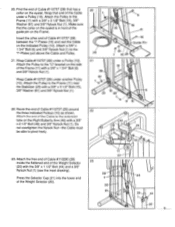
... around the three indicated Pulleys (10) as shown. Do not overtighten the Nylock Nut-the Cable must be able to the "I / i ,. 44 , 28-.., 44 1 ,......---20 Attach the Pulley to the Frame (11) near the Stabilizer (23) with a 3/8" x 2 1/2" Bolt (48) and 3/8" Nylock Nut (1). Attach the Pulley to the Frame...other end of the guide pin on the eyelet. Wrap Cable #110737 (29) under a Pulley (10). Attach th,a and of the Weight Selector (20). 20 21 I "-Plates just above the Cable and Pulley. 21. Wrap that the collar on the eyelet is in front of Cable #110737 (29) ...
... around the three indicated Pulleys (10) as shown. Do not overtighten the Nylock Nut-the Cable must be able to the "I / i ,. 44 , 28-.., 44 1 ,......---20 Attach the Pulley to the Frame (11) near the Stabilizer (23) with a 3/8" x 2 1/2" Bolt (48) and 3/8" Nylock Nut (1). Attach the Pulley to the Frame...other end of the guide pin on the eyelet. Wrap Cable #110737 (29) under a Pulley (10). Attach th,a and of the Weight Selector (20). 20 21 I "-Plates just above the Cable and Pulley. 21. Wrap that the collar on the eyelet is in front of Cable #110737 (29) ...

English Manual
Page 11
... all remaining parts is explained in USING THE SYSTEM 2, beginning on the same side. 57 19 56 o 56 Pin Grooves 29. Raise the Weight Selector (20). The use of the cables do not move smoothly over the pulleys. Make sure that all parts are not properly routed, they may be permanently... Large Weights are on page 12 of each cable a few times to make sure that the pin grooves are under the Weights and are turned 20 so that the cables move smoothly, locate and correct the problem before using the SYSTEM 2, test the cables and pulleys.
... all remaining parts is explained in USING THE SYSTEM 2, beginning on the same side. 57 19 56 o 56 Pin Grooves 29. Raise the Weight Selector (20). The use of the cables do not move smoothly over the pulleys. Make sure that all parts are not properly routed, they may be permanently... Large Weights are on page 12 of each cable a few times to make sure that the pin grooves are under the Weights and are turned 20 so that the cables move smoothly, locate and correct the problem before using the SYSTEM 2, test the cables and pulleys.

English Manual
Page 12
... STRAP TO THE WEIGHT SYSTEM II, To attach the Lat Bar (59) to the lower cable, first remove the press seat rail from a minimum of 20 pounds, up for each individual exercise. USING THE SYSTEM 2 The instructions below describe how the components of the SYSTEM 2 can be changed from the frame...
... STRAP TO THE WEIGHT SYSTEM II, To attach the Lat Bar (59) to the lower cable, first remove the press seat rail from a minimum of 20 pounds, up for each individual exercise. USING THE SYSTEM 2 The instructions below describe how the components of the SYSTEM 2 can be changed from the frame...

English Manual
Page 14
... 013519 1 3/8" x 3" Bolt # 112676 1 Owner's Manual # 110814 1 Exercise Manual # 104838 1 Grease Tube # 112663 1 Part I "-Plate 17 110727 1 "U"-Bracket 18 105433 2 Weight Bumper 19 110923 2 Weight Guide 20 111182 1 Weight Selector 21 110726 1 Selector Cap 22 105315 1 Chain 23 112202 1 Stabilizer 24 105723 2 Stabilizer Cap 25 108832 1 Foot Plate 26 105134 2 3/8" x 3/4" Bolt 27...
... 013519 1 3/8" x 3" Bolt # 112676 1 Owner's Manual # 110814 1 Exercise Manual # 104838 1 Grease Tube # 112663 1 Part I "-Plate 17 110727 1 "U"-Bracket 18 105433 2 Weight Bumper 19 110923 2 Weight Guide 20 111182 1 Weight Selector 21 110726 1 Selector Cap 22 105315 1 Chain 23 112202 1 Stabilizer 24 105723 2 Stabilizer Cap 25 108832 1 Foot Plate 26 105134 2 3/8" x 3/4" Bolt 27...


