
English Manual
Page 9
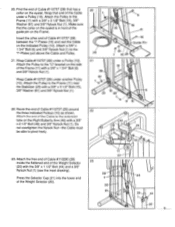
... (11) near the Stabilizer (23) with a 3/8" x 2 1/2" Bolt (48) and 3/8" Nylock Nut (1). Do not overtighten the Nylock Nut-the Cable must be able to pivot freely. 20 1 .- . .. 6 . 10 16 11 ,,,a---15 • Guide Pin 0 29 6 1 1 10 29 21 15 29 61 1 1 . 23 10 29 , -b ,- 11 10 ') ...23. Wrap that has a collar on the indicated Pulley (10). Route the end of Cable #110737 (29) between the "I / i ,. 44 , 28-.., 44 1 ,......---20 Find the end of Cable #110737 (29) that end of the guide pin on the Right Butterfly Arm (46) with a 3/8" x 3 1/2" Bolt (15), 3/8" Washer...
... (11) near the Stabilizer (23) with a 3/8" x 2 1/2" Bolt (48) and 3/8" Nylock Nut (1). Do not overtighten the Nylock Nut-the Cable must be able to pivot freely. 20 1 .- . .. 6 . 10 16 11 ,,,a---15 • Guide Pin 0 29 6 1 1 10 29 21 15 29 61 1 1 . 23 10 29 , -b ,- 11 10 ') ...23. Wrap that has a collar on the indicated Pulley (10). Route the end of Cable #110737 (29) between the "I / i ,. 44 , 28-.., 44 1 ,......---20 Find the end of Cable #110737 (29) that end of the guide pin on the Right Butterfly Arm (46) with a 3/8" x 3 1/2" Bolt (15), 3/8" Washer...

English Manual
Page 11
28. Raise the Weight Selector (20). Before using the SYSTEM 2. IMPORTANT: If the cables are tightened securely. Place the nine Large Weights (56) and the Small Weight (57) 28 between the ...Weight Guides (19) by tipping the 19 Weights as shown (see the inset drawing). Make sure that all the Large Weights are turned 20 so that the pin grooves are under the Weights and are on page 12 of each cable a few times to make sure that all parts...
28. Raise the Weight Selector (20). Before using the SYSTEM 2. IMPORTANT: If the cables are tightened securely. Place the nine Large Weights (56) and the Small Weight (57) 28 between the ...Weight Guides (19) by tipping the 19 Weights as shown (see the inset drawing). Make sure that all the Large Weights are turned 20 so that the pin grooves are under the Weights and are on page 12 of each cable a few times to make sure that all parts...

English Manual
Page 12
... adjusted. Adjust the length of the Chain until the bracket is attached to the lower cable, first remove the press seat rail from a minimum of 20 pounds, up for each individual exercise. ATTACHING AND REMOVING THE PRESS SEAT RAIL The press seat rail should be determined by attaching the Cable Clips...
... adjusted. Adjust the length of the Chain until the bracket is attached to the lower cable, first remove the press seat rail from a minimum of 20 pounds, up for each individual exercise. ATTACHING AND REMOVING THE PRESS SEAT RAIL The press seat rail should be determined by attaching the Cable Clips...

English Manual
Page 14
... 013519 1 3/8" x 3" Bolt # 112676 1 Owner's Manual # 110814 1 Exercise Manual # 104838 1 Grease Tube # 112663 1 Part I "-Plate 17 110727 1 "U"-Bracket 18 105433 2 Weight Bumper 19 110923 2 Weight Guide 20 111182 1 Weight Selector 21 110726 1 Selector Cap 22 105315 1 Chain 23 112202 1 Stabilizer 24 105723 2 Stabilizer Cap 25 108832 1 Foot Plate 26 105134 2 3/8" x 3/4" Bolt 27...
... 013519 1 3/8" x 3" Bolt # 112676 1 Owner's Manual # 110814 1 Exercise Manual # 104838 1 Grease Tube # 112663 1 Part I "-Plate 17 110727 1 "U"-Bracket 18 105433 2 Weight Bumper 19 110923 2 Weight Guide 20 111182 1 Weight Selector 21 110726 1 Selector Cap 22 105315 1 Chain 23 112202 1 Stabilizer 24 105723 2 Stabilizer Cap 25 108832 1 Foot Plate 26 105134 2 3/8" x 3/4" Bolt 27...


