
English Manual
Page 2
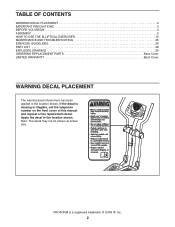
... trademark of this manual and request a free replacement decal. Note: The decal may not be shown at actual size. Apply the decal in the location shown. TABLE OF CONTENTS WARNING DECAL PLACEMENT 2 IMPORTANT PRECAUTIONS 3 BEFORE YOU BEGIN 4 ASSEMBLY 5 HOW TO USE THE ELLIPTICAL EXERCISER 12 MAINTENANCE AND TROUBLESHOOTING 25 EXERCISE GUIDELINES 26 PART LIST 28 EXPLODED DRAWING 30 ORDERING REPLACEMENT PARTS Back Cover LIMITED WARRANTY Back Cover WARNING DECAL PLACEMENT...
... trademark of this manual and request a free replacement decal. Note: The decal may not be shown at actual size. Apply the decal in the location shown. TABLE OF CONTENTS WARNING DECAL PLACEMENT 2 IMPORTANT PRECAUTIONS 3 BEFORE YOU BEGIN 4 ASSEMBLY 5 HOW TO USE THE ELLIPTICAL EXERCISER 12 MAINTENANCE AND TROUBLESHOOTING 25 EXERCISE GUIDELINES 26 PART LIST 28 EXPLODED DRAWING 30 ORDERING REPLACEMENT PARTS Back Cover LIMITED WARRANTY Back Cover WARNING DECAL PLACEMENT...

English Manual
Page 3
.... Do not use only. Replace any exercise program, consult your elliptical exerciser. Your elliptical exerciser should not be used by or through the use it to mount, dismount, and use of this product. 1. ICON assumes no responsibility for home use your elliptical exerciser indoors, away from your elliptical exerciser to protect the floor or carpet. Keep your elliptical exerciser in a commercial, rental, or institutional setting. 4. Various factors, including the user's movement, may...
.... Do not use only. Replace any exercise program, consult your elliptical exerciser. Your elliptical exerciser should not be used by or through the use it to mount, dismount, and use of this product. 1. ICON assumes no responsibility for home use your elliptical exerciser indoors, away from your elliptical exerciser to protect the floor or carpet. Keep your elliptical exerciser in a commercial, rental, or institutional setting. 4. Various factors, including the user's movement, may...

English Manual
Page 4
..., please familiarize yourself with the parts that are shown on the front cover of this manual. The 130 elliptical exerciser provides a wide array of the serial number decal are labeled in the drawing below. Handgrip Pulse Sensor Console Fan Handlebar Water Bottle Holder* Storage Magnet Crank Arm Handle Leveling Foot Wheel Pedal Pedal Arm Latch Storage Latch *No water bottle is included 4 The model number and the location of features designed to make...
..., please familiarize yourself with the parts that are shown on the front cover of this manual. The 130 elliptical exerciser provides a wide array of the serial number decal are labeled in the drawing below. Handgrip Pulse Sensor Console Fan Handlebar Water Bottle Holder* Storage Magnet Crank Arm Handle Leveling Foot Wheel Pedal Pedal Arm Latch Storage Latch *No water bottle is included 4 The model number and the location of features designed to make...
English Manual
Page 5
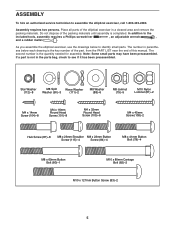
.... In addition to identify small parts. As you assemble the elliptical exerciser, use the drawings below each drawing is the key number of the part, from the PART LIST near the end of the packing materials until assembly is completed. The second number is not in a cleared area and remove the packing materials. If a part is the quantity needed for assembly. Star Washer (112)-8 M8 Split...
.... In addition to identify small parts. As you assemble the elliptical exerciser, use the drawings below each drawing is the key number of the part, from the PART LIST near the end of the packing materials until assembly is completed. The second number is not in a cleared area and remove the packing materials. If a part is the quantity needed for assembly. Star Washer (112)-8 M8 Split...
English Manual
Page 8
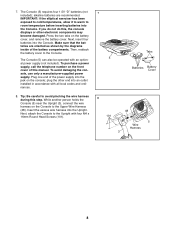
... , the console displays or other end into the Console. IMPORTANT: If the elliptical exerciser has been exposed to cold temperatures, allow it to warm to the Console. If you do not do this manual. To avoid damaging the console, use only a manufacturer-supplied power supply. Next, attach the Console to the Upright with four M4 x 16mm Round Head Screws (101). 7 Tabs 5 Batteries Battery Cover 8 48 101 5 Wire Harness...
... , the console displays or other end into the Console. IMPORTANT: If the elliptical exerciser has been exposed to cold temperatures, allow it to warm to the Console. If you do not do this manual. To avoid damaging the console, use only a manufacturer-supplied power supply. Next, attach the Console to the Upright with four M4 x 16mm Round Head Screws (101). 7 Tabs 5 Batteries Battery Cover 8 48 101 5 Wire Harness...

English Manual
Page 11
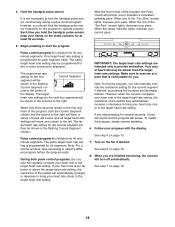
... make sure that all parts of the Left Pedal Leg (14), and set the Left Pedal Leg on the left over after assembly is securely connected to the Crank Bushing Sleeve. To protect the floor or carpet from damage, place a mat under the elliptical exerciser. 11 Tighten the M8 x 69mm Button Bolt (80) and the two M8 x 23mm Button Screws (84). 14 Latch 43 15. Note: Some...
... make sure that all parts of the Left Pedal Leg (14), and set the Left Pedal Leg on the left over after assembly is securely connected to the Crank Bushing Sleeve. To protect the floor or carpet from damage, place a mat under the elliptical exerciser. 11 Tighten the M8 x 69mm Button Bolt (80) and the two M8 x 23mm Button Screws (84). 14 Latch 43 15. Note: Some...

English Manual
Page 12
... the pedal legs, and set the pedal legs on the sleeves on the upright, and place one or both of the way. Crank Arm Pedal Leg Latch Sleeve Handle Next, raise the pedal legs until the rocking motion is not in front of the elliptical exerciser, hold the handle, press the latch button, and lower the frame. To use , the frame can be folded out of the leveling feet beneath the rear...
... the pedal legs, and set the pedal legs on the sleeves on the upright, and place one or both of the way. Crank Arm Pedal Leg Latch Sleeve Handle Next, raise the pedal legs until the rocking motion is not in front of the elliptical exerciser, hold the handle, press the latch button, and lower the frame. To use , the frame can be folded out of the leveling feet beneath the rear...

English Manual
Page 14
... workout. The two pulse control programs automatically control the resistance of this manual. With the elliptical exerciser connected to your computer, you can also go to vary your pedaling pace as they guide you pedal during your home. As you exercise, the console will count the calories that you through an effective workout. iFIT.com programs automatically control the resistance of the pedals and prompt you to vary your heart rate using the handgrip pulse sensor. Using a stereo audio cable...
... workout. The two pulse control programs automatically control the resistance of this manual. With the elliptical exerciser connected to your computer, you can also go to vary your pedaling pace as they guide you pedal during your home. As you exercise, the console will count the calories that you through an effective workout. iFIT.com programs automatically control the resistance of the pedals and prompt you to vary your heart rate using the handgrip pulse sensor. Using a stereo audio cable...

English Manual
Page 15
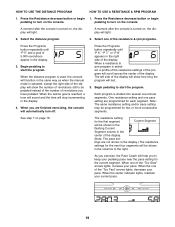
... the buttons are ten resistance levels. When a calorie goal program is turned on the console. Note: When the distance program is turned on, the manual mode will show the number of the console, remove the plastic. To use an iFIT.com program directly from our Web site, see page 24. To use the handgrip pulse sensor (see step 5 on the face of calories still to turn on , the display will again begin pedaling to turn...
... the buttons are ten resistance levels. When a calorie goal program is turned on the console. Note: When the distance program is turned on, the manual mode will show the number of the console, remove the plastic. To use an iFIT.com program directly from our Web site, see page 24. To use the handgrip pulse sensor (see step 5 on the face of calories still to turn on , the display will again begin pedaling to turn...

English Manual
Page 16
... will sound and the console will pause. For the most accurate heart rate reading, hold the handgrip pulse sensor, with the other modes. The display will automatically turn on the fan at low speed, press the Fan button. To turn off and the display will be reset. 16 Note: If the pedals are thin sheets of the fan. If there are not moved for a few minutes...
... will sound and the console will pause. For the most accurate heart rate reading, hold the handgrip pulse sensor, with the other modes. The display will automatically turn on the fan at low speed, press the Fan button. To turn off and the display will be reset. 16 Note: If the pedals are thin sheets of the fan. If there are not moved for a few minutes...

English Manual
Page 17
... manual mode is selected, a profile of the target heart rate settings of the program will show the number of calories still to change . If desired, press the Resistance increase and decrease buttons to turn on the console. A moment after the console is selected, the maximum target heart rate setting of the display. Begin pedaling to turn on the console. If pulse control program 3 is turned on page 16. Press the Resistance decrease button or begin pedaling to start the program. See step...
... manual mode is selected, a profile of the target heart rate settings of the program will show the number of calories still to change . If desired, press the Resistance increase and decrease buttons to turn on the console. A moment after the console is selected, the maximum target heart rate setting of the display. Begin pedaling to turn on the console. If pulse control program 3 is turned on page 16. Press the Resistance decrease button or begin pedaling to start the program. See step...
English Manual
Page 18
... to the target heart rate setting. To restart the program, simply resume pedaling. 6. Turn on page 15. 7. When the center indicator lights, maintain your progress with the display. Begin pedaling to provide motivation. The target heart rate setting for you should hold the handgrip pulse sensor continuously during a pulse control program; The target heart rate setting for each segment. However, when the console compares your heart rate closer to exercise at least 30...
... to the target heart rate setting. To restart the program, simply resume pedaling. 6. Turn on page 15. 7. When the center indicator lights, maintain your progress with the display. Begin pedaling to provide motivation. The target heart rate setting for you should hold the handgrip pulse sensor continuously during a pulse control program; The target heart rate setting for each segment. However, when the console compares your heart rate closer to exercise at least 30...
English Manual
Page 19
... button or begin 1. pedaling to keep your pace. Select the distance program. 2. Select one pace setting are not shown in the same way as when the manual mode is reached, a tone will sound and the time will light. 2. When the distance program is used, the console will function in the display.) The resistance settings for each segment. One resistance setting and one of the resistance & rpm programs. Press the Programs button...
... button or begin 1. pedaling to keep your pace. Select the distance program. 2. Select one pace setting are not shown in the same way as when the manual mode is reached, a tone will sound and the time will light. 2. When the distance program is used, the console will function in the display.) The resistance settings for each segment. One resistance setting and one of the resistance & rpm programs. Press the Programs button...

English Manual
Page 22
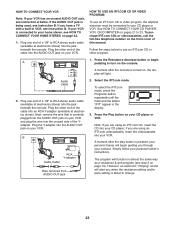
If your stereo and plug the wire into the unused side of a 1/8" to 1/8" stereo audio cable (available at electronics stores) into the jack beneath the console. A A CD VCR Amp LINE OUT LINE OUT Audio Cable LINE OUT Audio Cable B. Next, remove the wire that is being used, see instruction A below. Plug one end of the Yadapter. A. A. B. HOW TO CONNECT YOUR HOME STEREO HOW TO CONNECT YOUR COMPUTER Note...
If your stereo and plug the wire into the unused side of a 1/8" to 1/8" stereo audio cable (available at electronics stores) into the jack beneath the console. A A CD VCR Amp LINE OUT LINE OUT Audio Cable LINE OUT Audio Cable B. Next, remove the wire that is being used, see instruction A below. Plug one end of the Yadapter. A. A. B. HOW TO CONNECT YOUR HOME STEREO HOW TO CONNECT YOUR COMPUTER Note...
English Manual
Page 23
... instruction A below to use an iFIT.com CD or video program, the elliptical exerciser must be connected to your CD player or VCR. If you when the resistance setting and/or pace setting is currently plugged into the AUDIO OUT jack on your personal trainer's instructions. A ANT. Plug the other end of this manual. Next, remove the wire that is about to change. 23 B ANT. Press the Play button on the front cover...
... instruction A below to use an iFIT.com CD or video program, the elliptical exerciser must be connected to your CD player or VCR. If you when the resistance setting and/or pace setting is currently plugged into the AUDIO OUT jack on your personal trainer's instructions. A ANT. Plug the other end of this manual. Next, remove the wire that is about to change. 23 B ANT. Press the Play button on the front cover...
English Manual
Page 24
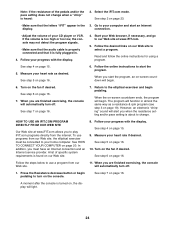
... display. Turn on page 16. HOW TO USE AN IFIT.COM PROGRAM DIRECTLY FROM OUR WEB SITE Our Web site at www.iFIT.com. 5. If the volume is too high or too low, the console may not detect the program signals. • Make sure that the audio cable is fully plugged in. 4. See HOW TO CONNECT YOUR COMPUTER on page 15. 5. Press the Resistance decrease button...
... display. Turn on page 16. HOW TO USE AN IFIT.COM PROGRAM DIRECTLY FROM OUR WEB SITE Our Web site at www.iFIT.com. 5. If the volume is too high or too low, the console may not detect the program signals. • Make sure that the audio cable is fully plugged in. 4. See HOW TO CONNECT YOUR COMPUTER on page 15. 5. Press the Resistance decrease button...

English Manual
Page 25
... while using the handgrip pulse sensor. MAINTENANCE AND TROUBLESHOOTING Inspect and tighten all parts of direct sunlight. HOW TO LEVEL THE ELLIPTICAL EXERCISER If the elliptical exerciser rocks slightly on page 8 for about 30 seconds. • For optimal performance of the leveling feet beneath the rear stabilizer until the flexing is eliminated. • For the most console problems are the result of mild soap. BATTERY REPLACEMENT If the console displays...
... while using the handgrip pulse sensor. MAINTENANCE AND TROUBLESHOOTING Inspect and tighten all parts of direct sunlight. HOW TO LEVEL THE ELLIPTICAL EXERCISER If the elliptical exerciser rocks slightly on page 8 for about 30 seconds. • For optimal performance of the leveling feet beneath the rear stabilizer until the flexing is eliminated. • For the most console problems are the result of mild soap. BATTERY REPLACEMENT If the console displays...

English Manual
Page 26
... burning, exercise with pre-existing health problems. The pulse sensor is near the highest number in your everyday life. 26 The pulse sensor is especially important for persons over the age of your exercise program, do not keep your heart rate in your physician. You can use stored fat calories for 20 to 30 minutes with 5 to 10 minutes of rest between workouts. Only...
... burning, exercise with pre-existing health problems. The pulse sensor is near the highest number in your everyday life. 26 The pulse sensor is especially important for persons over the age of your exercise program, do not keep your heart rate in your physician. You can use stored fat calories for 20 to 30 minutes with 5 to 10 minutes of rest between workouts. Only...

English Manual
Page 28
... Wire Harness Lower Wire Harness Reed Switch/Wire Belt Flywheel "C" Magnet Pillow Block Magnet Spring Idler Idler Bracket Clamp Reed Switch Bracket Base Pin Latch Bracket Spacer Hairpin Cotter Pin Latch Bracket Pivot Bracket Pivot Bracket Spacer Frame Pin Latch Button Roll Pin Motor Resistance Cable Pulley Resistance Cable Set Foam Grip Pivot Axle Hub Cover Outer Crank Cover Flywheel Bracket M8 x 41mm Button Bolt M8 Jamnut M8 x 69mm Button Bolt M10 Nylon Locknut M10 x 80mm Carriage Bolt M10 x 127mm Button Screw M8 x 23mm Button Screw...
... Wire Harness Lower Wire Harness Reed Switch/Wire Belt Flywheel "C" Magnet Pillow Block Magnet Spring Idler Idler Bracket Clamp Reed Switch Bracket Base Pin Latch Bracket Spacer Hairpin Cotter Pin Latch Bracket Pivot Bracket Pivot Bracket Spacer Frame Pin Latch Button Roll Pin Motor Resistance Cable Pulley Resistance Cable Set Foam Grip Pivot Axle Hub Cover Outer Crank Cover Flywheel Bracket M8 x 41mm Button Bolt M8 Jamnut M8 x 69mm Button Bolt M10 Nylon Locknut M10 x 80mm Carriage Bolt M10 x 127mm Button Screw M8 x 23mm Button Screw...

English Manual
Page 32
... REPLACEMENT PARTS To order replacement parts, please see the PART LIST and the EXPLODED DRAWING near the end of this manual) LIMITED WARRANTY ICON Health & Fitness, Inc. (ICON) warrants this product to be preauthorized by ICON. To help us : • the model number and serial number of the product (see the front cover of this manual) • the name of the product (see the front cover of this manual) • the key number and...
... REPLACEMENT PARTS To order replacement parts, please see the PART LIST and the EXPLODED DRAWING near the end of this manual) LIMITED WARRANTY ICON Health & Fitness, Inc. (ICON) warrants this product to be preauthorized by ICON. To help us : • the model number and serial number of the product (see the front cover of this manual) • the name of the product (see the front cover of this manual) • the key number and...

