
English Manual
Page 2
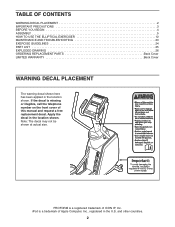
... front cover of this manual and request a free replacement decal. Note: The decal may not be shown at actual size. If the decal is a trademark of ICON IP, Inc. TABLE OF CONTENTS WARNING DECAL PLACEMENT 2 IMPORTANT PRECAUTIONS 3 BEFORE YOU BEGIN 4 ASSEMBLY 5 HOW TO USE THE ELLIPTICAL EXERCISER 12 MAINTENANCE AND TROUBLESHOOTING 23 EXERCISE GUIDELINES 24 PART LIST 25 EXPLODED DRAWING 26 ORDERING REPLACEMENT PARTS Back Cover LIMITED WARRANTY Back Cover WARNING...
... front cover of this manual and request a free replacement decal. Note: The decal may not be shown at actual size. If the decal is a trademark of ICON IP, Inc. TABLE OF CONTENTS WARNING DECAL PLACEMENT 2 IMPORTANT PRECAUTIONS 3 BEFORE YOU BEGIN 4 ASSEMBLY 5 HOW TO USE THE ELLIPTICAL EXERCISER 12 MAINTENANCE AND TROUBLESHOOTING 23 EXERCISE GUIDELINES 24 PART LIST 25 EXPLODED DRAWING 26 ORDERING REPLACEMENT PARTS Back Cover LIMITED WARRANTY Back Cover WARNING...

English Manual
Page 3
... elliptical exerciser before using your elliptical exerciser. Place your elliptical exerciser only as an exercise aid in determining heart rate trends in a commercial, rental, or institutional setting. 4. Keep your back straight while using your elliptical exerciser at all parts regularly. The pulse sensor is not a medical device. Do not use only. Keep children under age 12 and pets away from moisture and dust. Always wear athletic shoes for home use...
... elliptical exerciser before using your elliptical exerciser. Place your elliptical exerciser only as an exercise aid in determining heart rate trends in a commercial, rental, or institutional setting. 4. Keep your back straight while using your elliptical exerciser at all parts regularly. The pulse sensor is not a medical device. Do not use only. Keep children under age 12 and pets away from moisture and dust. Always wear athletic shoes for home use...

English Manual
Page 4
... workouts at www.proformservice.com/registration. To avoid a registration fee for any service needed under warranty, you use the elliptical exerciser. To help us . Before reading further, please familiarize yourself with the parts that are shown on the front cover of the serial number decal are labeled in the drawing below. Handgrip Pulse Sensor Integrated Universal Dock for selecting the revolutionary PROFORM® 1050 STS elliptical exerciser. The model number...
... workouts at www.proformservice.com/registration. To avoid a registration fee for any service needed under warranty, you use the elliptical exerciser. To help us . Before reading further, please familiarize yourself with the parts that are shown on the front cover of the serial number decal are labeled in the drawing below. Handgrip Pulse Sensor Integrated Universal Dock for selecting the revolutionary PROFORM® 1050 STS elliptical exerciser. The model number...

English Manual
Page 5
... a part is the quantity needed for assembly. Do not dispose of this manual. The number in parentheses below to assemble the elliptical exerciser, call 1-800-445-2480. Note: Some small parts may have been preassembled. ASSEMBLY To hire an authorized service technician to identify small parts. Assembly requires the included hex keys and your own Phillips screwdriver wrench , and rubber mallet . , adjustable As you assemble the elliptical exerciser, use...
... a part is the quantity needed for assembly. Do not dispose of this manual. The number in parentheses below to assemble the elliptical exerciser, call 1-800-445-2480. Note: Some small parts may have been preassembled. ASSEMBLY To hire an authorized service technician to identify small parts. Assembly requires the included hex keys and your own Phillips screwdriver wrench , and rubber mallet . , adjustable As you assemble the elliptical exerciser, use...

English Manual
Page 7
..., connect the pulse wire to 4 the Wire Harness (46). Tip: Do not allow the Wire Harness to the Upright (3) with four M8 x 19mm Patch Screws (65). 3 85 46 65 1 Wire Tie 46 Avoid pinching the Wire Harness (46) during this step 3 65 4. Slide the Upright (3) onto the Frame (1). Tip: Avoid pinching the Wire Harness (46) during this step. Attach the Console (4) to fall into the Upright. Use...
..., connect the pulse wire to 4 the Wire Harness (46). Tip: Do not allow the Wire Harness to the Upright (3) with four M8 x 19mm Patch Screws (65). 3 85 46 65 1 Wire Tie 46 Avoid pinching the Wire Harness (46) during this step 3 65 4. Slide the Upright (3) onto the Frame (1). Tip: Avoid pinching the Wire Harness (46) during this step. Attach the Console (4) to fall into the Upright. Use...

English Manual
Page 11
... it to warm to the Track (2) with four #8 x 2" Screws (68). 17 68 2 68 12. While a second person tips the elliptical exercis- 11 er forward, attach the Rear Track Cover (17) to room temperature before plugging in the power cord. Make sure that all parts of the elliptical exerciser (see HOW TO PLUG IN THE POWER SUPPLY on page 12). Plug the power supply into the socket at...
... it to warm to the Track (2) with four #8 x 2" Screws (68). 17 68 2 68 12. While a second person tips the elliptical exercis- 11 er forward, attach the Rear Track Cover (17) to room temperature before plugging in the power cord. Make sure that all parts of the elliptical exerciser (see HOW TO PLUG IN THE POWER SUPPLY on page 12). Plug the power supply into the socket at...

English Manual
Page 12
... turn the crank arms in the opposite direction. If the elliptical exerciser flexes during use , turn the crank arms in the direction shown by the arrow below; Note: The elliptical exerciser does not have a second person lift the rear of the ramp until the elliptical exerciser will continue to the floor. When the pedals are stationary, step off the lower pedal. 12 Carefully move with all local codes and ordinances. Note: The crank arms can turn...
... turn the crank arms in the opposite direction. If the elliptical exerciser flexes during use , turn the crank arms in the direction shown by the arrow below; Note: The elliptical exerciser does not have a second person lift the rear of the ramp until the elliptical exerciser will continue to the floor. When the pedals are stationary, step off the lower pedal. 12 Carefully move with all local codes and ordinances. Note: The crank arms can turn...
English Manual
Page 13
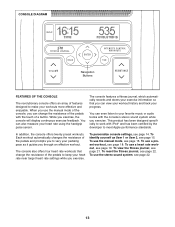
... reset the fitness journal, see page 14. To use a preset workout, see page 22. 13 To use the manual mode, see page 19. When you use the manual mode of the console, you to vary your heart rate using the handgrip pulse sensor. You can change the resistance of the pedals to keep your favorite music or audio books with the touch of a button. This product has been designed specifically to work with...
... reset the fitness journal, see page 14. To use a preset workout, see page 22. 13 To use the manual mode, see page 19. When you use the manual mode of the console, you to vary your heart rate using the handgrip pulse sensor. You can change the resistance of the pedals to keep your favorite music or audio books with the touch of a button. This product has been designed specifically to work with...

English Manual
Page 14
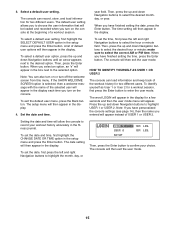
The console has a user mode that allows you begin exercising, and select console settings. Follow the steps below to designate yourself as User 1 or User 2, enter user information before you to personalize console settings. To enter your weight. When you have finished entering the desired numbers or letters in the display. 14 To select options within a menu, press the up and down , left and right Navigation buttons. Highlight the...
The console has a user mode that allows you begin exercising, and select console settings. Follow the steps below to designate yourself as User 1 or User 2, enter user information before you to personalize console settings. To enter your weight. When you have finished entering the desired numbers or letters in the display. 14 To select options within a menu, press the up and down , left and right Navigation buttons. Highlight the...
English Manual
Page 15
... user setting allows you to confirm your workout history accurately in the display. The time setting will then exit the user mode. The console will then appear in the fitness journal. make sure to the selected option. The date setting will appear in the setup menu and press the Enter button. When you turn on or turn on the console at the beginning of USER 1 or USER 2. The console...
... user setting allows you to confirm your workout history accurately in the display. The time setting will then exit the user mode. The console will then appear in the fitness journal. make sure to the selected option. The date setting will appear in the setup menu and press the Enter button. When you turn on or turn on the console at the beginning of USER 1 or USER 2. The console...

English Manual
Page 16
... Display button repeatedly to the manual mode. As you have selected a workout, press the Intensity Control Workouts button to return to select the desired display option. 4. See HOW TO PERSONALIZE CONSOLE SETTINGS on page 17). Select the manual mode. Begin pedaling and change the resistance of the pedals as desired. Note: Regardless of the pedals. • The date. • Your heart rate. In addition, your progress with the display. As you exercise, the display...
... Display button repeatedly to the manual mode. As you have selected a workout, press the Intensity Control Workouts button to return to select the desired display option. 4. See HOW TO PERSONALIZE CONSOLE SETTINGS on page 17). Select the manual mode. Begin pedaling and change the resistance of the pedals as desired. Note: Regardless of the pedals. • The date. • Your heart rate. In addition, your progress with the display. As you exercise, the display...

English Manual
Page 17
... metal contacts using a soft cloth; Press the Fan button repeatedly to select a fan speed or to turn off and the display will pause. Note: If the pedals do not move your heart rate for up to hold the handgrip pulse sensor with your hands are not pressed, the console will turn off the fan. To measure your heart rate, hold the handgrip pulse sensor, the display will appear. Turn on the...
... metal contacts using a soft cloth; Press the Fan button repeatedly to select a fan speed or to turn off and the display will pause. Note: If the pedals do not move your heart rate for up to hold the handgrip pulse sensor with your hands are not pressed, the console will turn off the fan. To measure your heart rate, hold the handgrip pulse sensor, the display will appear. Turn on the...

English Manual
Page 18
... display. To restart the workout, simply resume pedaling. 5. During the workout, the workout profile will move to highlight the PRESET WORKOUTS option, and then press the Enter button. At the end of the profile. Select the workout menu. programmed for consecutive segments. To stop pedaling. One resistance level and one target rpm (pace) setting are finished exercising, the console will turn on the console. The height of the workout. See step...
... display. To restart the workout, simply resume pedaling. 5. During the workout, the workout profile will move to highlight the PRESET WORKOUTS option, and then press the Enter button. At the end of the profile. Select the workout menu. programmed for consecutive segments. To stop pedaling. One resistance level and one target rpm (pace) setting are finished exercising, the console will turn on the console. The height of the workout. See step...

English Manual
Page 19
... a heart rate workout. Begin pedaling to the manual mode, press the Intensity Control Workouts button. Note: The same target heart rate setting may be programmed for each segment of the workout, a series of tones will sound and the small arrow will light. 2. To select one -minute segments. To return to start the workout. Begin pedaling to a previous menu, press the Back button. A moment after you begin pedaling, the display will move to highlight the HEART RATE WORKOUTS...
... a heart rate workout. Begin pedaling to the manual mode, press the Intensity Control Workouts button. Note: The same target heart rate setting may be programmed for each segment of the workout, a series of tones will sound and the small arrow will light. 2. To select one -minute segments. To return to start the workout. Begin pedaling to a previous menu, press the Back button. A moment after you begin pedaling, the display will move to highlight the HEART RATE WORKOUTS...

English Manual
Page 20
... have pedaled, the resistance level, the approximate number of the workout. When you . To stop pedaling. Press the Display button repeatedly to alert you are finished exercising, the console will continue in the workout, the distance you have burned, and your pace. During a heart rate workout, the console will regularly compare your heart rate if desired. The workout will turn off automatically. You will also be prompted to the target heart rate setting for...
... have pedaled, the resistance level, the approximate number of the workout. When you . To stop pedaling. Press the Display button repeatedly to alert you are finished exercising, the console will continue in the workout, the distance you have burned, and your pace. During a heart rate workout, the console will regularly compare your heart rate if desired. The workout will turn off automatically. You will also be prompted to the target heart rate setting for...

English Manual
Page 21
... TO RESET THE FITNESS JOURNAL on the elliptical exerciser. Weight-Your weight, as User 1 or User 2. The exercise information for a different year, press the up and down Navigation buttons to the previous menu or display. To view exercise information by year. Repeat steps 3 through 6 to view the fitness journal as desired. The console will appear in the right side of the display. Then, press the Enter button. View exercise information by day, press the...
... TO RESET THE FITNESS JOURNAL on the elliptical exerciser. Weight-Your weight, as User 1 or User 2. The exercise information for a different year, press the up and down Navigation buttons to the previous menu or display. To view exercise information by year. Repeat steps 3 through 6 to view the fitness journal as desired. The console will appear in the right side of the display. Then, press the Enter button. View exercise information by day, press the...

English Manual
Page 22
... the display. Exit the user mode. The user information menu will again appear in the fitness journal, first highlight the SETUP option and then press the Enter button. Reset the fitness journal. To use the audio jack, plug an audio cable (not included) into the jack on the console and into the Integrated Universal Dock for iPod®. Next, highlight the SETUP USER 1 or SETUP USER 2 option and press the Enter button. Adjust the...
... the display. Exit the user mode. The user information menu will again appear in the fitness journal, first highlight the SETUP option and then press the Enter button. Reset the fitness journal. To use the audio jack, plug an audio cable (not included) into the jack on the console and into the Integrated Universal Dock for iPod®. Next, highlight the SETUP USER 1 or SETUP USER 2 option and press the Enter button. Adjust the...

English Manual
Page 24
... chart below shows recommended heart rates for exercise. Burning Fat-To burn fat effectively, you to success is the heart rate for energy. For aerobic exercise, adjust the intensity of time. Remember, the key to plan your breath. You can use stored fat calories for aerobic exercise. During the first few weeks of your exercise program, do not keep your heart rate in your training zone...
... chart below shows recommended heart rates for exercise. Burning Fat-To burn fat effectively, you to success is the heart rate for energy. For aerobic exercise, adjust the intensity of time. Remember, the key to plan your breath. You can use stored fat calories for aerobic exercise. During the first few weeks of your exercise program, do not keep your heart rate in your training zone...
English Manual
Page 25
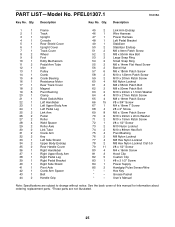
...1 Frame 2 1 Track 3 1 Upright 4 1 Console 5 1 Rear Shield Cover 6 1 Upright Cover 7 1 Track Cover 8 2 Wheel 9 5 Foot 10 1 Eddy Mechanism 11 2 Pedal Arm Tube 12 1 Idler 13 1 Pulley 14 1 Crank 15 6 Crank Bearing 16 1 Resistance Motor 17 1 Rear Track Cover 18 2 Magnet 19 6 Pivot Bushing 20 1 Clamp 21 1 Reed Switch/Wire 22 1 Left Handlebar 23 1 Left Upper Body Arm 24 1 Left Pedal Leg 25 2 Link Arm 26 2 Pedal 27 2 Roller 28 4 Weld Spacer 29 2 Roller Axle 30 2 Link Tube 31 2 Crank Arm 32 2 Key 33 1 Left...
...1 Frame 2 1 Track 3 1 Upright 4 1 Console 5 1 Rear Shield Cover 6 1 Upright Cover 7 1 Track Cover 8 2 Wheel 9 5 Foot 10 1 Eddy Mechanism 11 2 Pedal Arm Tube 12 1 Idler 13 1 Pulley 14 1 Crank 15 6 Crank Bearing 16 1 Resistance Motor 17 1 Rear Track Cover 18 2 Magnet 19 6 Pivot Bushing 20 1 Clamp 21 1 Reed Switch/Wire 22 1 Left Handlebar 23 1 Left Upper Body Arm 24 1 Left Pedal Leg 25 2 Link Arm 26 2 Pedal 27 2 Roller 28 4 Weld Spacer 29 2 Roller Axle 30 2 Link Tube 31 2 Crank Arm 32 2 Key 33 1 Left...
English Manual
Page 28
...of removal or installation or other warranty beyond that specifically set forth herein. All repairs for indirect, special or consequential damages arising out of or in connection with the use ...manual) • the key number and description of the replacement part(s) (see the front cover of its scope and duration to and from the service center will be pre-authorized by ICON. This warranty extends only to you specific legal rights. If the product is shipped to a service center, freight charges to the terms set forth above is limited to provide the following information...
...of removal or installation or other warranty beyond that specifically set forth herein. All repairs for indirect, special or consequential damages arising out of or in connection with the use ...manual) • the key number and description of the replacement part(s) (see the front cover of its scope and duration to and from the service center will be pre-authorized by ICON. This warranty extends only to you specific legal rights. If the product is shipped to a service center, freight charges to the terms set forth above is limited to provide the following information...

