
English Manual
Page 2
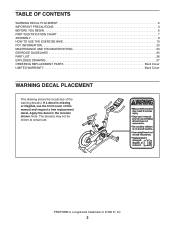
...a free replacement decal. PROFORM is missing or illegible, see the front cover of ICON IP, Inc. 2 TABLE OF CONTENTS WARNING DECAL PLACEMENT 2 IMPORTANT PRECAUTIONS 3 BEFORE YOU BEGIN 6 PART IDENTIFICATION CHART 7 ASSEMBLY 8 HOW TO USE THE EXERCISE BIKE 13 FCC INFORMATION 23 ...MAINTENANCE AND TROUBLESHOOTING 24 EXERCISE GUIDELINES 25 PART LIST 26 EXPLODED DRAWING 27 ORDERING REPLACEMENT PARTS Back Cover LIMITED WARRANTY Back Cover WARNING...
...a free replacement decal. PROFORM is missing or illegible, see the front cover of ICON IP, Inc. 2 TABLE OF CONTENTS WARNING DECAL PLACEMENT 2 IMPORTANT PRECAUTIONS 3 BEFORE YOU BEGIN 6 PART IDENTIFICATION CHART 7 ASSEMBLY 8 HOW TO USE THE EXERCISE BIKE 13 FCC INFORMATION 23 ...MAINTENANCE AND TROUBLESHOOTING 24 EXERCISE GUIDELINES 25 PART LIST 26 EXPLODED DRAWING 27 ORDERING REPLACEMENT PARTS Back Cover LIMITED WARRANTY Back Cover WARNING...
English Manual
Page 3
...power cord and switch the power switch to the off position when the exercise bike is especially important for foot protection. 14. Do not use the exercise bike in use and before using the exercise bike; The exercise bike should be used by an autho- Do not modify the power cord...manual. 11. ICON assumes no responsibility for home use an extension cord. 18. The exercise bike is not working properly. Place the exercise bike on the exercise bike. Keep children under age 12 and pets away from the exercise bike at least 2 ft. (0.6 m) of all precautions. 2. do not wear loose ...
...power cord and switch the power switch to the off position when the exercise bike is especially important for foot protection. 14. Do not use the exercise bike in use and before using the exercise bike; The exercise bike should be used by an autho- Do not modify the power cord...manual. 11. ICON assumes no responsibility for home use an extension cord. 18. The exercise bike is not working properly. Place the exercise bike on the exercise bike. Keep children under age 12 and pets away from the exercise bike at least 2 ft. (0.6 m) of all precautions. 2. do not wear loose ...
English Manual
Page 6
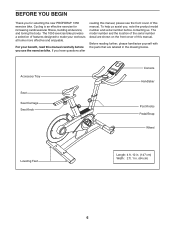
If you have questions after reading this manual, please see the front cover of this manual. Cycling is an effective exercise for selecting the new PROFORM® 1050 exercise bike. To help us . Before reading further, please familiarize yourself with the parts that are shown on the front cover of this manual carefully before contacting ...
If you have questions after reading this manual, please see the front cover of this manual. Cycling is an effective exercise for selecting the new PROFORM® 1050 exercise bike. To help us . Before reading further, please familiarize yourself with the parts that are shown on the front cover of this manual carefully before contacting ...
English Manual
Page 12
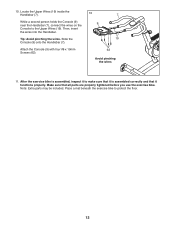
...19mm Screws (62). 10 7 9 19 62 Avoid pinching the wires 11. Tip: Avoid pinching the wires. 10. Place a mat beneath the exercise bike to the Upper Wires (19). Then, insert the wires into the Handlebar. Make sure that it is assembled correctly and that all parts are properly... tightened before you use the exercise bike. Locate the Upper Wires (19) inside the Handlebar (7). Slide the Console (9) onto the Handlebar (7). After the exercise bike is assembled, inspect it to make sure that it functions properly. Note: ...
...19mm Screws (62). 10 7 9 19 62 Avoid pinching the wires 11. Tip: Avoid pinching the wires. 10. Place a mat beneath the exercise bike to the Upper Wires (19). Then, insert the wires into the Handlebar. Make sure that it is assembled correctly and that all parts are properly... tightened before you use the exercise bike. Locate the Upper Wires (19) inside the Handlebar (7). Slide the Console (9) onto the Handlebar (7). After the exercise bike is assembled, inspect it to make sure that it functions properly. Note: ...

English Manual
Page 13
...tabs. HOW TO ADJUST THE HORIZONTAL POSITION OF THE SEAT CARRIAGE To adjust the position of the pedal straps. HOW TO LEVEL THE EXERCISE BIKE If the exercise bike rocks slightly on your floor during use, turn one or both of the seat to the position that the post knob is engaged ... leveling feet on the rear stabilizer (see the drawing on page 6) until the rocking motion is most comfortable. To adjust the height of the exercise bike. Then, move the Post Knob seat post upward or downward, release the post knob into the receptacle on the seat clamp a few turns, ...
...tabs. HOW TO ADJUST THE HORIZONTAL POSITION OF THE SEAT CARRIAGE To adjust the position of the pedal straps. HOW TO LEVEL THE EXERCISE BIKE If the exercise bike rocks slightly on your floor during use, turn one or both of the seat to the position that the post knob is engaged ... leveling feet on the rear stabilizer (see the drawing on page 6) until the rocking motion is most comfortable. To adjust the height of the exercise bike. Then, move the Post Knob seat post upward or downward, release the post knob into the receptacle on the seat clamp a few turns, ...
English Manual
Page 14
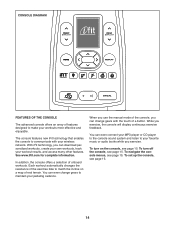
In addition, the console offers a selection of onboard workouts. Each workout automatically changes the resistance of the exercise bike to make your workout results, and access many other features. See www.iFit.com for complete information. You can even connect your MP3 player or ... up the console, see page 15. You can even change gears with your pedaling cadence. When you use the manual mode of the console, you exercise. To turn on a map of real terrain. While you can change gears to communicate with the touch of a button. To navigate the console menus, see...
In addition, the console offers a selection of onboard workouts. Each workout automatically changes the resistance of the exercise bike to make your workout results, and access many other features. See www.iFit.com for complete information. You can even connect your MP3 player or ... up the console, see page 15. You can even change gears with your pedaling cadence. When you use the manual mode of the console, you exercise. To turn on a map of real terrain. While you can change gears to communicate with the touch of a button. To navigate the console menus, see...
English Manual
Page 15
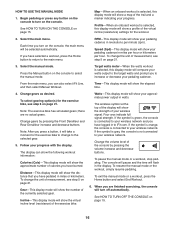
... page 23. To use the sound system, see page 18. Note: If there is a sheet of measurement is selected, see page 17. Before using the exercise bike for firmware updates. 3. Press the Home button to return to the main menu or to select a menu option. To use the Home, left button to... the first time, set up for you do not do not move for firmware updates. See HOW TO PLUG IN THE POWER ADAPTER on the exercise bike may wear prematurely. The console is plugged in either miles or kilometers. When the power adapter is now ready for your console. 1. Press the ...
... page 23. To use the sound system, see page 18. Note: If there is a sheet of measurement is selected, see page 17. Before using the exercise bike for firmware updates. 3. Press the Home button to return to the main menu or to select a menu option. To use the Home, left button to... the first time, set up for you do not do not move for firmware updates. See HOW TO PLUG IN THE POWER ADAPTER on the exercise bike may wear prematurely. The console is plugged in either miles or kilometers. When the power adapter is now ready for your console. 1. Press the ...
English Manual
Page 16
... on the console to your pedaling cadence. To change to increase or decrease your wireless network. Change gears as desired. Note: The exercise bike has simulated gears; The wireless symbol at the top of the display will show the strength of measurement, see step 5 on page 21...resistance) of the console by pressing the Front Derailleur and Rear Derailleur increase and decrease buttons. To select gearing option(s) for the exercise bike to change the unit of your watts output to your wireless network. Watts—-This display mode will compare your wireless signal. Four...
... on the console to your pedaling cadence. To change to increase or decrease your wireless network. Change gears as desired. Note: The exercise bike has simulated gears; The wireless symbol at the top of the display will show the strength of measurement, see step 5 on page 21...resistance) of the console by pressing the Front Derailleur and Rear Derailleur increase and decrease buttons. To select gearing option(s) for the exercise bike to change the unit of your watts output to your wireless network. Watts—-This display mode will compare your wireless signal. Four...

English Manual
Page 17
... the number of calories you will also change gears by pressing the Front and Rear Derailleur increase and decrease buttons. After you are finished exercising, the console will burn during the workout. See step 5 on the console and then select the desired workout. When you view the workout...Start the workout. The colored line at the top of the profile will depend on the console. The display will show a map of the exercise bike, and your progress. The actual number of calories that you will turn on your weight, the resistance of the trail and a marker indicating ...
... the number of calories you will also change gears by pressing the Front and Rear Derailleur increase and decrease buttons. After you are finished exercising, the console will burn during the workout. See step 5 on the console and then select the desired workout. When you view the workout...Start the workout. The colored line at the top of the profile will depend on the console. The display will show a map of the exercise bike, and your progress. The actual number of calories that you will turn on your weight, the resistance of the trail and a marker indicating ...
English Manual
Page 21
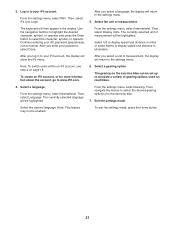
...select Display Units. After you select a language, the display will return to the settings menu. To create an iFit account, or for the exercise bike. 7. Then, select Language. From the settings menu, select Gearing. Select the desired language. After you select a unit of measurement will show... the iFit menu. Note: To switch users within an iFit account, see step 4 on the exercise bike can be highlighted. Select a language. The currently selected language will then appear in the display. Log in kilometers. Use the navigation ...
...select Display Units. After you select a language, the display will return to the settings menu. To create an iFit account, or for the exercise bike. 7. Then, select Language. From the settings menu, select Gearing. Select the desired language. After you select a unit of measurement will show... the iFit menu. Note: To switch users within an iFit account, see step 4 on the exercise bike can be highlighted. Select a language. The currently selected language will then appear in the display. Log in kilometers. Use the navigation ...
English Manual
Page 22
... settings menu. 7. From the maintenance menu, select Firmware Update. View technical information. The display will return to the controller of the exercise bike, the controller dot will be green; When the update is not connected, the dot will run a network test and check the connection... that has been pedaled, and other information. After you view the information, press the Enter button. View the total number of the exercise bike. After you restore the default settings, unplug the power adapter, wait for the console. From the maintenance menu, select Technical Info. ...
... settings menu. 7. From the maintenance menu, select Firmware Update. View technical information. The display will return to the controller of the exercise bike, the controller dot will be green; When the update is not connected, the dot will run a network test and check the connection... that has been pedaled, and other information. After you view the information, press the Enter button. View the total number of the exercise bike. After you restore the default settings, unplug the power adapter, wait for the console. From the maintenance menu, select Technical Info. ...
English Manual
Page 24
... you are pedaling, the drive belt may need to identify the parts mentioned below. Next, remove the #8 x 32 x 13mm Screw (81) from the exercise bike. Then, tighten the Idler Adjustment Screw (39) until the Drive Belt (30) is tight, tighten the 3/8" Jam Nut (71). Replace any worn parts ... replacement power adapter is needed, call the telephone number on the right side of the exercise bike regularly. See the EXPLODED DRAWING on page 27 to be adjusted. Loosen the 3/8" Jam Nut (71). To clean the exercise bike, use a damp cloth and a small amount of direct sunlight. IMPORTANT: To avoid ...
... you are pedaling, the drive belt may need to identify the parts mentioned below. Next, remove the #8 x 32 x 13mm Screw (81) from the exercise bike. Then, tighten the Idler Adjustment Screw (39) until the Drive Belt (30) is tight, tighten the 3/8" Jam Nut (71). Replace any worn parts ... replacement power adapter is needed, call the telephone number on the right side of the exercise bike regularly. See the EXPLODED DRAWING on page 27 to be adjusted. Loosen the 3/8" Jam Nut (71). To clean the exercise bike, use a damp cloth and a small amount of direct sunlight. IMPORTANT: To avoid ...


