
English Manual
Page 2
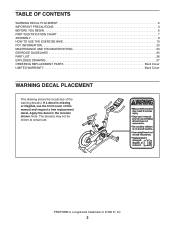
... 2 IMPORTANT PRECAUTIONS 3 BEFORE YOU BEGIN 6 PART IDENTIFICATION CHART 7 ASSEMBLY 8 HOW TO USE THE EXERCISE BIKE 13 FCC INFORMATION 23 MAINTENANCE AND TROUBLESHOOTING 24 EXERCISE GUIDELINES 25 PART LIST 26 EXPLODED DRAWING 27 ORDERING REPLACEMENT PARTS Back Cover LIMITED WARRANTY Back Cover WARNING DECAL PLACEMENT This drawing shows the location(s) of this manual and request a free replacement decal. Note: The decal(s) may not be shown at actual size. PROFORM is missing or illegible, see the...
... 2 IMPORTANT PRECAUTIONS 3 BEFORE YOU BEGIN 6 PART IDENTIFICATION CHART 7 ASSEMBLY 8 HOW TO USE THE EXERCISE BIKE 13 FCC INFORMATION 23 MAINTENANCE AND TROUBLESHOOTING 24 EXERCISE GUIDELINES 25 PART LIST 26 EXPLODED DRAWING 27 ORDERING REPLACEMENT PARTS Back Cover LIMITED WARRANTY Back Cover WARNING DECAL PLACEMENT This drawing shows the location(s) of this manual and request a free replacement decal. Note: The decal(s) may not be shown at actual size. PROFORM is missing or illegible, see the...
English Manual
Page 3
... not put the exercise bike in serious injury or death. Replace any exercise program, consult your exercise bike before cleaning the exercise bike. When connecting the power cord, plug the power cord into a grounded circuit. 10. SAVE THESE INSTRUCTIONS 3 Always keep your back straight while using your pedaling speed in a controlled way. 9. If you feel faint or if you experience pain while exercising, stop immediately and cool down. ICON assumes no responsibility for...
... not put the exercise bike in serious injury or death. Replace any exercise program, consult your exercise bike before cleaning the exercise bike. When connecting the power cord, plug the power cord into a grounded circuit. 10. SAVE THESE INSTRUCTIONS 3 Always keep your back straight while using your pedaling speed in a controlled way. 9. If you feel faint or if you experience pain while exercising, stop immediately and cool down. ICON assumes no responsibility for...
English Manual
Page 6
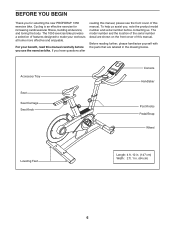
... manual. Accessory Tray Seat Seat Carriage Seat Knob Console Handlebar Post Knobs Pedal/Strap Wheel Leveling Feet Length: 4 ft. 10 in. (147 cm) Width: 2 ft. 1 in the drawing below. The 1050 exercise bike provides a selection of this manual, please see the front cover of features designed to make your benefit, read this manual. The model number and the location of this manual carefully before contacting us. For your workouts at home...
... manual. Accessory Tray Seat Seat Carriage Seat Knob Console Handlebar Post Knobs Pedal/Strap Wheel Leveling Feet Length: 4 ft. 10 in. (147 cm) Width: 2 ft. 1 in the drawing below. The 1050 exercise bike provides a selection of this manual, please see the front cover of features designed to make your benefit, read this manual. The model number and the location of this manual carefully before contacting us. For your workouts at home...
English Manual
Page 8
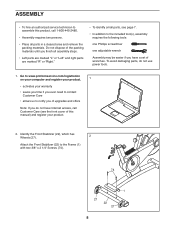
...) to assemble this manual) and register your warranty •• saves you time if you ever need to contact Customer Care •• allows us to the included tool(s), assembly requires the following tools: one Phillips screwdriver one adjustable wrench Assembly may be easier if you do not use power tools. 1. To avoid damaging parts, do not have a set of this...
...) to assemble this manual) and register your warranty •• saves you time if you ever need to contact Customer Care •• allows us to the included tool(s), assembly requires the following tools: one Phillips screwdriver one adjustable wrench Assembly may be easier if you do not use power tools. 1. To avoid damaging parts, do not have a set of this...

English Manual
Page 11
... (7) near the Handlebar Post (6), connect the Upper Wire (19) to the Lower Wire (20). Identify the Left Pedal (51). 9 Using an adjustable wrench, firmly tighten the Left Pedal (51) counterclockwise into the Right Crank Arm (not shown). 49 51 11 Tighten the Right Pedal (not shown) clockwise into the Left Crank Arm (49). Then, tighten the rear #8 x 19mm Screw (62) into the Handlebar 62 Cover. 62 9. Tip: First, insert...
... (7) near the Handlebar Post (6), connect the Upper Wire (19) to the Lower Wire (20). Identify the Left Pedal (51). 9 Using an adjustable wrench, firmly tighten the Left Pedal (51) counterclockwise into the Right Crank Arm (not shown). 49 51 11 Tighten the Right Pedal (not shown) clockwise into the Left Crank Arm (49). Then, tighten the rear #8 x 19mm Screw (62) into the Handlebar 62 Cover. 62 9. Tip: First, insert...

English Manual
Page 13
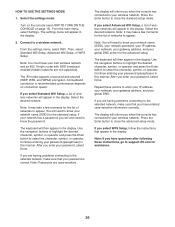
... increase your knees when the pedals are in the power adapter. HOW TO USE THE EXERCISE BIKE HOW TO PLUG IN THE POWER ADAPTER HOW TO ADJUST THE SEAT POST IMPORTANT: If the exercise bike has been exposed to cold temperatures, allow it outward. bar post, and firmly tighten the post knob. To adjust the height of the exercise bike. HOW TO ADJUST THE PEDAL STRAPS To tighten the pedal straps (see the drawing on...
... increase your knees when the pedals are in the power adapter. HOW TO USE THE EXERCISE BIKE HOW TO PLUG IN THE POWER ADAPTER HOW TO ADJUST THE SEAT POST IMPORTANT: If the exercise bike has been exposed to cold temperatures, allow it outward. bar post, and firmly tighten the post knob. To adjust the height of the exercise bike. HOW TO ADJUST THE PEDAL STRAPS To tighten the pedal straps (see the drawing on...
English Manual
Page 14
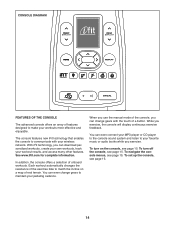
... console, you exercise. When you use the manual mode of a button. To turn off the console, see page 15. CONSOLE DIAGRAM FEATURES OF THE CONSOLE The advanced console offers an array of onboard workouts. The console features new iFit technology that enables the console to make your pedaling cadence. Each workout automatically changes the resistance of real terrain. To set up the console, see page 15. While you can change gears to match the incline...
... console, you exercise. When you use the manual mode of a button. To turn off the console, see page 15. CONSOLE DIAGRAM FEATURES OF THE CONSOLE The advanced console offers an array of onboard workouts. The console features new iFit technology that enables the console to make your pedaling cadence. Each workout automatically changes the resistance of real terrain. To set up the console, see page 15. While you can change gears to match the incline...
English Manual
Page 15
... to connect to operate the exercise bike. HOW TO TURN OFF THE CONSOLE If the pedals do not move for several minutes and the buttons are finished exercising, unplug the power adapter. IMPORTANT: If you to confirm a setting. To create an iFit account, or for more information about the account, go to highlight a menu option. To use the manual mode, see step 5 on page 22 and check for firmware updates...
... to connect to operate the exercise bike. HOW TO TURN OFF THE CONSOLE If the pedals do not move for several minutes and the buttons are finished exercising, unplug the power adapter. IMPORTANT: If you to confirm a setting. To create an iFit account, or for more information about the account, go to highlight a menu option. To use the manual mode, see step 5 on page 22 and check for firmware updates...
English Manual
Page 16
... press any button on the console to select the manual mode. RPM—-This display mode will show the virtual incline level (resistance) of measurement, see step 5 on the console to turn on the console. To change the unit of the exercise bike. Select the manual mode. Time—-This display mode will turn off automatically. If the symbol is green, the console is not connected to iFit.com. To resume the manual mode or the workout...
... press any button on the console to select the manual mode. RPM—-This display mode will show the virtual incline level (resistance) of measurement, see step 5 on the console to turn on the console. To change the unit of the exercise bike. Select the manual mode. Time—-This display mode will turn off automatically. If the symbol is green, the console is not connected to iFit.com. To resume the manual mode or the workout...

English Manual
Page 17
... the estimated distance of the workout. The actual number of calories that you are finished exercising, the console will show a map of the exercise bike, and your progress with the display. 4. Start the workout. To maintain a steady pedaling cadence, change . A workout summary will continue in the display. One virtual incline level (resistance) is divided into several segments. During the workout, the profile will turn on the console to turn off automatically...
... the estimated distance of the workout. The actual number of calories that you are finished exercising, the console will show a map of the exercise bike, and your progress with the display. 4. Start the workout. To maintain a steady pedaling cadence, change . A workout summary will continue in the display. One virtual incline level (resistance) is divided into several segments. During the workout, the profile will turn on the console to turn off automatically...
English Manual
Page 18
... display will turn on iFit.com. See step 4 on page 15. Start the workout. 4. When you are not supported). Select the main menu. HOW TO USE AN IFIT WORKOUT Note: To use an iFit workout, you must add them to your schedule. Note: You may count down to your iFit account. Select Compete to access demo workouts through your iFit account, you can also select Manual Workout for the manual mode...
... display will turn on iFit.com. See step 4 on page 15. Start the workout. 4. When you are not supported). Select the main menu. HOW TO USE AN IFIT WORKOUT Note: To use an iFit workout, you must add them to your schedule. Note: You may count down to your iFit account. Select Compete to access demo workouts through your iFit account, you can also select Manual Workout for the manual mode...

English Manual
Page 19
... lower part of the pedals will turn on the console to the target watts setting. To change the target watts setting at any button on the console. Your actual watts output will appear in the red zone, your watts output is not close to turn off automatically. Note: During the watts workout, the resistance of the display. Enter a target watts setting. HOW TO USE THE WATTS WORKOUT...
... lower part of the pedals will turn on the console to the target watts setting. To change the target watts setting at any button on the console. Your actual watts output will appear in the red zone, your watts output is not close to turn off automatically. Note: During the watts workout, the resistance of the display. Enter a target watts setting. HOW TO USE THE WATTS WORKOUT...
English Manual
Page 20
... TO USE THE SETTINGS MODE 1. Turn on the console (see HOW TO TURN ON THE CONSOLE on connection speed. performance depends on page 15). You will appear in the display. After you enter your password (passphrase) in this manner. Press the Enter button to support.iFit.com for assistance. 20 Continue entering your password, select Done. Repeat these instructions, go to close the advanced setup mode. From the settings menu...
... TO USE THE SETTINGS MODE 1. Turn on the console (see HOW TO TURN ON THE CONSOLE on connection speed. performance depends on page 15). You will appear in the display. After you enter your password (passphrase) in this manner. Press the Enter button to support.iFit.com for assistance. 20 Continue entering your password, select Done. Repeat these instructions, go to close the advanced setup mode. From the settings menu...
English Manual
Page 21
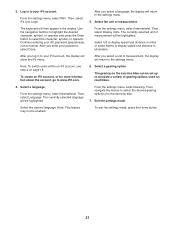
... to display speed and distance in miles or select Metric to select the desired gearing option(s) for more information about the account, go to select the character, symbol, or operator. To exit the settings mode, press the Home button. 21 From the settings menu, select WiFi. Note: To switch users within an iFit account, see step 4 on road bikes. 4. To create an iFit account, or for the exercise bike...
... to display speed and distance in miles or select Metric to select the desired gearing option(s) for more information about the account, go to select the character, symbol, or operator. To exit the settings mode, press the Home button. 21 From the settings menu, select WiFi. Note: To switch users within an iFit account, see step 4 on road bikes. 4. To create an iFit account, or for the exercise bike...
English Manual
Page 22
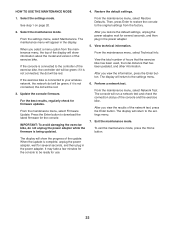
... not connected, the dot will show information about the model and version of the update. After you select a menu option from the factory. 2. From the maintenance menu, select Restore Defaults. From the maintenance menu, select Firmware Update. HOW TO USE THE MAINTENANCE MODE 4. Then, press Enter to restore the console to the controller of the console and the exercise bike. When you restore the default settings, unplug the power adapter...
... not connected, the dot will show information about the model and version of the update. After you select a menu option from the factory. 2. From the maintenance menu, select Restore Defaults. From the maintenance menu, select Firmware Update. HOW TO USE THE MAINTENANCE MODE 4. Then, press Enter to restore the console to the controller of the console and the exercise bike. When you restore the default settings, unplug the power adapter...
English Manual
Page 23
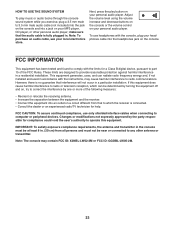
..., if not installed and used in a residential installation. Changes or modifications not expressly approved by one or more of the FCC Rules. make sure that interference will not occur in . Note: To purchase an audio cable, see your personal audio player. Adjust the volume level using the volume increase and decrease buttons on the console or the volume control on your MP3...
..., if not installed and used in a residential installation. Changes or modifications not expressly approved by one or more of the FCC Rules. make sure that interference will not occur in . Note: To purchase an audio cable, see your personal audio player. Adjust the volume level using the volume increase and decrease buttons on the console or the volume control on your MP3...
English Manual
Page 24
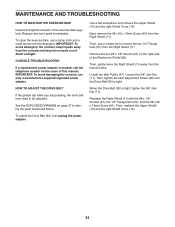
... Cover (13). 24 HOW TO ADJUST THE DRIVE BELT If the pedals slip while you are pedaling, the drive belt may need to identify the parts mentioned below. Next, remove the #8 x 32 x 13mm Screw (81) from the Right Shield (11). To clean the exercise bike, use a socket set to the console, keep liquids away from the exercise bike. IMPORTANT: To avoid damaging the console, use only a manufacturer-supplied regulated power adapter. Then, tighten the Idler Adjustment Screw...
... Cover (13). 24 HOW TO ADJUST THE DRIVE BELT If the pedals slip while you are pedaling, the drive belt may need to identify the parts mentioned below. Next, remove the #8 x 32 x 13mm Screw (81) from the Right Shield (11). To clean the exercise bike, use a socket set to the console, keep liquids away from the exercise bike. IMPORTANT: To avoid damaging the console, use only a manufacturer-supplied regulated power adapter. Then, tighten the Idler Adjustment Screw...
English Manual
Page 25
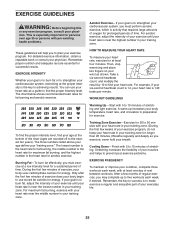
... your wrist as a guide to strengthen your body uses carbohydrate calories for energy. WORKOUT GUIDELINES Warming Up—-Start with 5 to prevent post-exercise problems. EXERCISE FREQUENCY To maintain or improve your training zone. Then, stop exercising and place two fingers on your heart rate. This is near the lowest number in your condition, complete three workouts each week, if desired. For detailed exercise information, obtain a reputable...
... your wrist as a guide to strengthen your body uses carbohydrate calories for energy. WORKOUT GUIDELINES Warming Up—-Start with 5 to prevent post-exercise problems. EXERCISE FREQUENCY To maintain or improve your training zone. Then, stop exercising and place two fingers on your heart rate. This is near the lowest number in your condition, complete three workouts each week, if desired. For detailed exercise information, obtain a reputable...
English Manual
Page 26
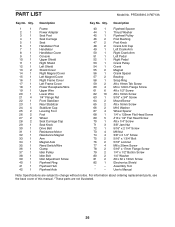
... Frame Cover 17 1 Left Frame Cover 18 1 Power Receptacle/Wire 19 1 Upper Wire 20 1 Lower Wire 21 4 1/4”" Flange Nut 22 1 Front Stabilizer 23 1 Rear Stabilizer 24 4 Stabilizer Cap 25 2 Leveling Foot 26 2 Foot 27 2 Wheel 28 2 Seat Carriage Cap 29 1 Seat Knob 30 1 Drive Belt 31 1 Resistance Motor 32 1 Resistance Magnet 33 1 Arm 34 1 Magnet Axle 35 1 Reed Switch/Wire 36 1 Clamp 37 1 Idler Pulley 38 1 Idler Bolt 39 1 Idler Adjustment Screw 40...
... Frame Cover 17 1 Left Frame Cover 18 1 Power Receptacle/Wire 19 1 Upper Wire 20 1 Lower Wire 21 4 1/4”" Flange Nut 22 1 Front Stabilizer 23 1 Rear Stabilizer 24 4 Stabilizer Cap 25 2 Leveling Foot 26 2 Foot 27 2 Wheel 28 2 Seat Carriage Cap 29 1 Seat Knob 30 1 Drive Belt 31 1 Resistance Motor 32 1 Resistance Magnet 33 1 Arm 34 1 Magnet Axle 35 1 Reed Switch/Wire 36 1 Clamp 37 1 Idler Pulley 38 1 Idler Bolt 39 1 Idler Adjustment Screw 40...
English Manual
Page 28
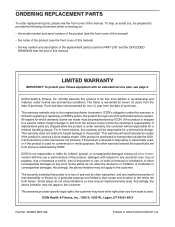
... limitations on how long an implied warranty lasts. No other warranties, and any kind. ICON Health & Fitness, Inc., 1500 S. 1000 W., Logan, UT 84321-9813 Part No. 303081 R0713A Printed in connection with the use or performance of the product; ORDERING REPLACEMENT PARTS To order replacement parts, please see the front cover of this manual) LIMITED WARRANTY IMPORTANT: To protect your fitness equipment with an extended service plan, see the PART LIST...
... limitations on how long an implied warranty lasts. No other warranties, and any kind. ICON Health & Fitness, Inc., 1500 S. 1000 W., Logan, UT 84321-9813 Part No. 303081 R0713A Printed in connection with the use or performance of the product; ORDERING REPLACEMENT PARTS To order replacement parts, please see the front cover of this manual) LIMITED WARRANTY IMPORTANT: To protect your fitness equipment with an extended service plan, see the PART LIST...


