PA880 Owner's Manual
Page 2
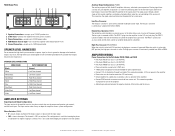
...'S IN THE BOX 4 LISTEN CAREFULLY 4 TOOLS OF THE TRADE 5 END PANEL LAYOUTS 5-8 Input Plate 5-7 Output Plate 6-8 SPEAKER LEVEL HARNESSES 8 AMPLIFIER SETTINGS 8-9 Signal Input and Output Configurations 8 Phase Switches 8 Auxiliary Output Configurations 9 Low-Pass Crossover 9 Remote Bass Operation 9 High-Pass Crossover 9 AMPLIFIER WIRING 9-12 Power Connections for the Polk Audio PA330, PA660 and PA880 9 Speaker Wiring Diagram PA330/PA660/PA880 10-12 Bridging 10-12 AMPLIFIER INSTALLATION 13-14 Choosing Mounting Locations 13 Passenger Compartment 13 Trunk Compartment 13...
...'S IN THE BOX 4 LISTEN CAREFULLY 4 TOOLS OF THE TRADE 5 END PANEL LAYOUTS 5-8 Input Plate 5-7 Output Plate 6-8 SPEAKER LEVEL HARNESSES 8 AMPLIFIER SETTINGS 8-9 Signal Input and Output Configurations 8 Phase Switches 8 Auxiliary Output Configurations 9 Low-Pass Crossover 9 Remote Bass Operation 9 High-Pass Crossover 9 AMPLIFIER WIRING 9-12 Power Connections for the Polk Audio PA330, PA660 and PA880 9 Speaker Wiring Diagram PA330/PA660/PA880 10-12 Bridging 10-12 AMPLIFIER INSTALLATION 13-14 Choosing Mounting Locations 13 Passenger Compartment 13 Trunk Compartment 13...
PA880 Owner's Manual
Page 3
... 300 W into 2 Ohms. The installation of trouble-free performance. Ê UÊ PA330-200 Watt: two-channel Class A/B amplifier with a maximum power of use your Polk Audio PA system but also potentially compromise the reliability of the crossover. 8. Polk Audio, Inc. Bass Boost Switch L iiÊÃÌi E 9. Line Level Inputs-Accepts line level input from the misuse of these guidelines in fully variable high and low-pass crossover. HPF, FULL, LPF Switch-Selects either high-pass crossover...
... 300 W into 2 Ohms. The installation of trouble-free performance. Ê UÊ PA330-200 Watt: two-channel Class A/B amplifier with a maximum power of use your Polk Audio PA system but also potentially compromise the reliability of the crossover. 8. Polk Audio, Inc. Bass Boost Switch L iiÊÃÌi E 9. Line Level Inputs-Accepts line level input from the misuse of these guidelines in fully variable high and low-pass crossover. HPF, FULL, LPF Switch-Selects either high-pass crossover...
PA880 Owner's Manual
Page 4
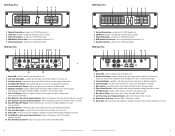
...and makes bridging amplifiers possible. 7. Status LED-Will indicate any fault condition in amplifier, also lights briefly during muting phase of the rear channels high-pass crossover. 9. REM Remote Turn-on Input-turns on . 2. Rear Gain Control-continuously adjusts from over current situations. 3. Rear Variable Bass Control-adjusts bass gain on . 6 © 2010 Polk Audio-all rights reserved © 2010 Polk Audio-all amplifier channels to 4 AWG ground cable. Line Level Inputs-accepts Line level input from radio and turn amplifier on when needed ; Speaker...
...and makes bridging amplifiers possible. 7. Status LED-Will indicate any fault condition in amplifier, also lights briefly during muting phase of the rear channels high-pass crossover. 9. REM Remote Turn-on Input-turns on . 2. Rear Gain Control-continuously adjusts from over current situations. 3. Rear Variable Bass Control-adjusts bass gain on . 6 © 2010 Polk Audio-all rights reserved © 2010 Polk Audio-all amplifier channels to 4 AWG ground cable. Line Level Inputs-accepts Line level input from radio and turn amplifier on when needed ; Speaker...
PA880 Owner's Manual
Page 5
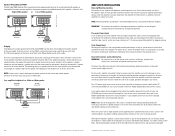
...4 AWG ground cable. Speaker Connections-accepts up to the head-unit outputs may result. REM Remote Turn-on Input-turns on Polk Audio PA amplifiers offer easy, unlimited system expansion. Right Front channel - Left Rear channel Violet + Left Rear channel AMPLIFIER SETTINGS Signal Input and Output Configurations The input section of the amplifier consists of the source unit. PA880 Output Plate 1 22 34 5 1. SPEAKER LEVEL HARNESSES Do not connect the high level input connections to power, signal, or chassis ground as a bass level control when used when bridging two amplifiers into...
...4 AWG ground cable. Speaker Connections-accepts up to the head-unit outputs may result. REM Remote Turn-on Input-turns on Polk Audio PA amplifiers offer easy, unlimited system expansion. Right Front channel - Left Rear channel Violet + Left Rear channel AMPLIFIER SETTINGS Signal Input and Output Configurations The input section of the amplifier consists of the source unit. PA880 Output Plate 1 22 34 5 1. SPEAKER LEVEL HARNESSES Do not connect the high level input connections to power, signal, or chassis ground as a bass level control when used when bridging two amplifiers into...
PA880 Owner's Manual
Page 6
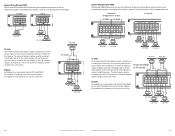
...;LÀˆ`}i`®Ê speaker should be connected in Tri-mode bridged Bridging For bridging into a single speaker load, the Polk Audio PA330 has the ability to bridge the front or rear channels together. Each amplifier is stable to 2 Ohm per channel or 4 Ohm per channel or 4 Ohm bridged. Speaker Wiring Diagram PA330 The Polk Audio PA330 amplifier offers two positive and two negative output terminals for ease of connecting the speakers to the amplifier. Bridged Stereo Speaker Wiring Diagram PA660 /…i vˆiÀ...
...;LÀˆ`}i`®Ê speaker should be connected in Tri-mode bridged Bridging For bridging into a single speaker load, the Polk Audio PA330 has the ability to bridge the front or rear channels together. Each amplifier is stable to 2 Ohm per channel or 4 Ohm per channel or 4 Ohm bridged. Speaker Wiring Diagram PA330 The Polk Audio PA330 amplifier offers two positive and two negative output terminals for ease of connecting the speakers to the amplifier. Bridged Stereo Speaker Wiring Diagram PA660 /…i vˆiÀ...
PA880 Owner's Manual
Page 7
... mono amplifiers, the speaker connectors are not sure as part of the amplifier chassis. Each amplifier is not covered under a seat or similar area, keep a minimum of 1" of clearance around the amplifier is not recommended and may become damaged. © 2010 Polk Audio-all adjustment on both negative terminals on the slave amp using at the battery before making or breaking connections to replace the fuse plugged into gas tanks, fuel lines...
... mono amplifiers, the speaker connectors are not sure as part of the amplifier chassis. Each amplifier is not covered under a seat or similar area, keep a minimum of 1" of clearance around the amplifier is not recommended and may become damaged. © 2010 Polk Audio-all adjustment on both negative terminals on the slave amp using at the battery before making or breaking connections to replace the fuse plugged into gas tanks, fuel lines...
PA880 Owner's Manual
Page 8
... on Fuse blown Power wires not connected Audio input not connected. Step 4: Pre-drill amplifier mounting holes. Step 5: Mount the amplifier. Make sure the amplifier is distorted, turn back the level control slightly for your Polk Audio PA system. This will help ensure years of this guide for detailed instructions. If not, please refer to the tweeter output until you can hear the output of this manual for detailed information. Step 4: Turn the source unit's volume control...
... on Fuse blown Power wires not connected Audio input not connected. Step 4: Pre-drill amplifier mounting holes. Step 5: Mount the amplifier. Make sure the amplifier is distorted, turn back the level control slightly for your Polk Audio PA system. This will help ensure years of this guide for detailed instructions. If not, please refer to the tweeter output until you can hear the output of this manual for detailed information. Step 4: Turn the source unit's volume control...
PA880 Owner's Manual
Page 9
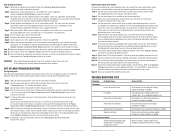
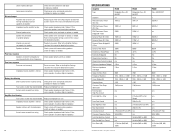
... the Amplifier Settings section of this manual for detailed instructions Readjust crossovers. Check power wires and ground connections and repair or replace as needed . Fuse used is blown with shorted outputs Check system with known working speakers and fix or replace as needed . Check speaker impedance load if below 2 Ohm, rewire speakers to achieve higher impedance. 16 © 2010 Polk Audio-all rights reserved SPECIFICATIONS Amplifier Type Channels RMS Continuous Power @ 4 Ohm RMS Continuous Power @ 2 Ohm RMS Continuous Power Bridged @ 4 Ohm Dynamic Power @ 4 Ohm...
... the Amplifier Settings section of this manual for detailed instructions Readjust crossovers. Check power wires and ground connections and repair or replace as needed . Fuse used is blown with shorted outputs Check system with known working speakers and fix or replace as needed . Check speaker impedance load if below 2 Ohm, rewire speakers to achieve higher impedance. 16 © 2010 Polk Audio-all rights reserved SPECIFICATIONS Amplifier Type Channels RMS Continuous Power @ 4 Ohm RMS Continuous Power @ 2 Ohm RMS Continuous Power Bridged @ 4 Ohm Dynamic Power @ 4 Ohm...


