User Manual
Page 3
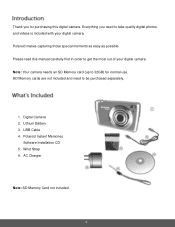
... digital camera. Everything you for normal use. Note: Your camera needs an SD Memory card (up to be purchased separately. 1. Wrist Strap 6. Polaroid makes capturing those special moments as easy as possible. AC Charger Note: SD Memory Card not included. 2 SD Memory cards are not included and need to take quality digital photos and videos is included...
... digital camera. Everything you for normal use. Note: Your camera needs an SD Memory card (up to be purchased separately. 1. Wrist Strap 6. Polaroid makes capturing those special moments as easy as possible. AC Charger Note: SD Memory Card not included. 2 SD Memory cards are not included and need to take quality digital photos and videos is included...
User Manual
Page 4
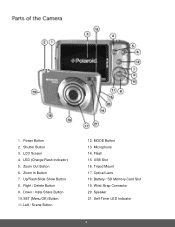
Shutter Button 3. Down / Insta-Share Button 10. Left / Scene Button 12. Battery / SD Memory Card Slot 19. Power Button 2. LED (Charge/Flash Indicator) 5. Right / Delete Button 9. MODE Button 13. Flash 15. Optical Lens 18. Self-Timer LED Indicator 3 1. Up/Flash/Slide Show Button 8. SET (Menu/OK) Button 11. Microphone 14. Speaker 21. Zoom In Button 7. USB Slot 16. LCD Screen 4. Zoom Out Button 6. Tripod Mount 17. Wrist Strap Connector 20.
Shutter Button 3. Down / Insta-Share Button 10. Left / Scene Button 12. Battery / SD Memory Card Slot 19. Power Button 2. LED (Charge/Flash Indicator) 5. Right / Delete Button 9. MODE Button 13. Flash 15. Optical Lens 18. Self-Timer LED Indicator 3 1. Up/Flash/Slide Show Button 8. SET (Menu/OK) Button 11. Microphone 14. Speaker 21. Zoom In Button 7. USB Slot 16. LCD Screen 4. Zoom Out Button 6. Tripod Mount 17. Wrist Strap Connector 20.
User Manual
Page 5
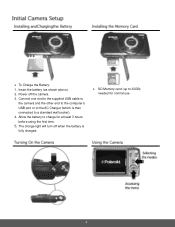
To Charge the Battery: 1. Allow the battery to charge for normal use. 4 The charge light will turn off the camera. 3. Connect one end to the supplied USB cable to the camera and the other end to the computer's USB port or to the AC Charger (which is fully charged. SD Memory card (up to a standard wall socket). 4. Power off when the battery is then connected to 32GB) needed for at least 3 hours before using the first time. 5. Insert the battery (as shown above). 2.
To Charge the Battery: 1. Allow the battery to charge for normal use. 4 The charge light will turn off the camera. 3. Connect one end to the supplied USB cable to the camera and the other end to the computer's USB port or to the AC Charger (which is fully charged. SD Memory card (up to a standard wall socket). 4. Power off when the battery is then connected to 32GB) needed for at least 3 hours before using the first time. 5. Insert the battery (as shown above). 2.
User Manual
Page 10
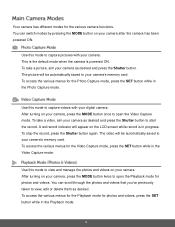
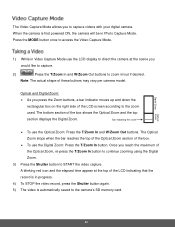
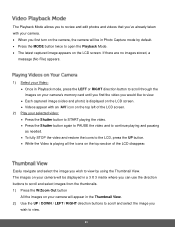
... this mode to open the Video Capture mode. To take a video, aim your camera, press the MODE button twice to capture pictures with your camera's memory card. Use this mode to your digital camera. You can switch modes by pressing the MODE button on your camera after the camera has been powered... desired and press the Shutter button. You can scroll through the photos and videos that you've previously taken to capture videos with your camera's memory card.
... this mode to open the Video Capture mode. To take a video, aim your camera, press the MODE button twice to capture pictures with your camera's memory card. Use this mode to your digital camera. You can switch modes by pressing the MODE button on your camera after the camera has been powered... desired and press the Shutter button. You can scroll through the photos and videos that you've previously taken to capture videos with your camera's memory card.
User Manual
Page 11
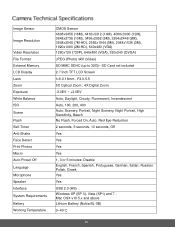
..., Greek Yes Yes USB 2.0 (HS) Windows XP (SP 3), Vista (SP1) and 7 ; Image Sensor Image Resolution Video Resolution File Format External Memory LCD Display Lens Zoom Exposure White Balance ISO Scene Flash Self-Timer Anti-Shake Face Detect Print Photos Macro Auto Power Off Language Microphone Speaker...JPEG (Photo) /AVI (Video) SD MMC SDHC (up to 32G)- Mac OSX v10.5.x and above Lithium Battery (Nokia BL-5B) 0~40C 10 SD Card not included 2.7 Inch TFT LCD Screen f=6.0-18mm , F3.0-5.5 5X Optical Zoom ; 4X Digital Zoom -3.0EV ~ +3.0EV Auto, Daylight, Cloudy, Fluorescent, Incandescent Auto...
..., Greek Yes Yes USB 2.0 (HS) Windows XP (SP 3), Vista (SP1) and 7 ; Image Sensor Image Resolution Video Resolution File Format External Memory LCD Display Lens Zoom Exposure White Balance ISO Scene Flash Self-Timer Anti-Shake Face Detect Print Photos Macro Auto Power Off Language Microphone Speaker...JPEG (Photo) /AVI (Video) SD MMC SDHC (up to 32G)- Mac OSX v10.5.x and above Lithium Battery (Nokia BL-5B) 0~40C 10 SD Card not included 2.7 Inch TFT LCD Screen f=6.0-18mm , F3.0-5.5 5X Optical Zoom ; 4X Digital Zoom -3.0EV ~ +3.0EV Auto, Daylight, Cloudy, Fluorescent, Incandescent Auto...
User Manual
Page 16
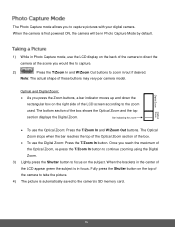
... the Shutter button to focus on the right side of the camera to take the picture. 4) The picture is automatically saved to the camera's SD memory card. 15 The bottom section of these buttons may vary per camera model. The Optical Zoom stops when the bar reaches the top of the Optical...
... the Shutter button to focus on the right side of the camera to take the picture. 4) The picture is automatically saved to the camera's SD memory card. 15 The bottom section of these buttons may vary per camera model. The Optical Zoom stops when the bar reaches the top of the Optical...
User Manual
Page 32
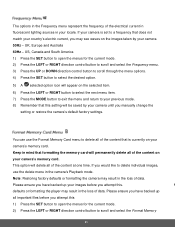
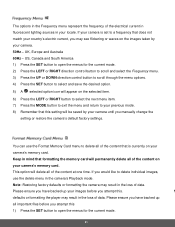
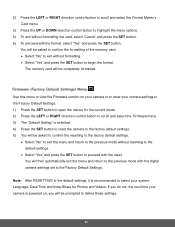
... camera's default factory settings. This option will be saved by your camera. 50Hz - If your camera is currently on your camera's memory card. Please ensure you have backed up your images before you attempt this. Please ensure you have backed up all important files before you ...UK, Europe and Australia 60Hz - The options in the Frequency menu represent the frequency of the content on your camera's memory card. Keep in mind that formatting the memory card will appear on the selected item. 6) Press the LEFT or RIGHT button to select the next menu item. 7) Press ...
... camera's default factory settings. This option will be saved by your camera. 50Hz - If your camera is currently on your camera's memory card. Please ensure you have backed up your images before you attempt this. Please ensure you have backed up all important files before you ...UK, Europe and Australia 60Hz - The options in the Frequency menu represent the frequency of the content on your camera's memory card. Keep in mind that formatting the memory card will appear on the selected item. 6) Press the LEFT or RIGHT button to select the next menu item. 7) Press ...

User Manual
Page 33
If you will then automatically exit the menu and return to define those settings. 32 The memory card will be asked to confirm the formatting of the memory card. Select "No" to exit without formatting. Select "Yes" and press the SET button to highlight the menu options. 4) To exit ...confirm the resetting to the factory default settings. Select "No" to exit the menu and return to the previous mode without formatting the card, select 'Cancel' and press the SET button. 5) To proceed with the format, select "Yes" and press the SET button. You will be ...
If you will then automatically exit the menu and return to define those settings. 32 The memory card will be asked to confirm the formatting of the memory card. Select "No" to exit without formatting. Select "Yes" and press the SET button to highlight the menu options. 4) To exit ...confirm the resetting to the factory default settings. Select "No" to exit the menu and return to the previous mode without formatting the card, select 'Cancel' and press the SET button. 5) To proceed with the format, select "Yes" and press the SET button. You will be ...
User Manual
Page 34
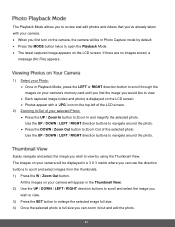
... on the camera, the camera will be in Playback Mode, press the LEFT or RIGHT direction button to scroll through the images on your camera's memory card until you find the image you would like to navigate around the photo. The Playback Mode allows you to review and edit photos and videos...
... on the camera, the camera will be in Playback Mode, press the LEFT or RIGHT direction button to scroll through the images on your camera's memory card until you find the image you would like to navigate around the photo. The Playback Mode allows you to review and edit photos and videos...
User Manual
Page 37
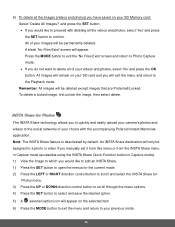
...mode. Remember: All images will be deleted except images that are Protected/Locked. The INSTA Share technology allows you have saved on your SD Memory card: Select 'Delete All Images?' Note: The INSTA Share feature is deactivated by default. A blank 'No Files Exist' screen will exit the...confirm. All images will remain on the selected item 6) Press the MODE button to exit the menu and return to proceed with the accompanying Polaroid Instant Memories application. To delete a locked image, first unlock the image, then select delete. 6) To delete all of your videos and photos, ...
...mode. Remember: All images will be deleted except images that are Protected/Locked. The INSTA Share technology allows you have saved on your SD Memory card: Select 'Delete All Images?' Note: The INSTA Share feature is deactivated by default. A blank 'No Files Exist' screen will exit the...confirm. All images will remain on the selected item 6) Press the MODE button to exit the menu and return to proceed with the accompanying Polaroid Instant Memories application. To delete a locked image, first unlock the image, then select delete. 6) To delete all of your videos and photos, ...
User Manual
Page 39
... the next menu item. 7) Press the MODE button to exit the menu and return to your camera can use the Print Photos menu to your memory card. Photos that image in the playback mode. Remember that is locked will display a lock symbol on your camera directly to a Pictbridge compatible printer. 1) Scroll through...
... the next menu item. 7) Press the MODE button to exit the menu and return to your camera can use the Print Photos menu to your memory card. Photos that image in the playback mode. Remember that is locked will display a lock symbol on your camera directly to a Pictbridge compatible printer. 1) Scroll through...
User Manual
Page 41
... Zoom. 3) Press the Shutter button to the zoom used. A blinking red icon and the elapsed time appear at the scene you to the camera's SD memory card. 40 Optical and Digital Zoom: As you reach the maximum of the box. To use the Optical Zoom: Press the T/Zoom In and...
... Zoom. 3) Press the Shutter button to the zoom used. A blinking red icon and the elapsed time appear at the scene you to the camera's SD memory card. 40 Optical and Digital Zoom: As you reach the maximum of the box. To use the Optical Zoom: Press the T/Zoom In and...
User Manual
Page 52
...loss of data. If your camera is currently on your camera's memory card. Keep in mind that formatting the memory card will permanently delete all important files before you would like to delete individual images, use the Format Memory Card menu to a frequency that does not match your country's electric ...51 UK, Europe and Australia 60Hz - This option will be saved by your locale. Please ensure you have backed up your camera's memory card. N defaults or formatting the player may see flickering or waves on the images taken by your camera until you have backed up all...
...loss of data. If your camera is currently on your camera's memory card. Keep in mind that formatting the memory card will permanently delete all important files before you would like to delete individual images, use the Format Memory Card menu to a frequency that does not match your country's electric ...51 UK, Europe and Australia 60Hz - This option will be saved by your locale. Please ensure you have backed up your camera's memory card. N defaults or formatting the player may see flickering or waves on the images taken by your camera until you have backed up all...
User Manual
Page 53
...SET button to open the menus for Photos and Videos. 2) Press the LEFT or RIGHT direction control button to scroll and select the Format Memory Card menu. 3) Press the UP or DOWN direction control button to highlight the menu options. 4) To exit without formatting. Select "Yes..." and press the SET button to begin the format. The memory card will be asked to confirm the formatting of the memory card. Select "No" to exit without formatting the card, select 'Cancel' and press the SET button. 5) To proceed with the format, select "Yes...
...SET button to open the menus for Photos and Videos. 2) Press the LEFT or RIGHT direction control button to scroll and select the Format Memory Card menu. 3) Press the UP or DOWN direction control button to highlight the menu options. 4) To exit without formatting. Select "Yes..." and press the SET button to begin the format. The memory card will be asked to confirm the formatting of the memory card. Select "No" to exit without formatting the card, select 'Cancel' and press the SET button. 5) To proceed with the format, select "Yes...
User Manual
Page 54
... File) appears. 1) Select your Video: Once in Playback mode, press the LEFT or RIGHT direction button to scroll through the images on your camera's memory card until you find the video you would like to view. Each captured image (video and photo) is displayed on the LCD screen. Videos...
... File) appears. 1) Select your Video: Once in Playback mode, press the LEFT or RIGHT direction button to scroll through the images on your camera's memory card until you find the video you would like to view. Each captured image (video and photo) is displayed on the LCD screen. Videos...
User Manual
Page 56
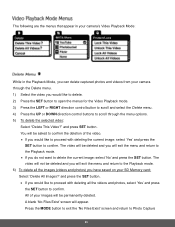
... the menus that appear in your camera's Video Playback Mode: While in the Playback Mode, you can delete captured photos and videos from your SD Memory card: Select 'Delete All Images?' The video will be asked to confirm the deletion of your images will exit the menu and return to the Playback...
... the menus that appear in your camera's Video Playback Mode: While in the Playback Mode, you can delete captured photos and videos from your SD Memory card: Select 'Delete All Images?' The video will be asked to confirm the deletion of your images will exit the menu and return to the Playback...
User Manual
Page 57
... 1) View the image to which you to quickly and easily upload your camera's photos and videos to the social networks of your SD card and you will exit the menu and return to your choice with the selected INSTA Share destination site. 9) Changing the INSTA Share destination ... 5) Press the SET button to select and save the desired option. 6) A selected option icon will appear on the image with the accompanying Polaroid Instant Memories application. To delete a locked image, first unlock the image, then select delete. Remember: You can be deleted except images that are Protected/Locked.
... 1) View the image to which you to quickly and easily upload your camera's photos and videos to the social networks of your SD card and you will exit the menu and return to your choice with the selected INSTA Share destination site. 9) Changing the INSTA Share destination ... 5) Press the SET button to select and save the desired option. 6) A selected option icon will appear on the image with the accompanying Polaroid Instant Memories application. To delete a locked image, first unlock the image, then select delete. Remember: You can be deleted except images that are Protected/Locked.
User Manual
Page 63
... is not included. This item may be imported from your camera's SD card. This item may be purchased separately. 2) Using an iPad SD Card Reader: Connect the SD Card Reader to your iPad, and then insert your digital camera's SD Memory card into the slot to avoid damaging it. Please handle your camera with care...
... is not included. This item may be imported from your camera's SD card. This item may be purchased separately. 2) Using an iPad SD Card Reader: Connect the SD Card Reader to your iPad, and then insert your digital camera's SD Memory card into the slot to avoid damaging it. Please handle your camera with care...
User Manual
Page 66
...my computer. What do not appear on the SD memory card. With test photos (if applicable to the images stored on my computer. This camera requires an SD card for e-mail support, please contact us at www.polaroid.com. The images were also deleted from there....We recommend always downloading your photos to prevent unintentional data loss. Q: I have in the camera's memory. All images deleted using the Polaroid Instant Memories. Q: I deleted images using the Polaroid Instant Memories are not stored in fact taken photos. Press the Shutter button to take some sample photos and ...
...my computer. What do not appear on the SD memory card. With test photos (if applicable to the images stored on my computer. This camera requires an SD card for e-mail support, please contact us at www.polaroid.com. The images were also deleted from there....We recommend always downloading your photos to prevent unintentional data loss. Q: I have in the camera's memory. All images deleted using the Polaroid Instant Memories. Q: I deleted images using the Polaroid Instant Memories are not stored in fact taken photos. Press the Shutter button to take some sample photos and ...

