User Manual
Page 3
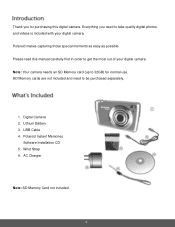
... those special moments as easy as possible. Digital Camera 2. Polaroid Instant Memories Software Installation CD 5. Wrist Strap 6. Thank you need to get the most out of your digital camera. Everything you for normal use. Please ... card (up to 32GB) for purchasing this manual carefully first in order to be purchased separately. 1. AC Charger Note: SD Memory Card not included. 2 Lithium Battery 3.
... those special moments as easy as possible. Digital Camera 2. Polaroid Instant Memories Software Installation CD 5. Wrist Strap 6. Thank you need to get the most out of your digital camera. Everything you for normal use. Please ... card (up to 32GB) for purchasing this manual carefully first in order to be purchased separately. 1. AC Charger Note: SD Memory Card not included. 2 Lithium Battery 3.
User Manual
Page 4
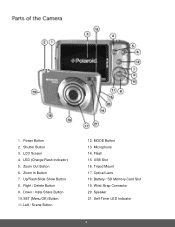
1. Zoom In Button 7. Up/Flash/Slide Show Button 8. Right / Delete Button 9. SET (Menu/OK) Button 11. Flash 15. LED (Charge/Flash Indicator) 5. Left / Scene Button 12. Wrist Strap Connector 20. Shutter Button 3. Optical Lens 18. Self-Timer LED Indicator 3 Down / Insta-Share Button 10. MODE Button 13. USB Slot 16. Microphone 14. Power Button 2. LCD Screen 4. Zoom Out Button 6. Tripod Mount 17. Speaker 21. Battery / SD Memory Card Slot 19.
1. Zoom In Button 7. Up/Flash/Slide Show Button 8. Right / Delete Button 9. SET (Menu/OK) Button 11. Flash 15. LED (Charge/Flash Indicator) 5. Left / Scene Button 12. Wrist Strap Connector 20. Shutter Button 3. Optical Lens 18. Self-Timer LED Indicator 3 Down / Insta-Share Button 10. MODE Button 13. USB Slot 16. Microphone 14. Power Button 2. LCD Screen 4. Zoom Out Button 6. Tripod Mount 17. Speaker 21. Battery / SD Memory Card Slot 19.
User Manual
Page 5
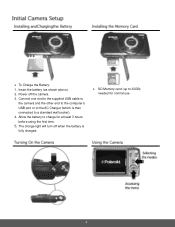
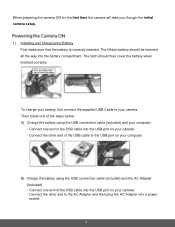
The charge light will turn off the camera. 3. To Charge the Battery: 1. Power off when the battery is then connected to a standard wall socket). 4. Connect one end to the supplied USB cable to the camera and the other end to the computer's USB port or to the AC Charger (which is fully charged. SD Memory card (up to charge for normal use. 4 Insert the battery (as shown above). 2. Allow the battery to 32GB) needed for at least 3 hours before using the first time. 5.
The charge light will turn off the camera. 3. To Charge the Battery: 1. Power off when the battery is then connected to a standard wall socket). 4. Connect one end to the supplied USB cable to the camera and the other end to the computer's USB port or to the AC Charger (which is fully charged. SD Memory card (up to charge for normal use. 4 Insert the battery (as shown above). 2. Allow the battery to 32GB) needed for at least 3 hours before using the first time. 5.
User Manual
Page 6
... then plug the AC Adapter into the USB port on your camera. - Connect the other end of the USB cable into a power socket. 5 B) Charge the battery using the USB connection cable (included) and your computer. Connect one end of the steps below: A) Charge the... battery using the USB connection cable (included) and the AC Adapter (included). - To charge your battery, first connect the supplied USB Cable to the USB port on your camera. When powering the camera ON for...
... then plug the AC Adapter into the USB port on your camera. - Connect the other end of the USB cable into a power socket. 5 B) Charge the battery using the USB connection cable (included) and your computer. Connect one end of the steps below: A) Charge the... battery using the USB connection cable (included) and the AC Adapter (included). - To charge your battery, first connect the supplied USB Cable to the USB port on your camera. When powering the camera ON for...
User Manual
Page 7
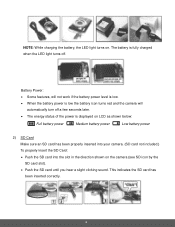
... is fully charged when the LED light turns off. This indicates the SD card has been inserted correctly. 6 The battery is displayed on LCD as shown below: Full battery power Medium battery power Low battery power 2) SD Card Make sure an SD card has been properly inserted into your camera. (SD card not included....) To properly insert the SD Card: Push the SD card into the slot in the direction shown on . NOTE: While charging the battery, the LED light turns on the camera (see SD icon by the SD card slot). Push the SD card until you hear a slight clicking...
... is fully charged when the LED light turns off. This indicates the SD card has been inserted correctly. 6 The battery is displayed on LCD as shown below: Full battery power Medium battery power Low battery power 2) SD Card Make sure an SD card has been properly inserted into your camera. (SD card not included....) To properly insert the SD Card: Push the SD card into the slot in the direction shown on . NOTE: While charging the battery, the LED light turns on the camera (see SD icon by the SD card slot). Push the SD card until you hear a slight clicking...
User Manual
Page 11
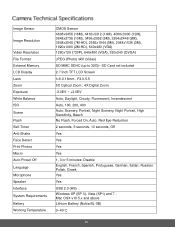
... Zoom Exposure White Balance ISO Scene Flash Self-Timer Anti-Shake Face Detect Print Photos Macro Auto Power Off Language Microphone Speaker Interface System Requirements Battery Working Temperature CMOS Sensor 4608x3456 (16M), 4416x3312 (14M), 4000x3000 (12M), 3648x2736 (10M), 3456x2592 (9M), 3264x2448 (8M), 3648x2048 (7M-HD), 2592x1944 (5M), 2048x1536 (3M), 1920x1080 (2M...-HD), 640x480 (VGA) 1280x720 (720P), 640x480 (VGA), 320x240 (QVGA) JPEG (Photo) /AVI (Video) SD MMC SDHC (up to 32G)- Mac OSX v10.5.x and above Lithium Battery (Nokia BL-5B) 0~40C 10
... Zoom Exposure White Balance ISO Scene Flash Self-Timer Anti-Shake Face Detect Print Photos Macro Auto Power Off Language Microphone Speaker Interface System Requirements Battery Working Temperature CMOS Sensor 4608x3456 (16M), 4416x3312 (14M), 4000x3000 (12M), 3648x2736 (10M), 3456x2592 (9M), 3264x2448 (8M), 3648x2048 (7M-HD), 2592x1944 (5M), 2048x1536 (3M), 1920x1080 (2M...-HD), 640x480 (VGA) 1280x720 (720P), 640x480 (VGA), 320x240 (QVGA) JPEG (Photo) /AVI (Video) SD MMC SDHC (up to 32G)- Mac OSX v10.5.x and above Lithium Battery (Nokia BL-5B) 0~40C 10
User Manual
Page 13
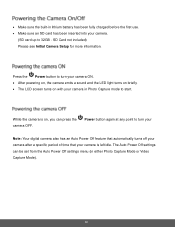
... is on with your camera is left idle. The Auto Power Off settings can press the camera OFF. Make sure the built-in lithium battery has been fully charged before the first use. Make sure an SD card has been inserted into your camera. (SD card up to turn...
... is on with your camera is left idle. The Auto Power Off settings can press the camera OFF. Make sure the built-in lithium battery has been fully charged before the first use. Make sure an SD card has been inserted into your camera. (SD card up to turn...
User Manual
Page 31
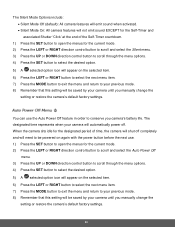
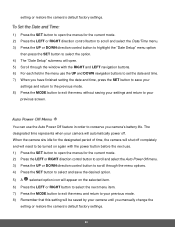
... need to be powered on again with the power button before the next use the Auto Power Off feature in order to conserve you camera's battery life. You can use . 1) Press the SET button to open the menus for the current mode. 2) Press the LEFT or RIGHT direction control button to...
... need to be powered on again with the power button before the next use the Auto Power Off feature in order to conserve you camera's battery life. You can use . 1) Press the SET button to open the menus for the current mode. 2) Press the LEFT or RIGHT direction control button to...
User Manual
Page 51
... menu. 3) Press the UP or DOWN direction control button to highlight the "Date Setup" menu option then press the SET button to conserve you camera's battery life. The designated time represents when your camera will automatically power off completely and will need to be turned on again with the power button...
... menu. 3) Press the UP or DOWN direction control button to highlight the "Date Setup" menu option then press the SET button to conserve you camera's battery life. The designated time represents when your camera will automatically power off completely and will need to be turned on again with the power button...
User Manual
Page 67
... users in private households in a manner that this can not be disposed of electrical and electronic equipment and/or battery. Battery 66 Disposal of your household waste disposal service. This symbol on the product or on the packaging indicates that protects human health and environment. The ... over to the applicable take-back scheme for the recycling of as household waste. You must dispose of Waste Electrical and Electronic Equipment and/or Battery by handling it is recycled in the European Union.
... users in private households in a manner that this can not be disposed of electrical and electronic equipment and/or battery. Battery 66 Disposal of your household waste disposal service. This symbol on the product or on the packaging indicates that protects human health and environment. The ... over to the applicable take-back scheme for the recycling of as household waste. You must dispose of Waste Electrical and Electronic Equipment and/or Battery by handling it is recycled in the European Union.


