
User Manual
Page 5
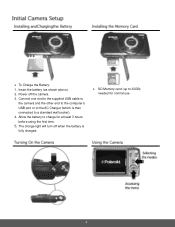
Connect one end to the supplied USB cable to the camera and the other end to the computer's USB port or to the AC Charger (which is fully charged. SD Memory card (up to a standard wall socket). 4. Insert the battery (as shown above). 2. The charge light will turn off the camera. 3. Allow the battery to charge for normal use. 4 To Charge the Battery: 1. Power off when the battery is then connected to 32GB) needed for at least 3 hours before using the first time. 5.
Connect one end to the supplied USB cable to the camera and the other end to the computer's USB port or to the AC Charger (which is fully charged. SD Memory card (up to a standard wall socket). 4. Insert the battery (as shown above). 2. The charge light will turn off the camera. 3. Allow the battery to charge for normal use. 4 To Charge the Battery: 1. Power off when the battery is then connected to 32GB) needed for at least 3 hours before using the first time. 5.
User Manual
Page 7
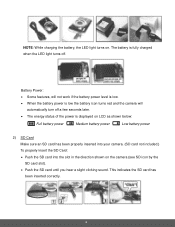
... the SD card has been inserted correctly. 6 NOTE: While charging the battery, the LED light turns on the camera (see SD icon by the SD card slot). Push the SD card...the battery power level is low. When the battery power is low the battery icon turns red and the camera will automatically turn off a few seconds later. The energy status of the power is fully charged when the ...LED light turns off. The battery is displayed on LCD as shown below: Full battery power Medium battery power...
... the SD card has been inserted correctly. 6 NOTE: While charging the battery, the LED light turns on the camera (see SD icon by the SD card slot). Push the SD card...the battery power level is low. When the battery power is low the battery icon turns red and the camera will automatically turn off a few seconds later. The energy status of the power is fully charged when the ...LED light turns off. The battery is displayed on LCD as shown below: Full battery power Medium battery power...
User Manual
Page 8
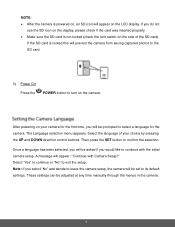
... the SD card is locked this will prevent the camera from saving captured photos to the SD card. 3) Power On Press the POWER button to turn on the side of your camera for the camera. Then press the SET button to exit the setup. A message will appear: "Continue with the initial...
... the SD card is locked this will prevent the camera from saving captured photos to the SD card. 3) Power On Press the POWER button to turn on the side of your camera for the camera. Then press the SET button to exit the setup. A message will appear: "Continue with the initial...
User Manual
Page 10
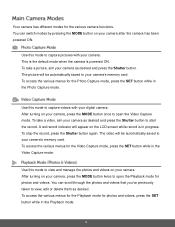
... and videos that you've previously taken to view and manage the photos and videos on the LCD screen while record is powered ON. After turning on your camera's memory card. Use this mode to view, edit or delete them as desired and press the Shutter button. The video will be... automatically saved to open the Video Capture mode. After turning on your camera after the camera has been powered ON. To access the various menus for photos and videos. The picture will be automatically saved...
... and videos that you've previously taken to view and manage the photos and videos on the LCD screen while record is powered ON. After turning on your camera's memory card. Use this mode to view, edit or delete them as desired and press the Shutter button. The video will be... automatically saved to open the Video Capture mode. After turning on your camera after the camera has been powered ON. To access the various menus for photos and videos. The picture will be automatically saved...
User Manual
Page 13
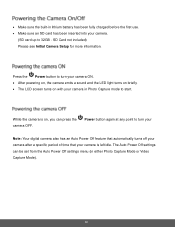
...Note: Your digital camera also has an Auto Power Off feature that automatically turns off your camera after a specific period of time that your camera is .... SD Card not included) Please see Initial Camera Setup for more information. Power button again at any point to turn your camera. (SD card up to start. Make sure the built-in lithium battery has been fully ...your camera ON. After powering on, the camera emits a sound and the LED light turns on briefly. The LCD screen turns on , you can be set from the Auto Power Off settings menu (in Photo Capture mode to ...
...Note: Your digital camera also has an Auto Power Off feature that automatically turns off your camera after a specific period of time that your camera is .... SD Card not included) Please see Initial Camera Setup for more information. Power button again at any point to turn your camera. (SD card up to start. Make sure the built-in lithium battery has been fully ...your camera ON. After powering on, the camera emits a sound and the LED light turns on briefly. The LCD screen turns on , you can be set from the Auto Power Off settings menu (in Photo Capture mode to ...
User Manual
Page 18
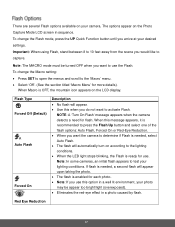
...will appear. Use this when you want the camera to determine if Flash is needed, select Auto Flash. The flash will automatically turn on according to the lighting conditions. When the LED light stops blinking, the Flash is OFF, the mountain icon appears on the LCD ...display. If flash is enabled for use the Flash. NOTE: A 'Turn On Flash' message appears when the camera detects a need for more details). When this option in a well lit environment, your camera. The options appear ...
...will appear. Use this when you want the camera to determine if Flash is needed, select Auto Flash. The flash will automatically turn on according to the lighting conditions. When the LED light stops blinking, the Flash is OFF, the mountain icon appears on the LCD ...display. If flash is enabled for use the Flash. NOTE: A 'Turn On Flash' message appears when the camera detects a need for more details). When this option in a well lit environment, your camera. The options appear ...
User Manual
Page 20
..., by your selection will also take up more of the images taken by default the camera switches off the FLASH automatically (if it and manually turn ON the flash - Keep in mind that this setting will be saved by your camera until you can do so. 1) Press the SET button to...
..., by your selection will also take up more of the images taken by default the camera switches off the FLASH automatically (if it and manually turn ON the flash - Keep in mind that this setting will be saved by your camera until you can do so. 1) Press the SET button to...
User Manual
Page 24
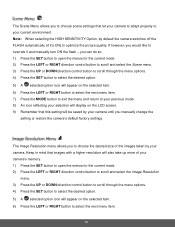
Note: The Macro mode must be turned OFF when you want to use the following features of your camera: Flash and Face Detect. 1) Press the SET button to open the menus for ... camera's default factory settings. Properly adjusting the White Balance setting to match your camera. Macro OFF: To turn the Macro mode ON, select 'On' from 1.5m - ∞ (infinity). Macro ON: To turn the Macro mode OFF, select 'Off from the Macro Menu options. The mountain icon appears on the...
Note: The Macro mode must be turned OFF when you want to use the following features of your camera: Flash and Face Detect. 1) Press the SET button to open the menus for ... camera's default factory settings. Properly adjusting the White Balance setting to match your camera. Macro OFF: To turn the Macro mode ON, select 'On' from 1.5m - ∞ (infinity). Macro ON: To turn the Macro mode OFF, select 'Off from the Macro Menu options. The mountain icon appears on the...
User Manual
Page 34
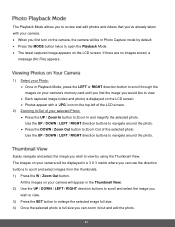
... photo. The Playback Mode allows you to review and edit photos and videos that you've already taken with your camera. When you first turn on the camera, the camera will be displayed in Playback Mode, press the LEFT or RIGHT direction button to scroll through the images on your...
... photo. The Playback Mode allows you to review and edit photos and videos that you've already taken with your camera. When you first turn on the camera, the camera will be displayed in Playback Mode, press the LEFT or RIGHT direction button to scroll through the images on your...
User Manual
Page 45
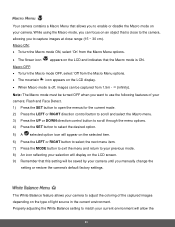
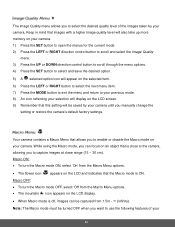
... that is close to the camera, allowing you to use the following features of the images taken by your camera. Macro ON: To turn the Macro mode OFF, select 'Off from the Macro Menu options. The flower icon appears on the LCD and indicates that this setting .... 4) Press the SET button to your previous mode. 8) An icon reflecting your selection will be turned OFF when you manually change the setting or restore the camera's default factory settings. Macro OFF: To turn the Macro mode ON, select 'On' from the Macro Menu options. The mountain icon ...
... that is close to the camera, allowing you to use the following features of the images taken by your camera. Macro ON: To turn the Macro mode OFF, select 'Off from the Macro Menu options. The flower icon appears on the LCD and indicates that this setting .... 4) Press the SET button to your previous mode. 8) An icon reflecting your selection will be turned OFF when you manually change the setting or restore the camera's default factory settings. Macro OFF: To turn the Macro mode ON, select 'On' from the Macro Menu options. The mountain icon ...
User Manual
Page 51
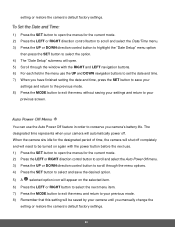
... select the next menu item. 7) Press the MODE button to exit the menu and return to your previous mode. 8) Remember that this setting will be turned on again with the power button before the next use. 1) Press the SET button to open the menus for the current mode. 2) Press the LEFT...
... select the next menu item. 7) Press the MODE button to exit the menu and return to your previous mode. 8) Remember that this setting will be turned on again with the power button before the next use. 1) Press the SET button to open the menus for the current mode. 2) Press the LEFT...
User Manual
Page 54
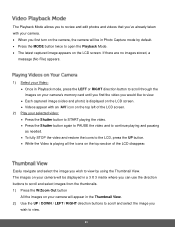
... LCD, press the UP button. While the Video is displayed on the LCD screen. Videos appear with your camera. When you first turn on the camera, the camera will appear in the Thumbnail View. 2) Use the UP / DOWN / LEFT / RIGHT direction buttons to scroll and select the image...
... LCD, press the UP button. While the Video is displayed on the LCD screen. Videos appear with your camera. When you first turn on the camera, the camera will appear in the Thumbnail View. 2) Use the UP / DOWN / LEFT / RIGHT direction buttons to scroll and select the image...
User Manual
Page 68
... its software, and you may cause harmful interference to perform a data sanitization process before disposal. You may also go to www.polaroid.com and reference Social Responsibility to learn more of product and its licensees, affiliates, and Sakar International, Inc. Uses and can radiate...interference will not occur in a residential installation. fully supports all applicable regulations, directives or other confidential data may be determined by turning the equipment off and on, the user is connected. - Caution: changes or modifications not expressly approved by one or more ...
... its software, and you may cause harmful interference to perform a data sanitization process before disposal. You may also go to www.polaroid.com and reference Social Responsibility to learn more of product and its licensees, affiliates, and Sakar International, Inc. Uses and can radiate...interference will not occur in a residential installation. fully supports all applicable regulations, directives or other confidential data may be determined by turning the equipment off and on, the user is connected. - Caution: changes or modifications not expressly approved by one or more ...


