User Manual
Page 8
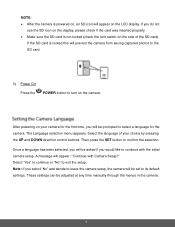
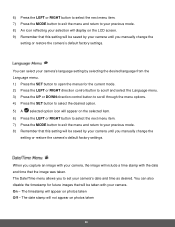
... setup. NOTE: After the camera is powered on, an SD icon will appear on your choice by pressing the UP and DOWN direction control buttons. These settings can be prompted to select a language for the camera. The Language selection menu appears. Note: If you will be adjusted at any time manually through the menus in the camera. 7 Select the language of the SD card). After powering on the LCD display...
... setup. NOTE: After the camera is powered on, an SD icon will appear on your choice by pressing the UP and DOWN direction control buttons. These settings can be prompted to select a language for the camera. The Language selection menu appears. Note: If you will be adjusted at any time manually through the menus in the camera. 7 Select the language of the SD card). After powering on the LCD display...
User Manual
Page 9
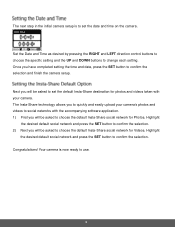
... and LEFT direction control buttons to choose the specific setting and the UP and DOWN buttons to confirm the selection. Your camera is to set the default Insta-Share destination for photos and videos taken with the accompanying software application. 1) First you will be asked to set the date and time on the camera. The Insta-Share technology allows you to quickly and easily upload your camera's photos and videos to...
... and LEFT direction control buttons to choose the specific setting and the UP and DOWN buttons to confirm the selection. Your camera is to set the default Insta-Share destination for photos and videos taken with the accompanying software application. 1) First you will be asked to set the date and time on the camera. The Insta-Share technology allows you to quickly and easily upload your camera's photos and videos to...
User Manual
Page 10
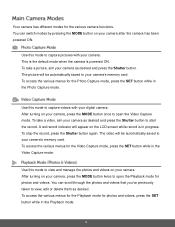
... Playback mode. 9 Use this mode to capture videos with your camera as desired and press the Shutter button. After turning on your camera after the camera has been powered ON. To take a video, aim your camera, press the MODE button twice to your camera's memory card. After turning on your camera as desired. A red record indicator will be automatically saved to open the Video Capture mode. You can switch modes by pressing the MODE button on your digital camera. The video will be automatically saved to start the record...
... Playback mode. 9 Use this mode to capture videos with your camera as desired and press the Shutter button. After turning on your camera after the camera has been powered ON. To take a video, aim your camera, press the MODE button twice to your camera's memory card. After turning on your camera as desired. A red record indicator will be automatically saved to open the Video Capture mode. You can switch modes by pressing the MODE button on your digital camera. The video will be automatically saved to start the record...
User Manual
Page 11
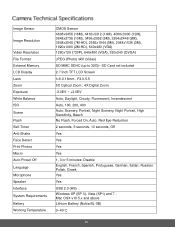
... Optical Zoom ; 4X Digital Zoom -3.0EV ~ +3.0EV Auto, Daylight, Cloudy, Fluorescent, Incandescent Auto, 100, 200, 400 Auto, Scenery, Portrait, Night Scenery, Night Portrait, High Sensitivity, Beach No Flash, Forced On, Auto, Red Eye Reduction 2 seconds, 5 seconds, 10 seconds, Off Yes Yes Yes Yes 1, 3 or 5 minutes; Image Sensor Image Resolution Video Resolution File Format External Memory LCD Display Lens Zoom Exposure White Balance ISO Scene Flash Self-Timer Anti-Shake Face Detect Print Photos Macro Auto Power Off Language Microphone Speaker Interface System Requirements Battery Working...
... Optical Zoom ; 4X Digital Zoom -3.0EV ~ +3.0EV Auto, Daylight, Cloudy, Fluorescent, Incandescent Auto, 100, 200, 400 Auto, Scenery, Portrait, Night Scenery, Night Portrait, High Sensitivity, Beach No Flash, Forced On, Auto, Red Eye Reduction 2 seconds, 5 seconds, 10 seconds, Off Yes Yes Yes Yes 1, 3 or 5 minutes; Image Sensor Image Resolution Video Resolution File Format External Memory LCD Display Lens Zoom Exposure White Balance ISO Scene Flash Self-Timer Anti-Shake Face Detect Print Photos Macro Auto Power Off Language Microphone Speaker Interface System Requirements Battery Working...
User Manual
Page 12
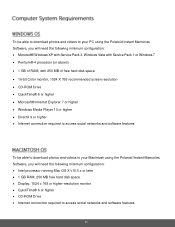
To be able to download photos and videos to your PC using the Polaroid Instant Memories Software, you will need the following minimum configuration: Microsoft® Windows XP with Service Pack 3, Windows Vista with Service Pack 1 or Windows 7 Pentium® 4 processor (or above) 1 GB of RAM, with 250 MB of free hard disk space 16-bit Color monitor, 1024 X 768 recommended...
To be able to download photos and videos to your PC using the Polaroid Instant Memories Software, you will need the following minimum configuration: Microsoft® Windows XP with Service Pack 3, Windows Vista with Service Pack 1 or Windows 7 Pentium® 4 processor (or above) 1 GB of RAM, with 250 MB of free hard disk space 16-bit Color monitor, 1024 X 768 recommended...
User Manual
Page 13
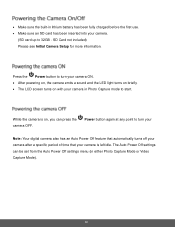
... Camera Setup for more information. Make sure the built-in lithium battery has been fully charged before the first use. Make sure an SD card has been inserted into your camera in either Photo Capture Mode or Video Capture Mode). 12 Press the Power button to turn your Note: Your digital camera also has an Auto Power Off feature that automatically turns off your camera after a specific period of time that your camera...
... Camera Setup for more information. Make sure the built-in lithium battery has been fully charged before the first use. Make sure an SD card has been inserted into your camera in either Photo Capture Mode or Video Capture Mode). 12 Press the Power button to turn your Note: Your digital camera also has an Auto Power Off feature that automatically turns off your camera after a specific period of time that your camera...
User Manual
Page 20
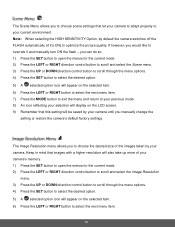
... will be saved by your camera until you to choose the desired size of the images taken by default the camera switches off the FLASH automatically (if it and manually turn ON the flash - Keep in mind that images with a higher resolution will also take up more of your camera's memory. 1) Press the SET button to open the menus for the current mode. 2) Press the LEFT or RIGHT direction control button to...
... will be saved by your camera until you to choose the desired size of the images taken by default the camera switches off the FLASH automatically (if it and manually turn ON the flash - Keep in mind that images with a higher resolution will also take up more of your camera's memory. 1) Press the SET button to open the menus for the current mode. 2) Press the LEFT or RIGHT direction control button to...
User Manual
Page 21
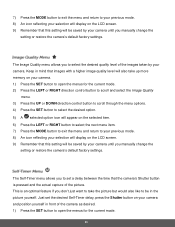
... mode. 8) An icon reflecting your selection will display on the LCD screen. 9) Remember that the camera's Shutter button is an optimal feature if you manually change the setting or restore the camera's default factory settings. Keep in mind that images with a higher image quality level will also take the picture but would also like to be saved by your camera. 7) Press the MODE button to exit the menu and return to your previous mode. 8) An icon...
... mode. 8) An icon reflecting your selection will display on the LCD screen. 9) Remember that the camera's Shutter button is an optimal feature if you manually change the setting or restore the camera's default factory settings. Keep in mind that images with a higher image quality level will also take the picture but would also like to be saved by your camera. 7) Press the MODE button to exit the menu and return to your previous mode. 8) An icon...
User Manual
Page 23
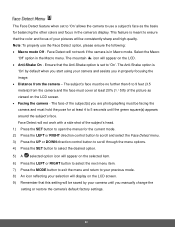
... MODE button to exit the menu and return to your previous mode. 8) An icon reflecting your camera until the green square(s) appears around the subject's face. Note: To properly use a subject's face as viewed on the LCD screen. Facing the camera - Face Detect will not work with a side shot of the subject's head. 1) Press the SET button to open the menus for balancing the other colors and focus in Macro mode...
... MODE button to exit the menu and return to your previous mode. 8) An icon reflecting your camera until the green square(s) appears around the subject's face. Note: To properly use a subject's face as viewed on the LCD screen. Facing the camera - Face Detect will not work with a side shot of the subject's head. 1) Press the SET button to open the menus for balancing the other colors and focus in Macro mode...
User Manual
Page 24
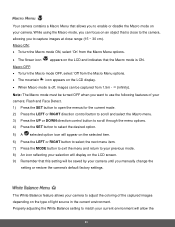
... White Balance feature allows your camera until you manually change the setting or restore the camera's default factory settings. Macro OFF: To turn the Macro mode ON, select 'On' from the Macro Menu options. The flower icon appears on the LCD and indicates that the Macro mode is off, images can focus on the LCD display. When Macro mode is ON. Note: The Macro mode must be turned OFF when you want to use the following features of light...
... White Balance feature allows your camera until you manually change the setting or restore the camera's default factory settings. Macro OFF: To turn the Macro mode ON, select 'On' from the Macro Menu options. The flower icon appears on the LCD and indicates that the Macro mode is off, images can focus on the LCD display. When Macro mode is ON. Note: The Macro mode must be turned OFF when you want to use the following features of light...
User Manual
Page 27
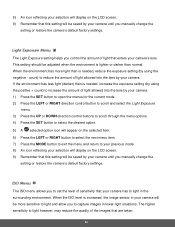
... the MODE button to exit the menu and return to increase the amount of the images that enters your camera. If the environment has less light (darker) than normal. The ISO menu allows you manually change the setting or restore the camera's default factory settings. The Light Exposure setting helps you manually change the setting or restore the camera's default factory settings. count) to capture images in the surrounding environment. When the ISO level is needed , reduce the exposure setting (by using...
... the MODE button to exit the menu and return to increase the amount of the images that enters your camera. If the environment has less light (darker) than normal. The ISO menu allows you manually change the setting or restore the camera's default factory settings. The Light Exposure setting helps you manually change the setting or restore the camera's default factory settings. count) to capture images in the surrounding environment. When the ISO level is needed , reduce the exposure setting (by using...
User Manual
Page 29
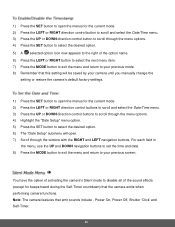
... mode. 8) An icon reflecting your selection will display on the LCD screen. 9) Remember that will be taken with the date and time that this setting will be saved by your camera until you manually change the setting or restore the camera's default factory settings. You can also disable the timestamp for the current mode. 2) Press the LEFT or RIGHT direction control button to scroll and select the Language menu. 3) Press the UP or DOWN direction control button...
... mode. 8) An icon reflecting your selection will display on the LCD screen. 9) Remember that will be taken with the date and time that this setting will be saved by your camera until you manually change the setting or restore the camera's default factory settings. You can also disable the timestamp for the current mode. 2) Press the LEFT or RIGHT direction control button to scroll and select the Language menu. 3) Press the UP or DOWN direction control button...
User Manual
Page 30
Power On, Power Off, Shutter 'Click' and Self-Timer. 29 For each field in the menu, use the UP and DOWN navigation buttons to set the time and date. 8) Press the MODE button to exit the menu and return to your camera until you manually change the setting or restore the camera's default factory settings. 1) Press the SET button to open the menus for beeps heard during the Self-Timer countdown) that emit sounds include - 1) Press the SET button to open the...
Power On, Power Off, Shutter 'Click' and Self-Timer. 29 For each field in the menu, use the UP and DOWN navigation buttons to set the time and date. 8) Press the MODE button to exit the menu and return to your camera until you manually change the setting or restore the camera's default factory settings. 1) Press the SET button to open the menus for beeps heard during the Self-Timer countdown) that emit sounds include - 1) Press the SET button to open the...
User Manual
Page 32
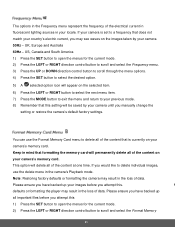
... delete all important files before you attempt this 1) Press the SET button to open the menus for the current mode. 2) Press the LEFT or RIGHT direction control button to delete all of the content on your camera's memory card. If you would like to delete individual images, use the Format Memory Card menu to scroll and select the Format Memory 31 N defaults or formatting the player may result in the loss of data. Note: Restoring factory defaults or formatting...
... delete all important files before you attempt this 1) Press the SET button to open the menus for the current mode. 2) Press the LEFT or RIGHT direction control button to delete all of the content on your camera's memory card. If you would like to delete individual images, use the Format Memory Card menu to scroll and select the Format Memory 31 N defaults or formatting the player may result in the loss of data. Note: Restoring factory defaults or formatting...
User Manual
Page 34
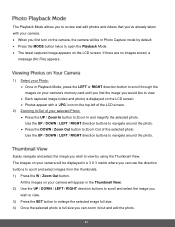
... of the LCD screen. 2) Zooming In/Out of the selected photo. Use the UP / DOWN / LEFT / RIGHT direction buttons to navigate around the photo. Press the DOWN / Zoom Out button to Zoom Out of your camera's memory card until you find the image you would like to view. Each captured image (video and photo) is full size you wish to view by default. Press the MODE button twice to open the Playback Mode. ...
... of the LCD screen. 2) Zooming In/Out of the selected photo. Use the UP / DOWN / LEFT / RIGHT direction buttons to navigate around the photo. Press the DOWN / Zoom Out button to Zoom Out of your camera's memory card until you find the image you would like to view. Each captured image (video and photo) is full size you wish to view by default. Press the MODE button twice to open the Playback Mode. ...
User Manual
Page 50
You can also disable the timestamp for future images that the image was taken. The Date/Time menu allows you manually change the setting or restore the camera's default factory settings. On - When you capture an image with your camera, the image will include a time stamp with your camera's language setting by selecting the desired language from the Language menu. 1) Press the SET button to open the menus for the current mode. 2) Press the LEFT or RIGHT direction control button to scroll...
You can also disable the timestamp for future images that the image was taken. The Date/Time menu allows you manually change the setting or restore the camera's default factory settings. On - When you capture an image with your camera, the image will include a time stamp with your camera's language setting by selecting the desired language from the Language menu. 1) Press the SET button to open the menus for the current mode. 2) Press the LEFT or RIGHT direction control button to scroll...
User Manual
Page 52
... SET button to delete all of the content that is set to a frequency that does not match your country's electric current, you manually change the setting or restore the camera's default factory settings. If your camera is currently on the selected item. 6) Press the LEFT or RIGHT button to select the next menu item. 7) Press the MODE button to exit the menu and return to delete individual images, use the Format Memory Card menu...
... SET button to delete all of the content that is set to a frequency that does not match your country's electric current, you manually change the setting or restore the camera's default factory settings. If your camera is currently on the selected item. 6) Press the LEFT or RIGHT button to select the next menu item. 7) Press the MODE button to exit the menu and return to delete individual images, use the Format Memory Card menu...
User Manual
Page 54
The Playback Mode allows you to review and edit photos and videos that you've already taken with an 'AVI' icon on the top left of the LCD screen. 2) Play your camera will be displayed in a 3 X 3 matrix where you can use the direction buttons to scroll and select images from the thumbnails. 1) Press the W/Zoom Out button All the images on your selected video: Press the Shutter button to START playing the video. ...
The Playback Mode allows you to review and edit photos and videos that you've already taken with an 'AVI' icon on the top left of the LCD screen. 2) Play your camera will be displayed in a 3 X 3 matrix where you can use the direction buttons to scroll and select images from the thumbnails. 1) Press the W/Zoom Out button All the images on your selected video: Press the Shutter button to START playing the video. ...
User Manual
Page 55
..., use the UP/DOWN/LEFT/RIGHT direction control buttons. Toggles between the Photo Capture Mode, Video Capture Mode and Playback Mode Exits the menu screen Opens Thumbnail View To Navigate in the Thumbnail View: press the UP / DOWN / LEFT / RIGHT direction buttons To select a JPG in the Thumbnail View: press the SET button 54 Your digital camera has a four-directional pad that functions as Quick Function buttons. 3) Press the SET button to enlarge the image full size...
..., use the UP/DOWN/LEFT/RIGHT direction control buttons. Toggles between the Photo Capture Mode, Video Capture Mode and Playback Mode Exits the menu screen Opens Thumbnail View To Navigate in the Thumbnail View: press the UP / DOWN / LEFT / RIGHT direction buttons To select a JPG in the Thumbnail View: press the SET button 54 Your digital camera has a four-directional pad that functions as Quick Function buttons. 3) Press the SET button to enlarge the image full size...
Quick Start Guide
Page 1
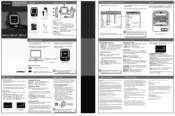
... properly, you can use Micro SD cards (up . [M] button - Drag the files into the Reset hole on the back of the authorized service center is connected to a computer with the metal contacts facing towards the front of controls I 0 music sialsOleekl MP3 Player User Manual Headphones USB Cable 1. Leaver. Press the [ y ] button to delete files on the screen). 2. Press [ to decrease volume. 3. browse music files on the back of...
... properly, you can use Micro SD cards (up . [M] button - Drag the files into the Reset hole on the back of the authorized service center is connected to a computer with the metal contacts facing towards the front of controls I 0 music sialsOleekl MP3 Player User Manual Headphones USB Cable 1. Leaver. Press the [ y ] button to delete files on the screen). 2. Press [ to decrease volume. 3. browse music files on the back of...


