User Guide
Page 2
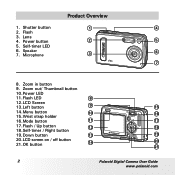
Lens 4. Speaker 7. Microphone ���� POLAROID DIGITAL CAME RA 7 8. Flash 3. Shutter button 2. Zoom out/ Thumbnail button 10.Power LED 11.Flash LED 8 12.LCD Screen 13.Left button 9 15 14.Menu button 10 15.Wrist strap holder 16 16.Mode button 11 17 17.Flash / Up button 12 18 18.Self-timer / Right button 19. Down button 13 19 20.LCD screen on / off button 21.OK button 14 20 21 2 Polaroid Digital Camera User Guide www.polaroid.com Product Overview 1. Power button 5. Self-timer LED 6. Zoom in button 9.
Lens 4. Speaker 7. Microphone ���� POLAROID DIGITAL CAME RA 7 8. Flash 3. Shutter button 2. Zoom out/ Thumbnail button 10.Power LED 11.Flash LED 8 12.LCD Screen 13.Left button 9 15 14.Menu button 10 15.Wrist strap holder 16 16.Mode button 11 17 17.Flash / Up button 12 18 18.Self-timer / Right button 19. Down button 13 19 20.LCD screen on / off button 21.OK button 14 20 21 2 Polaroid Digital Camera User Guide www.polaroid.com Product Overview 1. Power button 5. Self-timer LED 6. Zoom in button 9.
User Guide
Page 4
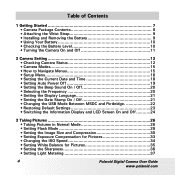
...; Installing and Removing the Battery 9 • Using Your Battery 10 • Checking the Battery Level 10 • Turning the Camera On and Off 11 2 Camera Setting 12 • Checking Camera Status 12 • Camera Modes 15 • How to Navigate Menus 15 • Setup Menu 16 • Setting the Current Date and Time 18... Pictures 33 • Changing the ISO Speed 34 • Setting White Balance for Pictures 35 • Setting the Sharpness 36 • Setting Light Metering 37 4 Polaroid Digital Camera User Guide www.polaroid.com
...; Installing and Removing the Battery 9 • Using Your Battery 10 • Checking the Battery Level 10 • Turning the Camera On and Off 11 2 Camera Setting 12 • Checking Camera Status 12 • Camera Modes 15 • How to Navigate Menus 15 • Setup Menu 16 • Setting the Current Date and Time 18... Pictures 33 • Changing the ISO Speed 34 • Setting White Balance for Pictures 35 • Setting the Sharpness 36 • Setting Light Metering 37 4 Polaroid Digital Camera User Guide www.polaroid.com
User Guide
Page 5
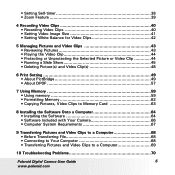
... • Installing the Software 64 • Software Included with Your Camera 66 • Computer System Requirements 67 9 Transferring Pictures and Video Clips to a Computer 68 • Before Transferring File 68 • Connecting to Your Computer 68 • Transferring Pictures and Video Clips to a Computer 69 10 Troubleshooting Problems 70 Polaroid Digital Camera User Guide 5 www.polaroid.com
... • Installing the Software 64 • Software Included with Your Camera 66 • Computer System Requirements 67 9 Transferring Pictures and Video Clips to a Computer 68 • Before Transferring File 68 • Connecting to Your Computer 68 • Transferring Pictures and Video Clips to a Computer 69 10 Troubleshooting Problems 70 Polaroid Digital Camera User Guide 5 www.polaroid.com
User Guide
Page 6
• Troubleshooting 70 11 Getting Help 74 • Polaroid Online Service 74 • Customer Support 74 • ArcSoft Software Help 74 12 Appendix 75 • Technical Specifications 75 • Capacity of SD Card 77 • Uninstalling Polaroid Digital Camera Driver (PC Only 80 • Camera Default Settings 81 • Tips, Your Safety & Maintenance 82 • Regulatory Information 83 6 Polaroid Digital Camera User Guide www.polaroid.com
• Troubleshooting 70 11 Getting Help 74 • Polaroid Online Service 74 • Customer Support 74 • ArcSoft Software Help 74 12 Appendix 75 • Technical Specifications 75 • Capacity of SD Card 77 • Uninstalling Polaroid Digital Camera Driver (PC Only 80 • Camera Default Settings 81 • Tips, Your Safety & Maintenance 82 • Regulatory Information 83 6 Polaroid Digital Camera User Guide www.polaroid.com
User Guide
Page 7
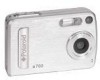
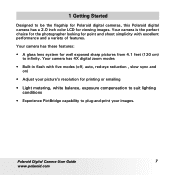
Polaroid Digital Camera User Guide 7 www.polaroid.com Your camera has these features: • A glass lens system for viewing images. 1 Getting Started Designed to be the flagship for Polaroid digital cameras, this Polaroid digital camera has a 2.0 inch color LCD for well exposed sharp pictures from 4.1 feet (120 cm) to plug-and-print your picture's resolution for point and shoot simplicity ...
Polaroid Digital Camera User Guide 7 www.polaroid.com Your camera has these features: • A glass lens system for viewing images. 1 Getting Started Designed to be the flagship for Polaroid digital cameras, this Polaroid digital camera has a 2.0 inch color LCD for well exposed sharp pictures from 4.1 feet (120 cm) to plug-and-print your picture's resolution for point and shoot simplicity ...
User Guide
Page 8
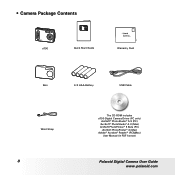
...-1434 Warranty Card Skin 4 X AAA Battery USB Cable Wrist Strap 8 The CD-ROM includes a700 Digital Camera Driver (PC only) ArcSoft® PhotoStudio® 5.5 (PC) /ArcSoft® PhotoStudio® 4.3 (Mac) ArcSoft PhotoPrinter® 5 Beta (PC) /ArcSoft PhotoPrinter® 4 (Mac) Adobe® Acrobat® Reader™ (PC&Mac) User Manual (in PDF format) Polaroid Digital Camera User Guide www.polaroid.com
...-1434 Warranty Card Skin 4 X AAA Battery USB Cable Wrist Strap 8 The CD-ROM includes a700 Digital Camera Driver (PC only) ArcSoft® PhotoStudio® 5.5 (PC) /ArcSoft® PhotoStudio® 4.3 (Mac) ArcSoft PhotoPrinter® 5 Beta (PC) /ArcSoft PhotoPrinter® 4 (Mac) Adobe® Acrobat® Reader™ (PC&Mac) User Manual (in PDF format) Polaroid Digital Camera User Guide www.polaroid.com
User Guide
Page 9
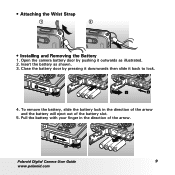
To remove the battery, slide the battery lock in the direction of the battery slot. 5. Pull the battery with your finger in the direction of the arrow and the battery will eject out of the arrow. 4 5 1 2 Polaroid Digital Camera User Guide 9 www.polaroid.com Close the battery door by pushing it back to lock. 1 2 3 1 2 1 2 4. Insert the battery as illustrated. 2. Open the camera battery door by pressing it downwards then slide it outwards as shown. 3. • Attaching the Wrist Strap 1 2 • Installing and Removing the Battery 1.
To remove the battery, slide the battery lock in the direction of the battery slot. 5. Pull the battery with your finger in the direction of the arrow and the battery will eject out of the arrow. 4 5 1 2 Polaroid Digital Camera User Guide 9 www.polaroid.com Close the battery door by pushing it back to lock. 1 2 3 1 2 1 2 4. Insert the battery as illustrated. 2. Open the camera battery door by pressing it downwards then slide it outwards as shown. 3. • Attaching the Wrist Strap 1 2 • Installing and Removing the Battery 1.
User Guide
Page 10
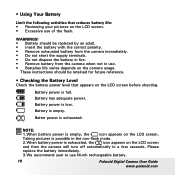
... power is empty. NOTE: 1.When battery power is exhausted, the icon appears on the LCD screen and then the camera will turn off automatically in use Ni-mh rechargeable battery. 10 Polaroid Digital Camera User Guide www.polaroid.com Battery has adequate power. WARNINGS! • Battery should be replaced by an adult. • Insert the battery with...
... power is empty. NOTE: 1.When battery power is exhausted, the icon appears on the LCD screen and then the camera will turn off automatically in use Ni-mh rechargeable battery. 10 Polaroid Digital Camera User Guide www.polaroid.com Battery has adequate power. WARNINGS! • Battery should be replaced by an adult. • Insert the battery with...
User Guide
Page 11
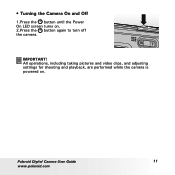
Polaroid Digital Camera User Guide 11 www.polaroid.com IMPORTANT! All operations, including taking pictures and video clips, and adjusting settings for shooting and playback, are performed while the camera is powered on . 2.Press the button again to turn off the camera. • Turning the Camera On and Off 1.Press the button until the Power On LED screen turns on .
Polaroid Digital Camera User Guide 11 www.polaroid.com IMPORTANT! All operations, including taking pictures and video clips, and adjusting settings for shooting and playback, are performed while the camera is powered on . 2.Press the button again to turn off the camera. • Turning the Camera On and Off 1.Press the button until the Power On LED screen turns on .
User Guide
Page 12
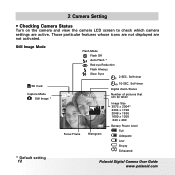
... that can be taken Image Size 3072 x 2304* 2304 x 1728 2048 x 1536 1600 x 1200 640 x 480 Battery Power Level Full Adequate Low Empty Exhausted Polaroid Digital Camera User Guide www.polaroid.com Self-timer X2.0 3072X2304 N Focus Frame Histogram 10-SEC. Still Image Mode SD Card Capture Mode Still Image * * Default setting 12 Flash Mode Flash...
... that can be taken Image Size 3072 x 2304* 2304 x 1728 2048 x 1536 1600 x 1200 640 x 480 Battery Power Level Full Adequate Low Empty Exhausted Polaroid Digital Camera User Guide www.polaroid.com Self-timer X2.0 3072X2304 N Focus Frame Histogram 10-SEC. Still Image Mode SD Card Capture Mode Still Image * * Default setting 12 Flash Mode Flash...
User Guide
Page 13
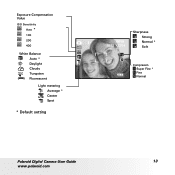
Exposure Compensation Value ISO Sensitivity Auto * 100 100 200 200 400 400 White Balance Auto * Daylight Cloudy Tungsten Fluorescent Light metering Average * Center Spot * Default setting 3072 X2304 Sharpness st Strong N Normal * s Soft N Compressin Super Fine * Fine Normal Polaroid Digital Camera User Guide 13 www.polaroid.com
Exposure Compensation Value ISO Sensitivity Auto * 100 100 200 200 400 400 White Balance Auto * Daylight Cloudy Tungsten Fluorescent Light metering Average * Center Spot * Default setting 3072 X2304 Sharpness st Strong N Normal * s Soft N Compressin Super Fine * Fine Normal Polaroid Digital Camera User Guide 13 www.polaroid.com

User Guide
Page 14
Video Mode SD Card Video Mode White Balance Auto * Daylight Cloudy Tungsten Fluorescent Playback Mode Locked File File Type Picture Video Clip SD Card Recording Indicator ELapsed Time Video Resolution 320 x 240 640 x 480 * 0001/0002 File Number 2004/09/05 13:05:12 Date and Time 14 Polaroid Digital Camera User Guide www.polaroid.com
Video Mode SD Card Video Mode White Balance Auto * Daylight Cloudy Tungsten Fluorescent Playback Mode Locked File File Type Picture Video Clip SD Card Recording Indicator ELapsed Time Video Resolution 320 x 240 640 x 480 * 0001/0002 File Number 2004/09/05 13:05:12 Date and Time 14 Polaroid Digital Camera User Guide www.polaroid.com
User Guide
Page 15
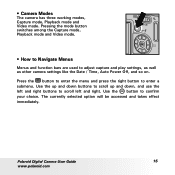
... and Video mode. Press the button to enter the menu and press the right button to adjust capture and play settings, as well as other camera settings like the Date / Time, Auto Power Off, and so on. Pressing the mode button switches among the Capture mode, Playback mode and Video mode... and down buttons to scroll up and down, and use the left and right. The currently selected option will be accessed and takes effect immediately. Polaroid Digital Camera User Guide 15 www.polaroid.com
... and Video mode. Press the button to enter the menu and press the right button to adjust capture and play settings, as well as other camera settings like the Date / Time, Auto Power Off, and so on. Pressing the mode button switches among the Capture mode, Playback mode and Video mode... and down buttons to scroll up and down, and use the left and right. The currently selected option will be accessed and takes effect immediately. Polaroid Digital Camera User Guide 15 www.polaroid.com
User Guide
Page 16
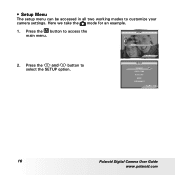
Press the button to select the SETUP option. Press the and button to access the main menu. SETUP FORMAT DATE / TIME AUTO OFF BEEP FREQUENCY 2/2 1/2 16 Polaroid Digital Camera User Guide www.polaroid.com SETUP STRONG AVERAGE SETUP 2. • Setup Menu The setup menu can be accessed in all two working modes to customize your camera settings. Here we take the mode for an example. 1.
Press the button to select the SETUP option. Press the and button to access the main menu. SETUP FORMAT DATE / TIME AUTO OFF BEEP FREQUENCY 2/2 1/2 16 Polaroid Digital Camera User Guide www.polaroid.com SETUP STRONG AVERAGE SETUP 2. • Setup Menu The setup menu can be accessed in all two working modes to customize your camera settings. Here we take the mode for an example. 1.
User Guide
Page 17
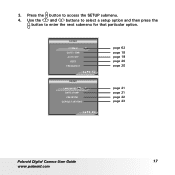
Press the button to enter the next submenu for that particular option. SETUP FORMAT DATE / TIME AUTO OFF BEEP FREQUENCY 1/2 SETUP LANGUAGE DATE STAMP USB MODE DEFAULT SETTING 2/2 page 62 page 18 page 19 page 20 page 20 page 21 page 21 page 22 page 23 Polaroid Digital Camera User Guide 17 www.polaroid.com 3. Use the and buttons to select a setup option and then press the button to access the SETUP submenu. 4.
Press the button to enter the next submenu for that particular option. SETUP FORMAT DATE / TIME AUTO OFF BEEP FREQUENCY 1/2 SETUP LANGUAGE DATE STAMP USB MODE DEFAULT SETTING 2/2 page 62 page 18 page 19 page 20 page 20 page 21 page 21 page 22 page 23 Polaroid Digital Camera User Guide 17 www.polaroid.com 3. Use the and buttons to select a setup option and then press the button to access the SETUP submenu. 4.
User Guide
Page 18
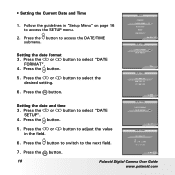
.... 5. Press the button. • Setting the Current Date and Time 1. Press the button. DATE / TIME DD / MM / YY 00 : 00 : 2006 01 : 01 :01 18 Polaroid Digital Camera User Guide www.polaroid.com
.... 5. Press the button. • Setting the Current Date and Time 1. Press the button. DATE / TIME DD / MM / YY 00 : 00 : 2006 01 : 01 :01 18 Polaroid Digital Camera User Guide www.polaroid.com
User Guide
Page 19
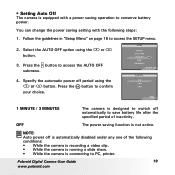
... AUTO OFF option using the or button. Press the button to access the SETUP menu. 2. Polaroid Digital Camera User Guide 19 www.polaroid.com SETUP FORMAT DATE / TIME AUTO OFF BEEP FREQUENCY 1/2 AUTO OFF OFF 1 MIN 3 MIN 1 MINUTE / 3 MINUTES The camera is designed to switch off is automatically disabled under any one of inactivity. • Setting Auto...
... AUTO OFF option using the or button. Press the button to access the SETUP menu. 2. Polaroid Digital Camera User Guide 19 www.polaroid.com SETUP FORMAT DATE / TIME AUTO OFF BEEP FREQUENCY 1/2 AUTO OFF OFF 1 MIN 3 MIN 1 MINUTE / 3 MINUTES The camera is designed to switch off is automatically disabled under any one of inactivity. • Setting Auto...
User Guide
Page 20
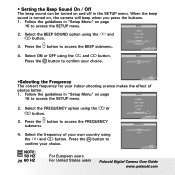
Follow the guidelines in "Setup Menu" on and off in "Setup Menu" on , the camera will beep when you press the buttons. 1. Select the BEEP SOUND option using the and button. Select ON or OFF using the and button. 3. ON ... and button. Press the button to access the BEEP submenu. FREQUENCY 50 Hz 60 Hz NOTE: 50 HZ 20 60 HZ For European users For United States users Polaroid Digital Camera User Guide www.polaroid.com • Setting the Beep Sound On / Off The beep sound can be turned on page 16 to access the SETUP menu. FORMAT...
Follow the guidelines in "Setup Menu" on and off in "Setup Menu" on , the camera will beep when you press the buttons. 1. Select the BEEP SOUND option using the and button. Select ON or OFF using the and button. 3. ON ... and button. Press the button to access the BEEP submenu. FREQUENCY 50 Hz 60 Hz NOTE: 50 HZ 20 60 HZ For European users For United States users Polaroid Digital Camera User Guide www.polaroid.com • Setting the Beep Sound On / Off The beep sound can be turned on page 16 to access the SETUP menu. FORMAT...
User Guide
Page 21
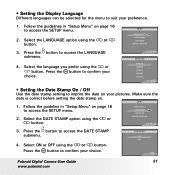
... before setting the date stamp on page 16 to access the SETUP menu. 2. LANGUAGE DATE STAMP USB MODE DEFAULT SETTING 2/2 3. DATE STAMP ON OFF Polaroid Digital Camera User Guide 21 www.polaroid.com Press the button to suit your preference. 1. SETUP 1. Follow the guideline in "Setup Menu" on your choice. Select the language you prefer using...
... before setting the date stamp on page 16 to access the SETUP menu. 2. LANGUAGE DATE STAMP USB MODE DEFAULT SETTING 2/2 3. DATE STAMP ON OFF Polaroid Digital Camera User Guide 21 www.polaroid.com Press the button to suit your preference. 1. SETUP 1. Follow the guideline in "Setup Menu" on your choice. Select the language you prefer using...
User Guide
Page 22
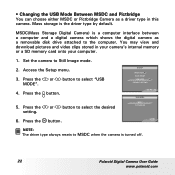
Mass storage is turned off. 22 Polaroid Digital Camera User Guide www.polaroid.com MSDC(Mass Storage Digital Camera) is a computer interface between a computer and a digital camera which shows the digital camera as a driver type in your camera's internal memory or a SD memory card onto your computer. 1. Access the Setup menu. 3. Press the or button to select "USB MODE". 4. NOTE: The driver type ...
Mass storage is turned off. 22 Polaroid Digital Camera User Guide www.polaroid.com MSDC(Mass Storage Digital Camera) is a computer interface between a computer and a digital camera which shows the digital camera as a driver type in your camera's internal memory or a SD memory card onto your computer. 1. Access the Setup menu. 3. Press the or button to select "USB MODE". 4. NOTE: The driver type ...


