User Manual
Page 7
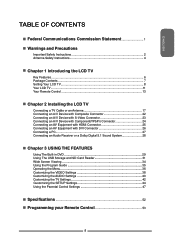
...Federal Communications Commission Statement 1 Warnings and Precautions Important Safety Instructions 2 Antenna Safety Instructions 4 Chapter 1 Introducing the LCD TV Key Features ...6 Package Contents ...7 Setting Your LCD TV...8 Your LCD TV...11 Your Remote Control 13 Chapter 2 Installing the LCD TV Connecting a TV Cable or an Antenna 17 Connecting an A/V Device with Composite Connector 22 Connecting an... Settings 40 Customizing the TV Settings 42 Customizing the SETUP Settings 44 Using the Parental Control Settings 47 Specifications ...52 Programming your Remote Control 53 5
...Federal Communications Commission Statement 1 Warnings and Precautions Important Safety Instructions 2 Antenna Safety Instructions 4 Chapter 1 Introducing the LCD TV Key Features ...6 Package Contents ...7 Setting Your LCD TV...8 Your LCD TV...11 Your Remote Control 13 Chapter 2 Installing the LCD TV Connecting a TV Cable or an Antenna 17 Connecting an A/V Device with Composite Connector 22 Connecting an... Settings 40 Customizing the TV Settings 42 Customizing the SETUP Settings 44 Using the Parental Control Settings 47 Specifications ...52 Programming your Remote Control 53 5
User Manual
Page 9
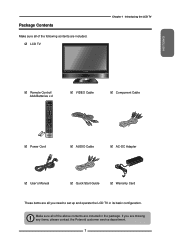
... contents are all of the above contents are missing any items, please contact the Polaroid customer service department. 7 If you need to set up and operate the LCD TV in the package. LCD TV Chapter 1 Introducing the LCD TV ENGLISH Remote Control/ AAA Batteries x 2 SET UP TV CAB/ SAT DVD AUX SLEEP DVD MENU VOL...
... contents are all of the above contents are missing any items, please contact the Polaroid customer service department. 7 If you need to set up and operate the LCD TV in the package. LCD TV Chapter 1 Introducing the LCD TV ENGLISH Remote Control/ AAA Batteries x 2 SET UP TV CAB/ SAT DVD AUX SLEEP DVD MENU VOL...
User Manual
Page 12
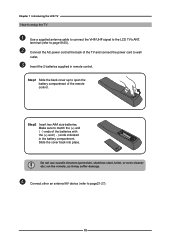
...back of the TV and connect the power cord to open the battery compartment of the batteries with the (+) and ( - ) ends indicated in remote control. Step1 Slide the back cover up to wall outlet. Do not use caustic cleaners (porcelain, stainless steel, toilet, or oven cleaner etc.) on... the remote, as it may suffer damage. Connect other an external AV device (refer to the LCD TV's ANT. Insert the 2 batteries supplied in the battery compartment. Step2 Insert two AAA size batteries. ...
...back of the TV and connect the power cord to open the battery compartment of the batteries with the (+) and ( - ) ends indicated in remote control. Step1 Slide the back cover up to wall outlet. Do not use caustic cleaners (porcelain, stainless steel, toilet, or oven cleaner etc.) on... the remote, as it may suffer damage. Connect other an external AV device (refer to the LCD TV's ANT. Insert the 2 batteries supplied in the battery compartment. Step2 Insert two AAA size batteries. ...

User Manual
Page 15
... WXYZ 0 ENTER 24 SLEEP 5 ► Cycles through Wide mode settings: NORMAL/FULL/WIDE/ZOOM 9 MUTE Pressing once mutes audio. ENGLISH Your Remote Control Chapter 1 Introducing the LCD TV This package includes a Polaroid remote that enables control of the following device mode controls: TV, CBL/SAT, DVD/VCR, or AUDIO. 2 SET UP 1 3 TV CAB/ SAT...
... WXYZ 0 ENTER 24 SLEEP 5 ► Cycles through Wide mode settings: NORMAL/FULL/WIDE/ZOOM 9 MUTE Pressing once mutes audio. ENGLISH Your Remote Control Chapter 1 Introducing the LCD TV This package includes a Polaroid remote that enables control of the following device mode controls: TV, CBL/SAT, DVD/VCR, or AUDIO. 2 SET UP 1 3 TV CAB/ SAT...

User Manual
Page 16
...with 0-9 and ENTER buttons to 5m away, if pointed directly at the receiver. 14 Effective range: The remote can control the LCD TV from up to select a digital channels. Chapter 2 Installing the LCD TV SET UP TV CAB/ SAT DVD AUX SLEEP DVD MENU VOL CH PAGE MUTE GUIDE ASPECT LIVE TV... and selects individual menu items. OK confirms option settings OK In TV mode, pressing OK to display a channel list 15 INFO Displays information on the LCD TV screen such as input source, channel, program title. 12 16 CC Cycles through the Closed Caption: 13 Analog Closed Caption:...
...with 0-9 and ENTER buttons to 5m away, if pointed directly at the receiver. 14 Effective range: The remote can control the LCD TV from up to select a digital channels. Chapter 2 Installing the LCD TV SET UP TV CAB/ SAT DVD AUX SLEEP DVD MENU VOL CH PAGE MUTE GUIDE ASPECT LIVE TV... and selects individual menu items. OK confirms option settings OK In TV mode, pressing OK to display a channel list 15 INFO Displays information on the LCD TV screen such as input source, channel, program title. 12 16 CC Cycles through the Closed Caption: 13 Analog Closed Caption:...
User Manual
Page 22
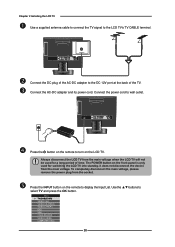
... (S-VIDEO) VIDEO3 (YPbPr) DVD USB CARD READER VIDEO4 (HDMI) COMPUTER(VGA) 20 Press the INPUT button on the remote to the DC 12V port at the back of time. Chapter 2 Installing the LCD TV Use a supplied antenna cable to connect the TV signal to select TV and press the OK button. The... POWER button on the LCD TV. Use the ▲▼ buttons to the LCD TV's TV CABLE terminal. Press the button on the remote to wall outlet. To completely disconnect the main voltage, please remove the power plug from the...
... (S-VIDEO) VIDEO3 (YPbPr) DVD USB CARD READER VIDEO4 (HDMI) COMPUTER(VGA) 20 Press the INPUT button on the remote to the DC 12V port at the back of time. Chapter 2 Installing the LCD TV Use a supplied antenna cable to connect the TV signal to select TV and press the OK button. The... POWER button on the LCD TV. Use the ▲▼ buttons to the LCD TV's TV CABLE terminal. Press the button on the remote to wall outlet. To completely disconnect the main voltage, please remove the power plug from the...
User Manual
Page 23
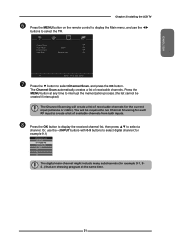
...to create a list of receivable channels. Or, use the ◄► buttons to select the TV. ENGLISH Chapter 2 Installing the LCD TV Press the MENU button on the remote control to display the Main menu, and use the ▪ (INPUT button) with 0-9 buttons to select digital channel( for example ...9.1) Channel List 5-2 RF5-2 9-1 KQED-HD 9-2 KOED-SD 8 CCT 12 13 15 The digital main channel might include many subchannels (for the ...
...to create a list of receivable channels. Or, use the ◄► buttons to select the TV. ENGLISH Chapter 2 Installing the LCD TV Press the MENU button on the remote control to display the Main menu, and use the ▪ (INPUT button) with 0-9 buttons to select digital channel( for example ...9.1) Channel List 5-2 RF5-2 9-1 KQED-HD 9-2 KOED-SD 8 CCT 12 13 15 The digital main channel might include many subchannels (for the ...
User Manual
Page 24
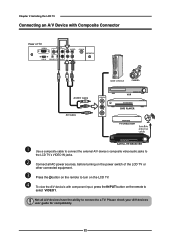
... or other connected equipment. Not all AC power sources, before turning on the remote to select VIDEO1. Please check your A/V devices user guide for compatibility. 22 Connect all A/V devices have the ability to connect to a TV. Chapter 2 Installing the LCD TV Connecting an A/V Device with component input, press the INPUT button on... IN R GAME CONSOLE AUDIO Cable AV Cable VIDEO OUT L R DVD PLAYER Use a composite cable to connect the external A/V device's composite video/audio jacks to the LCD TV's VIDEO IN jacks. Press the button on the remote to turn on the...
... or other connected equipment. Not all AC power sources, before turning on the remote to select VIDEO1. Please check your A/V devices user guide for compatibility. 22 Connect all A/V devices have the ability to connect to a TV. Chapter 2 Installing the LCD TV Connecting an A/V Device with component input, press the INPUT button on... IN R GAME CONSOLE AUDIO Cable AV Cable VIDEO OUT L R DVD PLAYER Use a composite cable to connect the external A/V device's composite video/audio jacks to the LCD TV's VIDEO IN jacks. Press the button on the remote to turn on the...
User Manual
Page 25
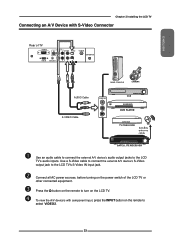
... select VIDEO2. 23 To view the A/V device's with S-Video Connector Rear of the LCD TV or other connected equipment. ENGLISH Chapter 2 Installing the LCD TV Connecting an A/V Device with component input, press the INPUT button on the remote to turn on the power switch of TV HDMI IN YPbPr IN Y Pb Pr VIDEO...
... select VIDEO2. 23 To view the A/V device's with S-Video Connector Rear of the LCD TV or other connected equipment. ENGLISH Chapter 2 Installing the LCD TV Connecting an A/V Device with component input, press the INPUT button on the remote to turn on the power switch of TV HDMI IN YPbPr IN Y Pb Pr VIDEO...
User Manual
Page 26
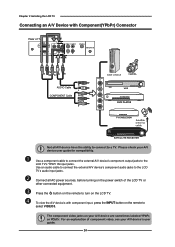
...TV. Use an audio cable to connect the external A/V device's component audio jacks to the LCD TV's YPbPr IN input jacks. The component video jacks on the LCD TV. Press the button on the remote to turn on your A/V device are sometimes labeled YPbPr, or YCbCr. To view the A/V...device user guide for compatibility. Use a component cable to connect the external A/V device's component output jacks to the LCD TV's audio input jacks. Chapter 2 Installing the LCD TV Connecting an A/V Device with component input, press the INPUT button on the remote to select VIDEO3. For an explanation of the...
...TV. Use an audio cable to connect the external A/V device's component audio jacks to the LCD TV's YPbPr IN input jacks. The component video jacks on the LCD TV. Press the button on the remote to turn on your A/V device are sometimes labeled YPbPr, or YCbCr. To view the A/V...device user guide for compatibility. Use a component cable to connect the external A/V device's component output jacks to the LCD TV's audio input jacks. Chapter 2 Installing the LCD TV Connecting an A/V Device with component input, press the INPUT button on the remote to select VIDEO3. For an explanation of the...
User Manual
Page 27
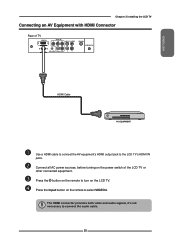
... Connecting an AV Equipment with HDMI Connector Rear of the LCD TV or other connected equipment. Press the Input button on the power switch of TV HDMI IN YPbPr IN Y Pb Pr VIDEO S-VIDEO COAXIAL VHF/... the AV equipment's HDMI output jack to select VIDEO4. The HDMI connector provides both video and audio signals, it's not necessary to turn on the LCD TV. Connect all AC power sources, before turning on the remote to the LCD TV's HDMI IN jacks. Press the button on the...
... Connecting an AV Equipment with HDMI Connector Rear of the LCD TV or other connected equipment. Press the Input button on the power switch of TV HDMI IN YPbPr IN Y Pb Pr VIDEO S-VIDEO COAXIAL VHF/... the AV equipment's HDMI output jack to select VIDEO4. The HDMI connector provides both video and audio signals, it's not necessary to turn on the LCD TV. Connect all AC power sources, before turning on the remote to the LCD TV's HDMI IN jacks. Press the button on the...
User Manual
Page 28
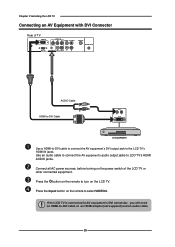
Connect all AC power sources, before turning on the remote to select VIDEO4. Press the Input button on the remote to turn on the LCD TV. Press the button on the power switch of TV HDMI IN YPbPr IN Y Pb Pr VIDEO S-VIDEO COAXIAL VHF/UHF IN VGA IN VGA ... to -DVI cable or an HDMI adapter(not supplied) and an audio cable. 26 Chapter 2 Installing the LCD TV Connecting an AV Equipment with DVI Connector Rear of the LCD TV or other connected equipment. If the LCD TV is connected to AV equipment's DVI connector, you will need an HDMI-to the...
Connect all AC power sources, before turning on the remote to select VIDEO4. Press the Input button on the remote to turn on the LCD TV. Press the button on the power switch of TV HDMI IN YPbPr IN Y Pb Pr VIDEO S-VIDEO COAXIAL VHF/UHF IN VGA IN VGA ... to -DVI cable or an HDMI adapter(not supplied) and an audio cable. 26 Chapter 2 Installing the LCD TV Connecting an AV Equipment with DVI Connector Rear of the LCD TV or other connected equipment. If the LCD TV is connected to AV equipment's DVI connector, you will need an HDMI-to the...
User Manual
Page 29
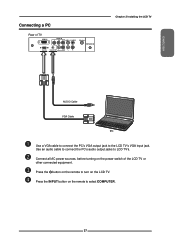
Use an audio cable to connect the PC's audio output jacks to select COMPUTER. 27 Press the INPUT button on the remote to LCD TV's. Connect all AC power sources, before turning on the power switch of TV HDMI IN YPbPr IN Y Pb Pr VIDEO S-VIDEO COAXIAL VHF/UHF IN VGA IN VGA LINE IN L R L R Chapter 2 Installing the LCD TV ENGLISH AUDIO Cable VGA Cable PC Use a VGA cable to connect the PC's VGA output jack to turn on the LCD TV. Press the button on the remote to the LCD TV's VGA input jack. Connecting a PC Rear of the LCD TV or other connected equipment.
Use an audio cable to connect the PC's audio output jacks to select COMPUTER. 27 Press the INPUT button on the remote to LCD TV's. Connect all AC power sources, before turning on the power switch of TV HDMI IN YPbPr IN Y Pb Pr VIDEO S-VIDEO COAXIAL VHF/UHF IN VGA IN VGA LINE IN L R L R Chapter 2 Installing the LCD TV ENGLISH AUDIO Cable VGA Cable PC Use a VGA cable to connect the PC's VGA output jack to turn on the LCD TV. Press the button on the remote to the LCD TV's VGA input jack. Connecting a PC Rear of the LCD TV or other connected equipment.

User Manual
Page 30
Press the button on the remote to turn on the power switch of the LCD TV or other connected equipment. Connect all AC power sources, before turning on the LCD TV. 28 HDMI IN YPbPr IN Y Pb Pr VIDEO S-VIDEO COAXIAL VHF/UHF IN VGA IN VGA LINE IN L R L R AUDIO Cable Audio Receiver Use an audio cable to connect the audio receiver's audio LINE IN jacks to play the LCD monitor audio through your stereo system. Chapter 2 Installing the LCD TV Connecting an Audio Receiver or a Dolby Digital 5.1 Sound System For better sound quality, you may want to LCD TV's SPDIF OUT jacks.
Press the button on the remote to turn on the power switch of the LCD TV or other connected equipment. Connect all AC power sources, before turning on the LCD TV. 28 HDMI IN YPbPr IN Y Pb Pr VIDEO S-VIDEO COAXIAL VHF/UHF IN VGA IN VGA LINE IN L R L R AUDIO Cable Audio Receiver Use an audio cable to connect the audio receiver's audio LINE IN jacks to play the LCD monitor audio through your stereo system. Chapter 2 Installing the LCD TV Connecting an Audio Receiver or a Dolby Digital 5.1 Sound System For better sound quality, you may want to LCD TV's SPDIF OUT jacks.
User Manual
Page 31
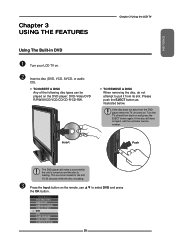
... sound while the unit is turned on and the disc is loading. Press the Input button on the remote, use ▲▼ to pull it from the DVD player when the TV is turned on and ...press the EJECT button again. This sound is normal for the first 15-30 seconds while the disc is loading. Input Source TV(CABLE/AIR) VIDEO1 (AV) VIDEO2 (S-VIDEO) VIDEO3... VIDEO4 (HDMI) COMPUTER(VGA) 29 ENGLISH Chapter 3 USING THE FEATURES Chapter 3 Using the LCD TV Using The Built-in DVD Turn your LCD TV on the DVD player: DVD-Video/DVD R/RW/SVCD/VCD/CD/CD-R/CD-RW. ...
... sound while the unit is turned on and the disc is loading. Press the Input button on the remote, use ▲▼ to pull it from the DVD player when the TV is turned on and ...press the EJECT button again. This sound is normal for the first 15-30 seconds while the disc is loading. Input Source TV(CABLE/AIR) VIDEO1 (AV) VIDEO2 (S-VIDEO) VIDEO3... VIDEO4 (HDMI) COMPUTER(VGA) 29 ENGLISH Chapter 3 USING THE FEATURES Chapter 3 Using the LCD TV Using The Built-in DVD Turn your LCD TV on the DVD player: DVD-Video/DVD R/RW/SVCD/VCD/CD/CD-R/CD-RW. ...
User Manual
Page 32
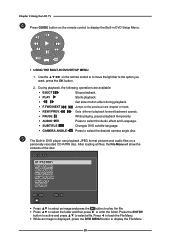
...to display the File Menu. 30 While an image is displayed, press the DVD MENU button to play the file. Chapter 3 Using the LCD TV Press GUIDE button on a personally recorded CD-R/RW disc. PAUSE While playing, pause playback temporarily AUDIO Press to enter the folder. SUBTITLE Changes ...and Language. Get slow motion effect during playback F.FWD/NEXT Jumps to the option you want, press the OK button. 2. Use the on the remote control to to move the light bar to the previous/next chapter or track. CAMERA ANGLE Press to select a file. Press the ENTER ...
...to display the File Menu. 30 While an image is displayed, press the DVD MENU button to play the file. Chapter 3 Using the LCD TV Press GUIDE button on a personally recorded CD-R/RW disc. PAUSE While playing, pause playback temporarily AUDIO Press to enter the folder. SUBTITLE Changes ...and Language. Get slow motion effect during playback F.FWD/NEXT Jumps to the option you want, press the OK button. 2. Use the on the remote control to to move the light bar to the previous/next chapter or track. CAMERA ANGLE Press to select a file. Press the ENTER ...
User Manual
Page 33
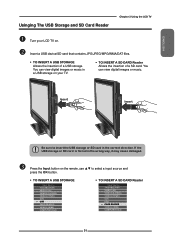
If the USB storage or SD card is forced in a USB storage on . Press the Input button on the remote, use ▲▼ to insert the USB storage or SD card in the correct direction. You can view digital images or music. ENGLISH Usinging The ...USB Storage and SD Card Reader Chapter 3 Using the LCD TV Turn your LCD TV on your TV. Insert a USB device/SD card that contains JPG/JPEG/MPG/WMA/DAT files. TO INSERT A USB STORAGE Input...
If the USB storage or SD card is forced in a USB storage on . Press the Input button on the remote, use ▲▼ to insert the USB storage or SD card in the correct direction. You can view digital images or music. ENGLISH Usinging The ...USB Storage and SD Card Reader Chapter 3 Using the LCD TV Turn your LCD TV on your TV. Insert a USB device/SD card that contains JPG/JPEG/MPG/WMA/DAT files. TO INSERT A USB STORAGE Input...

User Manual
Page 34
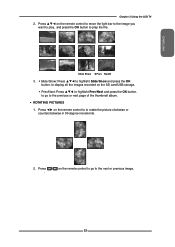
Chapter 3 Using the LCD TV After loading all files, the File Menu will show by pressing . 3. Press ◄ to the next or previous image. RUNNGING A SLIDE SHOW 1. It may cause data loading failure. While an image is being reading. Press on the remote control to go to back the File Menu.... Show ◄Prev Next► 32 Press the ENTER button to active and press ▲▼ to enter the folder. Press ▲▼ on the remote control to play the file. While an image is displayed full size, you want to play the file. 2. Press ▲▼ to...
Chapter 3 Using the LCD TV After loading all files, the File Menu will show by pressing . 3. Press ◄ to the next or previous image. RUNNGING A SLIDE SHOW 1. It may cause data loading failure. While an image is being reading. Press on the remote control to go to back the File Menu.... Show ◄Prev Next► 32 Press the ENTER button to active and press ▲▼ to enter the folder. Press ▲▼ on the remote control to play the file. While an image is displayed full size, you want to play the file. 2. Press ▲▼ to...
User Manual
Page 35
... OK button, to go to rotate the picture clockwise or counterclockwise in 90-degree increments. 2. Slide Show ◄Prev Next► 3. ENGLISH Chapter 3 Using the LCD TV 2. Slide Show: Press ▲▼◄ to highlisht Slide Show and press the OK button, to the previous or next page of the thumbnail... album. Press ◄► on the SD card/USB storage. on the remote control to move the light bar to the image you want to play, and press the OK button to play the file. Press . ROTATING...
... OK button, to go to rotate the picture clockwise or counterclockwise in 90-degree increments. 2. Slide Show ◄Prev Next► 3. ENGLISH Chapter 3 Using the LCD TV 2. Slide Show: Press ▲▼◄ to highlisht Slide Show and press the OK button, to the previous or next page of the thumbnail... album. Press ◄► on the SD card/USB storage. on the remote control to move the light bar to the image you want to play, and press the OK button to play the file. Press . ROTATING...
User Manual
Page 37
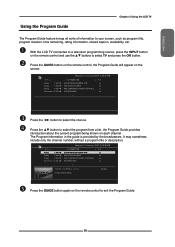
...9660; button to select the program from a list, the Program Guide provides introduction about the current program being shown on the remote control to select the channel. With the LCD TV connected to a television programming source, press the INPUT button on the screen: 3-1 Today 7:00 PM Today 7:30 ... the channel number, without a program title or description. 3-1 Today 7:00 PM Today 7:30 PM Today 9:30 PM Tomorrow 12:30 AM Monday 15 January 2007 2:36:26 PM 7-2 KQED-SD 7-2 EYEWITHNESS NEWS 4PM cc ABC WORLD NEWS cc ABC'S MONDAY NIGHT FOOTBALL cc SPORTSZONE cc 5:00 PM...
...9660; button to select the program from a list, the Program Guide provides introduction about the current program being shown on the remote control to select the channel. With the LCD TV connected to a television programming source, press the INPUT button on the screen: 3-1 Today 7:00 PM Today 7:30 ... the channel number, without a program title or description. 3-1 Today 7:00 PM Today 7:30 PM Today 9:30 PM Tomorrow 12:30 AM Monday 15 January 2007 2:36:26 PM 7-2 KQED-SD 7-2 EYEWITHNESS NEWS 4PM cc ABC WORLD NEWS cc ABC'S MONDAY NIGHT FOOTBALL cc SPORTSZONE cc 5:00 PM...


