User Manual
Page 12
... (+) and ( - ) ends indicated in remote control. Chapter 1 Introducing the LCD TV How to setup the TV Use a supplied antenna cable to connect the VHF/UHF signal to page18-22). terminal (refer to the LCD TV's ANT. Do not use caustic cleaners (porcelain, stainless steel, toilet, or oven cleaner etc.) on the...
... (+) and ( - ) ends indicated in remote control. Chapter 1 Introducing the LCD TV How to setup the TV Use a supplied antenna cable to connect the VHF/UHF signal to page18-22). terminal (refer to the LCD TV's ANT. Do not use caustic cleaners (porcelain, stainless steel, toilet, or oven cleaner etc.) on the...
User Manual
Page 13
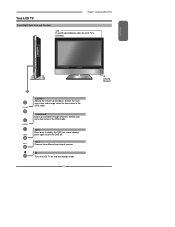
ENGLISH VOLUME+Adjusts the volume up and down . Selects the mainmenu item and change values for items when in the OSD mode. MENU Press once to turn the OSD off. Turns the LCD TV on screen display), press again to display the OSD (on and into standby mode. 11 IR Infrared Receiver CHANNEL▲▼ Scans up and down through channels. Your LCD TV Chapter 1 Introducing the LCD TV Front/Right Side View and Controls LED The LED light indicates when the LCD TV is activated. Selects submenu item when in the OSD mode. INPUT Chooses from different input signal sources.
ENGLISH VOLUME+Adjusts the volume up and down . Selects the mainmenu item and change values for items when in the OSD mode. MENU Press once to turn the OSD off. Turns the LCD TV on screen display), press again to display the OSD (on and into standby mode. 11 IR Infrared Receiver CHANNEL▲▼ Scans up and down through channels. Your LCD TV Chapter 1 Introducing the LCD TV Front/Right Side View and Controls LED The LED light indicates when the LCD TV is activated. Selects submenu item when in the OSD mode. INPUT Chooses from different input signal sources.

User Manual
Page 22
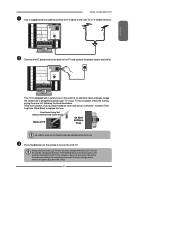
...authorization from the broadcast/cable company, and/ or program owner. ■ A 75-ohm coaxial cable connector is built into the ANT. Since the signals of these channels is used. This converter/descrambler is necessary for proper grounding and, in the diagram below. RF switch (not included) A OUT ...IN B 2 set , connect the 75ohm cable into the set for easy hookup. When connecting the 75-ohm coaxial cable to the set signal splitter (not included) Cable TV Line VHF/UHF IN Cable TV converter/ descrambler (not included) ■ The RF switch (not included) is ...
...authorization from the broadcast/cable company, and/ or program owner. ■ A 75-ohm coaxial cable connector is built into the ANT. Since the signals of these channels is used. This converter/descrambler is necessary for proper grounding and, in the diagram below. RF switch (not included) A OUT ...IN B 2 set , connect the 75ohm cable into the set for easy hookup. When connecting the 75-ohm coaxial cable to the set signal splitter (not included) Cable TV Line VHF/UHF IN Cable TV converter/ descrambler (not included) ■ The RF switch (not included) is ...
User Manual
Page 23
... to turn on the front panel is designed to replace the fuse. Chapter 2 Installing the LCD TV Use a supplied antenna cable to connect the TV signal to wall outlet. In the event of TV 4A 250V 5x20mm Fuse BE SURE TO UNPLUG AC POWER CORD BEFORE REMOVING THE FUSE. If the...
... to turn on the front panel is designed to replace the fuse. Chapter 2 Installing the LCD TV Use a supplied antenna cable to connect the TV signal to wall outlet. In the event of TV 4A 250V 5x20mm Fuse BE SURE TO UNPLUG AC POWER CORD BEFORE REMOVING THE FUSE. If the...
User Manual
Page 30
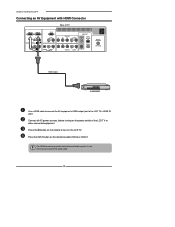
Press the INPUT button on the remote to connect the audio cable. 28 The HDMI connector provides both video and audio signals, it's not necessary to select VIDEO6 or VIDEO7. Press the button on the LCD TV. Chapter 2 Installing the LCD TV Connecting an AV Equipment with ...
Press the INPUT button on the remote to connect the audio cable. 28 The HDMI connector provides both video and audio signals, it's not necessary to select VIDEO6 or VIDEO7. Press the button on the LCD TV. Chapter 2 Installing the LCD TV Connecting an AV Equipment with ...
User Manual
Page 41
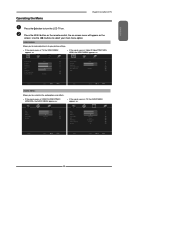
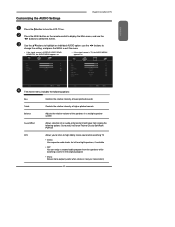
... to your main menu option. Use the ◄► buttons to select your picture settings. ▪ If the signal source is TV, the VIDEO MENU appears as: ▪ If the signal source is Video/S-Video/YPbPr/VGA/ HDMI, the VIDEO MENU appears as: Picture Mode User Picture Mode User Contrast 50... Select Exit AUDIO MENU: Allows you to customize the audio options and effects. ▪ If the signal source is VIDEO/S-VIDEO/YPbPr/ HDMI/VGA, the AUDIO MENU appears as: ▪ If the signal source is TV, the AUDIO MENU appears as: Bass Treble Balance Sound Effect Speaker Surround On 50 ...
... to your main menu option. Use the ◄► buttons to select your picture settings. ▪ If the signal source is TV, the VIDEO MENU appears as: ▪ If the signal source is Video/S-Video/YPbPr/VGA/ HDMI, the VIDEO MENU appears as: Picture Mode User Picture Mode User Contrast 50... Select Exit AUDIO MENU: Allows you to customize the audio options and effects. ▪ If the signal source is VIDEO/S-VIDEO/YPbPr/ HDMI/VGA, the AUDIO MENU appears as: ▪ If the signal source is TV, the AUDIO MENU appears as: Bass Treble Balance Sound Effect Speaker Surround On 50 ...
User Manual
Page 42
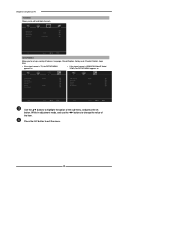
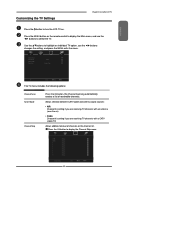
... you to set up a variety of features: Language, Closed Caption, factory reset, Parental Control, sleep timer. ▪ If the signal source is TV, the SETUP MENU appears as: ▪ If the signal source is HDMI/VGA/Video/S-Video/ YPbPr, the SETUP MENU appears as: OSD Language Time Setup Closed Caption Parental Gamma...
... you to set up a variety of features: Language, Closed Caption, factory reset, Parental Control, sleep timer. ▪ If the signal source is TV, the SETUP MENU appears as: ▪ If the signal source is HDMI/VGA/Video/S-Video/ YPbPr, the SETUP MENU appears as: OSD Language Time Setup Closed Caption Parental Gamma...

User Manual
Page 43
... the ◄► buttons to change the setting, and press the MENU to exit the menu ▪ If the signal source is TV, the VIDEO MENU appears as: ▪ If the signal source is VGA/Video/S-Video/YPbPr/ HDMI, the VIDEO MENU appears as: Picture Mode User Picture Mode User Contrast 50...
... the ◄► buttons to change the setting, and press the MENU to exit the menu ▪ If the signal source is TV, the VIDEO MENU appears as: ▪ If the signal source is VGA/Video/S-Video/YPbPr/ HDMI, the VIDEO MENU appears as: Picture Mode User Picture Mode User Contrast 50...
User Manual
Page 44
... ▪ Auto Adjust ▪ H. Position ▪ V. Press the OK button to reduce the noise level of the picture based on the VGA mode Controls the signal phase, which can improve focus clarity and image stability based on the VGA mode 42 Position ▪ Clock ▪ Phase Select Exit Press the OK...
... ▪ Auto Adjust ▪ H. Position ▪ V. Press the OK button to reduce the noise level of the picture based on the VGA mode Controls the signal phase, which can improve focus clarity and image stability based on the VGA mode 42 Position ▪ Clock ▪ Phase Select Exit Press the OK...
User Manual
Page 45
...;► buttons to change the setting, and press the MENU to exit the menu ▪ If the signal source is VIDEO/S-VIDEO/YPbPr/ HDMI/VGA, the AUDIO MENU appears as: ▪ If the signal source is TV, the AUDIO MENU appears as: Bass Treble Balance Sound Effect Speaker Surround On 50 Bass...
...;► buttons to change the setting, and press the MENU to exit the menu ▪ If the signal source is VIDEO/S-VIDEO/YPbPr/ HDMI/VGA, the AUDIO MENU appears as: ▪ If the signal source is TV, the AUDIO MENU appears as: Bass Treble Balance Sound Effect Speaker Surround On 50 Bass...
User Manual
Page 47
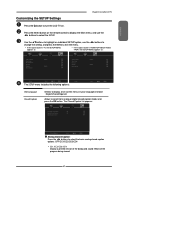
... Settings Chapter 3 Using the LCD TV Press the button to turn the LCD TV on the channel list. Allows selection between CATV cable and antenna signal sources: ▪ AIR Choose this setting if you are receiving TV channels with an antenna (over the air) ▪ Cable Choose this setting if you...
... Settings Chapter 3 Using the LCD TV Press the button to turn the LCD TV on the channel list. Allows selection between CATV cable and antenna signal sources: ▪ AIR Choose this setting if you are receiving TV channels with an antenna (over the air) ▪ Cable Choose this setting if you...
User Manual
Page 49
... the ◄► buttons to change the setting, and press the MENU to exit the menu. ▪ If the signal source is TV, the SETUP MENU appears as: ▪ If the signal source is HDMI/VGA/Video/S-Video/ YPbPr, the SETUP MENU appears as: OSD Language Time Setup Closed Caption Parental Gamma...
... the ◄► buttons to change the setting, and press the MENU to exit the menu. ▪ If the signal source is TV, the SETUP MENU appears as: ▪ If the signal source is HDMI/VGA/Video/S-Video/ YPbPr, the SETUP MENU appears as: OSD Language Time Setup Closed Caption Parental Gamma...
User Manual
Page 51
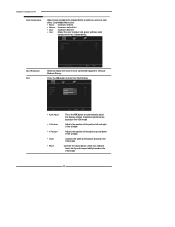
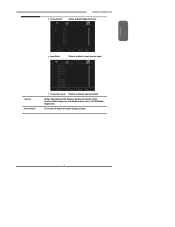
.... 2 ABC 3 DISC 4 5 6 7 8 9 10 Analog Analog Analog Analog Analog Analog Analog Analog Analog Channel Block Input Block Set OK Select Exit Selects to block a Input source signal 1 TV(CABLE/AIR) 2 VIDEO1 (AV) 3 VIDEO2 (S-VIDEO) 4 VIDEO3 (YPbPr1) 5 VIDEO4 (YPbPr2) 6 DVD 7 USB 8 CARD READER 6 VIDEO5 (HDMI1) 7 VIDEO6 (HDMI2) 8 COMPUTER(VGA) Input Block Set OK...
.... 2 ABC 3 DISC 4 5 6 7 8 9 10 Analog Analog Analog Analog Analog Analog Analog Analog Analog Channel Block Input Block Set OK Select Exit Selects to block a Input source signal 1 TV(CABLE/AIR) 2 VIDEO1 (AV) 3 VIDEO2 (S-VIDEO) 4 VIDEO3 (YPbPr1) 5 VIDEO4 (YPbPr2) 6 DVD 7 USB 8 CARD READER 6 VIDEO5 (HDMI1) 7 VIDEO6 (HDMI2) 8 COMPUTER(VGA) Input Block Set OK...

