User Manual
Page 1
This manual should help ? DVD Recorder with 160GB Hard Disc Drive DRA-01601A User's Manual Questions? Need some help you still have questions, call our toll-free customer service number at 1-866-286-5168. 20070406 If you understand your new product.
This manual should help ? DVD Recorder with 160GB Hard Disc Drive DRA-01601A User's Manual Questions? Need some help you still have questions, call our toll-free customer service number at 1-866-286-5168. 20070406 If you understand your new product.

User Manual
Page 2
...dewed and the unit may not work normally. Do not use organic solvents such as a heater), on your DVD recorder. Do not operate for future reference. This manual provides information regarding the use and maintenance of your TV display during operation, the function you use the unit in...keep the power on the unit. Safety Instructions To ensure proper use of this product, please read this manual carefully. • Keep this unit immediately after removing it may damage the DVD recorder. 2 WARNING: To prevent fire or electric shock, do not attempt to rain or moisture. ...
...dewed and the unit may not work normally. Do not use organic solvents such as a heater), on your DVD recorder. Do not operate for future reference. This manual provides information regarding the use and maintenance of your TV display during operation, the function you use the unit in...keep the power on the unit. Safety Instructions To ensure proper use of this product, please read this manual carefully. • Keep this unit immediately after removing it may damage the DVD recorder. 2 WARNING: To prevent fire or electric shock, do not attempt to rain or moisture. ...
User Manual
Page 8
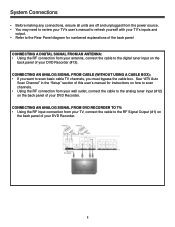
... "Setup" section of this user's manual for numbered explanations of the back panel CONNECTING A DIGITAL SIGNAL FROM AN ANTENNA: • Using the RF connection from your antenna, connect the cable to the RF Signal Output (#1) on the back panel of your DVD Recorder. 8 CONNECTING AN ANALOG SIGNAL FROM... digital tuner input on the back panel of your DVD Recorder (#13). System Connections • Before making any connections, ensure all units are off and unplugged from the power source. • You may need to review your TV's user's manual to refresh yourself with your TV's inputs and output...
... "Setup" section of this user's manual for numbered explanations of the back panel CONNECTING A DIGITAL SIGNAL FROM AN ANTENNA: • Using the RF connection from your antenna, connect the cable to the RF Signal Output (#1) on the back panel of your DVD Recorder. 8 CONNECTING AN ANALOG SIGNAL FROM... digital tuner input on the back panel of your DVD Recorder (#13). System Connections • Before making any connections, ensure all units are off and unplugged from the power source. • You may need to review your TV's user's manual to refresh yourself with your TV's inputs and output...
User Manual
Page 14
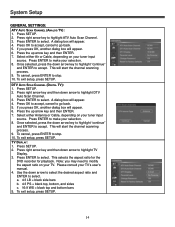
..., depending on your tuner input source. Press ENTER to highlight DTV Auto Scan Channel. 3. Once selected, press the down arrow to make your TV's user's manual. 4. Please consult your selection. 8. If you press OK, another dialog box will appear. 6. If you press OK, another dialog box will appear. 6. Press SETUP. 2. Press.... Press SETUP. 2. Press the up arrow key and then ENTER. 7. To cancel, press ENTER to accept. TV DISPLAY: 1. This selects the aspect ratio for the DVD recorder for playback.
..., depending on your tuner input source. Press ENTER to highlight DTV Auto Scan Channel. 3. Once selected, press the down arrow to make your TV's user's manual. 4. Please consult your selection. 8. If you press OK, another dialog box will appear. 6. If you press OK, another dialog box will appear. 6. Press SETUP. 2. Press.... Press SETUP. 2. Press the up arrow key and then ENTER. 7. To cancel, press ENTER to accept. TV DISPLAY: 1. This selects the aspect ratio for the DVD recorder for playback.
User Manual
Page 22
... appear. The system state should indicate "stop recording, press STOP. A dialog box will immediately start recording your current source input. This will appear. 3. While recording, the unit will appear. 3. To confirm timeshift is off , press DISPLAY. RECORD TO A DVD USING THE REC BUTTON: 1. Note: If ... THE HDD USING THE REC BUTTON: 1. Using the right or left arrow, select DVD. If yes, see the YesDVD section in this manual. 22 Select the source for the recording. 2. A dialog box will not let you want to select the source. 1. Press and hold SOURCE ...
... appear. The system state should indicate "stop recording, press STOP. A dialog box will immediately start recording your current source input. This will appear. 3. While recording, the unit will appear. 3. To confirm timeshift is off , press DISPLAY. RECORD TO A DVD USING THE REC BUTTON: 1. Note: If ... THE HDD USING THE REC BUTTON: 1. Using the right or left arrow, select DVD. If yes, see the YesDVD section in this manual. 22 Select the source for the recording. 2. A dialog box will not let you want to select the source. 1. Press and hold SOURCE ...


