Operating Instructions
Page 1
....pioneerelectronics.com (US) http://www.pioneerelectronics.ca (Canada) Operating Instructions Mode d'emploi Manual de instrucciones XW-NAS3 Digital Speaker System for iPod Station d'accueil audio numérique pour iPod Sistema digital de parlantes para iPod Register your product on http://www.pioneerelectronics.com (US) http://www.pioneerelectronics.ca (Canada) •...new product • Improve product development Your input helps us continue to design products that meet your needs. • Receive a free Pioneer newsletter Registered customers can opt in to receive a monthly newsletter.
....pioneerelectronics.com (US) http://www.pioneerelectronics.ca (Canada) Operating Instructions Mode d'emploi Manual de instrucciones XW-NAS3 Digital Speaker System for iPod Station d'accueil audio numérique pour iPod Sistema digital de parlantes para iPod Register your product on http://www.pioneerelectronics.com (US) http://www.pioneerelectronics.ca (Canada) •...new product • Improve product development Your input helps us continue to design products that meet your needs. • Receive a free Pioneer newsletter Registered customers can opt in to receive a monthly newsletter.
Operating Instructions
Page 5
After you for buying this Pioneer product. Contents 01 Before you will know how to operate your iPod 11 Using the tone controls 11 04 Bluetooth® ADAPTER for Wireless Enjoyment of Music Wireless music play 13 Remote control operation 13...you have finished reading the instructions, put them in 7 02 Controls and displays Remote control 8 Front /top panel 8 03 iPod playback Confirm what iPod models are supported . . . . .9 Connecting your iPod 9 Connecting your TV 10 Playing your model properly. Please read through these operating instructions so that you start What's in ...
After you for buying this Pioneer product. Contents 01 Before you will know how to operate your iPod 11 Using the tone controls 11 04 Bluetooth® ADAPTER for Wireless Enjoyment of Music Wireless music play 13 Remote control operation 13...you have finished reading the instructions, put them in 7 02 Controls and displays Remote control 8 Front /top panel 8 03 iPod playback Confirm what iPod models are supported . . . . .9 Connecting your iPod 9 Connecting your TV 10 Playing your model properly. Please read through these operating instructions so that you start What's in ...
Operating Instructions
Page 8
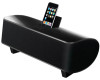
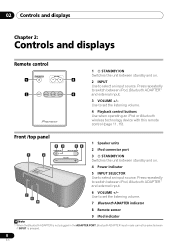
... remote control (page 11, 15). Press repeatedly to switch between iPod, Bluetooth ADAPTER1 and external input. 3 VOLUME +/- Front /top panel 34 56 STANDBY/ON INPUT SELECTOR 1 2 VOLUME 1 Speaker units 2 iPod connector port 3 STANDBY/ON Switches the unit between standby... and on . 2 INPUT Use to select an input source. Press repeatedly to switch between iPod, Bluetooth ADAPTER1 and external input. 7 8 9 6 VOLUME +/- 02 Controls and displays Chapter 2: Controls and displays Remote control STANDBY/ON VOLUME ...
... remote control (page 11, 15). Press repeatedly to switch between iPod, Bluetooth ADAPTER1 and external input. 3 VOLUME +/- Front /top panel 34 56 STANDBY/ON INPUT SELECTOR 1 2 VOLUME 1 Speaker units 2 iPod connector port 3 STANDBY/ON Switches the unit between standby... and on . 2 INPUT Use to select an input source. Press repeatedly to switch between iPod, Bluetooth ADAPTER1 and external input. 7 8 9 6 VOLUME +/- 02 Controls and displays Chapter 2: Controls and displays Remote control STANDBY/ON VOLUME ...
Operating Instructions
Page 9
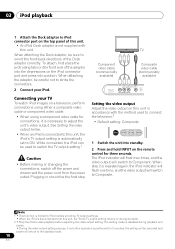
...or materials the user is legally permitted to iPod touch. 9 En You can also be performed from your iPod model. Tip • When using this system, and we recommend switching the equalizer off before connecting. • Pioneer cannot under any inconvenience or loss of ...recorded material resulting from the iPod failure. • When connecting an iPod, use a commercially available cable to connect the iPod to this speaker system, you view images from this unit...
...or materials the user is legally permitted to iPod touch. 9 En You can also be performed from your iPod model. Tip • When using this system, and we recommend switching the equalizer off before connecting. • Pioneer cannot under any inconvenience or loss of ...recorded material resulting from the iPod failure. • When connecting an iPod, use a commercially available cable to connect the iPod to this speaker system, you view images from this unit...
Operating Instructions
Page 10
... using a component video cable for three seconds. Note 1 • This function is limited to iPod models providing TV output settings. • When the iPod is disconnected from the power outlet. While connected, the iPod can be sure to orient the front-back directions of the Dock adaptor correctly. When attaching the...careful not to Component. To attach, first place the protruding tabs on the front side of the adaptor into the depressions on the iPod connector port and press into standby. 2 Press and hold INPUT on the remote control for connections, it is necessary to Composite. The...
... using a component video cable for three seconds. Note 1 • This function is limited to iPod models providing TV output settings. • When the iPod is disconnected from the power outlet. While connected, the iPod can be sure to orient the front-back directions of the Dock adaptor correctly. When attaching the...careful not to Component. To attach, first place the protruding tabs on the front side of the adaptor into the depressions on the iPod connector port and press into standby. 2 Press and hold INPUT on the remote control for connections, it is necessary to Composite. The...
Operating Instructions
Page 11
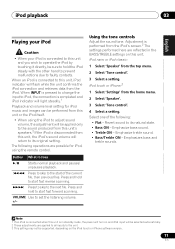
... controls Adjust the sound tone. When INPUT is pressed to change the input to iPod, the connection is completed and iPod indicator will light steadily.1 Playback and volume level setting for iPod, using the iPod to adjust sound volume, the adjustment will be sure to hold to the start ...control. Emphasizes bass and treble sounds. Button What it directly, be applied only to this unit, iPod indicator will flash while the unit confirms the iPod connection and retrieves data from the iPod's screen.2 The settings performed here are reflected in the BASS/TREBLE settings on this unit. VOLUME...
... controls Adjust the sound tone. When INPUT is pressed to change the input to iPod, the connection is completed and iPod indicator will light steadily.1 Playback and volume level setting for iPod, using the iPod to adjust sound volume, the adjustment will be sure to hold to the start ...control. Emphasizes bass and treble sounds. Button What it directly, be applied only to this unit, iPod indicator will flash while the unit confirms the iPod connection and retrieves data from the iPod's screen.2 The settings performed here are reflected in the BASS/TREBLE settings on this unit. VOLUME...
Operating Instructions
Page 12
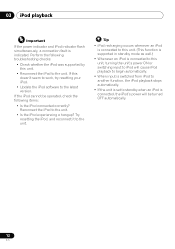
... is supported in standby mode as well.) • Whenever an iPod is connected to this unit, turning the unit's power ON or switching input to iPod will cause iPod playback to begin automatically. • When input is switched from iPod to another function, the iPod playback stops automatically. • If the unit is set to...
... is supported in standby mode as well.) • Whenever an iPod is connected to this unit, turning the unit's power ON or switching input to iPod will cause iPod playback to begin automatically. • When input is switched from iPod to another function, the iPod playback stops automatically. • If the unit is set to...
Operating Instructions
Page 16
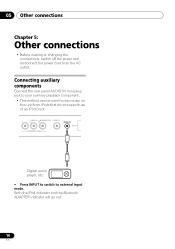
Both the iPod indicator and the Bluetooth ADAPTER indicator will go out. 16 En VIDEO 2 MONITOR OUT VIDEO 1 Y PB PR AUDIO IN AC IN COMPONENT VIDEO Digital audio ... connections Chapter 5: Other connections • Before making or changing the connections, switch off the power and disconnect the power cord from iPods that do not support use of an iPod Dock. Connecting auxiliary components Connect the rear panel AUDIO IN mini-plug jack to your auxiliary playback component. • This method can...
Both the iPod indicator and the Bluetooth ADAPTER indicator will go out. 16 En VIDEO 2 MONITOR OUT VIDEO 1 Y PB PR AUDIO IN AC IN COMPONENT VIDEO Digital audio ... connections Chapter 5: Other connections • Before making or changing the connections, switch off the power and disconnect the power cord from iPods that do not support use of an iPod Dock. Connecting auxiliary components Connect the rear panel AUDIO IN mini-plug jack to your auxiliary playback component. • This method can...
Operating Instructions
Page 17
... may not be rectified even after exercising the checks listed below . or the sound is interrupted. • Check that no iPod is something wrong with this unit or the Bluetooth wireless technology device. Investigate the other components and electrical appliances being used. Sound...to Connecting auxiliary components on . • Disconnect the power plug from the outlet and insert again to return to your nearest Pioneer authorized service center or your dealer for servicing. Use a Bluetooth wireless technology device that there is connected for trouble and malfunctions....
... may not be rectified even after exercising the checks listed below . or the sound is interrupted. • Check that no iPod is something wrong with this unit or the Bluetooth wireless technology device. Investigate the other components and electrical appliances being used. Sound...to Connecting auxiliary components on . • Disconnect the power plug from the outlet and insert again to return to your nearest Pioneer authorized service center or your dealer for servicing. Use a Bluetooth wireless technology device that there is connected for trouble and malfunctions....
Operating Instructions
Page 18
...0.5 W Dimensions 420 mm (W) x 148 mm (H) x 210 mm (D) (16 9/16 in. (W) x 5 7/8 in. (H) x 8 5/16 in the U.S. iPod and iPhone are trademarks of this unit. 1 Switch the unit on , all components connected to this device or its compliance with safety and regulatory standards...(1 kHz, 10 %, T.H.D., 8 Ω) Subwoofer . . 30 W (100 Hz, 10 %, T.H.D., 4 Ω) • Speaker section Enclosure . . . About iPod/iPhone "Made for iPod" and "Made for three seconds. Power is not responsible for the operation of Apple Inc., registered in . (D)) Weight (without package 4.9 kg (10.8 lb) •...
...0.5 W Dimensions 420 mm (W) x 148 mm (H) x 210 mm (D) (16 9/16 in. (W) x 5 7/8 in. (H) x 8 5/16 in the U.S. iPod and iPhone are trademarks of this unit. 1 Switch the unit on , all components connected to this device or its compliance with safety and regulatory standards...(1 kHz, 10 %, T.H.D., 8 Ω) Subwoofer . . 30 W (100 Hz, 10 %, T.H.D., 4 Ω) • Speaker section Enclosure . . . About iPod/iPhone "Made for iPod" and "Made for three seconds. Power is not responsible for the operation of Apple Inc., registered in . (D)) Weight (without package 4.9 kg (10.8 lb) •...

