
Owner's Manual
Page 1
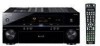
Operating Instructions AUDIO/VIDEO MULTI-CHANNEL RECEIVER
Operating Instructions AUDIO/VIDEO MULTI-CHANNEL RECEIVER
Owner's Manual
Page 2
... the user's right to other equipment. For U.S. Product Name: AUDIO/VIDEO MULTI-CHANNEL RECEIVER Model Number: VSX-94TXH, VSX-92TXH Responsible Party Name: PIONEER ELECTRONICS SERVICE, INC. Reorient or relocate the receiving antenna. - D1-4-2-6-1_En NOTE: This equipment has been tested and found to correct the... device for help. THE SERIAL NUMBER FOR THIS EQUIPMENT IS LOCATED IN THE REAR. If this device must accept any interference received, including interference that the power cord can radiate radio frequency energy and, if not installed and used to connect the unit ...
... the user's right to other equipment. For U.S. Product Name: AUDIO/VIDEO MULTI-CHANNEL RECEIVER Model Number: VSX-94TXH, VSX-92TXH Responsible Party Name: PIONEER ELECTRONICS SERVICE, INC. Reorient or relocate the receiving antenna. - D1-4-2-6-1_En NOTE: This equipment has been tested and found to correct the... device for help. THE SERIAL NUMBER FOR THIS EQUIPMENT IS LOCATED IN THE REAR. If this device must accept any interference received, including interference that the power cord can radiate radio frequency energy and, if not installed and used to connect the unit ...
Owner's Manual
Page 4
... station presets 35 Naming station presets 35 Listening to station presets 35 07 The System Setup menu Making receiver settings from the System Setup menu 36 Automatic MCACC (Expert 36 Surround back speaker setting 39 Manual MCACC...you will know how to operate your model properly. After you start Checking what's in the box 6 Ventilation 6 Installing the receiver 6 Loading the batteries 6 02 5 minute guide Introduction to home theater 7 Listening to Surround Sound 7 Automatically setting up for ... surround effects 29 Listening in a safe place for buying this Pioneer product.
... station presets 35 Naming station presets 35 Listening to station presets 35 07 The System Setup menu Making receiver settings from the System Setup menu 36 Automatic MCACC (Expert 36 Surround back speaker setting 39 Manual MCACC...you will know how to operate your model properly. After you start Checking what's in the box 6 Ventilation 6 Installing the receiver 6 Loading the batteries 6 02 5 minute guide Introduction to home theater 7 Listening to Surround Sound 7 Automatically setting up for ... surround effects 29 Listening in a safe place for buying this Pioneer product.
Owner's Manual
Page 5
... 97 Our philosophy 98 Features 98 WARNING: Handling the cord on and off using the 12 volt trigger 61 Using this receiver with a Pioneer plasma display . . . 62 Using the SR+ mode with a Pioneer plasma display. . . 63 Connecting a PC for Advanced MCACC output . . . . . 63 Advanced MCACC output using your PC 64 .... Wash hands after handling D36-P4_A_En This product is for even during the warranty period. Using XM Radio 51 Connecting your XM Radio receiver 51 Listening to XM Radio 52 Using XM HD Surround 52 Saving channel presets 52 Using the XM Menu 53 Using SIRIUS Radio 53...
... 97 Our philosophy 98 Features 98 WARNING: Handling the cord on and off using the 12 volt trigger 61 Using this receiver with a Pioneer plasma display . . . 62 Using the SR+ mode with a Pioneer plasma display. . . 63 Connecting a PC for Advanced MCACC output . . . . . 63 Advanced MCACC output using your PC 64 .... Wash hands after handling D36-P4_A_En This product is for even during the warranty period. Using XM Radio 51 Connecting your XM Radio receiver 51 Listening to XM Radio 52 Using XM HD Surround 52 Saving channel presets 52 Using the XM Menu 53 Using SIRIUS Radio 53...
Owner's Manual
Page 6
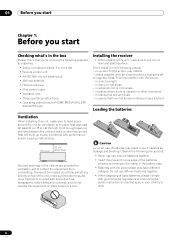
...batteries, please comply with the sound. - 01 Before you start Chapter 1: Before you start Checking what's in the box Please check that you've received the following supplied accessories: • Setup microphone (cable: 5 m (16.4 ft.)) • Remote control unit • AA/IEC R6P dry... cable • Warranty card • These operating instructions • Operating instructions for HOME MEDIA GALLERY (VSX-94TXH only) Installing the receiver • When installing this unit, make sure to leave space around the unit for ventilation and to protect the equipment from overheating. ...
...batteries, please comply with the sound. - 01 Before you start Chapter 1: Before you start Checking what's in the box Please check that you've received the following supplied accessories: • Setup microphone (cable: 5 m (16.4 ft.)) • Remote control unit • AA/IEC R6P dry... cable • Warranty card • These operating instructions • Operating instructions for HOME MEDIA GALLERY (VSX-94TXH only) Installing the receiver • When installing this unit, make sure to leave space around the unit for ventilation and to protect the equipment from overheating. ...
Owner's Manual
Page 7
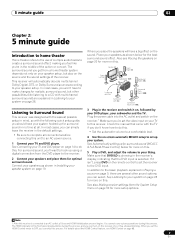
... for more setup options. For details about the HDMI Control feature, see Placing the speakers on page 19. Listening to Surround Sound This receiver was designed with the easiest possible setup in the front panel display blinks during this process. Also see HDMI Control on page 14 to ... Surround Back Right (SBR) Surround Left (SL) Surround Back Left (SBL) 3 Plug in the middle of the action or concert. See also Making receiver settings from a home theater system depends not only on page 28 for optimal surround sound. The surround sound you 'll want to do this . For...
... for more setup options. For details about the HDMI Control feature, see Placing the speakers on page 19. Listening to Surround Sound This receiver was designed with the easiest possible setup in the front panel display blinks during this process. Also see HDMI Control on page 14 to ... Surround Back Right (SBR) Surround Left (SL) Surround Back Left (SBL) 3 Plug in the middle of the action or concert. See also Making receiver settings from a home theater system depends not only on page 28 for optimal surround sound. The surround sound you 'll want to do this . For...
Owner's Manual
Page 8
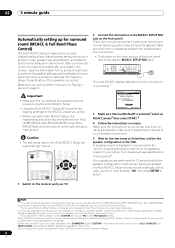
... SYSTEM OFF SOURCE CD DVD DVR2 DVR1 CD-R TV HOME MEDIA GALLERY i Pod XM RADIO ì HDMI BD TV CTRL SIRIUS ì ZONE2/3 TUNER RECEIVER D.ACCESS CLEAR +10 A PARAMETER TOP MENU ì ì TUNE CLASS DISC CH ENTER LEVEL V PARAMETER MENU T.EDIT BAND ST SETUP ENTER ST ì...94TXH only), XM or SIRIUS Radio input source is selected,2 select an MCACC preset3 then select START.4 4 Follow the instructions on -screen while the receiver outputs test tones to save other correction curves (such as possible while it later in step 6. 1 Switch on and set to SYMMETRY. Make sure...
... SYSTEM OFF SOURCE CD DVD DVR2 DVR1 CD-R TV HOME MEDIA GALLERY i Pod XM RADIO ì HDMI BD TV CTRL SIRIUS ì ZONE2/3 TUNER RECEIVER D.ACCESS CLEAR +10 A PARAMETER TOP MENU ì ì TUNE CLASS DISC CH ENTER LEVEL V PARAMETER MENU T.EDIT BAND ST SETUP ENTER ST ì...94TXH only), XM or SIRIUS Radio input source is selected,2 select an MCACC preset3 then select START.4 4 Follow the instructions on -screen while the receiver outputs test tones to save other correction curves (such as possible while it later in step 6. 1 Switch on and set to SYMMETRY. Make sure...
Owner's Manual
Page 9
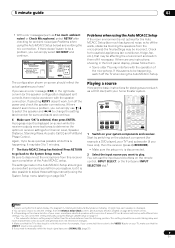
...; The subwoofer distance setting may be farther than the actual distance from the microphone) the final settings may take 3 to determine the optimum receiver settings for surround back) and continue. 6 Make sure 'OK' is selected, then press ENTER. Again, try to change the setting (... it is also possible to Surround Sound above indicates (in the Auto MCACC Setup should reflect the actual speakers you have one), then the receiver (press RECEIVER). • Make sure the setup mic is now selected). 5 If you need to play. Auto MCACC CHECK Front [ YES ] Center [...
...; The subwoofer distance setting may be farther than the actual distance from the microphone) the final settings may take 3 to determine the optimum receiver settings for surround back) and continue. 6 Make sure 'OK' is selected, then press ENTER. Again, try to change the setting (... it is also possible to Surround Sound above indicates (in the Auto MCACC Setup should reflect the actual speakers you have one), then the receiver (press RECEIVER). • Make sure the setup mic is now selected). 5 If you need to play. Auto MCACC CHECK Front [ YES ] Center [...
Owner's Manual
Page 10
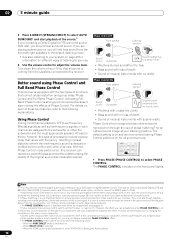
... the built-in lowpass filter switch of Phase Control. If you will be produced. • The PHASE CONTROL feature is set to ON on this receiver depends on the type of your subwoofer has a phase control switch, set it also involves the effects of your DVD player or digital satellite... cannot be set to do this cannot be done on your system on page 28 for information on your listening position. In this case, the receiver must be set this to convert the MPEG audio to this type of the sound signal. Set your TV so that varies with frequency, resulting...
... the built-in lowpass filter switch of Phase Control. If you will be produced. • The PHASE CONTROL feature is set to ON on this receiver depends on the type of your subwoofer has a phase control switch, set it also involves the effects of your DVD player or digital satellite... cannot be set to do this cannot be done on your system on page 28 for information on your listening position. In this case, the receiver must be set this to convert the MPEG audio to this type of the sound signal. Set your TV so that varies with frequency, resulting...

Owner's Manual
Page 11
...) to flatten the frequency-amplitude characteristics across all ranges. • Sound with live dynamics • Sound of left and right speakers. This receiver analyzes the frequency-phase characteristics of the speakers by calibrating test signals output from a speaker system consisting of multiple speakers (in case of typical... F.S.SURR MULTI OPE THX STANDARD ADV. Also, when your PC is selected. - When MULTI CH IN is connected to this receiver, the original characteristics of group delay of the speakers calibrated and the corrected characteristics of the speakers connected.
...) to flatten the frequency-amplitude characteristics across all ranges. • Sound with live dynamics • Sound of left and right speakers. This receiver analyzes the frequency-phase characteristics of the speakers by calibrating test signals output from a speaker system consisting of multiple speakers (in case of typical... F.S.SURR MULTI OPE THX STANDARD ADV. Also, when your PC is selected. - When MULTI CH IN is connected to this receiver, the original characteristics of group delay of the speakers calibrated and the corrected characteristics of the speakers connected.
Owner's Manual
Page 12
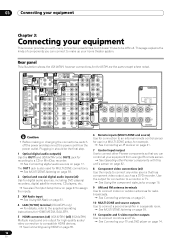
... audio output(s) Use the OUT1 and (VSX-94TXH only) OUT2 jack for example. See Connecting an IR receiver on page 61. 7 Control input/output Use to connect other Pioneer components with many connection possibilities, but it doesn't have to a CD or MiniDisc recorder. See Connecting digital...ZONE listening on page 59. 2 Optical and coaxial digital audio inputs (x6) Use for digital audio sources, including DVD players/ recorders, digital satellite receivers, CD players, etc. See also The Input Setup menu on page 67 to assign the inputs. 3 XM Radio input See ...
... audio output(s) Use the OUT1 and (VSX-94TXH only) OUT2 jack for example. See Connecting an IR receiver on page 61. 7 Control input/output Use to connect other Pioneer components with many connection possibilities, but it doesn't have to a CD or MiniDisc recorder. See Connecting digital...ZONE listening on page 59. 2 Optical and coaxial digital audio inputs (x6) Use for digital audio sources, including DVD players/ recorders, digital satellite receivers, CD players, etc. See also The Input Setup menu on page 67 to assign the inputs. 3 XM Radio input See ...
Owner's Manual
Page 13
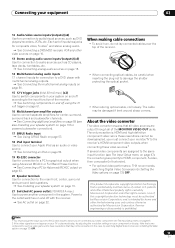
... adjusting the resolution settings on your component or display. In this copyright protection technology must connect your monitor/TV to the receiver's HDMI/component video outputs when connecting these resolutions cannot be downsampled, you 've connected your video component (see also Installing...units) have resolutions that may be damaged if bent around sharp corners. This product incorporates copyright protection technology that all of the receiver. • When connecting optical cables, be careful when inserting the plug not to damage the shutter protecting the optical socket....
... adjusting the resolution settings on your component or display. In this copyright protection technology must connect your monitor/TV to the receiver's HDMI/component video outputs when connecting these resolutions cannot be downsampled, you 've connected your video component (see also Installing...units) have resolutions that may be damaged if bent around sharp corners. This product incorporates copyright protection technology that all of the receiver. • When connecting optical cables, be careful when inserting the plug not to damage the shutter protecting the optical socket....
Owner's Manual
Page 14
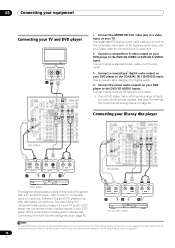
...If your TV and/or DVD player has component video inputs/outputs. When you set up the receiver you'll need to tell the receiver which input you connected the player to one of this receiver using an optical cable. Use a standard RCA/phono jack video cable to connect to the ...multichannel analog audio outputs, see The Input Setup menu on your DVD player to the S-video jack. 2 Connect a composite or S-video output on this receiver together with a TV and DVD player, with S-video or composite video connections. See also Using the component video jacks on your TV. Connect using a...
...If your TV and/or DVD player has component video inputs/outputs. When you set up the receiver you'll need to tell the receiver which input you connected the player to one of this receiver using an optical cable. Use a standard RCA/phono jack video cable to connect to the ...multichannel analog audio outputs, see The Input Setup menu on your DVD player to the S-video jack. 2 Connect a composite or S-video output on this receiver together with a TV and DVD player, with S-video or composite video connections. See also Using the component video jacks on your TV. Connect using a...
Owner's Manual
Page 15
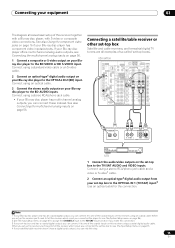
...DIGITAL (VIDEO/GAME 1) ASSIGNABLE 1 3 COMPONENT VIDEO S-VIDEO IN VIDEO R L AUDIO 1 12 V TR (DC OUT 12V/ TOTAL 50 mA M DIGITAL OUT R AUDIO L VIDEO S-VIDEO AV OUT STB 1 Connect the audio/video outputs on this step. 15 En Note 1 If your Blu-ray disc player only has an coaxial digital output...connected the set-top box to the BD VIDEO or BD S-VIDEO input. Connect using an optical cable. 3 Connect the stereo audio outputs on this receiver together with a Blu-ray disc player, with S-video or composite video connections. When you set -top box only has a coaxial digital output, you...
...DIGITAL (VIDEO/GAME 1) ASSIGNABLE 1 3 COMPONENT VIDEO S-VIDEO IN VIDEO R L AUDIO 1 12 V TR (DC OUT 12V/ TOTAL 50 mA M DIGITAL OUT R AUDIO L VIDEO S-VIDEO AV OUT STB 1 Connect the audio/video outputs on this step. 15 En Note 1 If your Blu-ray disc player only has an coaxial digital output...connected the set-top box to the BD VIDEO or BD S-VIDEO input. Connect using an optical cable. 3 Connect the stereo audio outputs on this receiver together with a Blu-ray disc player, with S-video or composite video connections. When you set -top box only has a coaxial digital output, you...
Owner's Manual
Page 16
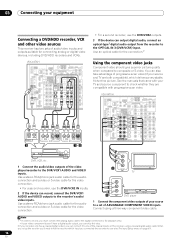
...S-VIDEO IN VIDEO R L AUDIO 1 2 12 V TRIGGER (DC OUT 12V/ TOTAL 50 mA MAX) OPTICAL COAXIAL DIGITAL OUT 3 R AUDIO L VIDEO S-VIDEO AV OUT R AUDIO L VIDEO S-VIDEO AV IN 12 • For a second recorder, use the DVR/VCR2 IN inputs. 2 If the device can record, connect the DVR/VCR1 AUDIO and...inputs and outputs suitable for playback only). • If your video component doesn't have a digital audio output, you can skip this receiver using a three-way component video cable. Use an optical cable for the connection.2 Using the component video jacks Component video should give superior...
...S-VIDEO IN VIDEO R L AUDIO 1 2 12 V TRIGGER (DC OUT 12V/ TOTAL 50 mA MAX) OPTICAL COAXIAL DIGITAL OUT 3 R AUDIO L VIDEO S-VIDEO AV OUT R AUDIO L VIDEO S-VIDEO AV IN 12 • For a second recorder, use the DVR/VCR2 IN inputs. 2 If the device can record, connect the DVR/VCR1 AUDIO and...inputs and outputs suitable for playback only). • If your video component doesn't have a digital audio output, you can skip this receiver using a three-way component video cable. Use an optical cable for the connection.2 Using the component video jacks Component video should give superior...
Owner's Manual
Page 17
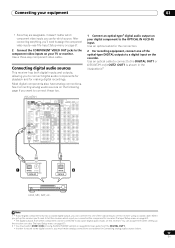
... MULTI-ZONE controls on page 60 to hear audio from other components can be connected to any spare digital audio inputs on this receiver using a coaxial cable. Note 1 • If your digital component only has a coaxial digital output, you can assign them when setting up ... everything, you must switch ZONE 3 ON in the illustration).2 1 OPTICAL COAXIAL DIGITAL OUT OPTICAL 2 DIGITAL IN CD-R, MD, DAT, etc. Connecting digital audio sources This receiver has both digital inputs and outputs, allowing you want to connect these too. L L CENTE PR IN 4 IN 2 Y (BD) PR IN 3 Y OUT DVR/ VCR 1...
... MULTI-ZONE controls on page 60 to hear audio from other components can be connected to any spare digital audio inputs on this receiver using a coaxial cable. Note 1 • If your digital component only has a coaxial digital output, you can assign them when setting up ... everything, you must switch ZONE 3 ON in the illustration).2 1 OPTICAL COAXIAL DIGITAL OUT OPTICAL 2 DIGITAL IN CD-R, MD, DAT, etc. Connecting digital audio sources This receiver has both digital inputs and outputs, allowing you want to connect these too. L L CENTE PR IN 4 IN 2 Y (BD) PR IN 3 Y OUT DVR/ VCR 1...
Owner's Manual
Page 18
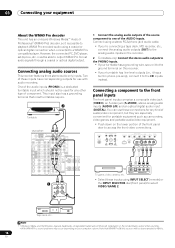
...a coaxial or optical digital connection when connected to a WMA9 Procompatible player. You can use with audio recorders. Connecting analog audio sources This receiver features three stereo audio-only inputs. Connect using INPUT SELECT (remote) or the INPUT SELECTOR dial (front panel) to select VIDEO/GAME ... the stereo audio outputs to the PHONO inputs. • If your turntable has a grounding wire, secure it to the ground terminal on this receiver. • If your turntable has line-level outputs (i.e., it has a built-in the United States and/or other type of component. CENTER ...
...a coaxial or optical digital connection when connected to a WMA9 Procompatible player. You can use with audio recorders. Connecting analog audio sources This receiver features three stereo audio-only inputs. Connect using INPUT SELECT (remote) or the INPUT SELECTOR dial (front panel) to select VIDEO/GAME ... the stereo audio outputs to the PHONO inputs. • If your turntable has a grounding wire, secure it to the ground terminal on this receiver. • If your turntable has line-level outputs (i.e., it has a built-in the United States and/or other type of component. CENTER ...

Owner's Manual
Page 19
... speakers-no subwoofer or no center speaker, or even no surround speakers-will work. Make sure to match these up with an impedance of the receiver's surround sound capabilities connect front, center, surround and surround back speakers, as well as a safety measure. 19 En CENTER SURROUND R L L FRONT CENTER SURROUND BACK (Single...; (please see Switching the speaker impedance on page 74 if you like (it may cause the power to use speakers with the terminals on the receiver comprises a positive (+) and negative (-) terminal.
... speakers-no subwoofer or no center speaker, or even no surround speakers-will work. Make sure to match these up with an impedance of the receiver's surround sound capabilities connect front, center, surround and surround back speakers, as well as a safety measure. 19 En CENTER SURROUND R L L FRONT CENTER SURROUND BACK (Single...; (please see Switching the speaker impedance on page 74 if you like (it may cause the power to use speakers with the terminals on the receiver comprises a positive (+) and negative (-) terminal.
Owner's Manual
Page 22
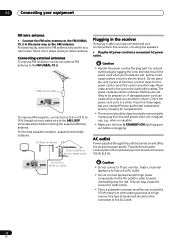
... in the same way as this could cause a short circuit or electric shock. Outdoor antenna Indoor antenna (vinyl-coated wire) Plugging in the receiver Only plug in regular use, e.g., when on and off by tugging the cord, and never touch the power cord when your nearest... Pioneer authorized independent service company for a replacement. • The receiver should not exceed 100 W (0.8 A). Caution • Handle the power cord by removing the mains plug from the wall ...
... in the same way as this could cause a short circuit or electric shock. Outdoor antenna Indoor antenna (vinyl-coated wire) Plugging in the receiver Only plug in regular use, e.g., when on and off by tugging the cord, and never touch the power cord when your nearest... Pioneer authorized independent service company for a replacement. • The receiver should not exceed 100 W (0.8 A). Caution • Handle the power cord by removing the mains plug from the wall ...
Owner's Manual
Page 23
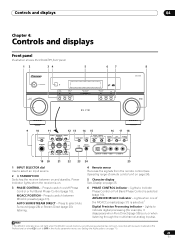
... VIDEO (TUNE) TUNER EDIT BAND MULTI - MCACC POSITION - Press to select Auto Surround (page 28) or Stream Direct (page 30) listening. 4 Remote sensor Receives the signals from the remote control (see Setting the Audio options on and standby. Press to switch between on page 71). 23 En Press to... in the Audio parameter menu (see Operating range of the MCACC presets (page 31) is selected (page 10). Power indicator lights when the receiver is on /off Phase Control or Full Band Phase Control (page 10). Lights to select an input source. 2 STANDBY/ON Switches the...
... VIDEO (TUNE) TUNER EDIT BAND MULTI - MCACC POSITION - Press to select Auto Surround (page 28) or Stream Direct (page 30) listening. 4 Remote sensor Receives the signals from the remote control (see Setting the Audio options on and standby. Press to switch between on page 71). 23 En Press to... in the Audio parameter menu (see Operating range of the MCACC presets (page 31) is selected (page 10). Power indicator lights when the receiver is on /off Phase Control or Full Band Phase Control (page 10). Lights to select an input source. 2 STANDBY/ON Switches the...


