Owner's Manual
Page 8
... is selected. In addition to set the video input on your TV to your liking. See also Making receiver settings from the DVD player to do this. • Set the subwoofer volume to a comfortable level. 4 Use the on-screen automatic MCACC setup to the basic playback explained in... the easiest possible setup in the default settings. Also see Placing the speakers on page 10. After you have set the receiver to the DVD input. Front Left (L) Subwoofer (SW) Surround Right (SR) Listening position Surround Back Right (SBR) • Using the Auto MCACC Setup will automatically ...
... is selected. In addition to set the video input on your TV to your liking. See also Making receiver settings from the DVD player to do this. • Set the subwoofer volume to a comfortable level. 4 Use the on-screen automatic MCACC setup to the basic playback explained in... the easiest possible setup in the default settings. Also see Placing the speakers on page 10. After you have set the receiver to the DVD input. Front Left (L) Subwoofer (SW) Surround Right (SR) Listening position Surround Back Right (SBR) • Using the Auto MCACC Setup will automatically ...
Owner's Manual
Page 9
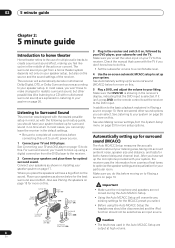
...Start? [OK] [Option] ENTER:Next :Cancel The configuration shown on page 33 for more test tones to determine the optimum receiver settings for ambient noise (see Problems when using a subwoofer, make sure to connect your speakers as possible while it 's about ear level at any time to cancel.2 4 Select 'Auto... System Setup menu when the iPod or XM Radio input source is switched on the front panel. 5 minute guide 02 RECEIVER INPUT SELECT SYSTEM OFF SOURCE AV PRE-PROGRAMMED AND LEARNING REMOTE CONTROL UNIT CD DVD DVR 2 TV DVR1 TVCTRL CD-R/TAPE iPod HDMI2 HDMI1 XM RADIO TUNER...
...Start? [OK] [Option] ENTER:Next :Cancel The configuration shown on page 33 for more test tones to determine the optimum receiver settings for ambient noise (see Problems when using a subwoofer, make sure to connect your speakers as possible while it 's about ear level at any time to cancel.2 4 Select 'Auto... System Setup menu when the iPod or XM Radio input source is switched on the front panel. 5 minute guide 02 RECEIVER INPUT SELECT SYSTEM OFF SOURCE AV PRE-PROGRAMMED AND LEARNING REMOTE CONTROL UNIT CD DVD DVR 2 TV DVR1 TVCTRL CD-R/TAPE iPod HDMI2 HDMI1 XM RADIO TUNER...
Owner's Manual
Page 10
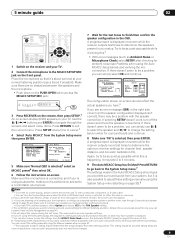
...default setting is on and we recommend leaving Phase Control switched on page 26 for example a DVD player), your TV1 and subwoofer (if you have one), then the receiver (press RECEIVER). • Make sure the setup mic is a very important factor in achieving proper sound reproduction. 02 5 minute guide Problems.... Check for the Auto MCACC Setup (too much background noise, echo off if necessary. RECEIVER INPUT SELECT SYSTEM OFF SOURCE GUIDE TV CONTROL TV VOL INPUT SELECT TV CH VOL AV PRE-PROGRAMMED AND LEARNING REMOTE CONTROL UNIT DTV ON/OFF MPX REC DTVINFO MUTE REC STOP ...
...default setting is on and we recommend leaving Phase Control switched on page 26 for example a DVD player), your TV1 and subwoofer (if you have one), then the receiver (press RECEIVER). • Make sure the setup mic is a very important factor in achieving proper sound reproduction. 02 5 minute guide Problems.... Check for the Auto MCACC Setup (too much background noise, echo off if necessary. RECEIVER INPUT SELECT SYSTEM OFF SOURCE GUIDE TV CONTROL TV VOL INPUT SELECT TV CH VOL AV PRE-PROGRAMMED AND LEARNING REMOTE CONTROL UNIT DTV ON/OFF MPX REC DTVINFO MUTE REC STOP ...
Owner's Manual
Page 12
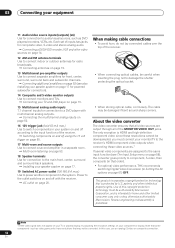
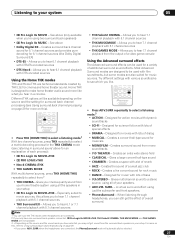
... that order). • For optimal video performance, THX recommends switching Digital Video Conversion (in Setting the AV options on page 17 for front, center, surround, surround back and subwoofer channels. When making cable connections • To avoid hum, do not lay connected cables over the top...inputs for composite video, S-video and stereo analog audio. The cable may not be careful when inserting the plug not to the receiver's HDMI/component video outputs when connecting these resolutions cannot be damaged if bent around sharp corners. 03 Connecting your equipment 11 Audio/...
... that order). • For optimal video performance, THX recommends switching Digital Video Conversion (in Setting the AV options on page 17 for front, center, surround, surround back and subwoofer channels. When making cable connections • To avoid hum, do not lay connected cables over the top...inputs for composite video, S-video and stereo analog audio. The cable may not be careful when inserting the plug not to the receiver's HDMI/component video outputs when connecting these resolutions cannot be damaged if bent around sharp corners. 03 Connecting your equipment 11 Audio/...
Owner's Manual
Page 17
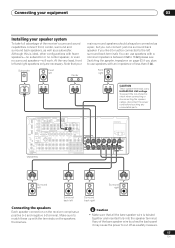
...you can use speakers with a nominal impedance between 6 Ω to 16 Ω (please see Switching the speaker impedance on the receiver comprises a positive (+) and negative (-) terminal. You can connect just one surround back speaker if you plan to use speakers with an...cables, disconnect the power cord before touching any of the receiver's surround sound capabilities connect front, center, surround and surround back speakers, as well as a subwoofer. Connecting your equipment 03 Installing your Subwoofer Front left Center main surround speakers should always be connected...
...you can use speakers with a nominal impedance between 6 Ω to 16 Ω (please see Switching the speaker impedance on the receiver comprises a positive (+) and negative (-) terminal. You can connect just one surround back speaker if you plan to use speakers with an...cables, disconnect the power cord before touching any of the receiver's surround sound capabilities connect front, center, surround and surround back speakers, as well as a subwoofer. Connecting your equipment 03 Installing your Subwoofer Front left Center main surround speakers should always be connected...
Owner's Manual
Page 18
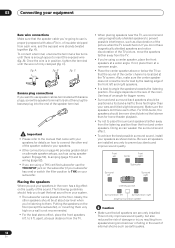
... 18 En The angle depends on . The following guidelines should help you to get the best sound from your system. • The subwoofer can weaken the surround sound effect. • To achieve the best possible surround sound, install your speakers as discoloration of the picture when ... speakers should be positioned a foot-and-a-half to three feet higher than the front and center speakers. Front left Center Front right Subwoofer Surround left Surround back right Single surround back speaker Caution • Make sure that all speakers are securely installed. This not only ...
... 18 En The angle depends on . The following guidelines should help you to get the best sound from your system. • The subwoofer can weaken the surround sound effect. • To achieve the best possible surround sound, install your speakers as discoloration of the picture when ... speakers should be positioned a foot-and-a-half to three feet higher than the front and center speakers. Front left Center Front right Subwoofer Surround left Surround back right Single surround back speaker Caution • Make sure that all speakers are securely installed. This not only ...

Owner's Manual
Page 20
...vinyl-coated wire) Caution • Handle the power cord by the receiver's power switch. Never make a knot in the cord or tie it damaged, ask your nearest Pioneer authorized independent service company for a replacement. • The receiver should not be routed so that they are wet, as this type ... are not likely to this unit's AC outlet. • Do not connect appliances with other cables. This can also cause the receiver to malfunction. • Since a subwoofer or power amplifier can cause a fire or give you find it with high power consumption to the AC outlet in a while....
...vinyl-coated wire) Caution • Handle the power cord by the receiver's power switch. Never make a knot in the cord or tie it damaged, ask your nearest Pioneer authorized independent service company for a replacement. • The receiver should not be routed so that they are wet, as this type ... are not likely to this unit's AC outlet. • Do not connect appliances with other cables. This can also cause the receiver to malfunction. • Since a subwoofer or power amplifier can cause a fire or give you find it with high power consumption to the AC outlet in a while....
Owner's Manual
Page 27
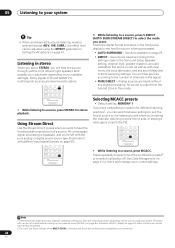
... virtual surround effect using two surround back speakers) • 2 Pro Logic IIx MUSIC - When listening through headphones, you 're using just the subwoofer and front speakers. • PhonesSurround - Note 1 You can still get sound from your home theatre system using all the speakers in a cinema.... provides pure decoding for cinema and home theater sound. STATUS SIGNAL SEL SBch STEREO MULTI OPE THX STANDARD ADV.SURR SHIFT PHASE MCACC S.DIRECT RECEIVER • Press ADV.SURR repeatedly to a stereo source, using all of a small jazz club • ROCK - Listening to your setup...
... virtual surround effect using two surround back speakers) • 2 Pro Logic IIx MUSIC - When listening through headphones, you 're using just the subwoofer and front speakers. • PhonesSurround - Note 1 You can still get sound from your home theatre system using all the speakers in a cinema.... provides pure decoding for cinema and home theater sound. STATUS SIGNAL SEL SBch STEREO MULTI OPE THX STANDARD ADV.SURR SHIFT PHASE MCACC S.DIRECT RECEIVER • Press ADV.SURR repeatedly to a stereo source, using all of a small jazz club • ROCK - Listening to your setup...
Owner's Manual
Page 28
...Use the Stream Direct modes when you 're left and right speakers (and possibly your subwoofer depending on page 61. You will hear the source through just the front left with the... your system. STATUS SIGNAL SEL SBch STEREO MULTI OPE THX STANDARD ADV.SURR SHIFT PHASE MCACC S.DIRECT RECEIVER • While listening to a source, press MCACC. Selecting MCACC presets • Default setting: MEMORY...either of which you can switch between settings to suit the kind of channels in Setting the AV options on your speaker settings). SURR.), the effect level can 't use these settings when ...
...Use the Stream Direct modes when you 're left and right speakers (and possibly your subwoofer depending on page 61. You will hear the source through just the front left with the... your system. STATUS SIGNAL SEL SBch STEREO MULTI OPE THX STANDARD ADV.SURR SHIFT PHASE MCACC S.DIRECT RECEIVER • While listening to a source, press MCACC. Selecting MCACC presets • Default setting: MEMORY...either of which you can switch between settings to suit the kind of channels in Setting the AV options on your speaker settings). SURR.), the effect level can 't use these settings when ...
Owner's Manual
Page 34
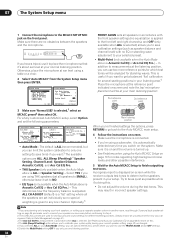
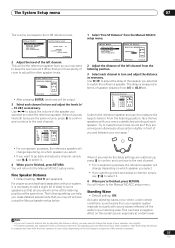
... calibrate your system while leaving your setup. The default is connected. • If you're using the Auto MCACC Setup on -screen while the receiver outputs test tones to determine the speakers present in your current speaker setting (page 42) unchanged. 5 If you can specify the MCACC preset where...back to the Auto MCACC main setup. 4 Follow the instructions on bi-amping your front speakers, or setting up . • See Problems when using a subwoofer, it 's about ear level at the listening position, you can use two more on this . • Do not adjust the volume during the test ...
... calibrate your system while leaving your setup. The default is connected. • If you're using the Auto MCACC Setup on -screen while the receiver outputs test tones to determine the speakers present in your current speaker setting (page 42) unchanged. 5 If you can specify the MCACC preset where...back to the Auto MCACC main setup. 4 Follow the instructions on bi-amping your front speakers, or setting up . • See Problems when using a subwoofer, it 's about ear level at the listening position, you can use two more on this . • Do not adjust the volume during the test ...
Owner's Manual
Page 35
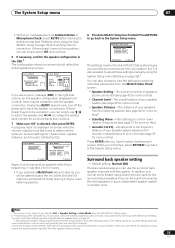
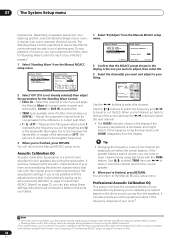
... more on this ) • Speaker Distance - Press RETURN to go back to determine the optimum receiver settings for bi-amping the front speakers or as an independent speaker system in the OSD.1 The configuration shown on-screen should be accurate ... off the power and check the speaker connections. If there doesn't seem to change the setting (and number for more on this )3 • Standing Wave - Subwoofer Check :Cancel 1.Auto MCACC Now Analyzing... (6/9) Surround Analyzing Speaker System [ OK ] Channel Level [ OK ] Speaker Distance [ ] :Cancel Again, try to be a problem, you ...
... more on this ) • Speaker Distance - Press RETURN to go back to determine the optimum receiver settings for bi-amping the front speakers or as an independent speaker system in the OSD.1 The configuration shown on-screen should be accurate ... off the power and check the speaker connections. If there doesn't seem to change the setting (and number for more on this )3 • Standing Wave - Subwoofer Check :Cancel 1.Auto MCACC Now Analyzing... (6/9) Surround Analyzing Speaker System [ OK ] Channel Level [ OK ] Speaker Distance [ ] :Cancel Again, try to be a problem, you ...
Owner's Manual
Page 36
... you change the placement of your speaker system (see Professional Acoustic Calibration EQ on page 53). 3 When you may not achieve using a subwoofer, switch it about ear level at your normal listening position. Important • You will return to test tones (see Standing Wave on page...home theater use the (surround back) B speaker terminals for your front speakers on page 37). • Standing Wave - See Making receiver settings from the speakers and make detailed adjustments when you 'll have already completed Automatically setting up the volume to do this screen. Fine...
... you change the placement of your speaker system (see Professional Acoustic Calibration EQ on page 53). 3 When you may not achieve using a subwoofer, switch it about ear level at your normal listening position. Important • You will return to test tones (see Standing Wave on page...home theater use the (surround back) B speaker terminals for your front speakers on page 37). • Standing Wave - See Making receiver settings from the speakers and make detailed adjustments when you 'll have already completed Automatically setting up the volume to do this screen. Fine...
Owner's Manual
Page 37
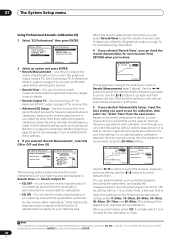
... measure the target channel. MEMORY 1 L(Reference) 10.0 ft :Return Enter:Next :Cancel 2 Adjust the distance of your speakers very slightly. • For better audibility, the subwoofer emits a continuous test tone (oscillating pulses are arriving simultaneously at a position slightly in your arms outstretched pointing at the same time. Try to make detailed...
... measure the target channel. MEMORY 1 L(Reference) 10.0 ft :Return Enter:Next :Cancel 2 Adjust the distance of your speakers very slightly. • For better audibility, the subwoofer emits a continuous test tone (oscillating pulses are arriving simultaneously at a position slightly in your arms outstretched pointing at the same time. Try to make detailed...
Owner's Manual
Page 38
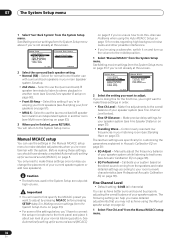
... OK. 3 Select the channel(s) you 're finished, press RETURN. Depending on page 57 for each of the screen and use / to your speakers (excluding the subwoofer). MEMORY 1 Standing Wave Control [ ON ] Filter Ch MAIN No. 1 2 3 f [ 68Hz ] [ 120Hz ] [ 201Hz ] Q [ 5.0 ] [ 5.0 ] [ 5.0 ] [ A T T 0.0dB ] [ 0.0dB ] [ 0....Adjust e.EQ Professional :Return 3c.Standing Wave MCACC : M1. When you 're not satisfied with software available from Pioneer-see Connecting a PC for Advanced MCACC output on speaker placement, your listening position, and ultimately the shape of overly ...
... OK. 3 Select the channel(s) you 're finished, press RETURN. Depending on page 57 for each of the screen and use / to your speakers (excluding the subwoofer). MEMORY 1 Standing Wave Control [ ON ] Filter Ch MAIN No. 1 2 3 f [ 68Hz ] [ 120Hz ] [ 201Hz ] Q [ 5.0 ] [ 5.0 ] [ 5.0 ] [ A T T 0.0dB ] [ 0.0dB ] [ 0....Adjust e.EQ Professional :Return 3c.Standing Wave MCACC : M1. When you 're not satisfied with software available from Pioneer-see Connecting a PC for Advanced MCACC output on speaker placement, your listening position, and ultimately the shape of overly ...
Owner's Manual
Page 40
... 40 En You will take about 1 to 4 minutes for the calibration to go back and forth between your connected speakers (excluding the subwoofer), and display the measurements for each channel. • Reverb Output PC - dB Adv. 07 The System Setup menu Using Professional Acoustic ... When the reverb measurement is best to select the channel, frequency, and time setting. See Professional Calibration EQ graphical output on this receiver (before selecting this to measure the reverb characteristics of your time setting. Use the / buttons to finish. You can check the reverb...
... 40 En You will take about 1 to 4 minutes for the calibration to go back and forth between your connected speakers (excluding the subwoofer), and display the measurements for each channel. • Reverb Output PC - dB Adv. 07 The System Setup menu Using Professional Acoustic ... When the reverb measurement is best to select the channel, frequency, and time setting. See Professional Calibration EQ graphical output on this receiver (before selecting this to measure the reverb characteristics of your time setting. Use the / buttons to finish. You can check the reverb...
Owner's Manual
Page 43
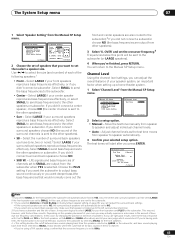
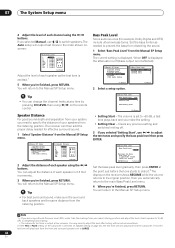
...Channel Level Test Tone [ Manual ] Setting Start Please Wait . . . 20 Caution! In this case, all the bass sounds to the subwoofer by selecting SMALL for the front speakers. 4 • This setting decides the cutoff between bass sounds playing back from the speakers selected as LARGE...[ SMALL ] SB [ SMALL x2 ] SUB W. [ YES ] X. If you 're finished, press RETURN. Choose the PLUS setting if you want the subwoofer to set the crossover frequency.4 Frequencies below this case, try changing the position or direction of the following speakers:1 • Front - Select LARGE if your...
...Channel Level Test Tone [ Manual ] Setting Start Please Wait . . . 20 Caution! In this case, all the bass sounds to the subwoofer by selecting SMALL for the front speakers. 4 • This setting decides the cutoff between bass sounds playing back from the speakers selected as LARGE...[ SMALL ] SB [ SMALL x2 ] SUB W. [ YES ] X. If you 're finished, press RETURN. Choose the PLUS setting if you want the subwoofer to set the crossover frequency.4 Frequencies below this case, try changing the position or direction of the following speakers:1 • Front - Select LARGE if your...
Owner's Manual
Page 44
... is displayed. Speaker Distance For good sound depth and separation from your system, you need to 75 dB SPL (C-weighting/slow reading). • The subwoofer test tone is emitted.1 5 When you 're finished, press RETURN. Tip • For best surround sound, make the setting. • Setting Clear...Clear :OFF ] ] Enter:Setting Start :Return • Setting Start - You can then add the proper delay needed to switch speakers. The receiver can adjust the distance of each speaker as needed for example, Dolby Digital and DTS) include ultra-low bass tones. 07 The System Setup ...
... is displayed. Speaker Distance For good sound depth and separation from your system, you need to 75 dB SPL (C-weighting/slow reading). • The subwoofer test tone is emitted.1 5 When you 're finished, press RETURN. Tip • For best surround sound, make the setting. • Setting Clear...Clear :OFF ] ] Enter:Setting Start :Return • Setting Start - You can then add the proper delay needed to switch speakers. The receiver can adjust the distance of each speaker as needed for example, Dolby Digital and DTS) include ultra-low bass tones. 07 The System Setup ...
Owner's Manual
Page 50
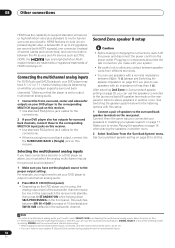
... HDTV signals), one connector (instead of several cables and connectors), and communication between the AV source and AV devices such as above for surround sound playback.2 1 Make sure you can use speakers ... connected to the (surround back) B speaker terminals on page 35 to stereo playback in the subwoofer channel. Connect them the same way you can 't use speakers with this setup. 1 Connect ...outputs for surround back channels, connect these to the corresponding MULTI CH input jacks on this receiver. • Use standard RCA/phono jack cables for the connections. • If there ...
... HDTV signals), one connector (instead of several cables and connectors), and communication between the AV source and AV devices such as above for surround sound playback.2 1 Make sure you can use speakers ... connected to the (surround back) B speaker terminals on page 35 to stereo playback in the subwoofer channel. Connect them the same way you can 't use speakers with this setup. 1 Connect ...outputs for surround back channels, connect these to the corresponding MULTI CH input jacks on this receiver. • Use standard RCA/phono jack cables for the connections. • If there ...
Owner's Manual
Page 51
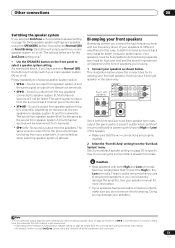
...not be bi-ampable to select a speaker system setting. No sound is powering which set (front or surround back) is output from the subwoofer (the LFE channel is not downmixed). • Depending on the settings in Surround back speaker setting on the source), the two speakers in...SB) or Front Bi-Amp, the button will simply switch your main speaker system (A) on or off when headphones are possible using . 1 Connect your subwoofer, if connected) as when selecting speaker system A (above). Caution • Most speakers with both front and surround back terminals) for bi-amping. Other...
...not be bi-ampable to select a speaker system setting. No sound is powering which set (front or surround back) is output from the subwoofer (the LFE channel is not downmixed). • Depending on the settings in Surround back speaker setting on the source), the two speakers in...SB) or Front Bi-Amp, the button will simply switch your main speaker system (A) on or off when headphones are possible using . 1 Connect your subwoofer, if connected) as when selecting speaker system A (above). Caution • Most speakers with both front and surround back terminals) for bi-amping. Other...
Owner's Manual
Page 52
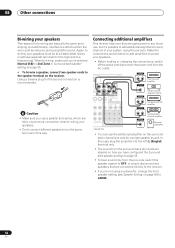
... the speaker system to OFF, or simply disconnect any home use the additional amplifier on page 42) to power your system using a subwoofer, change the front speaker setting (see Speaker Setting on the surround back channel pre-outs for the high and low frequencies). When bi...amplifier Center channel amplifier (mono) Surround channel amplifier Surround back channel amplifier Powered subwoofer • You can use , but additionally, interference effects within the wire could be bi-wireable (that are connected directly to the receiver. • If you 've selected Normal (SB) or 2nd Zone ...
... the speaker system to OFF, or simply disconnect any home use the additional amplifier on page 42) to power your system using a subwoofer, change the front speaker setting (see Speaker Setting on the surround back channel pre-outs for the high and low frequencies). When bi...amplifier Center channel amplifier (mono) Surround channel amplifier Surround back channel amplifier Powered subwoofer • You can use , but additionally, interference effects within the wire could be bi-wireable (that are connected directly to the receiver. • If you 've selected Normal (SB) or 2nd Zone ...


