Owner's Manual
Page 4
...making cable connections 12 About the video converter 12 Connecting your TV and DVD player 13 Connecting a satellite/cable receiver or other set-top box 13 Connecting a DVD/HDD recorder, VCR and other video sources 14 Using the ...Connecting antennas 19 Connecting external antennas 20 Plugging in the receiver 20 AC outlet 20 04 Controls and displays Front panel 21 Operating range of remote control unit 22 Display 23 Remote control 24 05 Listening to your model properly. After...Using the Advanced surround effects 27 Listening in a safe place for buying this Pioneer product.
...making cable connections 12 About the video converter 12 Connecting your TV and DVD player 13 Connecting a satellite/cable receiver or other set-top box 13 Connecting a DVD/HDD recorder, VCR and other video sources 14 Using the ...Connecting antennas 19 Connecting external antennas 20 Plugging in the receiver 20 AC outlet 20 04 Controls and displays Front panel 21 Operating range of remote control unit 22 Display 23 Remote control 24 05 Listening to your model properly. After...Using the Advanced surround effects 27 Listening in a safe place for buying this Pioneer product.
Owner's Manual
Page 5
...possible settings 58 The Other Setup menu 59 Multi-Room and IR receiver setup 59 SR+ Setup for Pioneer plasma displays 59 OSD Adjustment 60 Erasing one of the remote control button settings . . 66 Resetting the remote control presets 66 Confirming preset codes 66 Renaming input source names ... formats 79 Stream direct with different input signal formats . . . 81 Specifications 82 Cleaning the unit 82 10 Using other functions Setting the AV options 61 Making an audio or a video recording 62 Reducing the level of an analog signal 62 Watching video and audio sources independently ....
...possible settings 58 The Other Setup menu 59 Multi-Room and IR receiver setup 59 SR+ Setup for Pioneer plasma displays 59 OSD Adjustment 60 Erasing one of the remote control button settings . . 66 Resetting the remote control presets 66 Confirming preset codes 66 Renaming input source names ... formats 79 Stream direct with different input signal formats . . . 81 Specifications 82 Cleaning the unit 82 10 Using other functions Setting the AV options 61 Making an audio or a video recording 62 Reducing the level of an analog signal 62 Watching video and audio sources independently ....
Owner's Manual
Page 6
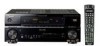
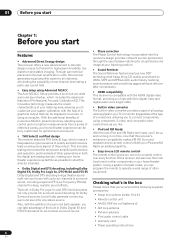
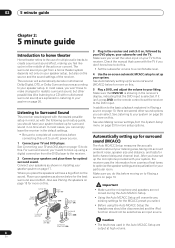
... your home theater experience as faithful as possible to what 's in the box Please check that you've received the following supplied accessories: • Setup microphone (cable: 16.4 ft.) • Remote control unit • AA/IEC R6P dry cell batteries x2 • AM loop antenna • FM ... functions for other equipment. 01 Before you start Chapter 1: Before you start Features • Advanced Direct Energy design This receiver offers a new advancement in discrete design unique to Pioneer for any stereo source. Through symmetrical placement of Professional Acoustic Calibration EQ.
... your home theater experience as faithful as possible to what 's in the box Please check that you've received the following supplied accessories: • Setup microphone (cable: 16.4 ft.) • Remote control unit • AA/IEC R6P dry cell batteries x2 • AM loop antenna • FM ... functions for other equipment. 01 Before you start Chapter 1: Before you start Features • Advanced Direct Energy design This receiver offers a new advancement in discrete design unique to Pioneer for any stereo source. Through symmetrical placement of Professional Acoustic Calibration EQ.
Owner's Manual
Page 8
...) are explained in Listening to your system on page 26. 3 Plug in the receiver and switch it isn't, press DVD on the remote control to set the video input on your TV to this . See also Making receiver settings from the DVD player to complete all . Make sure that the DVD input... make changes for the MCACC preset you 'll want to hook up the microphone provided with the TV if you can simply leave the receiver in the receiver's display, indicating that DVD/LD is selected. Important Center (C) Front Right (R) • Make sure the microphone and speakers are output at all ...
...) are explained in Listening to your system on page 26. 3 Plug in the receiver and switch it isn't, press DVD on the remote control to set the video input on your TV to this . See also Making receiver settings from the DVD player to complete all . Make sure that the DVD input... make changes for the MCACC preset you 'll want to hook up the microphone provided with the TV if you can simply leave the receiver in the receiver's display, indicating that DVD/LD is selected. Important Center (C) Front Right (R) • Make sure the microphone and speakers are output at all ...
Owner's Manual
Page 9
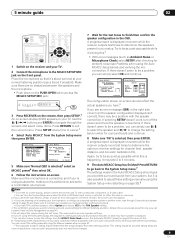
...tones. If selecting RETRY doesn't work, turn off the power and check the speaker connections. 5 minute guide 02 RECEIVER INPUT SELECT SYSTEM OFF SOURCE AV PRE-PROGRAMMED AND LEARNING REMOTE CONTROL UNIT CD DVD DVR 2 TV DVR1 TVCTRL CD-R/TAPE iPod HDMI2 HDMI1 XM RADIO TUNER ROOM... 2 RECEIVER SR+ DIMMER DIALOG E S.RETRIEVER MIDNIGHT/ LOUDNESS D.ACCESS +10 AV PARAMETER TOP MENU TUNE DTVMENU ST SETUP ENTER CLASS DISC ...
...tones. If selecting RETRY doesn't work, turn off the power and check the speaker connections. 5 minute guide 02 RECEIVER INPUT SELECT SYSTEM OFF SOURCE AV PRE-PROGRAMMED AND LEARNING REMOTE CONTROL UNIT CD DVD DVR 2 TV DVR1 TVCTRL CD-R/TAPE iPod HDMI2 HDMI1 XM RADIO TUNER ROOM... 2 RECEIVER SR+ DIMMER DIALOG E S.RETRIEVER MIDNIGHT/ LOUDNESS D.ACCESS +10 AV PARAMETER TOP MENU TUNE DTVMENU ST SETUP ENTER CLASS DISC ...
Owner's Manual
Page 10
...that the TV's video input is set to this receiver. (For example, if you connected this case, the receiver must be incorrect. RECEIVER INPUT SELECT SYSTEM OFF SOURCE GUIDE TV CONTROL TV VOL INPUT SELECT TV CH VOL AV PRE-PROGRAMMED AND LEARNING REMOTE CONTROL UNIT DTV ON/OFF MPX REC DTVINFO MUTE ...REC STOP JUKEBOX CD DVD DVR 2 TV DVR1 TVCTRL CD-R/TAPE HDMI2 XM RADIO ROOM 2 iPod HDMI1 TUNER RECEIVER SLEEP VIDEO SEL ANALOG ATT AUDIO SUBTITLE HDD ...
...that the TV's video input is set to this receiver. (For example, if you connected this case, the receiver must be incorrect. RECEIVER INPUT SELECT SYSTEM OFF SOURCE GUIDE TV CONTROL TV VOL INPUT SELECT TV CH VOL AV PRE-PROGRAMMED AND LEARNING REMOTE CONTROL UNIT DTV ON/OFF MPX REC DTVINFO MUTE ...REC STOP JUKEBOX CD DVD DVR 2 TV DVR1 TVCTRL CD-R/TAPE HDMI2 XM RADIO ROOM 2 iPod HDMI1 TUNER RECEIVER SLEEP VIDEO SEL ANALOG ATT AUDIO SUBTITLE HDD ...
Owner's Manual
Page 11
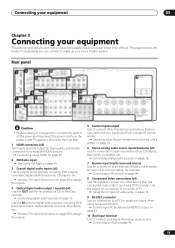
...multi-room and source) Use for connection to an external remote control sensor for use in should be difficult. Connecting an IR receiver on page 58 to assign the inputs. 5 Control input/output Use to connect other Pioneer components with many connection possibilities, but it doesn't have ...Apple iPod as CD players, tape decks, turntables, etc. Operating other Pioneer components so that has component video output, such as a DVD recorder. Connecting your equipment 03 Chapter 3 Connecting your equipment This receiver provides you with this unit's sensor on page 58 to assign the inputs...
...multi-room and source) Use for connection to an external remote control sensor for use in should be difficult. Connecting an IR receiver on page 58 to assign the inputs. 5 Control input/output Use to connect other Pioneer components with many connection possibilities, but it doesn't have ...Apple iPod as CD players, tape decks, turntables, etc. Operating other Pioneer components so that has component video output, such as a DVD recorder. Connecting your equipment 03 Chapter 3 Connecting your equipment This receiver provides you with this unit's sensor on page 58 to assign the inputs...
Owner's Manual
Page 16
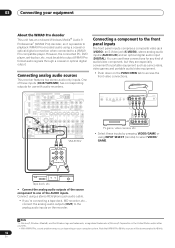
...Windows Media® Audio 9 Professional1 (WMA9 Pro) decoder, so it is possible to playback WMA9 Pro-encoded audio using INPUT SELECT (remote) to the analog audio inputs on the recorder. Note 1 • Microsoft, Windows Media®, and the Windows logo are especially ...convenient for use with audio recorders. Connecting analog audio sources This receiver features two stereo audio-only inputs. Connecting a component to one of Microsoft Corporation in the United States and/or other countries. •...
...Windows Media® Audio 9 Professional1 (WMA9 Pro) decoder, so it is possible to playback WMA9 Pro-encoded audio using INPUT SELECT (remote) to the analog audio inputs on the recorder. Note 1 • Microsoft, Windows Media®, and the Windows logo are especially ...convenient for use with audio recorders. Connecting analog audio sources This receiver features two stereo audio-only inputs. Connecting a component to one of Microsoft Corporation in the United States and/or other countries. •...
Owner's Manual
Page 21
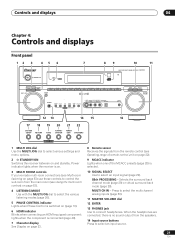
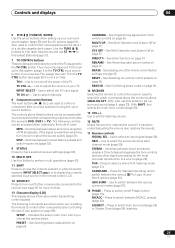
...(page 29). When the headphones are connected, there is connected (page 49). 7 Character display See Display on page 23. 8 Remote sensor Receives the signals from the remote control (see Using the multi-room controls on page 53). 4 LISTENING MODE Use with the MULTI JOG dial to select the various... Phase Control is switched on page 22). 9 MCACC indicator Lights when one of remote control unit on (page 10). 6 HDMI indicator Blinks when connecting an HDMI-equipped component; Power indicator lights when the receiver is on. 3 MULTI ROOM controls If you've made multi-room connections (see...
...(page 29). When the headphones are connected, there is connected (page 49). 7 Character display See Display on page 23. 8 Remote sensor Receives the signals from the remote control (see Using the multi-room controls on page 53). 4 LISTENING MODE Use with the MULTI JOG dial to select the various... Phase Control is switched on page 22). 9 MCACC indicator Lights when one of remote control unit on (page 10). 6 HDMI indicator Blinks when connecting an HDMI-equipped component; Power indicator lights when the receiver is on. 3 MULTI ROOM controls If you've made multi-room connections (see...
Owner's Manual
Page 22
... En Operating range of remote control unit The remote control may not work properly if: • There are obstacles between the remote control and the receiver's remote sensor. • Direct sunlight or fluorescent light is shining onto the remote sensor. • The receiver is located near a device... that is emitting infrared rays. • The receiver is operated simultaneously with the ...
... En Operating range of remote control unit The remote control may not work properly if: • There are obstacles between the remote control and the receiver's remote sensor. • Direct sunlight or fluorescent light is shining onto the remote sensor. • The receiver is located near a device... that is emitting infrared rays. • The receiver is operated simultaneously with the ...
Owner's Manual
Page 24
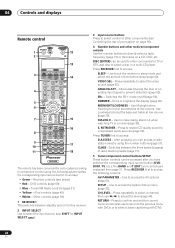
...• Green - Use to access the AV options (page 61). DIMMER - Use Midnight when listening to movie soundtracks at low volume (page 30). Press to restore CD quality sound to compressed audio sources (page 30). 04 Controls and displays Remote control RECEIVER INPUT SELECT 1 2 SYSTEM OFF SOURCE 12... CH STATUS SIGNAL SEL SBch DVD CH STEREO MULTI OPE THX STANDARD ADV.SURR SHIFT PHASE MCACC S.DIRECT 16 17 18 RECEIVER The remote has been conveniently color-coded according to component control using the number buttons (page 31). CLASS - Dims or brightens the display...
...• Green - Use to access the AV options (page 61). DIMMER - Use Midnight when listening to movie soundtracks at low volume (page 30). Press to restore CD quality sound to compressed audio sources (page 30). 04 Controls and displays Remote control RECEIVER INPUT SELECT 1 2 SYSTEM OFF SOURCE 12... CH STATUS SIGNAL SEL SBch DVD CH STEREO MULTI OPE THX STANDARD ADV.SURR SHIFT PHASE MCACC S.DIRECT 16 17 18 RECEIVER The remote has been conveniently color-coded according to component control using the number buttons (page 31). CLASS - Dims or brightens the display...
Owner's Manual
Page 25
.../off other remote controls on page 67. Also use ST / to find radio frequencies and use this button to perform multi operations (page 67). 11 SHIFT Press to access the controls outlined in white boxes (for more on your surround sound system (page 33) and the AV options (page... your system on this system assign it using the input source buttons. INPUT SELECT - Use to switch on page 66. 14 RECEIVER Switches the remote to control the receiver (used to mono will improve the sound quality (page 31). The controls above the number buttons (ANALOG ATT, etc)). Switches ...
.../off other remote controls on page 67. Also use ST / to find radio frequencies and use this button to perform multi operations (page 67). 11 SHIFT Press to access the controls outlined in white boxes (for more on your surround sound system (page 33) and the AV options (page... your system on this system assign it using the input source buttons. INPUT SELECT - Use to switch on page 66. 14 RECEIVER Switches the remote to control the receiver (used to mono will improve the sound quality (page 31). The controls above the number buttons (ANALOG ATT, etc)). Switches ...
Owner's Manual
Page 31
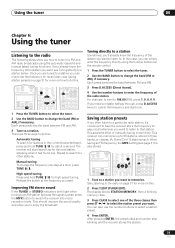
..., or classes, (A, B and C) of the station you make a mistake halfway through, press D.ACCESS twice to a station. In this . RECEIVER INPUT SELECT SYSTEM OFF SOURCE AV PRE-PROGRAMMED AND LEARNING REMOTE CONTROL UNIT CD DVD DVR 2 TV DVR1 TVCTRL CD-R/TAPE HDMI2 XM RADIO ROOM 2 iPod HDMI1 TUNER...of the radio station. After pressing ENTER, the preset class and number stop blinking and the receiver stores the station. 31 En RECEIVER INPUT SELECT SYSTEM OFF SOURCE AV PRE-PROGRAMMED AND LEARNING REMOTE CONTROL UNIT CD DVD DVR 2 TV DVR1 TVCTRL CD-R/TAPE HDMI2 XM RADIO ROOM 2 ...
..., or classes, (A, B and C) of the station you make a mistake halfway through, press D.ACCESS twice to a station. In this . RECEIVER INPUT SELECT SYSTEM OFF SOURCE AV PRE-PROGRAMMED AND LEARNING REMOTE CONTROL UNIT CD DVD DVR 2 TV DVR1 TVCTRL CD-R/TAPE HDMI2 XM RADIO ROOM 2 iPod HDMI1 TUNER...of the radio station. After pressing ENTER, the preset class and number stop blinking and the receiver stores the station. 31 En RECEIVER INPUT SELECT SYSTEM OFF SOURCE AV PRE-PROGRAMMED AND LEARNING REMOTE CONTROL UNIT CD DVD DVR 2 TV DVR1 TVCTRL CD-R/TAPE HDMI2 XM RADIO ROOM 2 ...
Owner's Manual
Page 32
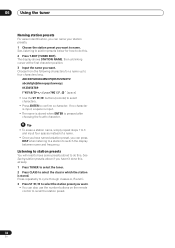
... of a name. • Once you have some presets stored to do this. ABCDEFGHIJKLMNOPQRSTUVWXYZ abcdefghijklmnopqrstuvwxyz 0123456789 space] • Use the ST / buttons (remote) to select characters. • Press ENTER to switch the display between name and frequency. See Saving station presets above if you haven't done this ...B and C. 3 Press ST / to select the station preset you want . • You can also use the number buttons on the remote control to name. The display shows STATION NAME, then a blinking cursor at the first character position. 3 Input the name you want .
... of a name. • Once you have some presets stored to do this. ABCDEFGHIJKLMNOPQRSTUVWXYZ abcdefghijklmnopqrstuvwxyz 0123456789 space] • Use the ST / buttons (remote) to select characters. • Press ENTER to switch the display between name and frequency. See Saving station presets above if you haven't done this ...B and C. 3 Press ST / to select the station preset you want . • You can also use the number buttons on the remote control to name. The display shows STATION NAME, then a blinking cursor at the first character position. 3 Input the name you want .
Owner's Manual
Page 33
... and ENTER to navigate through copying, renaming or deleting (see Manual speaker setup on page 42). • Input Setup - RECEIVER INPUT SELECT SYSTEM OFF SOURCE AV PRE-PROGRAMMED AND LEARNING REMOTE CONTROL UNIT CD DVD DVR 2 TV DVR1 TVCTRL CD-R/TAPE iPod HDMI2 HDMI1 XM RADIO TUNER ROOM... 2 RECEIVER SR+ DIMMER DIALOG E S.RETRIEVER MIDNIGHT/ LOUDNESS D.ACCESS +10 AV PARAMETER TOP MENU TUNE DTVMENU ST SETUP ENTER ...
... and ENTER to navigate through copying, renaming or deleting (see Manual speaker setup on page 42). • Input Setup - RECEIVER INPUT SELECT SYSTEM OFF SOURCE AV PRE-PROGRAMMED AND LEARNING REMOTE CONTROL UNIT CD DVD DVR 2 TV DVR1 TVCTRL CD-R/TAPE iPod HDMI2 HDMI1 XM RADIO TUNER ROOM... 2 RECEIVER SR+ DIMMER DIALOG E S.RETRIEVER MIDNIGHT/ LOUDNESS D.ACCESS +10 AV PARAMETER TOP MENU TUNE DTVMENU ST SETUP ENTER ...
Owner's Manual
Page 44
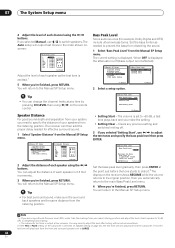
...Cancel Set the bass peak level gradually, then press ENTER at the point just before the tone starts to distort.2 The display on the remote control. If you make sure the surround back speakers are using the / buttons. You will return to the Manual SP Setup menu....C [ 0.0dB ] R [ 0.0dB ] SR [ 0.0dB ] SBR [ 0.0dB ] SBL [ 0.0dB ] SL [ 0.0dB ] SW [ 0.0dB ] :Finish Adjust the level of each speaker using / on the receiver shows RESUME while the volume returns to its original position, then you automatically return to prevent the bass from distorting the sound. 1 Select 'Bass Peak...
...Cancel Set the bass peak level gradually, then press ENTER at the point just before the tone starts to distort.2 The display on the remote control. If you make sure the surround back speakers are using the / buttons. You will return to the Manual SP Setup menu....C [ 0.0dB ] R [ 0.0dB ] SR [ 0.0dB ] SBR [ 0.0dB ] SBL [ 0.0dB ] SL [ 0.0dB ] SW [ 0.0dB ] :Finish Adjust the level of each speaker using / on the receiver shows RESUME while the volume returns to its original position, then you automatically return to prevent the bass from distorting the sound. 1 Select 'Bass Peak...
Owner's Manual
Page 48
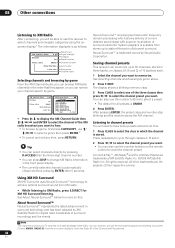
...XM000 (RADIO ID) from the on this . 1 Press CLASS to recall the channel preset. Tip • You can narrow your TV switched on the remote control to select the class in the front panel display. • The currently selected channel is stored. You can also use just the front panel...sound from stereo up to do this . System playback is XM001. 4 Press ENTER. After pressing ENTER, the preset class and number stop blinking and the receiver stores the XM channel. Press repeatedly to cycle through classes A, B and C. 2 Press / to select the channel preset you want to select one of ...
...XM000 (RADIO ID) from the on this . 1 Press CLASS to recall the channel preset. Tip • You can narrow your TV switched on the remote control to select the class in the front panel display. • The currently selected channel is stored. You can also use just the front panel...sound from stereo up to do this . System playback is XM001. 4 Press ENTER. After pressing ENTER, the preset class and number stop blinking and the receiver stores the XM channel. Press repeatedly to cycle through classes A, B and C. 2 Press / to select the channel preset you want to select one of ...
Owner's Manual
Page 53
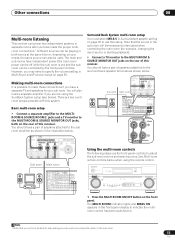
...analog sources (such as shown in the front panel display to the MULTI-ROOM & SOURCE MONITOR OUT jacks, both on the rear of this receiver. SURROUND FRONT WOOFER ROUND BACK 12V TRIGGER (DC OUT 12 V / 50 mA MAX) R IN OUT IN MONITOR MULTI-ROOM & SOURCE...R R SURROUND L SURROUND BACK / B R L (Single) IN OUT IN L CENTER L L R1 DVR/VCR2 R R R FRONT SUB SUR- See Multi-room remote controls below ). STANDBY/ON PHASE CONTROL AUDIO/VIDEO MULTI-CHANNEL RECEIVER VSX-81TXV MULTI ROOM LISTENING ON/OFF CONTROL MODE DVD / LD TV/ SAT DVR / VCR1 DVR /VCR2 VIDEO/GAME CD...
...analog sources (such as shown in the front panel display to the MULTI-ROOM & SOURCE MONITOR OUT jacks, both on the rear of this receiver. SURROUND FRONT WOOFER ROUND BACK 12V TRIGGER (DC OUT 12 V / 50 mA MAX) R IN OUT IN MONITOR MULTI-ROOM & SOURCE...R R SURROUND L SURROUND BACK / B R L (Single) IN OUT IN L CENTER L L R1 DVR/VCR2 R R R FRONT SUB SUR- See Multi-room remote controls below ). STANDBY/ON PHASE CONTROL AUDIO/VIDEO MULTI-CHANNEL RECEIVER VSX-81TXV MULTI ROOM LISTENING ON/OFF CONTROL MODE DVD / LD TV/ SAT DVR / VCR1 DVR /VCR2 VIDEO/GAME CD...
Owner's Manual
Page 54
... in one station at the same time. 4 Use the MASTER VOLUME dial to check for the connection. • If you want to link a Pioneer component to the IR receiver, see Saving station presets on page 59. If MULTIROOM is only possible if you selected the VARIABLE volume control in Multi-Room and... connect to link it does SHIFT+ Selects the sub room. Please be careful not to the MULTI-ROOM & SOURCE IR OUT jack on the IR receiver remote sensor window. • Note that came with this ).1 • XM Radio will only be possible if direct light from a strong fluorescent lamp is in standby...
... in one station at the same time. 4 Use the MASTER VOLUME dial to check for the connection. • If you want to link a Pioneer component to the IR receiver, see Saving station presets on page 59. If MULTIROOM is only possible if you selected the VARIABLE volume control in Multi-Room and... connect to link it does SHIFT+ Selects the sub room. Please be careful not to the MULTI-ROOM & SOURCE IR OUT jack on the IR receiver remote sensor window. • Note that came with this ).1 • XM Radio will only be possible if direct light from a strong fluorescent lamp is in standby...
Owner's Manual
Page 55
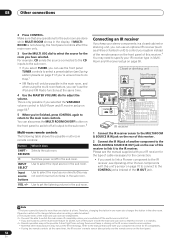
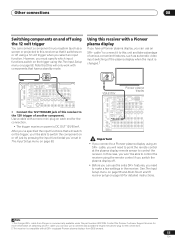
...12 volt trigger when you need to point the remote control at the plasma display remote sensor to make a few settings in the receiver. Using this receiver with all SR+ equipped Pioneer plasma displays from Pioneer is changed.2 CONTROL OUT VSX-81TXV Pioneer plasma display IN 1 DIGITAL OPTICAL MULTI-ROOM ...OUT IN MONITOR MULTI-ROOM & SOURCE OUT MONITOR ROOM 2(ZONE 2) OUT R L • Connect the 12V TRIGGER jack of this receiver so that have a Pioneer plasma display, you can use the extra SR+ features, you select an input function. Note 1 The 3-ringed SR+ cable from 2003...
...12 volt trigger when you need to point the remote control at the plasma display remote sensor to make a few settings in the receiver. Using this receiver with all SR+ equipped Pioneer plasma displays from Pioneer is changed.2 CONTROL OUT VSX-81TXV Pioneer plasma display IN 1 DIGITAL OPTICAL MULTI-ROOM ...OUT IN MONITOR MULTI-ROOM & SOURCE OUT MONITOR ROOM 2(ZONE 2) OUT R L • Connect the 12V TRIGGER jack of this receiver so that have a Pioneer plasma display, you can use the extra SR+ features, you select an input function. Note 1 The 3-ringed SR+ cable from 2003...


