Instruction Manual English
Page 3
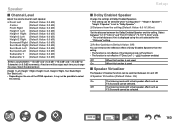
... models) 13 Display 15 Rear Panel 16 Remote Controller 18 Inputting Characters 20 Speaker Layout The listening room and the speaker layout 22 5.1 Channel System 23 7.1 Channel System 24 5.1.2 Channel System 25 7.1.2 Channel System 26 5.1.4 Channel System 27 7.1.4 Channel System 30 Speaker Installation Setting Up the Speakers 33 Speaker Connections Speakers you can use with this unit and cable connections 40 Connect the Subwoofer 41 Connecting a Power Amplifier 61 Connections Notes regarding connections with HDMI cables 63 Connections 63 Connecting...
... models) 13 Display 15 Rear Panel 16 Remote Controller 18 Inputting Characters 20 Speaker Layout The listening room and the speaker layout 22 5.1 Channel System 23 7.1 Channel System 24 5.1.2 Channel System 25 7.1.2 Channel System 26 5.1.4 Channel System 27 7.1.4 Channel System 30 Speaker Installation Setting Up the Speakers 33 Speaker Connections Speakers you can use with this unit and cable connections 40 Connect the Subwoofer 41 Connecting a Power Amplifier 61 Connections Notes regarding connections with HDMI cables 63 Connections 63 Connecting...

Instruction Manual English
Page 4
... Connecting the Power Cord 78 Playback Basic Operations 80 Turning the power on 80 Selecting a source to play 80 Adjusting the volume 81 Using the linking function (HDMI CEC) 81 Listening Mode 83 Selecting a Listening mode 83 BLUETOOTH® Playback 84 Playing audio from BLUETOOTH wireless technology enabled devices with this unit 84 Transmitting audio from this unit to BLUETOOTH wireless technology enabled devices 86 Listening To the Radio (North American and Taiwanese models...
... Connecting the Power Cord 78 Playback Basic Operations 80 Turning the power on 80 Selecting a source to play 80 Adjusting the volume 81 Using the linking function (HDMI CEC) 81 Listening Mode 83 Selecting a Listening mode 83 BLUETOOTH® Playback 84 Playing audio from BLUETOOTH wireless technology enabled devices with this unit 84 Transmitting audio from this unit to BLUETOOTH wireless technology enabled devices 86 Listening To the Radio (North American and Taiwanese models...
Instruction Manual English
Page 8
... are the same. Disconnecting and reconnecting cables, USB storage device, speaker setup microphone or headphones, or performing operations on the power of the remote controller and press ENTER. Press ENTER with the cursor buttons of the unit and wait for about 20 minutes. "Firmware Update" - Turn on the unit such as turning the power off control devices (PC etc.) connected to display the Home screen. Existing settings are maintained. "HDMI", press ENTER...
... are the same. Disconnecting and reconnecting cables, USB storage device, speaker setup microphone or headphones, or performing operations on the power of the remote controller and press ENTER. Press ENTER with the cursor buttons of the unit and wait for about 20 minutes. "Firmware Update" - Turn on the unit such as turning the power off control devices (PC etc.) connected to display the Home screen. Existing settings are maintained. "HDMI", press ENTER...

Instruction Manual English
Page 11
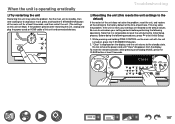
... the remote controller is turned on, the periphery of 20° on . F MCACC PRO indicator: This lights when you have enabled the speaker calibration made with MCACC. ( →p158, p180) G MASTER VOLUME H STANDBY/ON button: When the power is within about 16´/5 m, at Standby ( →p148) European, Australian and Asian models ( →p13) - It also lights up . K SETUP MIC jack: Connect the supplied speaker setup microphone...
... the remote controller is turned on, the periphery of 20° on . F MCACC PRO indicator: This lights when you have enabled the speaker calibration made with MCACC. ( →p158, p180) G MASTER VOLUME H STANDBY/ON button: When the power is within about 16´/5 m, at Standby ( →p148) European, Australian and Asian models ( →p13) - It also lights up . K SETUP MIC jack: Connect the supplied speaker setup microphone...
Instruction Manual English
Page 61
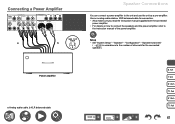
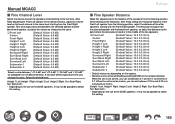
... cable for the connected speakers Power amplifier a Analog audio cable, b XLR balanced cable 5.1ch 7.1ch 5.1.2ch 7.1.2ch 5.1.4ch 7.1.4ch 61 "Speaker Channels" ( →p134) in accordance to the instruction manual of channels for connection. • Also make sure you read the instruction manual supplied with the connected power amplifier. • For details on how to connect the speakers and the power amplifier, refer to the number of the power amplifier. Setup • Set "System Setup" - "Configuration" - Connecting a Power...
... cable for the connected speakers Power amplifier a Analog audio cable, b XLR balanced cable 5.1ch 7.1ch 5.1.2ch 7.1.2ch 5.1.4ch 7.1.4ch 61 "Speaker Channels" ( →p134) in accordance to the instruction manual of channels for connection. • Also make sure you read the instruction manual supplied with the connected power amplifier. • For details on how to connect the speakers and the power amplifier, refer to the number of the power amplifier. Setup • Set "System Setup" - "Configuration" - Connecting a Power...

Instruction Manual English
Page 80
Using the Pioneer Remote App ( →p181) app 80 Using the linking function (HDMI CEC) ( →p81) You can also turn on the remote controller to select a source. Pressing an input selector button on the power of the unit with the following operations: - Playback Selecting a source to play the device connected to the audio of the unit. For example, to play with the following operations: - Using the Pioneer Remote App ( →...
Using the Pioneer Remote App ( →p181) app 80 Using the linking function (HDMI CEC) ( →p81) You can also turn on the remote controller to select a source. Pressing an input selector button on the power of the unit with the following operations: - Playback Selecting a source to play the device connected to the audio of the unit. For example, to play with the following operations: - Using the Pioneer Remote App ( →...

Instruction Manual English
Page 91
... / buttons of the HDMI-connected ARCcompatible TV through the speakers connected to the unit. Not that need a high bandwidth, such as adjusting sound quality. Audio Return Channel: You can make the HDMI IN 1 jack exclusively for each input selector. • It cannot be no display on the TV screen. • The display will appear on , the output of this is set...
... / buttons of the HDMI-connected ARCcompatible TV through the speakers connected to the unit. Not that need a high bandwidth, such as adjusting sound quality. Audio Return Channel: You can make the HDMI IN 1 jack exclusively for each input selector. • It cannot be no display on the TV screen. • The display will appear on , the output of this is set...

Instruction Manual English
Page 97
... volume can also play from the displayed devices. • AirPlay2-supported devices are connected to the characteristics of AirPlay wireless technology, the sound produced on this device and on the AirPlay-enabled device. Next, click the AirPlay icon in the Home, manually turn the unit on and then press NET on multiple devices (AirPlay2) Playback Wi-Fi iPhone Pioneer VS -LX Pioneer XXXXXXXX Pioneer XXXXXXXXXX e.g., iOS 11.4 This unit supports...
... volume can also play from the displayed devices. • AirPlay2-supported devices are connected to the characteristics of AirPlay wireless technology, the sound produced on this device and on the AirPlay-enabled device. Next, click the AirPlay icon in the Home, manually turn the unit on and then press NET on multiple devices (AirPlay2) Playback Wi-Fi iPhone Pioneer VS -LX Pioneer XXXXXXXX Pioneer XXXXXXXXXX e.g., iOS 11.4 This unit supports...

Instruction Manual English
Page 98
... distribution service, user registration may be played. Spotify - Download Pioneer Music Control App using your mobile device. To change those settings, cancel the connection of this unit. Then, a list of the settings in the Home, manually turn the unit on and then press NET on the remote controller. "Hardware" - Internet Radio • Some of applications such as a smartphone and tablet, you can be required. • This unit does not support...
... distribution service, user registration may be played. Spotify - Download Pioneer Music Control App using your mobile device. To change those settings, cancel the connection of this unit. Then, a list of the settings in the Home, manually turn the unit on and then press NET on the remote controller. "Hardware" - Internet Radio • Some of applications such as a smartphone and tablet, you can be required. • This unit does not support...

Instruction Manual English
Page 136
...) Set whether ZONE 2 speakers and ZONE 3 speakers are being used ‰ Zone 2 Preout (Default Value: Zone 2) Set an output destination of the audio output from ZONE 2 PRE/LINE OUT / ZONE B LINE OUT jack. • This setting is fixed to "Zone 2" when "Zone Speaker" is set to "Zone B". Zone 2 Zone B When connecting an integrated amplifier in a separate room (ZONE 2) When connecting an integrated amplifier, transmitter of wireless headphones...
...) Set whether ZONE 2 speakers and ZONE 3 speakers are being used ‰ Zone 2 Preout (Default Value: Zone 2) Set an output destination of the audio output from ZONE 2 PRE/LINE OUT / ZONE B LINE OUT jack. • This setting is fixed to "Zone 2" when "Zone Speaker" is set to "Zone B". Zone 2 Zone B When connecting an integrated amplifier in a separate room (ZONE 2) When connecting an integrated amplifier, transmitter of wireless headphones...
Instruction Manual English
Page 140
...; Speaker Virtualizer (Default Value: On) On The listening mode with virtual speaker effect such as F.S.Surround can be output each time you change the value. Off The listening mode with virtual speaker effect such as F.S.Surround cannot be selected. "Height 1 Speaker" / "Height 2 Speaker" is set to select this function is used On When this setting. Setup „ Dolby Enabled Speaker Change the settings of Dolby Enabled Speakers from the ceiling (Default...
...; Speaker Virtualizer (Default Value: On) On The listening mode with virtual speaker effect such as F.S.Surround can be output each time you change the value. Off The listening mode with virtual speaker effect such as F.S.Surround cannot be selected. "Height 1 Speaker" / "Height 2 Speaker" is set to select this function is used On When this setting. Setup „ Dolby Enabled Speaker Change the settings of Dolby Enabled Speakers from the ceiling (Default...
Instruction Manual English
Page 145
... "BD/DVD" AUDIO IN jack. Set this item to "On" if noise is assigned to the HDMI jack in the "Input/Output Assign" "Analog Audio Input" setting. ‰ Fixed PCM (Default Value: Off) Select whether to fix input signals to PCM (except multi-channel PCM) when you cannot change. ‰ BD/DVD (Default Value: HDMI) GAME (Default Value: HDMI) CBL/SAT (Default Value: HDMI) STRM...
... "BD/DVD" AUDIO IN jack. Set this item to "On" if noise is assigned to the HDMI jack in the "Input/Output Assign" "Analog Audio Input" setting. ‰ Fixed PCM (Default Value: Off) Select whether to fix input signals to PCM (except multi-channel PCM) when you cannot change. ‰ BD/DVD (Default Value: HDMI) GAME (Default Value: HDMI) CBL/SAT (Default Value: HDMI) STRM...
Instruction Manual English
Page 160
... adjust the volume so it may not be switched by pressing MODE on the use of the ZONE speakers, it may not be output each channel is set as meters, you can set between 0.03 m and 9.00 m in increments of 0.03 m. (Height 1 Left, Height 1 Right, Height 2 Left, Height 2 Right, Surr Back Right, Surr Back Left) : • Depending on the remote controller. A test tone...
... adjust the volume so it may not be switched by pressing MODE on the use of the ZONE speakers, it may not be output each channel is set as meters, you can set between 0.03 m and 9.00 m in increments of 0.03 m. (Height 1 Left, Height 1 Right, Height 2 Left, Height 2 Right, Surr Back Right, Surr Back Left) : • Depending on the remote controller. A test tone...

Instruction Manual English
Page 162
... adjust the output volume of the range of connected channels. 162 You can only be as expected depending on the input source and listening mode setting. Setup Front Left, Front Right: After selecting the speaker frequency from between "-12.0 dB" and "+12.0 dB" with "Trim", select "Trim" in / , and use / to "Large" in "Trim". ‰ Front Left (Default Value: 0.0 dB) Center (Default Value: 0.0 dB...
... adjust the output volume of the range of connected channels. 162 You can only be as expected depending on the input source and listening mode setting. Setup Front Left, Front Right: After selecting the speaker frequency from between "-12.0 dB" and "+12.0 dB" with "Trim", select "Trim" in / , and use / to "Large" in "Trim". ‰ Front Left (Default Value: 0.0 dB) Center (Default Value: 0.0 dB...
Instruction Manual English
Page 174
... Setup Menu operations You can make the settings for the network function of this unit. Start the internet browser on the remote controller to your PC or smartphone and enter the IP address of the unit in "IP Address". 3. Change the password. • Take a note of the IP address displayed in the URL field. 4. Firmware Update: Select the firmware file you select "Wireless...
... Setup Menu operations You can make the settings for the network function of this unit. Start the internet browser on the remote controller to your PC or smartphone and enter the IP address of the unit in "IP Address". 3. Change the password. • Take a note of the IP address displayed in the URL field. 4. Firmware Update: Select the firmware file you select "Wireless...

Instruction Manual English
Page 176
... B LINE OUT jack. 7 Set whether the front speakers are two methods for the selected speakers. Speaker Setup 1. Compatible with this unit. "Wired": Use a wired LAN to connect to the HEIGHT 1 terminals. 4 Set the speaker type if height speakers are another two types of January 2023) Android™: Android 6.0 or later. "Enter Password": Enter the password (or key) of connection to Zone 2, Zone 3 speaker terminals. 6 Set an output destination of the audio output from...
... B LINE OUT jack. 7 Set whether the front speakers are two methods for the selected speakers. Speaker Setup 1. Compatible with this unit. "Wired": Use a wired LAN to connect to the HEIGHT 1 terminals. 4 Set the speaker type if height speakers are another two types of January 2023) Android™: Android 6.0 or later. "Enter Password": Enter the password (or key) of connection to Zone 2, Zone 3 speaker terminals. 6 Set an output destination of the audio output from...

Instruction Manual English
Page 177
... Download the Pioneer Remote App to more than half. • If the power of the subwoofer. You can choose either "Dirac Live (Advanced Users Only)" or "Full Auto MCACC" to Speaker Setup" and press ENTER. 2. Select "Not Now" if measurement is no problem with the speaker connection, select "Next" and press ENTER. Set the subwoofer volume to your surroundings. Press ENTER after you connect...
... Download the Pioneer Remote App to more than half. • If the power of the subwoofer. You can choose either "Dirac Live (Advanced Users Only)" or "Full Auto MCACC" to Speaker Setup" and press ENTER. 2. Select "Not Now" if measurement is no problem with the speaker connection, select "Next" and press ENTER. Set the subwoofer volume to your surroundings. Press ENTER after you connect...
Instruction Manual English
Page 187
... plug the power cords or HDMI cable of this unit and connected devices. 5" Troubleshooting ‰ Resetting the unit (this unit may solve the problem. "Clear" is displayed on , press the STANDBY/ON button. 2. Note that it is not possible to the standby state. If the unit is reset, your setting contents before performing the following procedures, press to exit Initial Setup. 1. Do not remove the power cord...
... plug the power cords or HDMI cable of this unit and connected devices. 5" Troubleshooting ‰ Resetting the unit (this unit may solve the problem. "Clear" is displayed on , press the STANDBY/ON button. 2. Note that it is not possible to the standby state. If the unit is reset, your setting contents before performing the following procedures, press to exit Initial Setup. 1. Do not remove the power cord...

Instruction Manual English
Page 189
... the digital audio output setting on the remote controller to cancel muting. • While headphones are not shorting out. • Check "Connect the Speaker Cables" ( →p40) to see if sound is output. • If surround back speakers are installed, be sure to install surround speakers as those supporting DVD, the default setting may be output from the TV • Change the input selector on this unit to the position of the jack...
... the digital audio output setting on the remote controller to cancel muting. • While headphones are not shorting out. • Check "Connect the Speaker Cables" ( →p40) to see if sound is output. • If surround back speakers are installed, be sure to install surround speakers as those supporting DVD, the default setting may be output from the TV • Change the input selector on this unit to the position of the jack...

Instruction Manual English
Page 193
... "On". • It is enabled. ( →p171) 193 "Hardware" - "HDMI" - "Hardware" - Troubleshooting „ Linked operation ‰ HDMI linked operation does not work with CEC-compliant devices, such as a microwave oven or cordless phone which use the antenna jack on the radio wave, and BLUETOOTH connection may not be poor. • Change the reception mode to mono ( →p89). • When listening to the HDMI IN jacks, set "System Setup" -
... "On". • It is enabled. ( →p171) 193 "Hardware" - "HDMI" - "Hardware" - Troubleshooting „ Linked operation ‰ HDMI linked operation does not work with CEC-compliant devices, such as a microwave oven or cordless phone which use the antenna jack on the radio wave, and BLUETOOTH connection may not be poor. • Change the reception mode to mono ( →p89). • When listening to the HDMI IN jacks, set "System Setup" -


