Owner's Manual
Page 4
...receiver 5 Making cable connections 5 Loading the batteries 5 Operating range of remote control unit 5 2 5 minute guide Introduction to home theater 6 Listening to Surround Sound 7 Using the Quick Setup 10 3 Connecting up Audio/Video cords 11 S-video cables (VSX-D511 only 11 Digital audio... 16 Hints on speaker placement 17 AC outlet 18 Operating other Pioneer components .......... 18 4 Controls and displays Front Panel 19 Display... inputs ... 28 6 Setting up your receiver Choosing your receiver setup 29 Speaker setting 30 Subwoofer setting 30 Crossover frequency setting 30 LFE ...
...receiver 5 Making cable connections 5 Loading the batteries 5 Operating range of remote control unit 5 2 5 minute guide Introduction to home theater 6 Listening to Surround Sound 7 Using the Quick Setup 10 3 Connecting up Audio/Video cords 11 S-video cables (VSX-D511 only 11 Digital audio... 16 Hints on speaker placement 17 AC outlet 18 Operating other Pioneer components .......... 18 4 Controls and displays Front Panel 19 Display... inputs ... 28 6 Setting up your receiver Choosing your receiver setup 29 Speaker setting 30 Subwoofer setting 30 Crossover frequency setting 30 LFE ...
Owner's Manual
Page 8
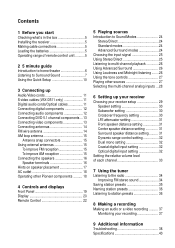
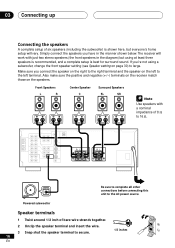
...is recommended, and all connections before connecting this unit to 16 Ω. Also make sure the positive and negative (+/-) terminals on the receiver match those on the left terminal. If you connect the speaker on the right to the left to the right terminal and the ...guide 3 Connect your speakers. Front Speakers L R Center Speaker C Surround Speakers SL SR RL RL INPUT Powered subwoofer 8 En Be sure to complete all six is shown here, but using a subwoofer, change the front speaker setting (see Speaker setting on page 30) to large. Simply connect the speakers you have...
...is recommended, and all connections before connecting this unit to 16 Ω. Also make sure the positive and negative (+/-) terminals on the receiver match those on the left terminal. If you connect the speaker on the right to the left to the right terminal and the ...guide 3 Connect your speakers. Front Speakers L R Center Speaker C Surround Speakers SL SR RL RL INPUT Powered subwoofer 8 En Be sure to complete all six is shown here, but using a subwoofer, change the front speaker setting (see Speaker setting on page 30) to large. Simply connect the speakers you have...
Owner's Manual
Page 9
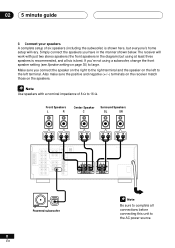
... adjust the volume to 27 for more on this . 5 minute guide 02 4 Plug in the receiver's display, indicating that the DVD input is showing in the receiver and switch it on, followed by your DVD player, your subwoofer and the TV. See pages 24 to your liking. See Using the Quick Setup on... pages 29 to do this . Use the MULTI JOG/INPUT SELECTOR dial to select and ENTER to confirm your receiver setup on the next page if you may...
... adjust the volume to 27 for more on this . 5 minute guide 02 4 Plug in the receiver's display, indicating that the DVD input is showing in the receiver and switch it on, followed by your DVD player, your subwoofer and the TV. See pages 24 to your liking. See Using the Quick Setup on... pages 29 to do this . Use the MULTI JOG/INPUT SELECTOR dial to select and ENTER to confirm your receiver setup on the next page if you may...
Owner's Manual
Page 13
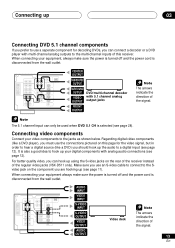
...FRONT OUTPUT The arrows indicate the direction of the regular video jacks (VSX-D511 only). Regarding digital video components (like a DVD player), you must use the connections pictured on the rear of the receiver instead of the signal. Connecting up 03 Connecting DVD 5.1 channel ...audio to a digital input (see page 12). CENTER OUTPUT SUBWOOFER OUTPUT SURROUND OUTPUT VIDEO OUTPUT DVD/multi-channel decoder with multi-channel analog outputs to the jacks as shown below. It is selected (see page 11). Connecting video components Connect your digital components with analog audio...
...FRONT OUTPUT The arrows indicate the direction of the regular video jacks (VSX-D511 only). Regarding digital video components (like a DVD player), you must use the connections pictured on the rear of the receiver instead of the signal. Connecting up 03 Connecting DVD 5.1 channel ...audio to a digital input (see page 12). CENTER OUTPUT SUBWOOFER OUTPUT SURROUND OUTPUT VIDEO OUTPUT DVD/multi-channel decoder with multi-channel analog outputs to the jacks as shown below. It is selected (see page 11). Connecting video components Connect your digital components with analog audio...
Owner's Manual
Page 16
...Be sure to complete all other INPUT connections before connecting this unit to large. Also make sure the positive and negative (+/-) terminals on the receiver match those on the left to the left terminal. 03 Connecting up Connecting the speakers A complete setup of bare wire strands together. ª...En Simply connect the speakers you 're not using at least three speakers is recommended, and a complete setup is shown here, but using a subwoofer, change the front speaker setting (see Speaker setting on page 30) to the AC power source. If you have in the diagram) but ...
...Be sure to complete all other INPUT connections before connecting this unit to large. Also make sure the positive and negative (+/-) terminals on the receiver match those on the left to the left terminal. 03 Connecting up Connecting the speakers A complete setup of bare wire strands together. ª...En Simply connect the speakers you 're not using at least three speakers is recommended, and a complete setup is shown here, but using a subwoofer, change the front speaker setting (see Speaker setting on page 30) to the AC power source. If you have in the diagram) but ...
Owner's Manual
Page 17
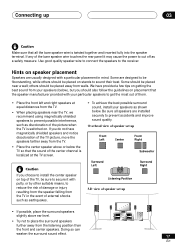
... placement in the event of external shocks such as shown below. Listening Position 3-D view of speaker set up Front Left Center Front Right Surround Left Subwoofer Surround Right If you should be placed on stands to prevent possible interference, such as a safety measure. Overhead view of speaker set up • If... (below), but you choose to install the center speaker on top of the TV, be sure to secure it may cause the power to the receiver.
... placement in the event of external shocks such as shown below. Listening Position 3-D view of speaker set up Front Left Center Front Right Surround Left Subwoofer Surround Right If you should be placed on stands to prevent possible interference, such as a safety measure. Overhead view of speaker set up • If... (below), but you choose to install the center speaker on top of the TV, be sure to secure it may cause the power to the receiver.
Owner's Manual
Page 25
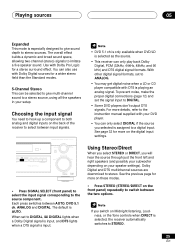
...use with your DVD player. • You can only select DIGITAL if the source you selected is assigned to a digital input. AUDIO/VIDEO MULTI-CHANNEL RECEIVER N∫m-Û.,, STEREO/ DIRECT SIGNAL SELECT MONITOR MIDNIGHT LOUDNESS TONE QUICK SETUP MULTI JOG MULTI JOG ENTER INPUT SELECTOR MASTER VOLUME DOWN ... a LD or CD player compatible with Dolby Pro Logic for more on these modes. • Press STEREO (STEREO/DIRECT on your subwoofer depending on the front panel) repeatedly to both analog and digital inputs on Midnight listening, Loudness, or the Tone controls when DIRECT is...
...use with your DVD player. • You can only select DIGITAL if the source you selected is assigned to a digital input. AUDIO/VIDEO MULTI-CHANNEL RECEIVER N∫m-Û.,, STEREO/ DIRECT SIGNAL SELECT MONITOR MIDNIGHT LOUDNESS TONE QUICK SETUP MULTI JOG MULTI JOG ENTER INPUT SELECTOR MASTER VOLUME DOWN ... a LD or CD player compatible with Dolby Pro Logic for more on these modes. • Press STEREO (STEREO/DIRECT on your subwoofer depending on the front panel) repeatedly to both analog and digital inputs on Midnight listening, Loudness, or the Tone controls when DIRECT is...
Owner's Manual
Page 29
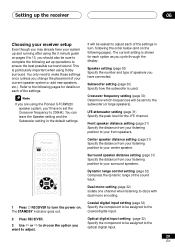
If you are using the Pioneer S-FCRW220 speaker system, you want to adjust. Dual mono setting (page 32) Isolate one channel when listening to discs with dual mono encoding. 1 Press RECEIVER to turn , following the order below (and on pages 6 to 10, you cycle through the display... the Speaker setting and the Subwoofer setting in turn the power on each of the settings. Surround speaker distance setting (page 31) Specify the distance from your listening RECEIVER position to your center speaker. Setting up the receiver 06 Choosing your receiver setup Even though you may ...
If you are using the Pioneer S-FCRW220 speaker system, you want to adjust. Dual mono setting (page 32) Isolate one channel when listening to discs with dual mono encoding. 1 Press RECEIVER to turn , following the order below (and on pages 6 to 10, you cycle through the display... the Speaker setting and the Subwoofer setting in turn the power on each of the settings. Surround speaker distance setting (page 31) Specify the distance from your listening RECEIVER position to your center speaker. Setting up the receiver 06 Choosing your receiver setup Even though you may ...
Owner's Manual
Page 30
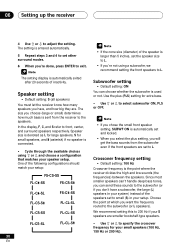
Speaker setting • Default setting: S (all speakers) You must let the receiver know how many speakers you don't have a subwoofer, the large (L) speakers in your system) instead of the following configurations should match your setup: FS-CS-SS FL-C -SS FS-CS-S FL-C -SL...). 30 En In the display, F, C, and S refer to adjust the setting. The setting is entered automatically. 5 Repeat steps 3 and 4 to set to the subwoofer (or L speakers). 06 Setting up the receiver 4 Use ' or ' to front, center, and surround speakers respectively. The setting display is the point where the...
Speaker setting • Default setting: S (all speakers) You must let the receiver know how many speakers you don't have a subwoofer, the large (L) speakers in your system) instead of the following configurations should match your setup: FS-CS-SS FL-C -SS FS-CS-S FL-C -SL...). 30 En In the display, F, C, and S refer to adjust the setting. The setting is entered automatically. 5 Repeat steps 3 and 4 to set to the subwoofer (or L speakers). 06 Setting up the receiver 4 Use ' or ' to front, center, and surround speakers respectively. The setting display is the point where the...
Owner's Manual
Page 31
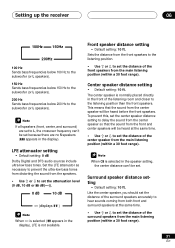
... distance setting • Default setting: 10 ft. Setting up the receiver 06 100Hz 150Hz 200Hz 100 Hz Sends bass frequencies below 100 Hz to the subwoofer (or L speakers). 150 Hz Sends bass frequencies below 150 Hz to the subwoofer (or L speakers). 200 Hz Sends bass frequencies below 200 Hz ...to delay the sound from the center speaker so that the sound from the main listening position (within a 30 foot range). 31 En LFE attenuator setting • Default setting: 0 dB Dolby Digital and DTS audio sources...
... distance setting • Default setting: 10 ft. Setting up the receiver 06 100Hz 150Hz 200Hz 100 Hz Sends bass frequencies below 100 Hz to the subwoofer (or L speakers). 150 Hz Sends bass frequencies below 150 Hz to the subwoofer (or L speakers). 200 Hz Sends bass frequencies below 200 Hz ...to delay the sound from the center speaker so that the sound from the main listening position (within a 30 foot range). 31 En LFE attenuator setting • Default setting: 0 dB Dolby Digital and DTS audio sources...
Owner's Manual
Page 33
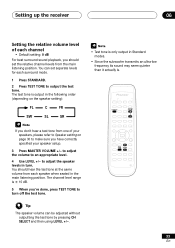
... position. to adjust the volume to turn . Î You should set seperate levels for each speaker when seated in Standard modes. • Since the subwoofer transmits an ultra-low frequency its sound may seem quieter than it actually is ± 10 dB. 5 When you're done, press TEST TONE to... FR SW SL SR • Test tone is output in the following order (depending on page 30 to output the test tone. Setting up the receiver 06 Setting the relative volume level of your speaker setup. 3 Press MASTER VOLUME +/- The test tone is only output in the main listening position. ...
... position. to adjust the volume to turn . Î You should set seperate levels for each speaker when seated in Standard modes. • Since the subwoofer transmits an ultra-low frequency its sound may seem quieter than it actually is ± 10 dB. 5 When you're done, press TEST TONE to... FR SW SL SR • Test tone is output in the following order (depending on page 30 to output the test tone. Setting up the receiver 06 Setting the relative volume level of your speaker setup. 3 Press MASTER VOLUME +/- The test tone is only output in the main listening position. ...


