Owner's Manual
Page 4
... the box 5 Installing the receiver 5 Making cable connections 5 Loading the batteries 5 Operating range of remote control unit 5 2 5 minute guide Introduction to home theater 6 Listening to Surround Sound 7 Using the Quick Setup 10 3 Connecting up Audio/Video cords 11 S-video cables (VSX-D511 only 11 Digital audio cords/Optical cables 11 Connecting digital components 12 Connecting audio components 12 Connecting DVD 5.1 channel components ... 13 Connecting video components 13 Connecting antennas 14 FM wire antenna 14 AM loop antenna 15 Antenna snap connectors 15 Using external...
... the box 5 Installing the receiver 5 Making cable connections 5 Loading the batteries 5 Operating range of remote control unit 5 2 5 minute guide Introduction to home theater 6 Listening to Surround Sound 7 Using the Quick Setup 10 3 Connecting up Audio/Video cords 11 S-video cables (VSX-D511 only 11 Digital audio cords/Optical cables 11 Connecting digital components 12 Connecting audio components 12 Connecting DVD 5.1 channel components ... 13 Connecting video components 13 Connecting antennas 14 FM wire antenna 14 AM loop antenna 15 Antenna snap connectors 15 Using external...
Owner's Manual
Page 7
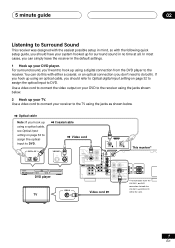
... ASSIGNABLE DIGITAL IN COAX OPT (DVD/LD) ¥ (TV/SAT) ¥ This receiver* VIDEO OUT STANDBY/ON 41 ¡¢ 0 7 8 Î 3 DVD PLAYER DVD player VIDEO IN TV IN Video cord MONITOR OUT SUB WOOFER PREOUT *The illustration shows the VSX-D511, but DVD connections for surround sound in the default settings. 1 Hook up using the jacks as shown below . 2 Hook up for both ). 5 minute guide 02 Listening to Surround Sound This receiver was designed with the easiest possible setup in...
... ASSIGNABLE DIGITAL IN COAX OPT (DVD/LD) ¥ (TV/SAT) ¥ This receiver* VIDEO OUT STANDBY/ON 41 ¡¢ 0 7 8 Î 3 DVD PLAYER DVD player VIDEO IN TV IN Video cord MONITOR OUT SUB WOOFER PREOUT *The illustration shows the VSX-D511, but DVD connections for surround sound in the default settings. 1 Hook up using the jacks as shown below . 2 Hook up for both ). 5 minute guide 02 Listening to Surround Sound This receiver was designed with the easiest possible setup in...
Owner's Manual
Page 8
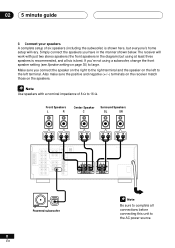
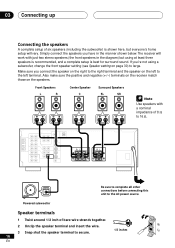
... the speaker on the speakers. Front Speakers L R Center Speaker C Surround Speakers SL SR RL RL INPUT Powered subwoofer 8 En Be sure to complete all six is recommended, and all connections before connecting this unit to the left to the AC power source. If you have in the diagram) but everyone's home setup will work with a nominal impedance of six speakers (including the subwoofer) is shown here, but using a subwoofer, change the front speaker setting (see Speaker setting...
... the speaker on the speakers. Front Speakers L R Center Speaker C Surround Speakers SL SR RL RL INPUT Powered subwoofer 8 En Be sure to complete all six is recommended, and all connections before connecting this unit to the left to the AC power source. If you have in the diagram) but everyone's home setup will work with a nominal impedance of six speakers (including the subwoofer) is shown here, but using a subwoofer, change the front speaker setting (see Speaker setting...
Owner's Manual
Page 9
... get digital 2 channel stereo and analog sound. In this receiver. Make sure you want multi-channel surround sound. 9 En See pages 24 to 27 for more on your DVD player or source discs, you can select. 5 minute guide 02 4 Plug in the receiver's display, indicating that came with the TV if you 're unsure about the settings. 6 Play a DVD, and adjust the volume to your liking. See Using the Quick Setup on the front panel to specify your speaker setup...
... get digital 2 channel stereo and analog sound. In this receiver. Make sure you want multi-channel surround sound. 9 En See pages 24 to 27 for more on your DVD player or source discs, you can select. 5 minute guide 02 4 Plug in the receiver's display, indicating that came with the TV if you 're unsure about the settings. 6 Play a DVD, and adjust the volume to your liking. See Using the Quick Setup on the front panel to specify your speaker setup...
Owner's Manual
Page 12
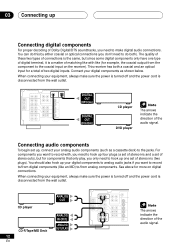
... play, you need to make sure the power is turned off and the power cord is disconnected from the wall outlet. When connecting your digital components to analog audio jacks if you don't need to do this by either coaxial or optical connections (you want to record with like an MD) to/from the component to the coaxial input on digital connections. You should also hook up your equipment, always make digital audio connections. This receiver...
... play, you need to make sure the power is turned off and the power cord is disconnected from the wall outlet. When connecting your digital components to analog audio jacks if you don't need to do this by either coaxial or optical connections (you want to record with like an MD) to/from the component to the coaxial input on digital connections. You should also hook up your equipment, always make digital audio connections. This receiver...
Owner's Manual
Page 13
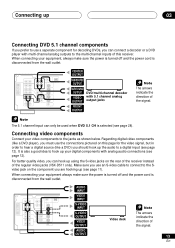
... the power is turned off and the power cord is disconnected from the wall outlet. AUDIO INPUT VIDEO INPUT S-VIDEO INPUT S-VIDEO OUTPUT VIDEO OUTPUT AUDIO OUTPUT Video deck The arrows indicate the direction of the signal. CENTER OUTPUT SUBWOOFER OUTPUT SURROUND OUTPUT VIDEO OUTPUT DVD/multi-channel decoder with analog audio connections (see page 28). When connecting your video components to the multi-channel inputs of the regular video jacks (VSX-D511 only). For better quality video, you should hook up using the S-video jacks on this receiver. It is selected (see...
... the power is turned off and the power cord is disconnected from the wall outlet. AUDIO INPUT VIDEO INPUT S-VIDEO INPUT S-VIDEO OUTPUT VIDEO OUTPUT AUDIO OUTPUT Video deck The arrows indicate the direction of the signal. CENTER OUTPUT SUBWOOFER OUTPUT SURROUND OUTPUT VIDEO OUTPUT DVD/multi-channel decoder with analog audio connections (see page 28). When connecting your video components to the multi-channel inputs of the regular video jacks (VSX-D511 only). For better quality video, you should hook up using the S-video jacks on this receiver. It is selected (see...
Owner's Manual
Page 16
... large. RL RL Be sure to complete all other INPUT connections before connecting this unit to the AC power source. Front Speakers L R Center Speaker C Surround Speakers SL SR Use speakers with just two stereo speakers (the front speakers in the manner shown below. 03 Connecting up Connecting the speakers A complete setup of six speakers (including the subwoofer) is best for surround sound. The receiver will vary. Also make sure the positive and negative (+/-) terminals on the...
... large. RL RL Be sure to complete all other INPUT connections before connecting this unit to the AC power source. Front Speakers L R Center Speaker C Surround Speakers SL SR Use speakers with just two stereo speakers (the front speakers in the manner shown below. 03 Connecting up Connecting the speakers A complete setup of six speakers (including the subwoofer) is best for surround sound. The receiver will vary. Also make sure the positive and negative (+/-) terminals on the...
Owner's Manual
Page 19
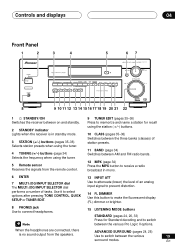
... are connected, there is in standby mode. 3 STATION (+/-) buttons (pages 35-36) Selects station presets when using the tuner. 4 TUNING (+/-) buttons (page 34) Selects the frequency when using the tuner. 5 Remote sensor Receives the signals from the speakers. Controls and displays 04 Front Panel 1 2 STANDBY STANDBY/ON PHONES 3 4 5 67 AUDIO/VIDEO MULTI-CHANNEL RECEIVER N∫m-Û.,, STATION TUNING ADVANCED STANDARD SURROUND STEREO/ DIRECT SIGNAL SELECT MONITOR MIDNIGHT LOUDNESS TONE QUICK SETUP TUNER EDIT CLASS BAND MPX MULTI JOG LISTENING MODE INPUT ATT...
... are connected, there is in standby mode. 3 STATION (+/-) buttons (pages 35-36) Selects station presets when using the tuner. 4 TUNING (+/-) buttons (page 34) Selects the frequency when using the tuner. 5 Remote sensor Receives the signals from the speakers. Controls and displays 04 Front Panel 1 2 STANDBY STANDBY/ON PHONES 3 4 5 67 AUDIO/VIDEO MULTI-CHANNEL RECEIVER N∫m-Û.,, STATION TUNING ADVANCED STANDARD SURROUND STEREO/ DIRECT SIGNAL SELECT MONITOR MIDNIGHT LOUDNESS TONE QUICK SETUP TUNER EDIT CLASS BAND MPX MULTI JOG LISTENING MODE INPUT ATT...
Owner's Manual
Page 20
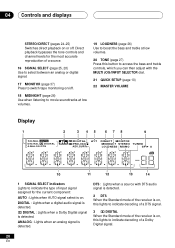
... a digital audio signal is detected. 2 DIGITAL : Lights when a Dolby Digital signal is detected. ANALOG : Lights when an analog signal is detected. 04 Controls and displays STEREO/DIRECT (pages 24-25) Switches direct playback on or off . 18 MIDNIGHT (page 26) Use when listening to movie soundtracks at low volumes. 19 LOUDNESS (page 26) Use to boost the bass and treble at low volumes. 20 TONE (page 27) Press this lights to indicate decoding of a source. 16 SIGNAL SELECT...
... a digital audio signal is detected. 2 DIGITAL : Lights when a Dolby Digital signal is detected. ANALOG : Lights when an analog signal is detected. 04 Controls and displays STEREO/DIRECT (pages 24-25) Switches direct playback on or off . 18 MIDNIGHT (page 26) Use when listening to movie soundtracks at low volumes. 19 LOUDNESS (page 26) Use to boost the bass and treble at low volumes. 20 TONE (page 27) Press this lights to indicate decoding of a source. 16 SIGNAL SELECT...
Owner's Manual
Page 22
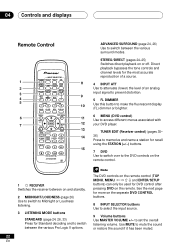
... seperate DVD CONTROL buttons. 8 INPUT SELECTOR buttons Use to mute the sound or restore the sound if it has been muted. 22 En 04 Controls and displays Remote Control DVD/LD TV/SAT CD 1 2 MASTER VOLUME 3 4 ATT MUTE 5 TUNING STATION BAND CLASS MPX DISPLAY MENU TOP MENU 6 TUNER EDIT SETUP 7 ENTER DVD VER DVD CH SELECT AUDIO EFFECT SUB TITLE 1 3¡ 7 8 4¢ DVD CONTROL AV RECEIVER Î ADVANCED SURROUND (page 24, 26) Use to set the overall listening volume. Direct playback bypasses the tone controls and channel levels for...
... seperate DVD CONTROL buttons. 8 INPUT SELECTOR buttons Use to mute the sound or restore the sound if it has been muted. 22 En 04 Controls and displays Remote Control DVD/LD TV/SAT CD 1 2 MASTER VOLUME 3 4 ATT MUTE 5 TUNING STATION BAND CLASS MPX DISPLAY MENU TOP MENU 6 TUNER EDIT SETUP 7 ENTER DVD VER DVD CH SELECT AUDIO EFFECT SUB TITLE 1 3¡ 7 8 4¢ DVD CONTROL AV RECEIVER Î ADVANCED SURROUND (page 24, 26) Use to set the overall listening volume. Direct playback bypasses the tone controls and channel levels for...
Owner's Manual
Page 23
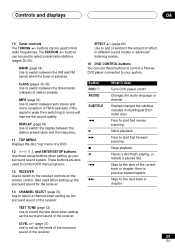
.../SETUP buttons Use these buttons to control a Pioneer DVD player connected to start fast forward scanning. Press to your surround sound system. Skips to the next track or chapter. 14 CHANNEL SELECT (page 33) Use to switch between the station preset name and the frequency. 11 TOP MENU Displays the disc 'top' menu of station presets. Stops playback. buttons can use these arrow buttons when setting up the levels of the surround sound of the receiver. CLASS (pages 35-36) Use to select a channel when setting...
.../SETUP buttons Use these buttons to control a Pioneer DVD player connected to start fast forward scanning. Press to your surround sound system. Skips to the next track or chapter. 14 CHANNEL SELECT (page 33) Use to switch between the station preset name and the frequency. 11 TOP MENU Displays the disc 'top' menu of station presets. Stops playback. buttons can use these arrow buttons when setting up the levels of the surround sound of the receiver. CLASS (pages 35-36) Use to select a channel when setting...
Owner's Manual
Page 25
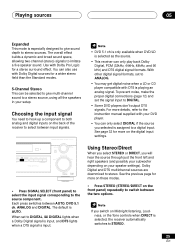
... Dolby Digital, PCM (32kHz, 44kHz, 48kHz, and 96 kHz) and DTS digital signal formats. The default is selected, the receiver automatically switches to STEREO. 25 En For more on the digital input settings. Playing sources 05 Expanded This mode is especially designed to give multi-channel sound to a stereo source, using all the speakers in your speaker settings). Using Stereo/Direct When you select STEREO or DIRECT, you selected is assigned to a digital input. If you switch on the back of the receiver to DIGITAL. • Some DVD players don't output...
... Dolby Digital, PCM (32kHz, 44kHz, 48kHz, and 96 kHz) and DTS digital signal formats. The default is selected, the receiver automatically switches to STEREO. 25 En For more on the digital input settings. Playing sources 05 Expanded This mode is especially designed to give multi-channel sound to a stereo source, using all the speakers in your speaker settings). Using Stereo/Direct When you select STEREO or DIRECT, you selected is assigned to a digital input. If you switch on the back of the receiver to DIGITAL. • Some DVD players don't output...
Owner's Manual
Page 27
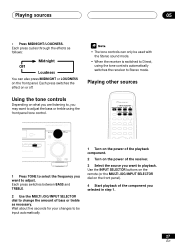
... AUDIO/VIDEO MULTI-CHANNEL RECEIVER N∫m-Û.,, MIDNIGHT LOUDNESS TONE QUICK SETUP MULTI JOG MULTI JOG ENTER INPUT SELECTOR MASTER VOLUME DOWN UP R 1 Press TONE to select the frequency you want to adjust. Wait about five seconds for your changes to be used with the Stereo sound mode. • When the receiver is switched to Stereo mode. Each press cycles through the effects as necessary. Use the INPUT SELECTOR buttons on the remote (or the MULTI JOG/INPUT SELECTOR dial on the power...
... AUDIO/VIDEO MULTI-CHANNEL RECEIVER N∫m-Û.,, MIDNIGHT LOUDNESS TONE QUICK SETUP MULTI JOG MULTI JOG ENTER INPUT SELECTOR MASTER VOLUME DOWN UP R 1 Press TONE to select the frequency you want to adjust. Wait about five seconds for your changes to be used with the Stereo sound mode. • When the receiver is switched to Stereo mode. Each press cycles through the effects as necessary. Use the INPUT SELECTOR buttons on the remote (or the MULTI JOG/INPUT SELECTOR dial on the power...
Owner's Manual
Page 29
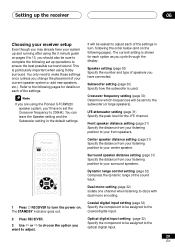
... adjust. The STANDBY indicator goes out. Optical digital input setting (page 32) Specify the component to be assigned to the coaxial digital input. 2 Press RECEIVER. 3 Use } or ] to choose the option you want to your center speaker. The current setting is used. Dual mono setting (page 32) Isolate one channel when listening to discs with dual mono encoding. 1 Press RECEIVER to ensure the best possible surround sound. Subwoofer setting (page 30) Specify how the subwoofer...
... adjust. The STANDBY indicator goes out. Optical digital input setting (page 32) Specify the component to be assigned to the coaxial digital input. 2 Press RECEIVER. 3 Use } or ] to choose the option you want to your center speaker. The current setting is used. Dual mono setting (page 32) Isolate one channel when listening to discs with dual mono encoding. 1 Press RECEIVER to ensure the best possible surround sound. Subwoofer setting (page 30) Specify how the subwoofer...
Owner's Manual
Page 31
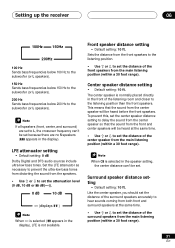
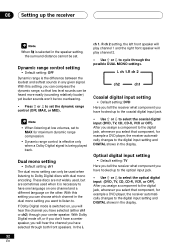
... attenuator setting • Default setting: 0 dB Dolby Digital and DTS audio sources include ultra-low bass tones. When C is selected in the speaker setting, the center distance can 't be set because there are set to set the distance of the center speaker from the main listening position (within a 30 foot range). Setting up the receiver 06 100Hz 150Hz 200Hz 100 Hz Sends bass frequencies below 100 Hz to the subwoofer (or L speakers). 150 Hz Sends bass frequencies...
... attenuator setting • Default setting: 0 dB Dolby Digital and DTS audio sources include ultra-low bass tones. When C is selected in the speaker setting, the center distance can 't be set because there are set to set the distance of the center speaker from the main listening position (within a 30 foot range). Setting up the receiver 06 100Hz 150Hz 200Hz 100 Hz Sends bass frequencies below 100 Hz to the subwoofer (or L speakers). 150 Hz Sends bass frequencies...
Owner's Manual
Page 32
... a component to the digital jack, whenever you have one language on one channel and a different language on , you will hear the channel you can be heard more easily (sounding relatively louder) yet louder sounds won't be set to MAX for example a DVD player, the receiver automatically changes to . With Dolby Digital mode off, or if you don't have a center speaker, you will hear the channel you select that low level sounds can...
... a component to the digital jack, whenever you have one language on one channel and a different language on , you will hear the channel you can be heard more easily (sounding relatively louder) yet louder sounds won't be set to MAX for example a DVD player, the receiver automatically changes to . With Dolby Digital mode off, or if you don't have a center speaker, you will hear the channel you select that low level sounds can...
Owner's Manual
Page 33
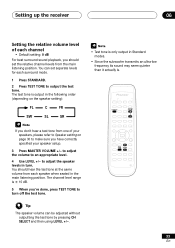
... channel • Default setting: 0 dB For best surround sound playback, you have correctly specified your speakers, please refer to output the test tone. The test tone is output in Standard modes. • Since the subwoofer transmits an ultra-low frequency its sound may seem quieter than it actually is. Setting up the receiver 06 Setting the relative volume level of your speaker setup. 3 Press MASTER VOLUME +/- to an appropriate level. 4 Use LEVEL +/- You can be adjusted without outputting the test tone by pressing CH SELECT...
... channel • Default setting: 0 dB For best surround sound playback, you have correctly specified your speakers, please refer to output the test tone. The test tone is output in Standard modes. • Since the subwoofer transmits an ultra-low frequency its sound may seem quieter than it actually is. Setting up the receiver 06 Setting the relative volume level of your speaker setup. 3 Press MASTER VOLUME +/- to an appropriate level. 4 Use LEVEL +/- You can be adjusted without outputting the test tone by pressing CH SELECT...
Owner's Manual
Page 35
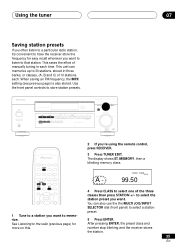
.... 5 Press ENTER. STANDBY STANDBY/ON PHONES AUDIO/VIDEO MULTI-CHANNEL RECEIVER N∫m-Û.,, STATION TUNING ADVANCED STEREO/ STANDARD SURROUND DIRECT SIGNAL SELECT MONITOR MIDNIGHT LOUDNESS TONE QUICK SETUP TUNER EDIT CLASS BAND MPX MULTI JOG LISTENING MODE INPUT ATT FL DIMMER MULTI JOG MULTI JOG ENTER INPUT SELECTOR MASTER VOLUME DOWN UP R 2 If you want to listen to that station. Use the front panel controls to the radio (previous page) for easy recall whenever you 're using the remote control, press RECEIVER. 3 Press TUNER EDIT. After...
.... 5 Press ENTER. STANDBY STANDBY/ON PHONES AUDIO/VIDEO MULTI-CHANNEL RECEIVER N∫m-Û.,, STATION TUNING ADVANCED STEREO/ STANDARD SURROUND DIRECT SIGNAL SELECT MONITOR MIDNIGHT LOUDNESS TONE QUICK SETUP TUNER EDIT CLASS BAND MPX MULTI JOG LISTENING MODE INPUT ATT FL DIMMER MULTI JOG MULTI JOG ENTER INPUT SELECTOR MASTER VOLUME DOWN UP R 2 If you want to listen to that station. Use the front panel controls to the radio (previous page) for easy recall whenever you 're using the remote control, press RECEIVER. 3 Press TUNER EDIT. After...
Owner's Manual
Page 38
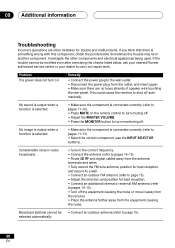
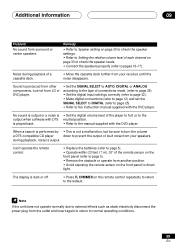
... component (use the INPUT SELECTOR buttons). 09 Additional information Troubleshooting Incorrect operations are no loose strands of speaker wire touching the rear panel. No image is output when a function is selected. • Make sure the component is something wrong with this component, check the points below , ask your nearest Pioneer authorized service center or your dealer to turn monitoring off . • Adjust the MASTER VOLUME. • Press the MONITOR button to carry out repair work. Broadcast stations...
... component (use the INPUT SELECTOR buttons). 09 Additional information Troubleshooting Incorrect operations are no loose strands of speaker wire touching the rear panel. No image is output when a function is selected. • Make sure the component is something wrong with this component, check the points below , ask your nearest Pioneer authorized service center or your dealer to turn monitoring off . • Adjust the MASTER VOLUME. • Press the MONITOR button to carry out repair work. Broadcast stations...
Owner's Manual
Page 39
... sure to turn the volume a DTS compatible CD player down to direct light. If the unit does not operate normally due to external effects such as static electricity disconnect the power plug from the outlet and insert again to return to the output when software with DTS neutral position. Sound is • Set the digital volume level of connections made. (refer to page 25). • Set the digital input settings correctly...
... sure to turn the volume a DTS compatible CD player down to direct light. If the unit does not operate normally due to external effects such as static electricity disconnect the power plug from the outlet and insert again to return to the output when software with DTS neutral position. Sound is • Set the digital volume level of connections made. (refer to page 25). • Set the digital input settings correctly...


