Owner's Manual
Page 4
...receiver 5 Making cable connections 5 Loading the batteries 5 Operating range of remote control unit 5 2 5 minute guide Introduction to home theater 6 Listening to Surround Sound 7 Using the Quick Setup 10 3 Connecting up Audio/Video cords 11 S-video cables (VSX-D511 only 11 Digital audio cords/Optical cables 11 Connecting digital components 12 Connecting audio... Connecting the speakers 16 Speaker terminals 16 Hints on speaker placement 17 AC outlet 18 Operating other Pioneer components .......... 18 4 Controls and displays Front Panel 19 Display 20 Remote Control 22 5 Playing...
...receiver 5 Making cable connections 5 Loading the batteries 5 Operating range of remote control unit 5 2 5 minute guide Introduction to home theater 6 Listening to Surround Sound 7 Using the Quick Setup 10 3 Connecting up Audio/Video cords 11 S-video cables (VSX-D511 only 11 Digital audio cords/Optical cables 11 Connecting digital components 12 Connecting audio... Connecting the speakers 16 Speaker terminals 16 Hints on speaker placement 17 AC outlet 18 Operating other Pioneer components .......... 18 4 Controls and displays Front Panel 19 Display 20 Remote Control 22 5 Playing...
Owner's Manual
Page 6
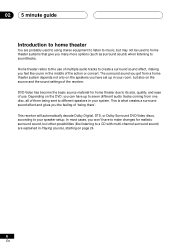
... you many more options (such as surround sound) when listening to soundtracks. Depending on the DVD, you the feeling of use of multiple audio tracks to create a surround sound effect, making you feel like listening to a CD with multi-channel surround sound) are probably used to ...home theater systems that give you have up in your speaker setup. This receiver will automatically decode Dolby Digital, DTS, or Dolby Surround DVD-Video discs, according to your system. Home theater refers to the use . The surround sound ...
... you many more options (such as surround sound) when listening to soundtracks. Depending on the DVD, you the feeling of use of multiple audio tracks to create a surround sound effect, making you feel like listening to a CD with multi-channel surround sound) are probably used to ...home theater systems that give you have up in your speaker setup. This receiver will automatically decode Dolby Digital, DTS, or Dolby Surround DVD-Video discs, according to your system. Home theater refers to the use . The surround sound ...
Owner's Manual
Page 7
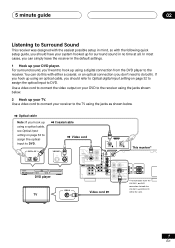
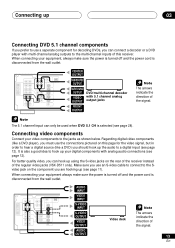
... a video cord to connect the video output on your DVD to the receiver using a digital connection from the DVD player to do both the VSX-D411 and VSX-D411S will be the same. 7 En You can simply leave the receiver in no time at all. In most cases, you don't need to...IN / TAPE / MD ASSIGNABLE DIGITAL IN COAX OPT (DVD/LD) ¥ (TV/SAT) ¥ This receiver* VIDEO OUT STANDBY/ON 41 ¡¢ 0 7 8 Î 3 DVD PLAYER DVD player VIDEO IN TV IN Video cord MONITOR OUT SUB WOOFER PREOUT *The illustration shows the VSX-D511, but DVD connections for surround sound...
... a video cord to connect the video output on your DVD to the receiver using a digital connection from the DVD player to do both the VSX-D411 and VSX-D411S will be the same. 7 En You can simply leave the receiver in no time at all. In most cases, you don't need to...IN / TAPE / MD ASSIGNABLE DIGITAL IN COAX OPT (DVD/LD) ¥ (TV/SAT) ¥ This receiver* VIDEO OUT STANDBY/ON 41 ¡¢ 0 7 8 Î 3 DVD PLAYER DVD player VIDEO IN TV IN Video cord MONITOR OUT SUB WOOFER PREOUT *The illustration shows the VSX-D511, but DVD connections for surround sound...
Owner's Manual
Page 9
.../INPUT SELECTOR dial to select and ENTER to 33 for more setup options. See also Choosing your receiver setup on your room size. Make sure you've set the video input on pages 29 to ..., your DVD player or source discs, you may only get digital 2 channel stereo and analog sound. Also make sure that DVD/LD is showing in the receiver and switch it on this. In this case, the listening ...mode must be set to Standard (it should already be set the receiver to your selection. There are several other sound options you 're unsure about the settings. 6 Play ...
.../INPUT SELECTOR dial to select and ENTER to 33 for more setup options. See also Choosing your receiver setup on your room size. Make sure you've set the video input on pages 29 to ..., your DVD player or source discs, you may only get digital 2 channel stereo and analog sound. Also make sure that DVD/LD is showing in the receiver and switch it on this. In this case, the listening ...mode must be set to Standard (it should already be set the receiver to your selection. There are several other sound options you 're unsure about the settings. 6 Play ...
Owner's Manual
Page 11
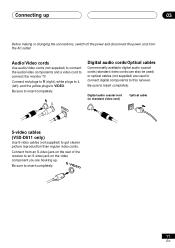
... jack on the rear of the receiver to insert completely. Connect from the AC outlet. Digital audio coaxial cord (or standard video cord) Optical cable S-video cables (VSX-D511 only) Use S-video cables (not supplied) to connect the monitor TV. Audio/Video cords Use audio/video cords (not supplied) to connect the audio/video components and a video cord...
... jack on the rear of the receiver to insert completely. Connect from the AC outlet. Digital audio coaxial cord (or standard video cord) Optical cable S-video cables (VSX-D511 only) Use S-video cables (not supplied) to connect the monitor TV. Audio/Video cords Use audio/video cords (not supplied) to connect the audio/video components and a video cord...
Owner's Manual
Page 12
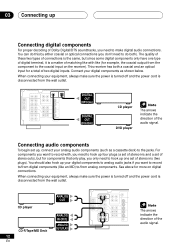
... the power cord is disconnected from the wall outlet. DIGITAL OUT (OPTICAL) DIGITAL OUT (COAXIAL) CD player DVD player The arrows indicate the direction of the audio signal. The quality of these two types of connections is the same, but for more on the receiver). You can do both a coaxial and an optical input...
... the power cord is disconnected from the wall outlet. DIGITAL OUT (OPTICAL) DIGITAL OUT (COAXIAL) CD player DVD player The arrows indicate the direction of the audio signal. The quality of these two types of connections is the same, but for more on the receiver). You can do both a coaxial and an optical input...
Owner's Manual
Page 13
...11). When connecting your digital components with multi-channel analog outputs to the multi-channel inputs of the regular video jacks (VSX-D511 only). Make sure you use an S-video cable to connect to the Svideo jack on the rear of the receiver instead of this page for...selected (see page 28). Regarding digital video components (like a DVD player), you must use the connections pictured on this receiver. When connecting your video components to the jacks as shown below. AUDIO INPUT VIDEO INPUT S-VIDEO INPUT S-VIDEO OUTPUT VIDEO OUTPUT AUDIO OUTPUT Video deck The arrows ...
...11). When connecting your digital components with multi-channel analog outputs to the multi-channel inputs of the regular video jacks (VSX-D511 only). Make sure you use an S-video cable to connect to the Svideo jack on the rear of the receiver instead of this page for...selected (see page 28). Regarding digital video components (like a DVD player), you must use the connections pictured on this receiver. When connecting your video components to the jacks as shown below. AUDIO INPUT VIDEO INPUT S-VIDEO INPUT S-VIDEO OUTPUT VIDEO OUTPUT AUDIO OUTPUT Video deck The arrows ...
Owner's Manual
Page 20
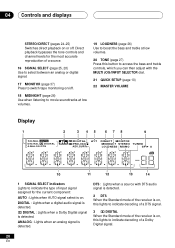
...lights to indicate decoding of a Dolby Digital signal. 20 En DIGITAL : Lights when a digital audio signal is detected. 2 DIGITAL : Lights when a Dolby Digital signal is on . DTS : Lights when a source with DTS audio signal is detected. 2 DTS When the Standard mode of the receiver is on or off . 18 MIDNIGHT...with the MULTI JOG/INPUT SELECTOR dial. 21 QUICK SETUP (page 10) 22 MASTER VOLUME Display 1 SIGNAL AUTO DIGITAL DIGITAL ANALOG DTS 2 3 45 678 9 DIGITAL ATT DIRECT MONITOR PROLOGIC MIDNIGHT STEREO TUNED ADV.SURR. 04 Controls and displays STEREO/DIRECT (pages 24-25) Switches...
...lights to indicate decoding of a Dolby Digital signal. 20 En DIGITAL : Lights when a digital audio signal is detected. 2 DIGITAL : Lights when a Dolby Digital signal is on . DTS : Lights when a source with DTS audio signal is detected. 2 DTS When the Standard mode of the receiver is on or off . 18 MIDNIGHT...with the MULTI JOG/INPUT SELECTOR dial. 21 QUICK SETUP (page 10) 22 MASTER VOLUME Display 1 SIGNAL AUTO DIGITAL DIGITAL ANALOG DTS 2 3 45 678 9 DIGITAL ATT DIRECT MONITOR PROLOGIC MIDNIGHT STEREO TUNED ADV.SURR. 04 Controls and displays STEREO/DIRECT (pages 24-25) Switches...
Owner's Manual
Page 25
...DTS lights when a DTS signal is input. • DVD 5.1 ch is only available when DVD/LD is assigned to a digital input. AUDIO/VIDEO MULTI-CHANNEL RECEIVER N∫m-Û.,, STEREO/ DIRECT SIGNAL SELECT MONITOR MIDNIGHT LOUDNESS TONE QUICK SETUP MULTI JOG MULTI JOG ENTER INPUT SELECTOR MASTER VOLUME ...signals. Using Stereo/Direct When you select STEREO or DIRECT, you selected is selected as the source. • This receiver can only select DIGITAL if the source you will hear the source through just the front left and right speakers (and possibly your speaker settings...
...DTS lights when a DTS signal is input. • DVD 5.1 ch is only available when DVD/LD is assigned to a digital input. AUDIO/VIDEO MULTI-CHANNEL RECEIVER N∫m-Û.,, STEREO/ DIRECT SIGNAL SELECT MONITOR MIDNIGHT LOUDNESS TONE QUICK SETUP MULTI JOG MULTI JOG ENTER INPUT SELECTOR MASTER VOLUME ...signals. Using Stereo/Direct When you select STEREO or DIRECT, you selected is selected as the source. • This receiver can only select DIGITAL if the source you will hear the source through just the front left and right speakers (and possibly your speaker settings...
Owner's Manual
Page 26
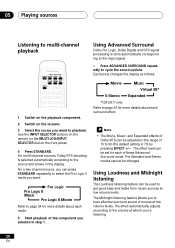
...multi-channel playback INPUT SELECTOR RECEIVER DVD/LD TV/SAT CD CD-R/ VCR/ DVR STANDARD 1 Switch on the playback component. 2 Switch on the front panel). 4 Press STANDARD. Each press changes the display as follows: Movie Music Virtual SB* 5-Stereo Expanded *VSX-D511 only. The Standard and ... Expanded effects of Dolby/DTS can be adjusted in the range of these Advanced Surround mode. Using Advanced Surround Dolby Pro Logic, Dolby Digital and DTS signal processing is 70) by pressing EFFECT +/- . The Midnight listening feature allows you selected in the display. Using Loudness...
...multi-channel playback INPUT SELECTOR RECEIVER DVD/LD TV/SAT CD CD-R/ VCR/ DVR STANDARD 1 Switch on the playback component. 2 Switch on the front panel). 4 Press STANDARD. Each press changes the display as follows: Movie Music Virtual SB* 5-Stereo Expanded *VSX-D511 only. The Standard and ... Expanded effects of Dolby/DTS can be adjusted in the range of these Advanced Surround mode. Using Advanced Surround Dolby Pro Logic, Dolby Digital and DTS signal processing is 70) by pressing EFFECT +/- . The Midnight listening feature allows you selected in the display. Using Loudness...
Owner's Manual
Page 29
...(page 30) Determine which frequencies will be sure to complete the following pages for details on . Optical digital input setting (page 32) Specify the component to be assigned to the coaxial digital input. 2 Press RECEIVER. 3 Use } or ] to choose the option you want to adjust. This is used. If ...you are using the Pioneer S-FCRW220 speaker system, you'll have to set up operations to ensure the best ...
...(page 30) Determine which frequencies will be sure to complete the following pages for details on . Optical digital input setting (page 32) Specify the component to be assigned to the coaxial digital input. 2 Press RECEIVER. 3 Use } or ] to choose the option you want to adjust. This is used. If ...you are using the Pioneer S-FCRW220 speaker system, you'll have to set up operations to ensure the best ...
Owner's Manual
Page 31
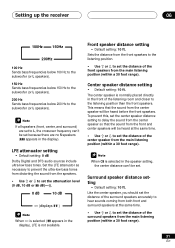
LFE attenuator setting • Default setting: 0 dB Dolby Digital and DTS audio sources include ultra-low bass tones. The center speaker is normally placed directly in the front of the listening room and closer to set the ... main listening position (within a 30 foot range). 31 En When C is not available. Surround speaker distance setting • Default setting: 10 ft. Setting up the receiver 06 100Hz 150Hz 200Hz 100 Hz Sends bass frequencies below 100 Hz to the subwoofer (or L speakers). 150 Hz Sends bass frequencies below 150 Hz...
LFE attenuator setting • Default setting: 0 dB Dolby Digital and DTS audio sources include ultra-low bass tones. The center speaker is normally placed directly in the front of the listening room and closer to set the ... main listening position (within a 30 foot range). 31 En When C is not available. Surround speaker distance setting • Default setting: 10 ft. Setting up the receiver 06 100Hz 150Hz 200Hz 100 Hz Sends bass frequencies below 100 Hz to the subwoofer (or L speakers). 150 Hz Sends bass frequencies below 150 Hz...
Owner's Manual
Page 32
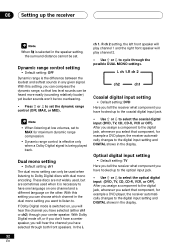
...channel and a different language on , you will hear the channel you select that component, for example a DVD player, the receiver automatically changes to Dolby Digital discs with dual mono encoding. After you assign a component to MAX for maximum dynamic range compression. • Dynamic range ...control is effective only when a Dolby Digital signal is being played back. 06 Setting up the receiver When S is switched on the other. These discs are not widely used, but are sometimes used when listening...
...channel and a different language on , you will hear the channel you select that component, for example a DVD player, the receiver automatically changes to Dolby Digital discs with dual mono encoding. After you assign a component to MAX for maximum dynamic range compression. • Dynamic range ...control is effective only when a Dolby Digital signal is being played back. 06 Setting up the receiver When S is switched on the other. These discs are not widely used, but are sometimes used when listening...
Owner's Manual
Page 38
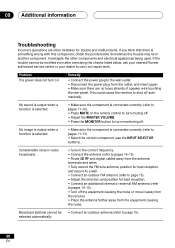
...; Adjust the MASTER VOLUME. • Press the MONITOR button to carry out repair work. This could cause the receiver to the wall outlet. • Disconnect the power plug from the outlet, and insert again. • Make ..., check the points below , ask your nearest Pioneer authorized service center or your dealer to turn monitoring off the equipment causing the noise or move it away from the receiver. • Place the antenna farther away from the...Connect the antenna (refer to pages 14-15). • Route 2 RF and digital cables away from the equipment causing the noise.
...; Adjust the MASTER VOLUME. • Press the MONITOR button to carry out repair work. This could cause the receiver to the wall outlet. • Disconnect the power plug from the outlet, and insert again. • Make ..., check the points below , ask your nearest Pioneer authorized service center or your dealer to turn monitoring off the equipment causing the noise or move it away from the receiver. • Place the antenna farther away from the...Connect the antenna (refer to pages 14-15). • Route 2 RF and digital cables away from the equipment causing the noise.
Owner's Manual
Page 39
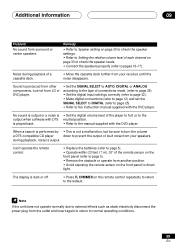
... down to prevent the output of loud noise from your speakers. during playback of a cassette deck. • Move the cassette deck further from your receiver, until the noise disappears. Remedy • Refer to Speaker setting on page 30 to check the speaker settings. • Refer to Setting the relative...to page 5). • Operate within 23 feet ( 7 m), 30° of the remote sensor on the front panel to direct light. is • Set the digital volume level of the player to full, or to the output when software with the DVD player. If the unit does not operate normally due...
... down to prevent the output of loud noise from your speakers. during playback of a cassette deck. • Move the cassette deck further from your receiver, until the noise disappears. Remedy • Refer to Speaker setting on page 30 to check the speaker settings. • Refer to Setting the relative...to page 5). • Operate within 23 feet ( 7 m), 30° of the remote sensor on the front panel to direct light. is • Set the digital volume level of the player to full, or to the output when software with the DVD player. If the unit does not operate normally due...


