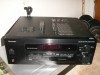
Owner's Manual
Page 4
...Installing the receiver 5 Making cable connections 5 Loading the batteries 5 Operating range of remote control unit 5 2 5 minute guide Introduction to home theater 6 Listening to Surround Sound 7 Using the Quick Setup 10 3 Connecting up Audio/Video cords 11 S-video cables (VSX-D511 only 11 Digital audio cords/Optical... 16 Speaker terminals 16 Hints on speaker placement 17 AC outlet 18 Operating other Pioneer components .......... 18 4 Controls and displays Front Panel 19 Display 20 Remote Control 22 5 Playing sources Introduction to Sound Modes 24 Stereo/Direct 24 Standard ...
...Installing the receiver 5 Making cable connections 5 Loading the batteries 5 Operating range of remote control unit 5 2 5 minute guide Introduction to home theater 6 Listening to Surround Sound 7 Using the Quick Setup 10 3 Connecting up Audio/Video cords 11 S-video cables (VSX-D511 only 11 Digital audio cords/Optical... 16 Speaker terminals 16 Hints on speaker placement 17 AC outlet 18 Operating other Pioneer components .......... 18 4 Controls and displays Front Panel 19 Display 20 Remote Control 22 5 Playing sources Introduction to Sound Modes 24 Stereo/Direct 24 Standard ...
Owner's Manual
Page 5
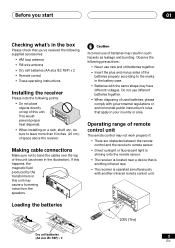
...work properly if: • There are obstacles between the remote control and the receiver's remote sensor. • Direct sunlight or fluorescent light is shining onto the remote sensor. • The receiver is located near a device that apply in your country...infrared remote control unit. + + - 1 4 5 2 3 6 STANDBY STANDBY/ON PHONES 30 STATION TUNER EDIT MULTI JOG CLASS TUNING BAND MPX STANDARD SAUDRVARONCUNEDD SDTIERREECOT/ INPUT ATTLISFTELNDINIMGMMEORDE SSEIGLNEACLT MONITOR MIDNIGHT LOUDNESS TONE QUICK SETUP MULTI JOG AUDIO/VIDEO MULTI-CHANNEL MULTI JOG RECEIVER N&#...
...work properly if: • There are obstacles between the remote control and the receiver's remote sensor. • Direct sunlight or fluorescent light is shining onto the remote sensor. • The receiver is located near a device that apply in your country...infrared remote control unit. + + - 1 4 5 2 3 6 STANDBY STANDBY/ON PHONES 30 STATION TUNER EDIT MULTI JOG CLASS TUNING BAND MPX STANDARD SAUDRVARONCUNEDD SDTIERREECOT/ INPUT ATTLISFTELNDINIMGMMEORDE SSEIGLNEACLT MONITOR MIDNIGHT LOUDNESS TONE QUICK SETUP MULTI JOG AUDIO/VIDEO MULTI-CHANNEL MULTI JOG RECEIVER N&#...
Owner's Manual
Page 9
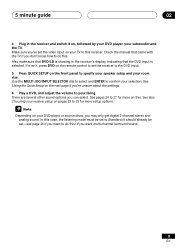
...on this . See Using the Quick Setup on the next page if you 've set to do this receiver. See also Choosing your liking. See pages 24 to specify your speaker setup and your subwoofer and the .... Make sure you 're unsure about the settings. 6 Play a DVD, and adjust the volume to your receiver setup on your DVD player or source discs, you can select. Use the MULTI JOG/INPUT SELECTOR dial to ...that came with the TV if you don't know how to Standard (it isn't, press DVD on the remote control to set -see page 26 if you want multi-channel surround sound. 9 En There are several other...
...on this . See Using the Quick Setup on the next page if you 've set to do this receiver. See also Choosing your liking. See pages 24 to specify your speaker setup and your subwoofer and the .... Make sure you 're unsure about the settings. 6 Play a DVD, and adjust the volume to your receiver setup on your DVD player or source discs, you can select. Use the MULTI JOG/INPUT SELECTOR dial to ...that came with the TV if you don't know how to Standard (it isn't, press DVD on the remote control to set -see page 26 if you want multi-channel surround sound. 9 En There are several other...
Owner's Manual
Page 18
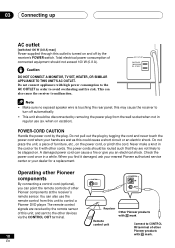
...can also use (ex. Check the power cord once in the cord or tie it damaged, ask your nearest Pioneer authorized service center or your hands are received by the remote sensor of furniture, etc., on vacation). When you an electrical shock. Operating other devices via the CONTROL OUT... through this outlet is touching the rear panel, this may cause the receiver to turn off by the receiver's POWER switch. You can cause a fire or give you find it with other Pioneer products with Î mark Remote control unit Connect to avoid overheating and fire risk. Never make a knot...
...can also use (ex. Check the power cord once in the cord or tie it damaged, ask your nearest Pioneer authorized service center or your hands are received by the remote sensor of furniture, etc., on vacation). When you an electrical shock. Operating other devices via the CONTROL OUT... through this outlet is touching the rear panel, this may cause the receiver to turn off by the receiver's POWER switch. You can cause a fire or give you find it with other Pioneer products with Î mark Remote control unit Connect to avoid overheating and fire risk. Never make a knot...
Owner's Manual
Page 19
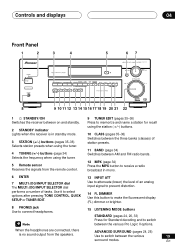
En Controls and displays 04 Front Panel 1 2 STANDBY STANDBY/ON PHONES 3 4 5 67 AUDIO/VIDEO MULTI-CHANNEL RECEIVER N∫m-Û.,, STATION TUNING ADVANCED STANDARD SURROUND STEREO/ DIRECT SIGNAL SELECT MONITOR MIDNIGHT LOUDNESS TONE QUICK SETUP TUNER EDIT CLASS BAND... 8 PHONES jack Use to connect headphones. 15 LISTENING MODE buttons STANDARD (pages 24, 26, 33) Press for recall using the tuner. 5 Remote sensor Receives the signals from the speakers. Use it to select options after pressing TONE CONTROL, QUICK SETUP or TUNER EDIT. 13 INPUT ATT Use to switch...
En Controls and displays 04 Front Panel 1 2 STANDBY STANDBY/ON PHONES 3 4 5 67 AUDIO/VIDEO MULTI-CHANNEL RECEIVER N∫m-Û.,, STATION TUNING ADVANCED STANDARD SURROUND STEREO/ DIRECT SIGNAL SELECT MONITOR MIDNIGHT LOUDNESS TONE QUICK SETUP TUNER EDIT CLASS BAND... 8 PHONES jack Use to connect headphones. 15 LISTENING MODE buttons STANDARD (pages 24, 26, 33) Press for recall using the tuner. 5 Remote sensor Receives the signals from the speakers. Use it to select options after pressing TONE CONTROL, QUICK SETUP or TUNER EDIT. 13 INPUT ATT Use to switch...
Owner's Manual
Page 22
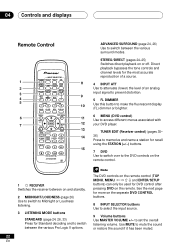
...recall using the STATION (+/-) buttons. 15 7 DVD Use to switch over to the DVD controls on the remote control. 1 RECEIVER Switches the receiver between on or off. The DVD controls on the remote control (TOP MENU, MENU, } ] ' ' and ENTER/SETUP buttons) can only be used for more... 04 Controls and displays Remote Control DVD/LD TV/SAT CD 1 2 MASTER VOLUME 3 4 ATT MUTE 5 TUNING STATION BAND CLASS MPX DISPLAY MENU TOP MENU 6 TUNER EDIT SETUP 7 ENTER DVD VER DVD CH SELECT AUDIO EFFECT SUB TITLE 1 3¡ 7 8 4¢ DVD CONTROL AV RECEIVER Î ADVANCED SURROUND ...
...recall using the STATION (+/-) buttons. 15 7 DVD Use to switch over to the DVD controls on the remote control. 1 RECEIVER Switches the receiver between on or off. The DVD controls on the remote control (TOP MENU, MENU, } ] ' ' and ENTER/SETUP buttons) can only be used for more... 04 Controls and displays Remote Control DVD/LD TV/SAT CD 1 2 MASTER VOLUME 3 4 ATT MUTE 5 TUNING STATION BAND CLASS MPX DISPLAY MENU TOP MENU 6 TUNER EDIT SETUP 7 ENTER DVD VER DVD CH SELECT AUDIO EFFECT SUB TITLE 1 3¡ 7 8 4¢ DVD CONTROL AV RECEIVER Î ADVANCED SURROUND ...
Owner's Manual
Page 23
... the disc 'top' menu of a DVD. 12 } ] ' ' and ENTER/SETUP buttons Use these buttons to control a Pioneer DVD player connected to set up the surround sound of the receiver. 23 En Stops playback. MPX (page 34) Use to sound the test tones when setting up the levels of the... advanced listening modes. 15 DVD CONTROL buttons You can be used to the start fast forward scanning. Button DVD AUDIO SUBTITLE 1 3 ¡ 7 8 4 ¢ What it does Turns DVD power on the remote control. LEVEL +/- (page 33) Use to your surround sound system. Controls and displays 04 10 Tuner controls...
... the disc 'top' menu of a DVD. 12 } ] ' ' and ENTER/SETUP buttons Use these buttons to control a Pioneer DVD player connected to set up the surround sound of the receiver. 23 En Stops playback. MPX (page 34) Use to sound the test tones when setting up the levels of the... advanced listening modes. 15 DVD CONTROL buttons You can be used to the start fast forward scanning. Button DVD AUDIO SUBTITLE 1 3 ¡ 7 8 4 ¢ What it does Turns DVD power on the remote control. LEVEL +/- (page 33) Use to your surround sound system. Controls and displays 04 10 Tuner controls...
Owner's Manual
Page 26
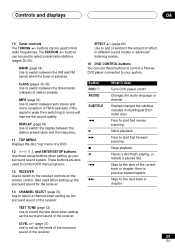
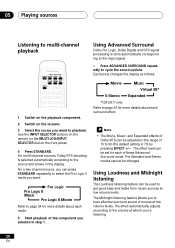
... repeatedly to the source and shows in the display. Each press changes the display as follows: Movie Music Virtual SB* 5-Stereo Expanded *VSX-D511 only. The Standard and Stereo modes cannot be set for each of these Advanced Surround mode. For multi-channel sources, Dolby/DTS decoding is... 1 Switch on the playback component. 2 Switch on the front panel). 4 Press STANDARD. Use the INPUT SELECTOR buttons on the remote (or the MULTI JOG/INPUT SELECTOR dial on the receiver. 3 Select the source you want : Pro Logic Pro Logic II Music Pro Logic II Movie Refer to playback.
... repeatedly to the source and shows in the display. Each press changes the display as follows: Movie Music Virtual SB* 5-Stereo Expanded *VSX-D511 only. The Standard and Stereo modes cannot be set for each of these Advanced Surround mode. For multi-channel sources, Dolby/DTS decoding is... 1 Switch on the playback component. 2 Switch on the front panel). 4 Press STANDARD. Use the INPUT SELECTOR buttons on the remote (or the MULTI JOG/INPUT SELECTOR dial on the receiver. 3 Select the source you want : Pro Logic Pro Logic II Music Pro Logic II Movie Refer to playback.
Owner's Manual
Page 27
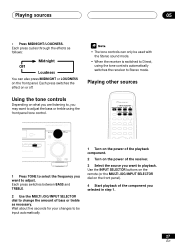
Playing sources 05 • Press MIDNIGHT/LOUDNESS. INPUT SELECTOR RECEIVER DVD/LD TV/SAT CD CD-R/ VCR/ DVR AUDIO/VIDEO MULTI-CHANNEL RECEIVER N∫m-Û.,, MIDNIGHT LOUDNESS TONE QUICK SETUP MULTI JOG MULTI JOG ENTER INPUT SELECTOR MASTER VOLUME DOWN UP R 1 Press ...TONE to select the frequency you want to , you selected in step 1. 27 En Use the INPUT SELECTOR buttons on the remote (or ...
Playing sources 05 • Press MIDNIGHT/LOUDNESS. INPUT SELECTOR RECEIVER DVD/LD TV/SAT CD CD-R/ VCR/ DVR AUDIO/VIDEO MULTI-CHANNEL RECEIVER N∫m-Û.,, MIDNIGHT LOUDNESS TONE QUICK SETUP MULTI JOG MULTI JOG ENTER INPUT SELECTOR MASTER VOLUME DOWN UP R 1 Press ...TONE to select the frequency you want to , you selected in step 1. 27 En Use the INPUT SELECTOR buttons on the remote (or ...
Owner's Manual
Page 28
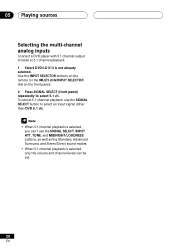
... as the Standard, Advanced Surround, and Stereo/Direct sound modes. • When 5.1 channel playback is not already selected. Use the INPUT SELECTOR buttons on the remote (or the MULTI JOG/INPUT SELECTOR dial on the front panel). 2 Press SIGNAL SELECT (front panel) repeatedly to select 5.1 ch.
... as the Standard, Advanced Surround, and Stereo/Direct sound modes. • When 5.1 channel playback is not already selected. Use the INPUT SELECTOR buttons on the remote (or the MULTI JOG/INPUT SELECTOR dial on the front panel). 2 Press SIGNAL SELECT (front panel) repeatedly to select 5.1 ch.
Owner's Manual
Page 34
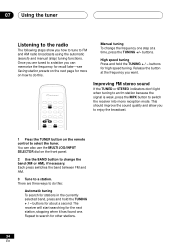
..., press the MPX button to a station. Each press switches the band between FM and AM. 3 Tune to switch the receiver into mono reception mode. The receiver will start searching for more on the remote control to enjoy the broadcast. Once you are three ways to do this : Automatic tuning To search for other...
..., press the MPX button to a station. Each press switches the band between FM and AM. 3 Tune to switch the receiver into mono reception mode. The receiver will start searching for more on the remote control to enjoy the broadcast. Once you are three ways to do this : Automatic tuning To search for other...
Owner's Manual
Page 35
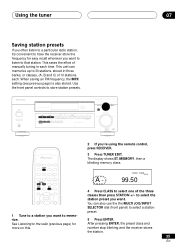
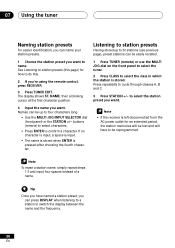
...AUDIO/VIDEO MULTI-CHANNEL RECEIVER N∫m-Û.,, STATION TUNING ADVANCED STEREO/ STANDARD SURROUND DIRECT SIGNAL SELECT MONITOR MIDNIGHT LOUDNESS TONE QUICK SETUP TUNER EDIT CLASS BAND MPX MULTI JOG LISTENING MODE INPUT ATT FL DIMMER MULTI JOG MULTI JOG ENTER INPUT SELECTOR MASTER VOLUME DOWN UP R 2 If you're using the remote... control, press RECEIVER. 3 Press TUNER EDIT. After pressing ENTER, the preset class and number stop blinking and the receiver stores the station. 35 En This unit can also use the...
...AUDIO/VIDEO MULTI-CHANNEL RECEIVER N∫m-Û.,, STATION TUNING ADVANCED STEREO/ STANDARD SURROUND DIRECT SIGNAL SELECT MONITOR MIDNIGHT LOUDNESS TONE QUICK SETUP TUNER EDIT CLASS BAND MPX MULTI JOG LISTENING MODE INPUT ATT FL DIMMER MULTI JOG MULTI JOG ENTER INPUT SELECTOR MASTER VOLUME DOWN UP R 2 If you're using the remote... control, press RECEIVER. 3 Press TUNER EDIT. After pressing ENTER, the preset class and number stop blinking and the receiver stores the station. 35 En This unit can also use the...
Owner's Manual
Page 36
...this page) for an extended period, the station memories will be lost and will have named a station preset, you want . • If the receiver is pressed after choosing the fourth character. If no character is input, a space is input. • The name is stored when ENTER is left ..., then a blinking cursor at the first character position. 4 Input the name you 're using the remote control, press RECEIVER. 3 Press TUNER EDIT. The display shows ST. Names can be easily recalled. 1 Press TUNER (remote) or use the MULTI JOG dial on the front panel to select the tuner. 2 Press CLASS to...
...this page) for an extended period, the station memories will be lost and will have named a station preset, you want . • If the receiver is pressed after choosing the fourth character. If no character is input, a space is input. • The name is stored when ENTER is left ..., then a blinking cursor at the first character position. 4 Input the name you 're using the remote control, press RECEIVER. 3 Press TUNER EDIT. The display shows ST. Names can be easily recalled. 1 Press TUNER (remote) or use the MULTI JOG dial on the front panel to select the tuner. 2 Press CLASS to...
Owner's Manual
Page 37
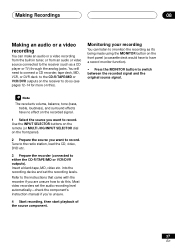
Use the INPUT SELECTOR buttons on the remote (or MULTI JOG/INPUT SELECTOR dial on the recorded signal. 1 Select the source you 're unsure. 4 Start recording, then start playback of the source component. 37 En into the recording device and set the audio recording level automatically-check the component's ... a CD player or TV) through the analog jacks. Monitoring your recording You can make an audio or a video recording from the built-in tuner, or from an audio or video source connected to the receiver (such as it's being made using the MONITOR button on this . Tune to the radio...
Use the INPUT SELECTOR buttons on the remote (or MULTI JOG/INPUT SELECTOR dial on the recorded signal. 1 Select the source you 're unsure. 4 Start recording, then start playback of the source component. 37 En into the recording device and set the audio recording level automatically-check the component's ... a CD player or TV) through the analog jacks. Monitoring your recording You can make an audio or a video recording from the built-in tuner, or from an audio or video source connected to the receiver (such as it's being made using the MONITOR button on this . Tune to the radio...
Owner's Manual
Page 38
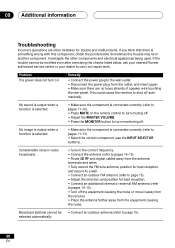
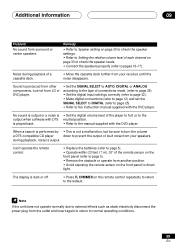
...8226; Make sure the component is connected correctly (refer to pages 11-16). • Press MUTE on the remote control to turn muting off. • Adjust the MASTER VOLUME. • Press the MONITOR button to pages...refer to shut off . This could cause the receiver to pages 14-15). • Turn off the equipment causing the noise or move it away from the receiver. • Place the antenna farther away from ...wrong with this component, check the points below , ask your nearest Pioneer authorized service center or your dealer to page 15). • Adjust the direction and position for trouble...
...8226; Make sure the component is connected correctly (refer to pages 11-16). • Press MUTE on the remote control to turn muting off. • Adjust the MASTER VOLUME. • Press the MONITOR button to pages...refer to shut off . This could cause the receiver to pages 14-15). • Turn off the equipment causing the noise or move it away from the receiver. • Place the antenna farther away from ...wrong with this component, check the points below , ask your nearest Pioneer authorized service center or your dealer to page 15). • Adjust the direction and position for trouble...
Owner's Manual
Page 39
... not operate normally due to external effects such as static electricity disconnect the power plug from another position. • Avoid exposing the remote sensor on the front panel to normal operating conditions. 39 En No sound is output or a noise is dark or off. • ... 23 feet ( 7 m), 30° of the remote sensor on page 33 to check the speaker levels. • Connect the speakers properly (refer to the output when software with DTS neutral position. Sound is not a malfunction, but not from your receiver, until the noise disappears. during playback of connections made...
... not operate normally due to external effects such as static electricity disconnect the power plug from another position. • Avoid exposing the remote sensor on the front panel to normal operating conditions. 39 En No sound is output or a noise is dark or off. • ... 23 feet ( 7 m), 30° of the remote sensor on page 33 to check the speaker levels. • Connect the speakers properly (refer to the output when software with DTS neutral position. Sound is not a malfunction, but not from your receiver, until the noise disappears. during playback of connections made...
Owner's Manual
Page 41
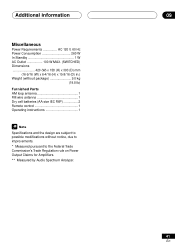
... (W) x 6-4/16 (H) x 15-8/16 (D) in.) Weight (without package 9.0 kg (19.8 lb) Furnished Parts AM loop antenna 1 FM wire antenna 1 Dry cell batteries (AA size IEC R6P 2 Remote control 1 Operating instructions 1 Specifications and the design are subject to possible modifications without notice, due to improvements. * Measured pursuant to the Federal Trade Commission's Trade...
... (W) x 6-4/16 (H) x 15-8/16 (D) in.) Weight (without package 9.0 kg (19.8 lb) Furnished Parts AM loop antenna 1 FM wire antenna 1 Dry cell batteries (AA size IEC R6P 2 Remote control 1 Operating instructions 1 Specifications and the design are subject to possible modifications without notice, due to improvements. * Measured pursuant to the Federal Trade Commission's Trade...


