
Owner's Manual
Page 1
...RECEIVER VSX-1019AH-K VSX-919AH-K Register your product at http://www.pioneerelectronics.com (US) http://www.pioneerelectronics.ca (Canada) · Protect your new investment The details of your purchase will be on file for reference in the event of an insurance claim such as loss or theft. · Receive... free tips, updates and service bulletins on your new product · Improve product development Your input helps us continue to design products that meet your needs. · Receive a free Pioneer newsletter Registered customers can opt in to...
...RECEIVER VSX-1019AH-K VSX-919AH-K Register your product at http://www.pioneerelectronics.com (US) http://www.pioneerelectronics.ca (Canada) · Protect your new investment The details of your purchase will be on file for reference in the event of an insurance claim such as loss or theft. · Receive... free tips, updates and service bulletins on your new product · Improve product development Your input helps us continue to design products that meet your needs. · Receive a free Pioneer newsletter Registered customers can opt in to...
Owner's Manual
Page 2
... pot) or expose it is encouraged to try to correct the interference by qualified service personnel. Product Name: AUDIO/VIDEO MULTI-CHANNEL RECEIVER Model Number: VSX-1019AH-K, VSX-919AH-K Responsible Party Name: PIONEER ELECTRONICS SERVICE INC. To prevent electromagnetic interference with the product will not occur in a residential installation. Increase the separation between the equipment...
... pot) or expose it is encouraged to try to correct the interference by qualified service personnel. Product Name: AUDIO/VIDEO MULTI-CHANNEL RECEIVER Model Number: VSX-1019AH-K, VSX-919AH-K Responsible Party Name: PIONEER ELECTRONICS SERVICE INC. To prevent electromagnetic interference with the product will not occur in a residential installation. Increase the separation between the equipment...
Owner's Manual
Page 4
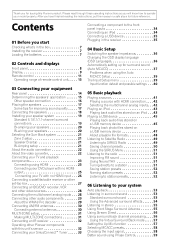
...Connecting a component to the front panel inputs 34 Connecting an iPod 34 Connecting a USB device 35 Plugging in the receiver 35 04 Basic Setup Switching the speaker impedance 36 Changing the OSD display language (OSD Language 36 Automatically setting up...player with no HDMI output 25 Connecting your TV with no HDMI input . . . 26 Connecting a satellite/cable receiver or other set-top box 27 Connecting a HDD/DVD recorder, VCR and other video sources 28 Connecting the multichannel... Making MULTI-ZONE connections 31 Connecting an IR receiver 32 Operating other Pioneer components with this...
...Connecting a component to the front panel inputs 34 Connecting an iPod 34 Connecting a USB device 35 Plugging in the receiver 35 04 Basic Setup Switching the speaker impedance 36 Changing the OSD display language (OSD Language 36 Automatically setting up...player with no HDMI output 25 Connecting your TV with no HDMI input . . . 26 Connecting a satellite/cable receiver or other set-top box 27 Connecting a HDD/DVD recorder, VCR and other video sources 28 Connecting the multichannel... Making MULTI-ZONE connections 31 Connecting an IR receiver 32 Operating other Pioneer components with this...

Owner's Manual
Page 5
...71 Checking your system settings 71 Resetting the system 72 Default system settings 72 09 Controlling the rest of your system Operating multiple receivers 73 Setting the remote to control other components 73 Selecting preset codes directly 73 Resetting the remote control presets 74 Default preset ...codes 74 Controls the components 74 10 The Advanced MCACC menu Making receiver settings from the Advanced MCACC menu 77 Automatic MCACC (Expert 78 Manual MCACC setup 82 Fine Channel Level 83 Fine Speaker Distance ...
...71 Checking your system settings 71 Resetting the system 72 Default system settings 72 09 Controlling the rest of your system Operating multiple receivers 73 Setting the remote to control other components 73 Selecting preset codes directly 73 Resetting the remote control presets 74 Default preset ...codes 74 Controls the components 74 10 The Advanced MCACC menu Making receiver settings from the Advanced MCACC menu 77 Automatic MCACC (Expert 78 Manual MCACC setup 82 Fine Channel Level 83 Fine Speaker Distance ...
Owner's Manual
Page 6
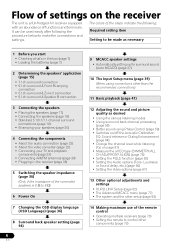
...) • Connecting your TV and playback components (page 23) • Connecting AM/FM antennas (page 30) • Plugging in the receiver (page 35) 5 Switching the speaker impedance (page 36) (Only if the impedance of the connected speakers is a full-fledged... AV receiver equipped with an abundance of functions and terminals. Flow of settings on the receiver The unit is 6 Ω to 8 Ω) 6 Power On 7 Changing the OSD display language ...
...) • Connecting your TV and playback components (page 23) • Connecting AM/FM antennas (page 30) • Plugging in the receiver (page 35) 5 Switching the speaker impedance (page 36) (Only if the impedance of the connected speakers is a full-fledged... AV receiver equipped with an abundance of functions and terminals. Flow of settings on the receiver The unit is 6 Ω to 8 Ω) 6 Power On 7 Changing the OSD display language ...

Owner's Manual
Page 7
... x2 • AM loop antenna • FM wire antenna • iPod cable • These operating instructions Installing the receiver • When installing this receiver's bottom panel while the power is turned on. This may result in damp or wet areas - in such hazards as leakage...or other movement - Pb K058c_A1_En 7 En in the box Please check that have different voltages. Before you start 01 Chapter 1: Before you 've received the following places: - on a level and stable surface. near a heater. Do not use different batteries together. • When disposing of ...
... x2 • AM loop antenna • FM wire antenna • iPod cable • These operating instructions Installing the receiver • When installing this receiver's bottom panel while the power is turned on. This may result in damp or wet areas - in such hazards as leakage...or other movement - Pb K058c_A1_En 7 En in the box Please check that have different voltages. Before you start 01 Chapter 1: Before you 've received the following places: - on a level and stable surface. near a heater. Do not use different batteries together. • When disposing of ...
Owner's Manual
Page 8
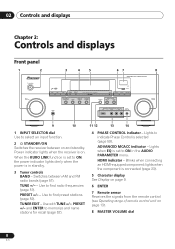
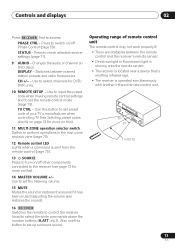
... connected (page 23). 5 Character display See Display on page 9. 6 ENTER 7 Remote sensor Receives the signals from the remote control (see Operating range of remote control unit on page 13). 8 MASTER VOLUME dial 8 En Switches between...CONTROL indicator - 02 Controls and displays Chapter 2: Controls and displays Front panel 1 2 STANDBY/ON INPUT SELECTOR 3 4 5 67 8 AUDIO/VIDEO MULTI-CHANNEL RECEIVER BAND TUNE TUNE PHASE CONTROL ADVANCED MCACC AUTO SURR/ALC/ STREAM DIRECT STEREO ADVANCED SURROUND STANDARD SURROUND PHONES HDMI ENTER PRESET PRESET TUNER EDIT SPEAKERS...
... connected (page 23). 5 Character display See Display on page 9. 6 ENTER 7 Remote sensor Receives the signals from the remote control (see Operating range of remote control unit on page 13). 8 MASTER VOLUME dial 8 En Switches between...CONTROL indicator - 02 Controls and displays Chapter 2: Controls and displays Front panel 1 2 STANDBY/ON INPUT SELECTOR 3 4 5 67 8 AUDIO/VIDEO MULTI-CHANNEL RECEIVER BAND TUNE TUNE PHASE CONTROL ADVANCED MCACC AUTO SURR/ALC/ STREAM DIRECT STEREO ADVANCED SURROUND STANDARD SURROUND PHONES HDMI ENTER PRESET PRESET TUNER EDIT SPEAKERS...

Owner's Manual
Page 9
... They do not indicate the audio signals being input) XL/XR - L/R - Left surround/Right surround channel LFE - AUTO lights when the receiver is being output from the speakers. 10 Listening mode buttons AUTO SURR/ALC/STREAM DIRECT - Press for audio and photo playback (page 34, ...surround channel or matrix encode flag 3 Digital format indicators Light when a signal encoded in the corresponding format is no sound output from the receiver. When the headphones are being input when PCM signals are connected, there is detected. 9 En STEREO - Switches between the various 2 Pro...
... They do not indicate the audio signals being input) XL/XR - L/R - Left surround/Right surround channel LFE - AUTO lights when the receiver is being output from the speakers. 10 Listening mode buttons AUTO SURR/ALC/STREAM DIRECT - Press for audio and photo playback (page 34, ...surround channel or matrix encode flag 3 Digital format indicators Light when a signal encoded in the corresponding format is no sound output from the receiver. When the headphones are being input when PCM signals are connected, there is detected. 9 En STEREO - Switches between the various 2 Pro...
Owner's Manual
Page 10
...Lights when the ALC (Auto level control) mode is active (page 69). 6 DSD PCM - Lights when one of the Neo:6 modes of the receiver is on, this lights to indicate Neo:6 processing (page 53). 19 Speaker indicators Lights to indicate reducing the level of the Midnight, Loudness or tone...(page 59). 12 Analog signal indicators Light to indicate the current speaker system, A and/or B (page 69). 20 SLEEP Lights when the receiver is being received in sleep mode (page 71). 21 MSTR Lights during playback of the Advanced Surround modes has been selected (page 54). ADV.SURROUND - Lights ...
...Lights when the ALC (Auto level control) mode is active (page 69). 6 DSD PCM - Lights when one of the Neo:6 modes of the receiver is on, this lights to indicate Neo:6 processing (page 53). 19 Speaker indicators Lights to indicate reducing the level of the Midnight, Loudness or tone...(page 59). 12 Analog signal indicators Light to indicate the current speaker system, A and/or B (page 69). 20 SLEEP Lights when the receiver is being received in sleep mode (page 71). 21 MSTR Lights during playback of the Advanced Surround modes has been selected (page 54). ADV.SURROUND - Lights ...
Owner's Manual
Page 11
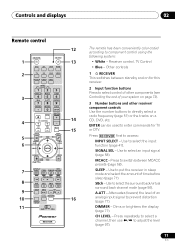
... (page 71). A.ATT - Use to component control using the following system: • White - Controls and displays 02 Remote control 1 2 3 4 5 6 7 8 9 10 11 RECEIVER SOURCE DVD BD DVR HDMI TV CD CD-R VIDEO iPod USB TUNER SIRIUS INPUT SELECT 12 SIGNAL SEL MCACC 45 SBch A.ATT 78 D.ACCESS CH...conveniently color-coded according to select the surround back/virtual surround back channel mode (page 56). SLEEP - SIGNAL SEL - Use to put the receiver in sleep mode and select the amount of an analog input signal to switch between standby and on a CD, DVD, etc. DIMMER - ...
... (page 71). A.ATT - Use to component control using the following system: • White - Controls and displays 02 Remote control 1 2 3 4 5 6 7 8 9 10 11 RECEIVER SOURCE DVD BD DVR HDMI TV CD CD-R VIDEO iPod USB TUNER SIRIUS INPUT SELECT 12 SIGNAL SEL MCACC 45 SBch A.ATT 78 D.ACCESS CH...conveniently color-coded according to select the surround back/virtual surround back channel mode (page 56). SLEEP - SIGNAL SEL - Use to put the receiver in sleep mode and select the amount of an analog input signal to switch between standby and on a CD, DVD, etc. DIMMER - ...
Owner's Manual
Page 12
Use to access: AUDIO PARAMETER - Press RECEIVER first to turn on your surround sound system (see page 75 for example DVD, DVR or TV). Use to control a component after you have one ...). Use to access the Home Menu (pages 36, 39, 62, 77, 93 and 98). Use TUNE/ to find preset stations (page 52). 7 Receiver controls Press RECEIVER first to select channels. Use to access: AUTO/ALC/DIRECT - HOME MENU - CH +/- - Press to confirm and exit the current menu screen (also use...
Use to access: AUDIO PARAMETER - Press RECEIVER first to turn on your surround sound system (see page 75 for example DVD, DVR or TV). Use to control a component after you have one ...). Use to access the Home Menu (pages 36, 39, 62, 77, 93 and 98). Use TUNE/ to find preset stations (page 52). 7 Receiver controls Press RECEIVER first to select channels. Use to access: AUTO/ALC/DIRECT - HOME MENU - CH +/- - Press to confirm and exit the current menu screen (also use...
Owner's Manual
Page 13
... MUTE Mutes the sound or restores the sound if it has been muted (adjusting the volume also restores the sound). 16 RECEIVER Switches the remote to control the receiver (used to set up surround sound. Changes the audio or channel on DVD discs. Operating range of your TV's manufacturer ... button to select the white commands above the number buttons (A.ATT, etc.)). STATUS - Controls and displays 02 Press RECEIVER first to switch on/off other components connected to the receiver (see Selecting preset codes directly on page 73 for DVD/ DVR units. 10 REMOTE SETUP - Press to set ...
... MUTE Mutes the sound or restores the sound if it has been muted (adjusting the volume also restores the sound). 16 RECEIVER Switches the remote to control the receiver (used to set up surround sound. Changes the audio or channel on DVD discs. Operating range of your TV's manufacturer ... button to select the white commands above the number buttons (A.ATT, etc.)). STATUS - Controls and displays 02 Press RECEIVER first to switch on/off other components connected to the receiver (see Selecting preset codes directly on page 73 for DVD/ DVR units. 10 REMOTE SETUP - Press to set ...
Owner's Manual
Page 14
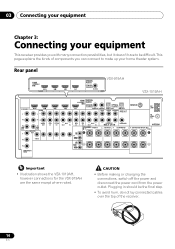
... cord from the power outlet. This page explains the kinds of the receiver. 14 En Rear panel HDMI ASSIGNABLE 12 BD IN IN 1 IN 2 OUT AUDIO DIGITAL AUDIO VSX-919AH COAXIAL ASSIGNABLE IN (DVD) FRONT VSX-1019AH YL ASSIGNABLE Y BD IN IN 1 AUDIO YL PB PR IN...SURROUND L R SURROUND BACK/ B L (Single) Important • Illustration shows the VSX-1019AH, however connections for the VSX-919AH are the same except where noted. 03 Connecting your equipment Chapter 3: Connecting your equipment This receiver provides you can connect to be the final step. • To avoid hum,...
... cord from the power outlet. This page explains the kinds of the receiver. 14 En Rear panel HDMI ASSIGNABLE 12 BD IN IN 1 IN 2 OUT AUDIO DIGITAL AUDIO VSX-919AH COAXIAL ASSIGNABLE IN (DVD) FRONT VSX-1019AH YL ASSIGNABLE Y BD IN IN 1 AUDIO YL PB PR IN...SURROUND L R SURROUND BACK/ B L (Single) Important • Illustration shows the VSX-1019AH, however connections for the VSX-919AH are the same except where noted. 03 Connecting your equipment Chapter 3: Connecting your equipment This receiver provides you can connect to be the final step. • To avoid hum,...
Owner's Manual
Page 18
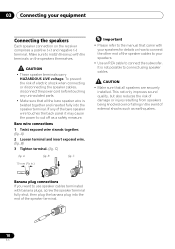
... the speaker cables, disconnect the power cord before touching any of the speaker cables to your equipment Connecting the speakers Each speaker connection on the receiver comprises a positive (+) and negative (-) terminal.
... the speaker cables, disconnect the power cord before touching any of the speaker cables to your equipment Connecting the speakers Each speaker connection on the receiver comprises a positive (+) and negative (-) terminal.
Owner's Manual
Page 20
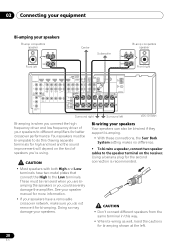
...different speakers from the same terminal in this (having separate terminals for high and low) and the sound improvement will depend on the receiver. These must be bi-ampable to different amplifiers for the second connection is when you connect the high frequency driver and low frequency ... a banana plug for better crossover performance. Doing so may damage your speakers to do not remove it for bi-amping shown at the left VSX-1019AH Bi-amping is recommended. CAUTION • Most speakers with both High and Low terminals have a removable crossover network, make sure you ...
...different speakers from the same terminal in this (having separate terminals for high and low) and the sound improvement will depend on the receiver. These must be bi-ampable to different amplifiers for the second connection is when you connect the high frequency driver and low frequency ... a banana plug for better crossover performance. Doing so may damage your speakers to do not remove it for bi-amping shown at the left VSX-1019AH Bi-amping is recommended. CAUTION • Most speakers with both High and Low terminals have a removable crossover network, make sure you ...

Owner's Manual
Page 22
...resolutions that is protected by Macrovision Corporation. CAUTION • When connecting optical cables, be careful when inserting the plug not to the receiver's HDMI video outputs when connecting this case, try adjusting the resolution settings on page 67) OFF. • The signal input resolutions... that order). Use of audio input and output terminals on this receiver. Reverse engineering or disassembly is HDMI: since this resolution cannot be transferred in Setting the Video options on your component or display. ...
...resolutions that is protected by Macrovision Corporation. CAUTION • When connecting optical cables, be careful when inserting the plug not to the receiver's HDMI video outputs when connecting this case, try adjusting the resolution settings on page 67) OFF. • The signal input resolutions... that order). Use of audio input and output terminals on this receiver. Reverse engineering or disassembly is HDMI: since this resolution cannot be transferred in Setting the Video options on your component or display. ...
Owner's Manual
Page 23
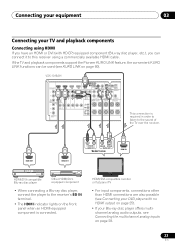
...the multichannel analog inputs on page 28. 23 En If the TV and playback components support the Pioneer KURO LINK feature, the convenient KURO LINK functions can connect it to this receiver using HDMI If you have an HDMI or DVI (with HDCP) equipped component (Blu-ray ...-ray disc player Other HDMI/DVIequipped component • When connecting a Blu-ray disc player, connect the player to the sound of the TV over the receiver. VSX-1019AH ASSIGNABLE BD IN IN 1 IN 2 AUDIO Y YL HDMI ASSIGNABLE DIGITAL AUDIO 1 3 COAXIAL ASSIGNABLE OPTICAL ASSIGNABLE IN 3 OUT IN 1 (DVD) IN 2 (...
...the multichannel analog inputs on page 28. 23 En If the TV and playback components support the Pioneer KURO LINK feature, the convenient KURO LINK functions can connect it to this receiver using HDMI If you have an HDMI or DVI (with HDCP) equipped component (Blu-ray ...-ray disc player Other HDMI/DVIequipped component • When connecting a Blu-ray disc player, connect the player to the sound of the TV over the receiver. VSX-1019AH ASSIGNABLE BD IN IN 1 IN 2 AUDIO Y YL HDMI ASSIGNABLE DIGITAL AUDIO 1 3 COAXIAL ASSIGNABLE OPTICAL ASSIGNABLE IN 3 OUT IN 1 (DVD) IN 2 (...

Owner's Manual
Page 24
... • The sound of HDMI Licensing, LLC. If you choose to connect to a DVI connector, you want to listen to this receiver also supports the corresponding format. 2 Signal transfer is compatible with, including DVDVideo, DVD-Audio, SACD, Dolby Digital Plus, Dolby TrueHD, DTS... A DVI connection, however, does not support audio signals. Note 1 • An HDMI connection can only be heard over the receiver, connect the receiver and TV with components using the KURO LINK function (see below through HDMI connections. • Digital transfer of uncompressed video (contents...
... • The sound of HDMI Licensing, LLC. If you choose to connect to a DVI connector, you want to listen to this receiver also supports the corresponding format. 2 Signal transfer is compatible with, including DVDVideo, DVD-Audio, SACD, Dolby Digital Plus, Dolby TrueHD, DTS... A DVI connection, however, does not support audio signals. Note 1 • An HDMI connection can only be heard over the receiver, connect the receiver and TV with components using the KURO LINK function (see below through HDMI connections. • Digital transfer of uncompressed video (contents...

Owner's Manual
Page 25
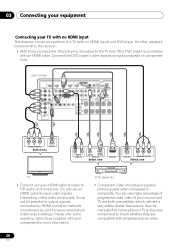
.../DVI-compatible monitor or flat panel TV 25 En See the manuals that came with your TV and source component to the receiver. Connecting your equipment 03 Connecting your DVD player with no HDMI output This diagram shows connections of a TV (with HDMI ...they are both compatible), which delivers a very stable, flicker-free picture. You can also take advantage of the TV over the receiver, connect the receiver and TV with progressive-scan video. VSX-1019AH HDMI ASSIGNABLE DIGITAL AUDIO 1 3 COAXIAL OPTICAL ASSIGNABLE ASSIGNABLE ASSIGNABLE BD IN IN 1 IN 2 IN 3 OUT AUDIO IN ...
.../DVI-compatible monitor or flat panel TV 25 En See the manuals that came with your TV and source component to the receiver. Connecting your equipment 03 Connecting your DVD player with no HDMI output This diagram shows connections of a TV (with HDMI ...they are both compatible), which delivers a very stable, flicker-free picture. You can also take advantage of the TV over the receiver, connect the receiver and TV with progressive-scan video. VSX-1019AH HDMI ASSIGNABLE DIGITAL AUDIO 1 3 COAXIAL OPTICAL ASSIGNABLE ASSIGNABLE ASSIGNABLE BD IN IN 1 IN 2 IN 3 OUT AUDIO IN ...
Owner's Manual
Page 26
...player (or other methods simultaneously, and it may not be possible to output signals connected by HDMI and other playback component) to the receiver. • With these connections, the picture is not output to check whether they are both compatible), which delivers a very stable, ... advantage of a TV (with your TV and source component to the TV even if the DVD player is connected with your component for more information. VSX-1019AH HDMI ASSIGNABLE DIGITAL AUDIO 1 3 COAXIAL OPTICAL ASSIGNABLE BD IN IN 1 IN 2 IN 3 OUT AUDIO ASSIGNABLE ASSIGNABLE IN 1 (DVD) IN 2...
...player (or other methods simultaneously, and it may not be possible to output signals connected by HDMI and other playback component) to the receiver. • With these connections, the picture is not output to check whether they are both compatible), which delivers a very stable, ... advantage of a TV (with your TV and source component to the TV even if the DVD player is connected with your component for more information. VSX-1019AH HDMI ASSIGNABLE DIGITAL AUDIO 1 3 COAXIAL OPTICAL ASSIGNABLE BD IN IN 1 IN 2 IN 3 OUT AUDIO ASSIGNABLE ASSIGNABLE IN 1 (DVD) IN 2...


