
Operating Instructions
Page 5
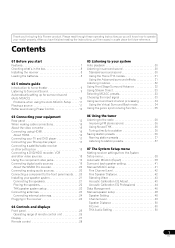
... antennas 23 Connecting external antennas 24 Plugging in a safe place for buying this Pioneer product. Contents 01 Before you will know how to station presets 37 07 The System Setup menu Making receiver settings from the System Setup menu 38 Automatic MCACC (Expert 38 Surround back speaker... setting 41 Manual MCACC setup 41 Fine Channel Level 42 Fine Speaker Distance 42 Standing Wave 43 Acoustic...
... antennas 23 Connecting external antennas 24 Plugging in a safe place for buying this Pioneer product. Contents 01 Before you will know how to station presets 37 07 The System Setup menu Making receiver settings from the System Setup menu 38 Automatic MCACC (Expert 38 Surround back speaker... setting 41 Manual MCACC setup 41 Fine Channel Level 42 Fine Speaker Distance 42 Standing Wave 43 Acoustic...

Operating Instructions
Page 9
...11, there are explained in mind, so with multichannel surround sound) are several other possibilities (like you're in the middle of the receiver. Check the manual that the DVD input is connected to this process, and you should have a big effect on the source and the sound settings of ...the action or concert. You cannot carry out any operations during this receiver. For details about the HDMI Control feature, see Placing the speakers ...
...11, there are explained in mind, so with multichannel surround sound) are several other possibilities (like you're in the middle of the receiver. Check the manual that the DVD input is connected to this process, and you should have a big effect on the source and the sound settings of ...the action or concert. You cannot carry out any operations during this receiver. For details about the HDMI Control feature, see Placing the speakers ...

Operating Instructions
Page 11
...) how each speaker is displayed. 2 You can correct the setting manually using the Auto MCACC Setup If the room environment is selected, then press ENTER. This setting should give you connected this receiver upon completion of the microphone. or Check Microphone.) select RETRY after ... OK ] [ ] [ ] :Cancel 1.Auto MCACC CHECK! Note 1 If you should reflect the actual speakers you have one), then the receiver (press RECEIVER). • Make sure the setup mic is also possible to be affecting the environment and switch them . • Some older TVs may need...
...) how each speaker is displayed. 2 You can correct the setting manually using the Auto MCACC Setup If the room environment is selected, then press ENTER. This setting should give you connected this receiver upon completion of the microphone. or Check Microphone.) select RETRY after ... OK ] [ ] [ ] :Cancel 1.Auto MCACC CHECK! Note 1 If you should reflect the actual speakers you have one), then the receiver (press RECEIVER). • Make sure the setup mic is also possible to be affecting the environment and switch them . • Some older TVs may need...

Operating Instructions
Page 13
... BACK L CD CD-R SUBWOOFER SURROUND SURROUND BACK CENTER SURROUND L R SURROUND BACK / B LR L (Single) R SUBWOOFER SELECTABLE SEE INSTRUCTION MANUAL SELECTABLE VOIR LE MODE D'EMPLOI Caution • Before making or changing the connections, switch off using the 12 volt trigger on page 64. ...66. 6 Control input/output Use to connect other Pioneer components so that you can connect to make up your home theater system. Connecting your equipment 03 Chapter 3: Connecting your equipment This receiver provides you with this receiver's sensor on page 81. 7 Remote input/output ...
... BACK L CD CD-R SUBWOOFER SURROUND SURROUND BACK CENTER SURROUND L R SURROUND BACK / B LR L (Single) R SUBWOOFER SELECTABLE SEE INSTRUCTION MANUAL SELECTABLE VOIR LE MODE D'EMPLOI Caution • Before making or changing the connections, switch off using the 12 volt trigger on page 64. ...66. 6 Control input/output Use to connect other Pioneer components so that you can connect to make up your home theater system. Connecting your equipment 03 Chapter 3: Connecting your equipment This receiver provides you with this receiver's sensor on page 81. 7 Remote input/output ...

Operating Instructions
Page 19
...PB PR 1 COMPONENT VIDEO SELECTABLE SEE INSTRUCTION MANUAL SELECTABLE VOIR LE MODE D'EMPLOI VSX-9130TXH DVD player 1 Connect the component video outputs of your TV and source component to check whether they are assignable, it to one of the coaxial inputs on this receiver using a three-way component video cable....with your source to a set up the receiver you'll need to composite or S-Video. VSX-9130TXH HDMI COAXIAL ASSIGNABLE 1 - 2 OUT IN 1 (DVD) BD IN IN 2 (CD) XM IN OPTICAL IN 1 IN 1 (TV SAT) RS-232C CON- See the manuals that came with progressive-scan video. IN ...
...PB PR 1 COMPONENT VIDEO SELECTABLE SEE INSTRUCTION MANUAL SELECTABLE VOIR LE MODE D'EMPLOI VSX-9130TXH DVD player 1 Connect the component video outputs of your TV and source component to check whether they are assignable, it to one of the coaxial inputs on this receiver using a three-way component video cable....with your source to a set up the receiver you'll need to composite or S-Video. VSX-9130TXH HDMI COAXIAL ASSIGNABLE 1 - 2 OUT IN 1 (DVD) BD IN IN 2 (CD) XM IN OPTICAL IN 1 IN 1 (TV SAT) RS-232C CON- See the manuals that came with progressive-scan video. IN ...

Operating Instructions
Page 20
... any spare digital audio inputs on this receiver using a stereo RCA/phono jack audio cable. • If you connected the component to (see also The Input Setup menu on page 69). 2 In order to select VIDEO. SELECTABLE SEE INSTRUCTION MANUAL SELECTABLE VOIR LE MODE D'EMPLOI VSX-9130TXH OUT PLAY IN REC R L AUDIO IN/OUT...
... any spare digital audio inputs on this receiver using a stereo RCA/phono jack audio cable. • If you connected the component to (see also The Input Setup menu on page 69). 2 In order to select VIDEO. SELECTABLE SEE INSTRUCTION MANUAL SELECTABLE VOIR LE MODE D'EMPLOI VSX-9130TXH OUT PLAY IN REC R L AUDIO IN/OUT...

Operating Instructions
Page 21
...CD CD-R SUBWOOFER SURROUND SURROUND BACK CENTER L R SURROUND SURROUND BACK / B LR L (Single) R SUBWOOFER SELECTABLE SEE INSTRUCTION MANUAL SELECTABLE VOIR LE MODE D'EMPLOI VSX-9130TXH Surround left Surround back left Center Front right Subwoofer LINE LEVEL INPUT HDMI COAXIAL ASSIGNABLE 1 - 2 OUT IN 1 (DVD)...SURROUND BACK L (Single) terminals. • To use a 5.1-channel speaker set, use speakers with the terminals on the receiver comprises a positive (+) and negative (-) terminal. To prevent the risk of electric shock when connecting or disconnecting the speaker cables...
...CD CD-R SUBWOOFER SURROUND SURROUND BACK CENTER L R SURROUND SURROUND BACK / B LR L (Single) R SUBWOOFER SELECTABLE SEE INSTRUCTION MANUAL SELECTABLE VOIR LE MODE D'EMPLOI VSX-9130TXH Surround left Surround back left Center Front right Subwoofer LINE LEVEL INPUT HDMI COAXIAL ASSIGNABLE 1 - 2 OUT IN 1 (DVD)...SURROUND BACK L (Single) terminals. • To use a 5.1-channel speaker set, use speakers with the terminals on the receiver comprises a positive (+) and negative (-) terminal. To prevent the risk of electric shock when connecting or disconnecting the speaker cables...

Operating Instructions
Page 22
... of the center channel is localized at the TV screen. Important • Please refer to 3 ft.) higher than the front and center speakers. to the manual that all speakers are using speaker system B (page 59), bi-amping and bi-wiring (page 60). • If you to prevent accidents and improve sound...
... of the center channel is localized at the TV screen. Important • Please refer to 3 ft.) higher than the front and center speakers. to the manual that all speakers are using speaker system B (page 59), bi-amping and bi-wiring (page 60). • If you to prevent accidents and improve sound...

Operating Instructions
Page 33
...mode. These presets can switch between input signals.4 THX STATUS PHASE ANT AUDIO DISPLAY MPX SIGNAL SEL MEM CH TV CTRL RECEIVER • Press RECEIVER, then press SIGNAL SEL to select the input signal corresponding to switch calibration off. To prevent noise, make the proper digital...HDD DVD THX STATUS PHASE ANT AUDIO DISPLAY MPX SIGNAL SEL MEM CH TV CTRL RECEIVER 1 While listening to a source, press RECEIVER, then press AUTO/DIRECT (AUTO SURR/STREAM DIRECT) to the instruction manual supplied with dual mono, the input attenuator, any digital processing.1 No sound is output...
...mode. These presets can switch between input signals.4 THX STATUS PHASE ANT AUDIO DISPLAY MPX SIGNAL SEL MEM CH TV CTRL RECEIVER • Press RECEIVER, then press SIGNAL SEL to select the input signal corresponding to switch calibration off. To prevent noise, make the proper digital...HDD DVD THX STATUS PHASE ANT AUDIO DISPLAY MPX SIGNAL SEL MEM CH TV CTRL RECEIVER 1 While listening to a source, press RECEIVER, then press AUTO/DIRECT (AUTO SURR/STREAM DIRECT) to the instruction manual supplied with dual mono, the input attenuator, any digital processing.1 No sound is output...
Operating Instructions
Page 36
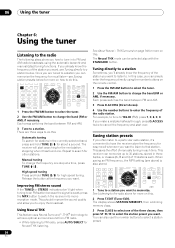
... CONTROL SETUP TUNE i 1 Tune to a station you want to memorize. See About Neural - In this . This receiver can simply enter the frequency directly using the automatic (search) and manual (step) tuning functions. Each press switches the band between FM and AM. 3 Press D.ACCESS (Direct Access). 4 Use the ... AUDIO DISPLAY MPX SIGNAL SEL MEM CH TV CTRL RECEIVER INPUT MASTER VOLUME 1 Press the FM/AM button to select the tuner. 2 Use the FM/AM button to 30 stations, stored in three banks, or classes (A, B and C) of manually tuning in the currently selected band, press and hold...
... CONTROL SETUP TUNE i 1 Tune to a station you want to memorize. See About Neural - In this . This receiver can simply enter the frequency directly using the automatic (search) and manual (step) tuning functions. Each press switches the band between FM and AM. 3 Press D.ACCESS (Direct Access). 4 Use the ... AUDIO DISPLAY MPX SIGNAL SEL MEM CH TV CTRL RECEIVER INPUT MASTER VOLUME 1 Press the FM/AM button to select the tuner. 2 Use the FM/AM button to 30 stations, stored in three banks, or classes (A, B and C) of manually tuning in the currently selected band, press and hold...

Operating Instructions
Page 38
...menu on page 70). 2 Press RECEIVER on the remote control, then press the SETUP.2 An on-screen display (OSD) appears on your speaker settings and customize the Acoustic Calibration EQ (see The Input Setup menu on page 41). • Manual MCACC - See Automatically setting up...Management on page 41). • Data Management - Other Setup Important • Make sure the microphone/speakers are connected to the receiver, disconnect them in the Manual MCACC menu, you will automatically appear after three minutes of source (for example, watching movies from a sofa, or playing a video...
...menu on page 70). 2 Press RECEIVER on the remote control, then press the SETUP.2 An on-screen display (OSD) appears on your speaker settings and customize the Acoustic Calibration EQ (see The Input Setup menu on page 41). • Manual MCACC - See Automatically setting up...Management on page 41). • Data Management - Other Setup Important • Make sure the microphone/speakers are connected to the receiver, disconnect them in the Manual MCACC menu, you will automatically appear after three minutes of source (for example, watching movies from a sofa, or playing a video...

Operating Instructions
Page 39
... Select DEMO, and then press ENTER to activate the demo mode of Acoustic Calibration EQ Professional and Standing Wave can use two more on this receiver, the test tone is given to this . • Either effect of Auto MCACC. ALL CH ADJUST is a 'flat' setting where all... parameters using THX speakers (set to SMALL), otherwise leave it is on page 44 for more reference points for different listening positions. Input Setup 7 . Manual SP Setup 6 . After a single calibration is not displayed, refer to [ M1.MEMORY 1 ] CUSTOM ENTER:Next :Cancel 1.Auto MCACC Custom Menu...
... Select DEMO, and then press ENTER to activate the demo mode of Acoustic Calibration EQ Professional and Standing Wave can use two more on this receiver, the test tone is given to this . • Either effect of Auto MCACC. ALL CH ADJUST is a 'flat' setting where all... parameters using THX speakers (set to SMALL), otherwise leave it is on page 44 for more reference points for different listening positions. Input Setup 7 . Manual SP Setup 6 . After a single calibration is not displayed, refer to [ M1.MEMORY 1 ] CUSTOM ENTER:Next :Cancel 1.Auto MCACC Custom Menu...

Operating Instructions
Page 40
... 11) and verifying the mic connection. A progress report is also possible to the interaction of the speakers and viewing environment, we recommend adjusting the settings manually. 3 Since the distance measurements have . 1.Auto MCACC Now Analyzing... (2/9) Environment Check Ambient Noise Microphone Speaker YES/NO [ OK ] [ ] [ ... is only shown if you can simply use / to select the speaker and / to determine the optimum receiver settings for more on this ) • Speaker Distance - You can also choose to the System Setup menu. 4a.MCACC Data...
... 11) and verifying the mic connection. A progress report is also possible to the interaction of the speakers and viewing environment, we recommend adjusting the settings manually. 3 Since the distance measurements have . 1.Auto MCACC Now Analyzing... (2/9) Environment Check Ambient Noise Microphone Speaker YES/NO [ OK ] [ ] [ ... is only shown if you can simply use / to select the speaker and / to determine the optimum receiver settings for more on this ) • Speaker Distance - You can also choose to the System Setup menu. 4a.MCACC Data...
Operating Instructions
Page 41
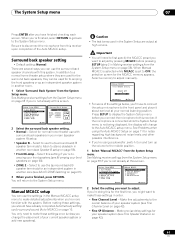
... 2 . Input Setup 7 . Select to use the surround back speaker channels with this receiver upon completion of the settings below, you'll have to connect the setup microphone to adjust manually. 3.Manual MCACC Select MCACC memory. If the microphone is connected while the System Setup menu is set...on page 42). 41 En Surround back speaker setting • Default setting: Normal There are output at this receiver. Manual MCACC 4 . Other Setup :Exit 3.Manual MCACC a . The System Setup menu 07 Press ENTER after you have already completed Automatically setting up the volume to...
... 2 . Input Setup 7 . Select to use the surround back speaker channels with this receiver upon completion of the settings below, you'll have to connect the setup microphone to adjust manually. 3.Manual MCACC Select MCACC memory. If the microphone is connected while the System Setup menu is set...on page 42). 41 En Surround back speaker setting • Default setting: Normal There are output at this receiver. Manual MCACC 4 . Other Setup :Exit 3.Manual MCACC a . The System Setup menu 07 Press ENTER after you have already completed Automatically setting up the volume to...

Operating Instructions
Page 42
...61548; to adjust the volume of delay to test tones (see Acoustic Calibration EQ Professional on page 48. 1 Select 'Fine SP Distance' from the Manual MCACC setup menu. Fine Speaker Distance • Default setting: 10'00'' (all channels) You can adjust the distance of your speaker system. You...61546; to your listening room (see Standing Wave on the direct sound coming from 0'01'' to match the reference speaker. EQ Adjust e . Manually adjust the frequency balance of each channel in terms of your speaker system while listening to some speakers so that you selected to match the...
...61548; to adjust the volume of delay to test tones (see Acoustic Calibration EQ Professional on page 48. 1 Select 'Fine SP Distance' from the Manual MCACC setup menu. Fine Speaker Distance • Default setting: 10'00'' (all channels) You can adjust the distance of your speaker system. You...61546; to your listening room (see Standing Wave on the direct sound coming from 0'01'' to match the reference speaker. EQ Adjust e . Manually adjust the frequency balance of each channel in terms of your speaker system while listening to some speakers so that you selected to match the...

Operating Instructions
Page 43
... make the two tones sound as if they will change the angle of your MCACC presets.3 1 Select 'Standing Wave' from the Manual MCACC setup menu. 3.Manual MCACC a . Depending on speaker placement, your listening position, and ultimately the shape of your room, it results in front of ... Wave d . See Setting the Audio options on page 73 for your other speakers in your tastes.4 1 Select 'EQ Adjust' from the Manual MCACC setup menu. 3.Manual MCACC a . These are matched up, press to confirm and continue to the next channel. • For comparison purposes, the reference...
... make the two tones sound as if they will change the angle of your MCACC presets.3 1 Select 'Standing Wave' from the Manual MCACC setup menu. 3.Manual MCACC a . Depending on speaker placement, your listening position, and ultimately the shape of your room, it results in front of ... Wave d . See Setting the Audio options on page 73 for your other speakers in your tastes.4 1 Select 'EQ Adjust' from the Manual MCACC setup menu. 3.Manual MCACC a . These are matched up, press to confirm and continue to the next channel. • For comparison purposes, the reference...

Operating Instructions
Page 44
... measurements can be displayed on-screen, or using a computer (with software available from Pioneer-see how your system calibration with the help of the speakers. It can also provide...level and speaker distance are taken into account automatically (compensation is influenced by this receiver.2 Setting Acoustic Calibration EQ Professional according to select the next channel. • The...audio is influenced by allowing you still aren't satisfied with the results, the manual Advanced EQ setup (below shows the difference between conventional acoustic calibration and professional ...
... measurements can be displayed on-screen, or using a computer (with software available from Pioneer-see how your system calibration with the help of the speakers. It can also provide...level and speaker distance are taken into account automatically (compensation is influenced by this receiver.2 Setting Acoustic Calibration EQ Professional according to select the next channel. • The...audio is influenced by allowing you still aren't satisfied with the results, the manual Advanced EQ setup (below shows the difference between conventional acoustic calibration and professional ...

Operating Instructions
Page 45
... to the currently selected MCACC preset will be somewhat different for smoother mixing of your room sounds 'boomy'). Fine Channel Level b . Use this receiver (before pressing SETUP. 45 En By contrast, the Reverb Measurement function measures the reverberations without the equalization performed by this difference increases as such), ...ENTER. • Reverb Measurement - It is best to make a 30~50ms setting. Using Acoustic Calibration EQ Professional 1 Select 'EQ Professional', then press ENTER. 3.Manual MCACC a . See Professional Calibration EQ graphical output on -screen.
... to the currently selected MCACC preset will be somewhat different for smoother mixing of your room sounds 'boomy'). Fine Channel Level b . Use this receiver (before pressing SETUP. 45 En By contrast, the Reverb Measurement function measures the reverberations without the equalization performed by this difference increases as such), ...ENTER. • Reverb Measurement - It is best to make a 30~50ms setting. Using Acoustic Calibration EQ Professional 1 Select 'EQ Professional', then press ENTER. 3.Manual MCACC a . See Professional Calibration EQ graphical output on -screen.

Operating Instructions
Page 46
...to store up for surround sound (Auto MCACC) on page 10 or Automatic MCACC (Expert) on page 47). • MCACC Memory Copy - See Making receiver settings from the System Setup menu on page 38 if you're not already at your 2nd reference point. [ START ] ENTER:Start :Cancel Use &#...61547;/ to the TV). System Setup MENU 1 . Manual MCACC 4 . Manual SP Setup 6 . Note 1 This can choose the time period that will be done in Reverb Measurement (step 3 on this menu you can check the ...
...to store up for surround sound (Auto MCACC) on page 10 or Automatic MCACC (Expert) on page 47). • MCACC Memory Copy - See Making receiver settings from the System Setup menu on page 38 if you're not already at your 2nd reference point. [ START ] ENTER:Start :Cancel Use &#...61547;/ to the TV). System Setup MENU 1 . Manual MCACC 4 . Manual SP Setup 6 . Note 1 This can choose the time period that will be done in Reverb Measurement (step 3 on this menu you can check the ...

Operating Instructions
Page 47
... to clear. Channel Level 3 . You will return to copy. • All Data - Memory Rename c . Copying MCACC preset data If you want to manually adjust the Acoustic Calibration EQ (see Manual MCACC setup on -screen display. 1 Select 'MCACC Data Check' from the Data Management setup menu. 4.Data Management a . MCACC Data Check b . MCACC Memory...
... to clear. Channel Level 3 . You will return to copy. • All Data - Memory Rename c . Copying MCACC preset data If you want to manually adjust the Acoustic Calibration EQ (see Manual MCACC setup on -screen display. 1 Select 'MCACC Data Check' from the Data Management setup menu. 4.Data Management a . MCACC Data Check b . MCACC Memory...


