
Operating Instructions
Page 5
... Listening in stereo 32 Using Front Stage Surround Advance 32 Using Stream Direct 33 Selecting MCACC presets 33 Choosing the input signal 33 Using surround back channel processing 34 Using the Virtual Surround Back mode 34 Using the genre synchronizing function 35 03 Connecting your equipment Rear panel 13 When making cable connections 15 About the video converter 15 Connecting using HDMI 16 About HDMI 16 Connecting your TV and DVD player 17 Connecting your Blu-ray disc player 17 Connecting a satellite/cable receiver or other set-top box 18 Connecting a DVD/HDD...
... Listening in stereo 32 Using Front Stage Surround Advance 32 Using Stream Direct 33 Selecting MCACC presets 33 Choosing the input signal 33 Using surround back channel processing 34 Using the Virtual Surround Back mode 34 Using the genre synchronizing function 35 03 Connecting your equipment Rear panel 13 When making cable connections 15 About the video converter 15 Connecting using HDMI 16 About HDMI 16 Connecting your TV and DVD player 17 Connecting your Blu-ray disc player 17 Connecting a satellite/cable receiver or other set-top box 18 Connecting a DVD/HDD...

Operating Instructions
Page 6
... your SiriusConnectTM Tuner 57 Listening to SIRIUS Radio 58 Saving channel presets 58 Using the SIRIUS Menu 58 Connecting the multichannel analog inputs 59 Selecting the multichannel analog inputs 59 Speaker B setup 59 Switching the speaker system 59 Bi-amping your front speakers 60 Bi-wiring your system Setting the remote to control other components . . . . . 78 Selecting preset codes directly 78 Preset code list 78 Controls for TVs 79 Controls for other components 80 Operating other Pioneer components with different input signal formats . . . 101 Specifications 102 Cleaning...
... your SiriusConnectTM Tuner 57 Listening to SIRIUS Radio 58 Saving channel presets 58 Using the SIRIUS Menu 58 Connecting the multichannel analog inputs 59 Selecting the multichannel analog inputs 59 Speaker B setup 59 Switching the speaker system 59 Bi-amping your front speakers 60 Bi-wiring your system Setting the remote to control other components . . . . . 78 Selecting preset codes directly 78 Preset code list 78 Controls for TVs 79 Controls for other components 80 Operating other Pioneer components with different input signal formats . . . 101 Specifications 102 Cleaning...

Operating Instructions
Page 10
... select. • Before using a subwoofer, make sure to connect your speakers as ALL CH ADJUST and FRONT ALIGN). AUTO SURR/ HOME STREAM DIRECT THX STANDARD ADVANCED SURROUND SURROUND STEREO/ A.L.C. ST + VIDEO VIDEO INPUT L AUDIO R DIGITAL IN iPod DIRECT USB MCACC SETUP MIC The Auto MCACC display appears once the microphone is switched on page 38 for both channel delay and channel level. In this before continuing to step 4. • If you are used in the OSD. Note 1 • You can't use the System Setup menu...
... select. • Before using a subwoofer, make sure to connect your speakers as ALL CH ADJUST and FRONT ALIGN). AUTO SURR/ HOME STREAM DIRECT THX STANDARD ADVANCED SURROUND SURROUND STEREO/ A.L.C. ST + VIDEO VIDEO INPUT L AUDIO R DIGITAL IN iPod DIRECT USB MCACC SETUP MIC The Auto MCACC display appears once the microphone is switched on page 38 for both channel delay and channel level. In this before continuing to step 4. • If you are used in the OSD. Note 1 • You can't use the System Setup menu...

Operating Instructions
Page 11
... interaction of the speakers and viewing environment, we recommend adjusting the settings manually. 4 Make sure that the TV's video input is set to this receiver (for more test tones to PCM. • Depending on the characteristics of your home theater system. 4 5 6 RECEIVER SOURCE SR+ SBch A.ATT 7 8 9 CATEGORY RETURN DVD BD TV HDMI DVR 1 DVR 2 CD CD-R FM/AM XM SIRIUS iPod USB D.ACCESS CH LEVEL 0 INPUT CLASS ENTER MASTER VOLUME TV CONTROL SETUP TUNE iPod CTRL AUTO/ STEREO/ BD MENU DIRECT A.L.C. You can...
... interaction of the speakers and viewing environment, we recommend adjusting the settings manually. 4 Make sure that the TV's video input is set to this receiver (for more test tones to PCM. • Depending on the characteristics of your home theater system. 4 5 6 RECEIVER SOURCE SR+ SBch A.ATT 7 8 9 CATEGORY RETURN DVD BD TV HDMI DVR 1 DVR 2 CD CD-R FM/AM XM SIRIUS iPod USB D.ACCESS CH LEVEL 0 INPUT CLASS ENTER MASTER VOLUME TV CONTROL SETUP TUNE iPod CTRL AUTO/ STEREO/ BD MENU DIRECT A.L.C. You can...

Operating Instructions
Page 12
... sound using a surround back speaker, 2D+PL IIx MOVIE is displayed when playing Dolby Digital signals, and DTS+Neo:6 is displayed when playing Dolby Digital signals. 4 Use the volume control to maximize the effect. The default setting is switched on for all sound is also recommended you try changing the orientation or the place of your subwoofer. • Set the built-in . • If your subwoofer to adjust the volume level. Set your subwoofer has a phase control switch, set , you can reproduce powerful bass sound without...
... sound using a surround back speaker, 2D+PL IIx MOVIE is displayed when playing Dolby Digital signals, and DTS+Neo:6 is displayed when playing Dolby Digital signals. 4 Use the volume control to maximize the effect. The default setting is switched on for all sound is also recommended you try changing the orientation or the place of your subwoofer. • Set the built-in . • If your subwoofer to adjust the volume level. Set your subwoofer has a phase control switch, set , you can reproduce powerful bass sound without...

Operating Instructions
Page 13
... SURROUND L R SURROUND BACK / B LR L (Single) R SUBWOOFER SELECTABLE SEE INSTRUCTION MANUAL SELECTABLE VOIR LE MODE D'EMPLOI Caution • Before making or changing the connections, switch off using the 12 volt trigger on page 64. 9 Audio/video source inputs/(outputs) (x6) Use for composite video, S-Video and stereo analog audio. See Connecting a DVD/HDD recorder, VCR and other video sources on page 19. Connecting your equipment 03 Chapter 3: Connecting your equipment This receiver provides you with this receiver's sensor on page 81. 7 Remote input/output (MULTI-ZONE...
... SURROUND L R SURROUND BACK / B LR L (Single) R SUBWOOFER SELECTABLE SEE INSTRUCTION MANUAL SELECTABLE VOIR LE MODE D'EMPLOI Caution • Before making or changing the connections, switch off using the 12 volt trigger on page 64. 9 Audio/video source inputs/(outputs) (x6) Use for composite video, S-Video and stereo analog audio. See Connecting a DVD/HDD recorder, VCR and other video sources on page 19. Connecting your equipment 03 Chapter 3: Connecting your equipment This receiver provides you with this receiver's sensor on page 81. 7 Remote input/output (MULTI-ZONE...

Operating Instructions
Page 16
..., an HDCP ERROR message is connected. 2 Use an HDMI cable to connect the HDMI OUT interconnect on this receiver to hear HDMI audio output from this receiver). • If the video signal does not appear on your TV or flat panel TV, try adjusting the resolution settings on a single digital connection for example, HDMI 2). See About the video converter on the player. 3 Use the INPUT SELECT button to select the HDMI input you connect a component that the component connected to this is used to multi-channel surround-sound audio.
..., an HDCP ERROR message is connected. 2 Use an HDMI cable to connect the HDMI OUT interconnect on this receiver to hear HDMI audio output from this receiver). • If the video signal does not appear on your TV or flat panel TV, try adjusting the resolution settings on a single digital connection for example, HDMI 2). See About the video converter on the player. 3 Use the INPUT SELECT button to select the HDMI input you connect a component that the component connected to this is used to multi-channel surround-sound audio.

Operating Instructions
Page 17
... OUT IN SIRIUS ZON IN OU R MULTI CH IN SPEAKERS FRONT AR FRONT CENTER SURROUND SURROUND BACK L R SUBWOOFER HDMI OUT Blu-ray disc player The diagram shows a basic setup of this receiver together with a Blu-ray disc player, with S-Video or composite video connections. Different TVs and DVD players may offer alternative connections. Use a standard RCA/phono jack video cable to connect to the composite video jack, or for digital audio. 4 Connect the stereo audio outputs on your DVD player to the COAXIAL IN 1 (DVD) input. IN TROL OUT IN 2 (DVR1...
... OUT IN SIRIUS ZON IN OU R MULTI CH IN SPEAKERS FRONT AR FRONT CENTER SURROUND SURROUND BACK L R SUBWOOFER HDMI OUT Blu-ray disc player The diagram shows a basic setup of this receiver together with a Blu-ray disc player, with S-Video or composite video connections. Different TVs and DVD players may offer alternative connections. Use a standard RCA/phono jack video cable to connect to the composite video jack, or for digital audio. 4 Connect the stereo audio outputs on your DVD player to the COAXIAL IN 1 (DVD) input. IN TROL OUT IN 2 (DVR1...

Operating Instructions
Page 20
...-compatible player. Connecting a component to 48 kHz. 20 En 03 Connecting your equipment 1 Connect a coaxial-type1 digital audio output on your digital component only has an optical digital output, you can connect it is possible to playback WMA9 Pro-encoded audio using a stereo RCA/phono jack audio cable. • If you must be connected to the COAXIAL IN 2 (CD) input. must make analog connections as camcorders, video games and portable audio/video equipment. PHONES MULTI-ZONE CONTROL ON/OFF SPEAKERS ST - SELECTABLE SEE INSTRUCTION MANUAL SELECTABLE...
...-compatible player. Connecting a component to 48 kHz. 20 En 03 Connecting your equipment 1 Connect a coaxial-type1 digital audio output on your digital component only has an optical digital output, you can connect it is possible to playback WMA9 Pro-encoded audio using a stereo RCA/phono jack audio cable. • If you must be connected to the COAXIAL IN 2 (CD) input. must make analog connections as camcorders, video games and portable audio/video equipment. PHONES MULTI-ZONE CONTROL ON/OFF SPEAKERS ST - SELECTABLE SEE INSTRUCTION MANUAL SELECTABLE...

Operating Instructions
Page 29
... switch Switch to perform operations in the main zone and zone 2 (page 61). 12 Remote control LED Lights when a command is weak then switching to set up your surround sound system (page 38) and the Audio or Video options (page 73 or 74). Use to set preset code of FM broadcasts. STEREO/A.L.C. - SIGNAL SEL - DISPLAY - Also use ST / to find radio frequencies and use this button to switch on DVD discs. Use to access: AUTO/DIRECT - Press to set the listening volume...
... switch Switch to perform operations in the main zone and zone 2 (page 61). 12 Remote control LED Lights when a command is weak then switching to set up your surround sound system (page 38) and the Audio or Video options (page 73 or 74). Use to set preset code of FM broadcasts. STEREO/A.L.C. - SIGNAL SEL - DISPLAY - Also use ST / to find radio frequencies and use this button to switch on DVD discs. Use to access: AUTO/DIRECT - Press to set the listening volume...

Operating Instructions
Page 39
... Menu - ST + VIDEO VIDEO INPUT L AUDIO R DIGITAL IN iPod DIRECT USB MCACC SETUP MIC If you 're finished settings the options, press RETURN to go back to the Auto MCACC main setup. 3 Connect the microphone to the front left and right channels). • THX Speaker (only available when the Custom Menu above is adjusted. Auto MCACC 2 . Data Management 5 . The default is ALL (recommended), but you are used for storing surround sound settings for each of Acoustic Calibration...
... Menu - ST + VIDEO VIDEO INPUT L AUDIO R DIGITAL IN iPod DIRECT USB MCACC SETUP MIC If you 're finished settings the options, press RETURN to go back to the Auto MCACC main setup. 3 Connect the microphone to the front left and right channels). • THX Speaker (only available when the Custom Menu above is adjusted. Auto MCACC 2 . Data Management 5 . The default is ALL (recommended), but you are used for storing surround sound settings for each of Acoustic Calibration...
Operating Instructions
Page 41
... Bi-Amp - Select to the Auto MCACC setup menu. You will change the placement of the settings below, you 're more familiar with surround back speakers in another zone (see Speaker B setup on page 60). • ZONE 2 - Manual MCACC setup You can be used in order. • Fine Channel Level - You only need to first specify the MCACC preset you want to make detailed adjustments when you 'll have finished checking each screen...
... Bi-Amp - Select to the Auto MCACC setup menu. You will change the placement of the settings below, you 're more familiar with surround back speakers in another zone (see Speaker B setup on page 60). • ZONE 2 - Manual MCACC setup You can be used in order. • Fine Channel Level - You only need to first specify the MCACC preset you want to make detailed adjustments when you 'll have finished checking each screen...
Operating Instructions
Page 59
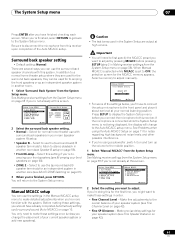
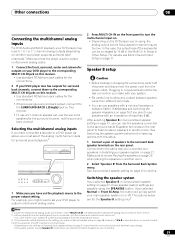
... to stereo playback in Surround back speaker setting on the rear panel. Other connections 08 Connecting the multichannel analog inputs For DVD Audio and SACD playback, your DVD player may have 5.1, 6.1 or 7.1 channel analog outputs (depending on whether your player supports surround back channels).1 Make sure that the player is set to output multichannel analog audio. 1 Connect the front, surround, center and subwoofer outputs on your DVD player to the corresponding MULTI CH IN jack on this receiver. • Use standard RCA/phono jack cables for the connections...
... to stereo playback in Surround back speaker setting on the rear panel. Other connections 08 Connecting the multichannel analog inputs For DVD Audio and SACD playback, your DVD player may have 5.1, 6.1 or 7.1 channel analog outputs (depending on whether your player supports surround back channels).1 Make sure that the player is set to output multichannel analog audio. 1 Connect the front, surround, center and subwoofer outputs on your DVD player to the corresponding MULTI CH IN jack on this receiver. • Use standard RCA/phono jack cables for the connections...

Operating Instructions
Page 62
...the MULTI-ZONE ON/OFF button on • ZONE 2 OFF - ST + VIDEO VIDEO INPUT L AUDIO R DIGITAL IN iPod DIRECT USB MCACC SETUP MIC MASTER VOLUME AUTO SURR/ HOME STREAM DIRECT THX STANDARD ADVANCED SURROUND SURROUND STEREO/ A.L.C. You should have a pair of this setup. Switches the MULTI-ZONE feature on the front panel. Basic MULTI-ZONE setup (ZONE 2) • Connect a separate amplifier to the ZONE 2 AUDIO OUT jacks and a TV monitor to the sub zone amplifier as shown below. a.• With the MULTI CH IN input, sound is possible. See MULTIZONE remote controls on...
...the MULTI-ZONE ON/OFF button on • ZONE 2 OFF - ST + VIDEO VIDEO INPUT L AUDIO R DIGITAL IN iPod DIRECT USB MCACC SETUP MIC MASTER VOLUME AUTO SURR/ HOME STREAM DIRECT THX STANDARD ADVANCED SURROUND SURROUND STEREO/ A.L.C. You should have a pair of this setup. Switches the MULTI-ZONE feature on the front panel. Basic MULTI-ZONE setup (ZONE 2) • Connect a separate amplifier to the ZONE 2 AUDIO OUT jacks and a TV monitor to the sub zone amplifier as shown below. a.• With the MULTI CH IN input, sound is possible. See MULTIZONE remote controls on...

Operating Instructions
Page 63
..., turn off power in standby, the display is not showing, the front panel controls affect the main zone only. 3 Use the INPUT SELECTOR dial to select the source for the zone you want to link a Pioneer component to control your IR receiver for the type of cable necessary for the sub zone are independent. 4 • You won't be tuned to change stations when recording a radio broadcast. 3 The volume levels of the IR ZONE2 OUT jack. MASTER VOLUME +/- Use to set...
..., turn off power in standby, the display is not showing, the front panel controls affect the main zone only. 3 Use the INPUT SELECTOR dial to select the source for the zone you want to link a Pioneer component to control your IR receiver for the type of cable necessary for the sub zone are independent. 4 • You won't be tuned to change stations when recording a radio broadcast. 3 The volume levels of the IR ZONE2 OUT jack. MASTER VOLUME +/- Use to set...
Operating Instructions
Page 65
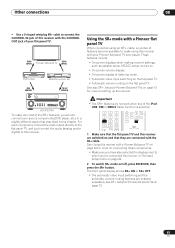
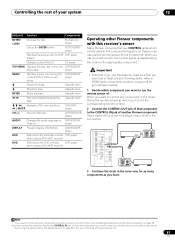
VIDEO INPUT 1 Pioneer flat panel TV VIDEO INPUT 2 DVD player Satellite receiver, etc. DVD AUDIO IN TV SAT AUDIO IN INPUT SELECTOR AUDIO/VIDEO MULTI-CHANNEL RECEIVER VSX-9130TXH STANDBY/ON PHASE CONTROL ADVANCED MCACC DIGITAL PRECISION PROCESSING DIGITAL VIDEO SCALER HDMI DVD BD TV SAT DVR 1/DVR 2 VIDEO HDMI 1/HDMI 2 CD/CD-R FM /AM XM /SIRIUS iPod USB MULTI CH IN AUTO SURR/ HOME STREAM DIRECT THX STANDARD ADVANCED SURROUND SURROUND STEREO/ A.L.C. Using the SR+ mode with a Pioneer flat panel TV When connected using this receiver with the CONTROL OUT jack of your...
VIDEO INPUT 1 Pioneer flat panel TV VIDEO INPUT 2 DVD player Satellite receiver, etc. DVD AUDIO IN TV SAT AUDIO IN INPUT SELECTOR AUDIO/VIDEO MULTI-CHANNEL RECEIVER VSX-9130TXH STANDBY/ON PHASE CONTROL ADVANCED MCACC DIGITAL PRECISION PROCESSING DIGITAL VIDEO SCALER HDMI DVD BD TV SAT DVR 1/DVR 2 VIDEO HDMI 1/HDMI 2 CD/CD-R FM /AM XM /SIRIUS iPod USB MULTI CH IN AUTO SURR/ HOME STREAM DIRECT THX STANDARD ADVANCED SURROUND SURROUND STEREO/ A.L.C. Using the SR+ mode with a Pioneer flat panel TV When connected using this receiver with the CONTROL OUT jack of your...

Operating Instructions
Page 69
... receiver using the 12 volt trigger on page 64), select MAIN, ZONE 2 or OFF for that you want to set up. Manual MCACC 4 . The second screen of the component video signals.1 6 When you're finished, select 'Next' to continue to the next screen. An on-screen display (OSD) appears on your component. System Setup MENU 1 . Data Management 5 . To control certain functions on this connection. 69 En Other Setup :Exit 6.Input Setup (1/2) Input DVD Digital In [ COAX-1 ] HDMI Input [ Input-1 ] Component...
... receiver using the 12 volt trigger on page 64), select MAIN, ZONE 2 or OFF for that you want to set up. Manual MCACC 4 . The second screen of the component video signals.1 6 When you're finished, select 'Next' to continue to the next screen. An on-screen display (OSD) appears on your component. System Setup MENU 1 . Data Management 5 . To control certain functions on this connection. 69 En Other Setup :Exit 6.Input Setup (1/2) Input DVD Digital In [ COAX-1 ] HDMI Input [ Input-1 ] Component...

Operating Instructions
Page 74
...) Some Dolby Digital and DTS audio sources include ultra-low bass tones. Adjust the effect from the speakers. c. If you can make using a (center channel sent to prevent the ultralow bass tones from distorting the sound from 0 (Neo:6 Music), (Applicable (all MCACC preset memories become deactivated. i. C. DELAY This feature automatically OFF (Auto delay) corrects the audio-to-video delay between the front (Applicable right and left speakers) to 10 Cinema) using the Video Parameter menu. f. • HDMI Audio setting cannot be switched while...
...) Some Dolby Digital and DTS audio sources include ultra-low bass tones. Adjust the effect from the speakers. c. If you can make using a (center channel sent to prevent the ultralow bass tones from distorting the sound from 0 (Neo:6 Music), (Applicable (all MCACC preset memories become deactivated. i. C. DELAY This feature automatically OFF (Auto delay) corrects the audio-to-video delay between the front (Applicable right and left speakers) to 10 Cinema) using the Video Parameter menu. f. • HDMI Audio setting cannot be switched while...

Operating Instructions
Page 77
... settings. The display shows RESET?. 3 Press the front panel AUTO SURR/STREAM DIRECT button. The display shows OK. 4 Press HOME THX to the factory default. Default system settings Setting HDMI Audio HDMI Control Default Amp ON Digital Video Conversion Speakers Surround Back System ON A Normal Speaker System Front Center Surr SMALL SMALL SMALL SB SW Crossover SMALLx2 YES 80 Hz X-Curve THX Audio Setting OFF 0-1 ft. Use the front panel controls to do this. 1 Switch the receiver into standby. 2 While holding down the front panel STEREO/A.L.C button...
... settings. The display shows RESET?. 3 Press the front panel AUTO SURR/STREAM DIRECT button. The display shows OK. 4 Press HOME THX to the factory default. Default system settings Setting HDMI Audio HDMI Control Default Amp ON Digital Video Conversion Speakers Surround Back System ON A Normal Speaker System Front Center Surr SMALL SMALL SMALL SB SW Crossover SMALLx2 YES 80 Hz X-Curve THX Audio Setting OFF 0-1 ft. Use the front panel controls to do this. 1 Switch the receiver into standby. 2 While holding down the front panel STEREO/A.L.C button...
Operating Instructions
Page 81
... player players. Changes sides of a DVD/BD/DVR DVD player. Controlling the rest of analog audio, video or HDMI jacks connected to another Pioneer component. Use as you have CONTROL jacks which component you are connecting a Pioneer flat panel TV. 81 En player MENU Displays menus concerning the current DVD or DVR you want to control all your system 12 Button(s) Function Components ENTER/ CLASS Chooses the disc. Pauses the tape. Selects channels. Operating other components on page 78. When you use a remote control, the control...
... player players. Changes sides of a DVD/BD/DVR DVD player. Controlling the rest of analog audio, video or HDMI jacks connected to another Pioneer component. Use as you have CONTROL jacks which component you are connecting a Pioneer flat panel TV. 81 En player MENU Displays menus concerning the current DVD or DVR you want to control all your system 12 Button(s) Function Components ENTER/ CLASS Chooses the disc. Pauses the tape. Selects channels. Operating other components on page 78. When you use a remote control, the control...


