
Owner's Manual
Page 3
... left un-used replacement parts specified by the operating instructions as opening or removing covers may corrode the cabinet. WALL OR CEILING MOUNTING - The product should not be situated away from the type of power supply to your home, consult your obsolete outlet. ANTENNA LEAD IN WIRE GROUND CLAMP ELECTRIC SERVICE EQUIPMENT Fig. NATIONAL ELECTRICAL CODE D1-4-2-2_En NO USER-SERVICEABLE PARTS INSIDE. or...
... left un-used replacement parts specified by the operating instructions as opening or removing covers may corrode the cabinet. WALL OR CEILING MOUNTING - The product should not be situated away from the type of power supply to your home, consult your obsolete outlet. ANTENNA LEAD IN WIRE GROUND CLAMP ELECTRIC SERVICE EQUIPMENT Fig. NATIONAL ELECTRICAL CODE D1-4-2-2_En NO USER-SERVICEABLE PARTS INSIDE. or...
Owner's Manual
Page 4
... Pro decoder 17 Connecting analog audio sources 17 Connecting a component to the front panel inputs 17 Installing your speaker system 18 Connecting the speakers 18 Placing the speakers 19 THX speaker system setup 20 Connecting antennas 20 Connecting external antennas 21 Plugging in the receiver 21 AC outlet 21 04 Controls and displays Front panel 22 Operating range of remote control unit 23 Display 24 Remote control 25 05 Listening to operate your system Auto playback 27 Listening in surround sound 27 Standard surround sound 27 Using the Home THX modes...
... Pro decoder 17 Connecting analog audio sources 17 Connecting a component to the front panel inputs 17 Installing your speaker system 18 Connecting the speakers 18 Placing the speakers 19 THX speaker system setup 20 Connecting antennas 20 Connecting external antennas 21 Plugging in the receiver 21 AC outlet 21 04 Controls and displays Front panel 22 Operating range of remote control unit 23 Display 24 Remote control 25 05 Listening to operate your system Auto playback 27 Listening in surround sound 27 Standard surround sound 27 Using the Home THX modes...
Owner's Manual
Page 5
... . . 61 Selecting preset codes directly 61 Resetting the remote control presets 61 Confirming preset codes 61 Direct function 61 Multi Operation and System Off 62 Programming a multi-operation or a shutdown sequence 62 Using multi operations 63 Using System off using the 12 volt trigger 52 Using this receiver with a Pioneer plasma display 53 Using the SR+ mode with a Pioneer plasma display 54 09 Other Settings The Input Assign menu 55 The Other Setup menu 56 Dynamic Range Control Setup 56 Dual Mono Setup 57 LFE Attenuator Setup 57 SR+ Setup for Pioneer plasma displays 57 Video...
... . . 61 Selecting preset codes directly 61 Resetting the remote control presets 61 Confirming preset codes 61 Direct function 61 Multi Operation and System Off 62 Programming a multi-operation or a shutdown sequence 62 Using multi operations 63 Using System off using the 12 volt trigger 52 Using this receiver with a Pioneer plasma display 53 Using the SR+ mode with a Pioneer plasma display 54 09 Other Settings The Input Assign menu 55 The Other Setup menu 56 Dynamic Range Control Setup 56 Dual Mono Setup 57 LFE Attenuator Setup 57 SR+ Setup for Pioneer plasma displays 57 Video...

Owner's Manual
Page 9
.... 8 The Auto MCACC Setup has finished! VIDEO VIDEO/GAME INPUT VIDEO L AUDIO R DIGITAL IN MCACC SETUP MIC The Auto MCACC display appears once the microphone is switched on the characteristics of each speaker is also possible to adjust these settings manually using the front panel display, the diagram in Listening to Surround Sound above indicates (in the right side column, there may be a problem, you cancel the Auto MCACC Setup, or leave an error message for channel level, speaker distance, and...
.... 8 The Auto MCACC Setup has finished! VIDEO VIDEO/GAME INPUT VIDEO L AUDIO R DIGITAL IN MCACC SETUP MIC The Auto MCACC display appears once the microphone is switched on the characteristics of each speaker is also possible to adjust these settings manually using the front panel display, the diagram in Listening to Surround Sound above indicates (in the right side column, there may be a problem, you cancel the Auto MCACC Setup, or leave an error message for channel level, speaker distance, and...
Owner's Manual
Page 10
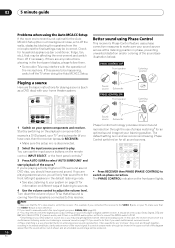
..., if you may interfere with your home theater system. XM RADIO DVD CD-R/TAPE CD SIRIUS TV iPod DVR 2 DVR 1 TV CTRL ZONE 2 TUNER RECEIVER SLEEP SR+ DIALOG E SB ch DIMMER PHASE ANALOG ATT MIDNIGHT/ LOUDNESS S.RETRIEVER D.ACCESS +10 CLASS DISC ENTER • Press RECEIVER then PHASE (PHASE CONTROL) to switch on the remote control, INPUT SELECT, or the front panel controls.2 3 Press AUTO SURR to select 'AUTO SURROUND' and start playback of phase...
..., if you may interfere with your home theater system. XM RADIO DVD CD-R/TAPE CD SIRIUS TV iPod DVR 2 DVR 1 TV CTRL ZONE 2 TUNER RECEIVER SLEEP SR+ DIALOG E SB ch DIMMER PHASE ANALOG ATT MIDNIGHT/ LOUDNESS S.RETRIEVER D.ACCESS +10 CLASS DISC ENTER • Press RECEIVER then PHASE (PHASE CONTROL) to switch on the remote control, INPUT SELECT, or the front panel controls.2 3 Press AUTO SURR to select 'AUTO SURROUND' and start playback of phase...
Owner's Manual
Page 11
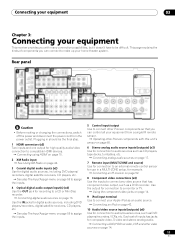
.... 3 Coaxial digital audio inputs (x2) Use for digital audio sources, including DVD players/ recorders, digital satellite receivers, CD players, etc. See also The Input Assign menu on page 14. 11 En Each set of components you can control all your equipment from the power outlet. Plugging in a MULTI-ZONE setup, for connection to a CD or MiniDisc recorder. Connecting digital audio sources on page 16. Use the output for connection to a monitor or TV. Using the component video jacks on page 14. 9 iPod input terminal Use to connect your...
.... 3 Coaxial digital audio inputs (x2) Use for digital audio sources, including DVD players/ recorders, digital satellite receivers, CD players, etc. See also The Input Assign menu on page 14. 11 En Each set of components you can control all your equipment from the power outlet. Plugging in a MULTI-ZONE setup, for connection to a CD or MiniDisc recorder. Connecting digital audio sources on page 16. Use the output for connection to a monitor or TV. Using the component video jacks on page 14. 9 iPod input terminal Use to connect your...

Owner's Manual
Page 12
... not lay connected cables over the top of this case, use an (analog) S-video or composite connection. 12 En If several video components are output through all analog video sources are assigned to the same input function (see also Installing your speaker system on page 18 for powered subwoofer connection). 13 Composite and S-video monitor outputs Use to connect monitors and TVs. Connecting your TV and DVD player on page 13. 14 Multichannel analog audio inputs 7.1 channel inputs for connection to a DVD player with the receiver. ...
... not lay connected cables over the top of this case, use an (analog) S-video or composite connection. 12 En If several video components are output through all analog video sources are assigned to the same input function (see also Installing your speaker system on page 18 for powered subwoofer connection). 13 Composite and S-video monitor outputs Use to connect monitors and TVs. Connecting your TV and DVD player on page 13. 14 Multichannel analog audio inputs 7.1 channel inputs for connection to a DVD player with the receiver. ...
Owner's Manual
Page 17
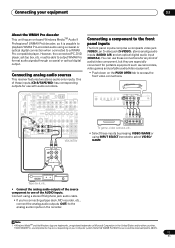
... pressing VIDEO/GAME or using a stereo RCA/phono jack audio cable. • If you're connecting a tape deck, MD recorder, etc., connect the analog audio outputs (OUT) to the analog audio inputs on the recorder. FRONT WOOFER ROUND 12V TRIGGE OUT IN MONITOR (DC OUT 50mA M OUT MONI OUT OUT IN L CENTER DVR/VCR2 R FRONT SUB WOOFER MULTI CH IN VSX-90TXV PHONES SYSTEM SETUP RETURN TONE TUNING/ STATION TUNER EDIT SPEAKERS MULTI JOG S - Connecting analog audio sources This receiver features two stereo audio-only inputs. Connecting your computer system. Connecting a component...
... pressing VIDEO/GAME or using a stereo RCA/phono jack audio cable. • If you're connecting a tape deck, MD recorder, etc., connect the analog audio outputs (OUT) to the analog audio inputs on the recorder. FRONT WOOFER ROUND 12V TRIGGE OUT IN MONITOR (DC OUT 50mA M OUT MONI OUT OUT IN L CENTER DVR/VCR2 R FRONT SUB WOOFER MULTI CH IN VSX-90TXV PHONES SYSTEM SETUP RETURN TONE TUNING/ STATION TUNER EDIT SPEAKERS MULTI JOG S - Connecting analog audio sources This receiver features two stereo audio-only inputs. Connecting your computer system. Connecting a component...
Owner's Manual
Page 26
...-in the remote control LCD. 12 SOURCE Press to turn on/off other components connected to the receiver (see page 61 for more on /off the power of the TV. TV CH +/- - Switches between stereo and mono reception of the Advanced Surround effects, the Dolby Pro Logic IIx Music and Neo:6 Music parameters and the sound delay setting (page 29). SIGNAL SEL - See Selecting preset codes directly on page 62. See Direct function on...
...-in the remote control LCD. 12 SOURCE Press to turn on/off other components connected to the receiver (see page 61 for more on /off the power of the TV. TV CH +/- - Switches between stereo and mono reception of the Advanced Surround effects, the Dolby Pro Logic IIx Music and Neo:6 Music parameters and the sound delay setting (page 29). SIGNAL SEL - See Selecting preset codes directly on page 62. See Direct function on...

Owner's Manual
Page 35
... want to the digital, component video and HDMI inputs (see Surround back speaker setting below). • Auto MCACC - Select to use the surround back speaker channels with surround back speakers in your main (speaker system A) setup. • Speaker B - Specify what you 're biamping your front speakers (see Bi-amping your surround back speakers (see The Input Assign menu on the receiver and your TV. RECEIVER INPUT SELECT SYSTEM OFF SOURCE XM RADIO DVD CD-R/TAPE CD SIRIUS TV iPod DVR 2 DVR 1 TV CTRL ZONE 2 TUNER RECEIVER DIALOG E PHASE...
... want to the digital, component video and HDMI inputs (see Surround back speaker setting below). • Auto MCACC - Select to use the surround back speaker channels with surround back speakers in your main (speaker system A) setup. • Speaker B - Specify what you 're biamping your front speakers (see Bi-amping your surround back speakers (see The Input Assign menu on the receiver and your TV. RECEIVER INPUT SELECT SYSTEM OFF SOURCE XM RADIO DVD CD-R/TAPE CD SIRIUS TV iPod DVR 2 DVR 1 TV CTRL ZONE 2 TUNER RECEIVER DIALOG E PHASE...

Owner's Manual
Page 36
... using the Auto MCACC Setup on page 39). • EQ Data Check - Fine Channel Level • Default setting: 0.0dB (all channels) You can achieve better surround sound by properly adjusting the overall balance of the speaker you connect the microphone to match the reference speaker. 36 En See Making receiver settings from the System Setup menu. Use / to adjust the volume of your room's reverb characteristics (see Setting the Acoustic Calibration EQ manually...
... using the Auto MCACC Setup on page 39). • EQ Data Check - Fine Channel Level • Default setting: 0.0dB (all channels) You can achieve better surround sound by properly adjusting the overall balance of the speaker you connect the microphone to match the reference speaker. 36 En See Making receiver settings from the System Setup menu. Use / to adjust the volume of your room's reverb characteristics (see Setting the Acoustic Calibration EQ manually...

Owner's Manual
Page 46
....1 Connecting your SIRIUS Connect tuner.2 VSX-90TXH OPTICAL DIGITAL OUT MULTI-ZONE & SOURCE ZONE 2 ANTENNA OUT IR IN IN 1 (DVD/LD) IN 2 (TV/SAT) IN 1 (DVR/ VCR1) IN 2 (TV/SAT) IN 3 (CD) COMPONENT VIDEO Y PB PR IN 1 Y PB PR IN 2 Y PB PR Y PB PR ASSIGNABLE 1 3 OUT HDMI ASSIGNABLE 12 XM IN ASSIGNABLE 13 S-VIDEO CONTROL OUT IN iPod IN IN IN OUT IN VIDEO AUDIO IN L IN 1 (DVD/LD) R IN 2 (DVR/VCR2) CD COAXIAL ASSIGNABLE 12...
....1 Connecting your SIRIUS Connect tuner.2 VSX-90TXH OPTICAL DIGITAL OUT MULTI-ZONE & SOURCE ZONE 2 ANTENNA OUT IR IN IN 1 (DVD/LD) IN 2 (TV/SAT) IN 1 (DVR/ VCR1) IN 2 (TV/SAT) IN 3 (CD) COMPONENT VIDEO Y PB PR IN 1 Y PB PR IN 2 Y PB PR Y PB PR ASSIGNABLE 1 3 OUT HDMI ASSIGNABLE 12 XM IN ASSIGNABLE 13 S-VIDEO CONTROL OUT IN iPod IN IN IN OUT IN VIDEO AUDIO IN L IN 1 (DVD/LD) R IN 2 (DVR/VCR2) CD COAXIAL ASSIGNABLE 12...

Owner's Manual
Page 48
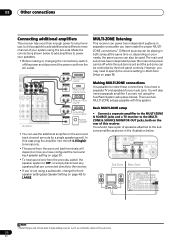
... this receiver. • Use standard RCA/phono jack cables for surround sound playback.2 1 Make sure you have selected Normal (SB), the button will simply switch your main speaker system (A) on page 18. Plugging in the subwoofer channel. Speaker B setup Connecting the multichannel analog inputs For DVD Audio and SACD playback, your DVD player also has outputs for surround back channels, connect these to stereo playback in another room. The options below for the Speaker B setting only.3 • Use the SPEAKERS button on the rear panel...
... this receiver. • Use standard RCA/phono jack cables for surround sound playback.2 1 Make sure you have selected Normal (SB), the button will simply switch your main speaker system (A) on page 18. Plugging in the subwoofer channel. Speaker B setup Connecting the multichannel analog inputs For DVD Audio and SACD playback, your DVD player also has outputs for surround back channels, connect these to stereo playback in another room. The options below for the Speaker B setting only.3 • Use the SPEAKERS button on the rear panel...
Owner's Manual
Page 50
...-R/TAPE/MD DVD/LD TV/SAT DVR/VCR1 AM LOOP L OUT PRE OUT CENTER L L (Single) IN 3 R R SUB R SUR- SURROUND WOOFER ROUND BACK MULTI CH IN VSX-90TXV ANALOG INPUT L R ANALOG INPUT ANALOG INPUT L R ANALOG INPUT L R ANALOG INPUT Front channel amplifier Center channel amplifier (mono) Surround channel amplifier Surround back channel amplifier Powered subwoofer • You can use , but it's possible to add additional amplifiers to every channel of this system: Basic MULTI-ZONE setup • Connect a separate amplifier to the MULTI-ZONE & SOURCE jacks and a TV monitor...
...-R/TAPE/MD DVD/LD TV/SAT DVR/VCR1 AM LOOP L OUT PRE OUT CENTER L L (Single) IN 3 R R SUB R SUR- SURROUND WOOFER ROUND BACK MULTI CH IN VSX-90TXV ANALOG INPUT L R ANALOG INPUT ANALOG INPUT L R ANALOG INPUT L R ANALOG INPUT Front channel amplifier Center channel amplifier (mono) Surround channel amplifier Surround back channel amplifier Powered subwoofer • You can use , but it's possible to add additional amplifiers to every channel of this system: Basic MULTI-ZONE setup • Connect a separate amplifier to the MULTI-ZONE & SOURCE jacks and a TV monitor...
Owner's Manual
Page 51
...SIRIUS iPod MULTI JOG ENTER PHONES SYSTEM SETUP RETURN TONE TUNING/ STATION TUNER EDIT SPEAKERS MULTI JOG S -VIDEO VIDEO/GAME INPUT VIDEO L AUDIO R DIGITAL IN MCACC SETUP MIC SIGNAL SB ch MULTI CH SELECT PROCESSING IN MASTER VOLUME 1 Press the MULTI ZONE ON/OFF button on /off all output to the sub zone.3 MULTI-ZONE remote controls The following steps use the MULTI-ZONE feature for example, changing the input source or starting playback). • Connect a TV monitor to the MULTI-ZONE & SOURCE MONITOR OUT jacks on the front panel to switch off in the sub zone. For...
...SIRIUS iPod MULTI JOG ENTER PHONES SYSTEM SETUP RETURN TONE TUNING/ STATION TUNER EDIT SPEAKERS MULTI JOG S -VIDEO VIDEO/GAME INPUT VIDEO L AUDIO R DIGITAL IN MCACC SETUP MIC SIGNAL SB ch MULTI CH SELECT PROCESSING IN MASTER VOLUME 1 Press the MULTI ZONE ON/OFF button on /off all output to the sub zone.3 MULTI-ZONE remote controls The following steps use the MULTI-ZONE feature for example, changing the input source or starting playback). • Connect a TV monitor to the MULTI-ZONE & SOURCE MONITOR OUT jacks on the front panel to switch off in the sub zone. For...

Owner's Manual
Page 58
... your volume setting. 1 Select 'Multi Zone Setup' from the Other Setup menu. 6. Note 1 If you selected ZONE2 in the sub zone (this setting if you've connected a power amplifier in the Surround back speaker setting on automatically when you 're finished, press RETURN. Other Setup a.DRC Setup b.Dual Mono Setup c.LFE ATT Setup d.SR+ Setup e.Video Conv. Use this receiver is quite low in the sub zone at maximum volume, so make sure the volume is simply being used as another Pioneer VSX receiver) in the sub zone...
... your volume setting. 1 Select 'Multi Zone Setup' from the Other Setup menu. 6. Note 1 If you selected ZONE2 in the sub zone (this setting if you've connected a power amplifier in the Surround back speaker setting on automatically when you 're finished, press RETURN. Other Setup a.DRC Setup b.Dual Mono Setup c.LFE ATT Setup d.SR+ Setup e.Video Conv. Use this receiver is quite low in the sub zone at maximum volume, so make sure the volume is simply being used as another Pioneer VSX receiver) in the sub zone...
Owner's Manual
Page 59
... once. Use the input source buttons (or INPUT SELECT). • If necessary, press SIGNAL SEL (SIGNAL SELECT) to select the input signal corresponding to the source component (see Connecting a DVD/HDD recorder, VCR and other functions Making an audio or a video recording You can make an audio or a video recording from the built-in the sound.2 XM RADIO DVD CD-R/TAPE CD SIRIUS TV iPod DVR 2 DVR 1 TV CTRL ZONE 2 TUNER RECEIVER SLEEP SR+ SB ch DIMMER ANALOG ATT MIDNIGHT...
... once. Use the input source buttons (or INPUT SELECT). • If necessary, press SIGNAL SEL (SIGNAL SELECT) to select the input signal corresponding to the source component (see Connecting a DVD/HDD recorder, VCR and other functions Making an audio or a video recording You can make an audio or a video recording from the built-in the sound.2 XM RADIO DVD CD-R/TAPE CD SIRIUS TV iPod DVR 2 DVR 1 TV CTRL ZONE 2 TUNER RECEIVER SLEEP SR+ SB ch DIMMER ANALOG ATT MIDNIGHT...

Owner's Manual
Page 67
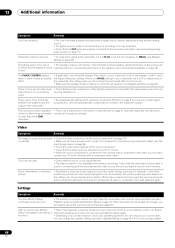
... other input source. broadcasts. Select any other speakers (see Speaker Setting on page 40) • If there is very little low frequency information in the sub zone (ZONE 2), it higher to match the characteristics of the advanced effect listening mode, you may be set too low; Make sure that the DTS signal output is set to the left channel speaker terminal. Setup or Status menu. software is played back. • If the source component has a digital volume control...
... other input source. broadcasts. Select any other speakers (see Speaker Setting on page 40) • If there is very little low frequency information in the sub zone (ZONE 2), it higher to match the characteristics of the advanced effect listening mode, you may be set too low; Make sure that the DTS signal output is set to the left channel speaker terminal. Setup or Status menu. software is played back. • If the source component has a digital volume control...
Owner's Manual
Page 68
... of the subwoofer. • See Automatically setting up the surround sound manually (page 36). incorrect. • Depending on a number of the source component. • Check that the source is not copy-protected. • The video converter is set the front speakers to the recorders input jacks (see Speaker Setting on the settings, etc. Can't record video. • Check that the video input you will automatically compensate for components connected using component cables (see The Input Assign menu on page...
... of the subwoofer. • See Automatically setting up the surround sound manually (page 36). incorrect. • Depending on a number of the source component. • Check that the source is not copy-protected. • The video converter is set the front speakers to the recorders input jacks (see Speaker Setting on the settings, etc. Can't record video. • Check that the video input you will automatically compensate for components connected using component cables (see The Input Assign menu on page...

Owner's Manual
Page 70
... connections for support. • Depending in Input some music files compatible with the signal path from the Switch off the receiver and reconnect the iPod to work , try resetting your iPod. versions prior to iPod update 2004-10-20 are no fluorescent or other Pioneer components with the remote. • Make sure that there is sent through this . • If you have assigned the analog/digital jack(s) to the corresponding HDMI input...
... connections for support. • Depending in Input some music files compatible with the signal path from the Switch off the receiver and reconnect the iPod to work , try resetting your iPod. versions prior to iPod update 2004-10-20 are no fluorescent or other Pioneer components with the remote. • Make sure that there is sent through this . • If you have assigned the analog/digital jack(s) to the corresponding HDMI input...


